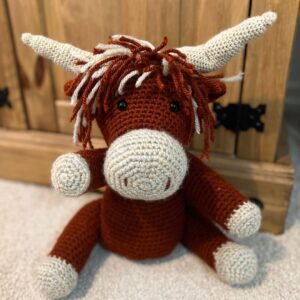
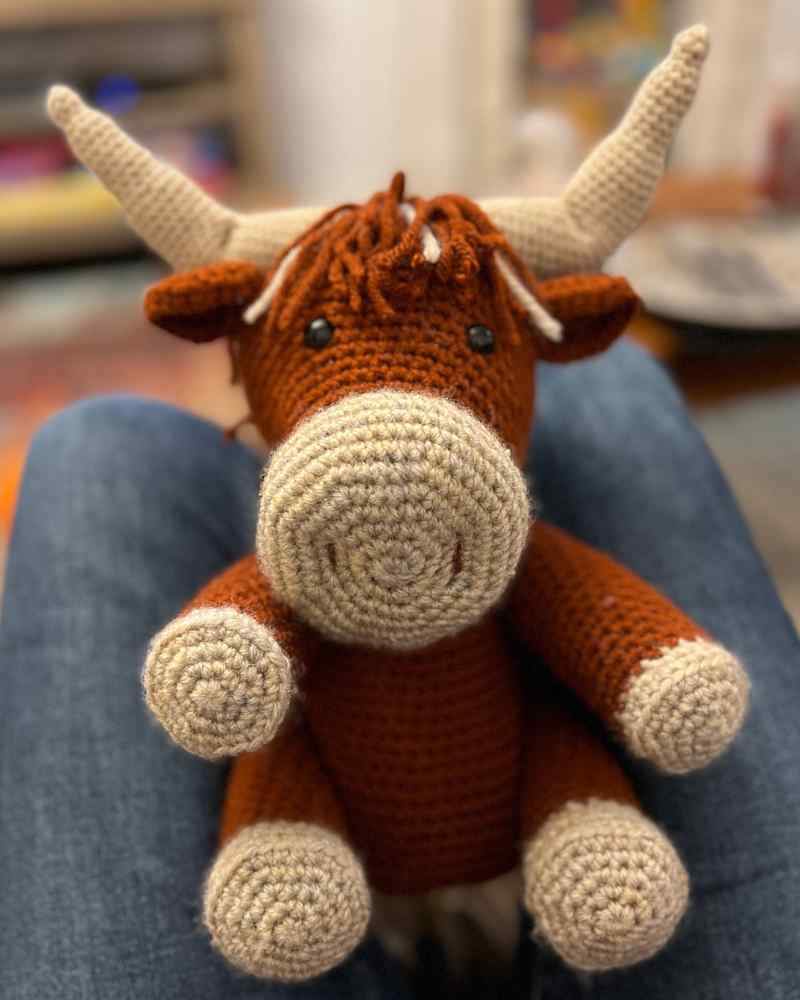
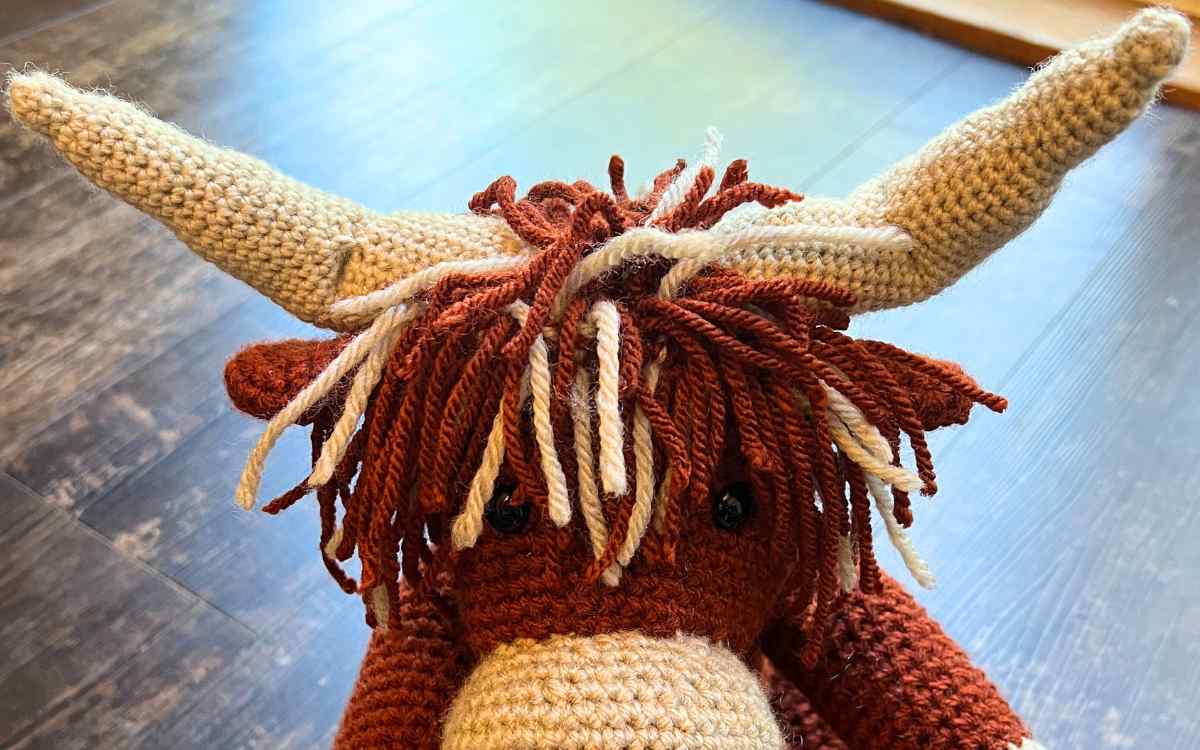
Shaggy Crochet Highland Cow
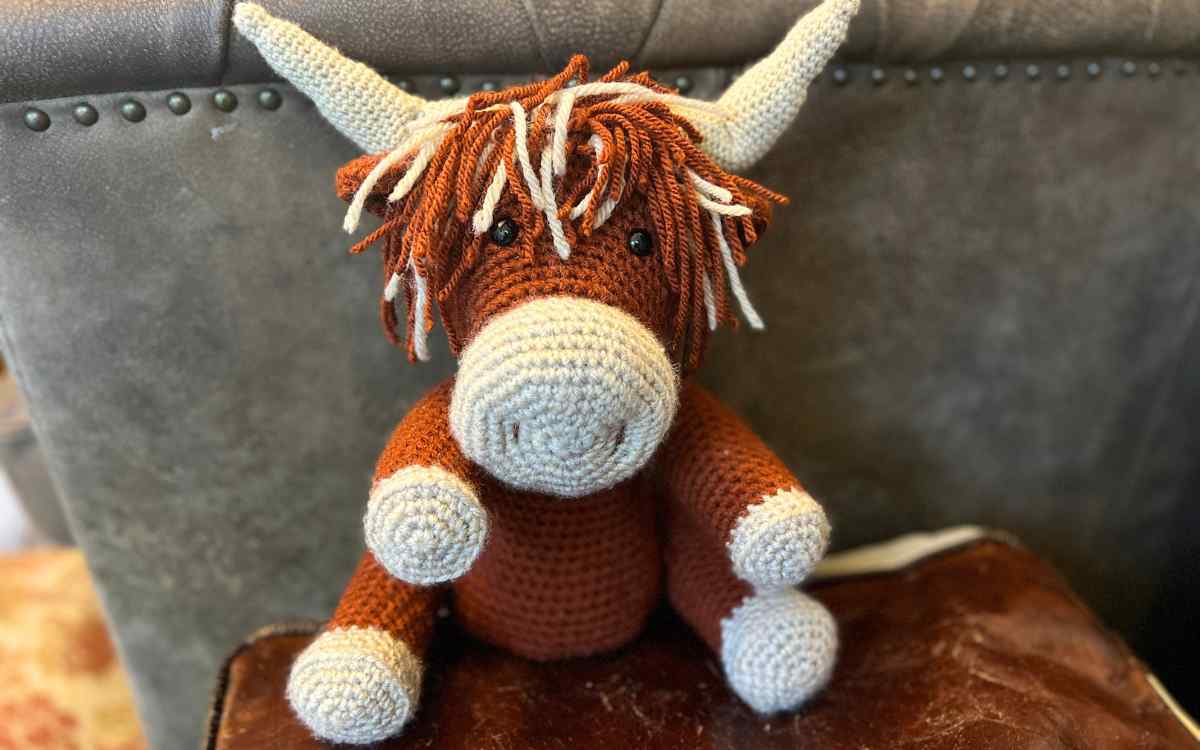
My shaggy crochet Highland Cow pattern is a celebration of one of my favorite farm animals.
This pattern is suitable for crochet beginners! The instructions are clearly set out, step by step. And you’ll find videos to help you along the way.

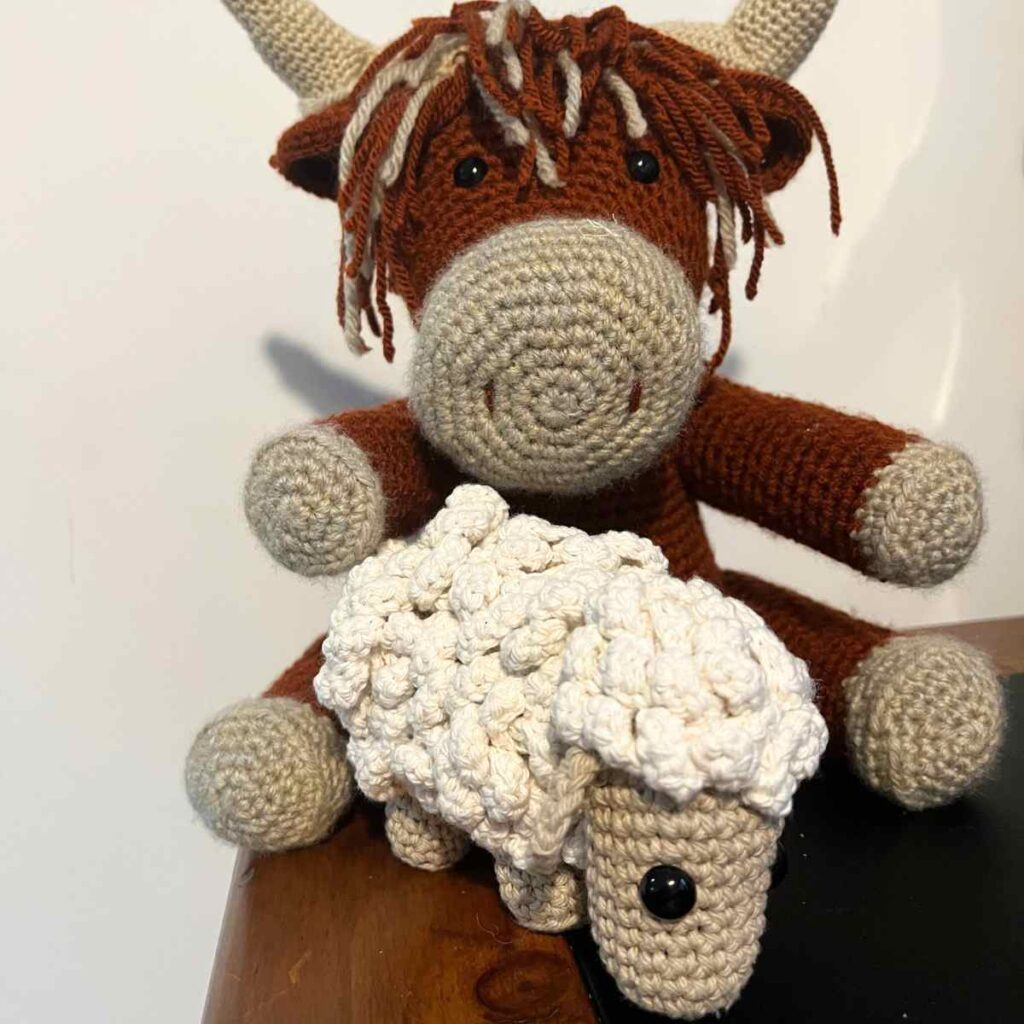
If you fancy a less shaggy cow, check out my amigurumi Texas Longhorn here! And if you’d prefer a smaller farm animal to get started with, here’s my adorable amiguri sheep!
If you prefer to print out your patterns, then you can purchase the download here:
Your Crochet Kit List
For the muzzle I used Life Chunky by Stylecraft* in Oatmeal, which gives an agouti look. The body and bulk of the limbs used Knitcraft’s Everyday Chunky yarn in Rust. I used a two thirds split mixture of these yarns for the hairy head.
For the horns I went with a different weight of yarn to give it that distinct look of a totally different material. I used a cream shade of Rowan’s worsted weight yarn*.
- 5mm/H crochet hook*
- 4mm/F crochet hook*
- 200g chunky red yarn*
- 100g chunky oat yarn*
- 50g worsted weight cream yarn*
- Safety eyes*
- Toy safe stuffing*
- Yarn needle*
- Scissors or a yarn cutter
- Stitch markers (optional)

Crochet Pattern Notes and Tips
This pattern builds from magic circles. There are tight rings of stitches that make the central section of many amigurumi animals.
The bulk of the stitches are single crochets, with standard increases and decreases. If you’re new to crochet then check out my crochet abbreviations guide here. You’ll also find a written explanation of each term when they first come up in the pattern.
Your Highland Cow’s tail will be crocheted from a simple chain, and the hair is woven using strands of yarn
The Free Crochet Highland Cow Pattern
Watch out for a couple of quick color changes within this pattern, and make sure you count your stitches carefully using a stitch marker or a yarn scrap to mark the start of each round.

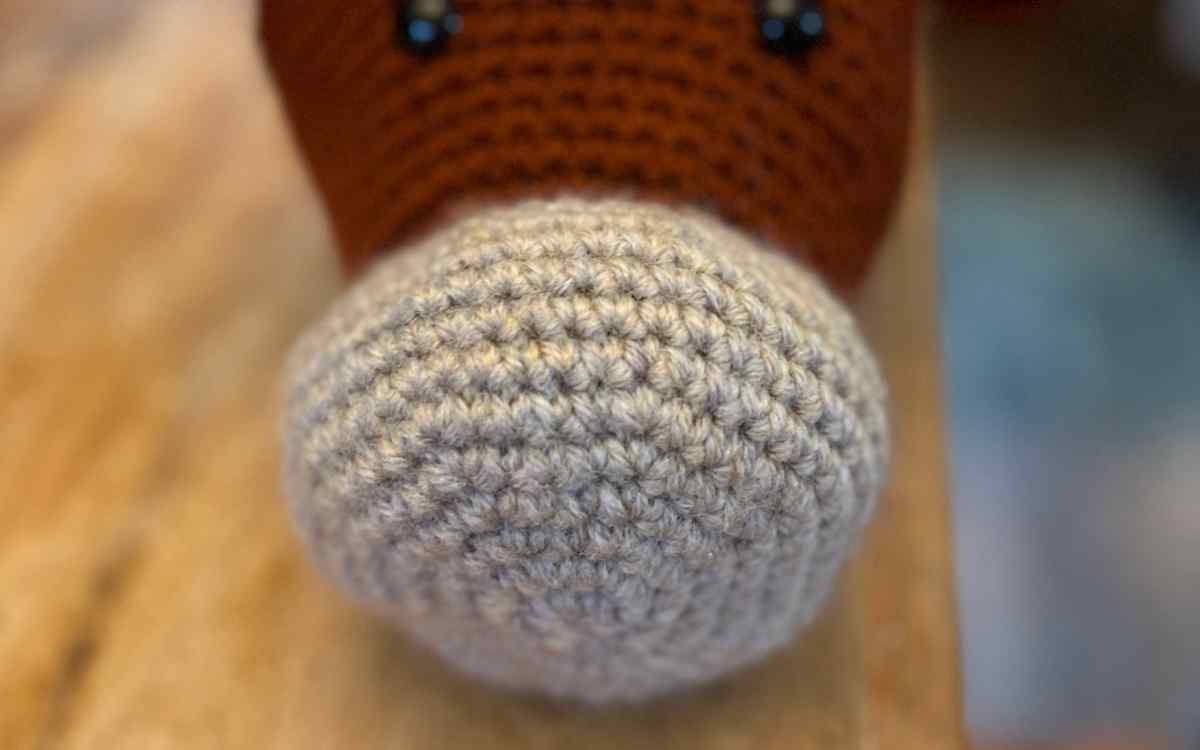
Crocheting The Muzzle
This section will be made entirely with your 5mm crochet hook and oat shade chunky yarn.
Round 1
Make a magic circle of eight stitches (8)
Round 2
Put two single crochets into each stitch of the round.
2sc x 8 (16)
Round 3
Make one single crochet into the first stitch, and two into the next. Repeat a further seven times to complete the round.
(1sc, 2sc) x 8 (24)
Round 4
(1sc x 2, 2sc) x 8 (32)
Round 5
(1sc x 3, 2sc) x 8 (40)
Round 6
(1sc x 4, 2sc) x 8 (48)
Round 7 – 8
1sc x 48 (48)
Round 9
Make one single crochet into the first four stitches, then use a single crochet to join the next two stitches together. Repeat for the length of the round, reducing the overall stitch count by eight.
(1sc x 4, sc2tog) x 8 (40)
Round 10
1sc x 40 (40)
Round 11
(1sc x 3, sc2tog) x 8 (32)
Round 12
(1sc x 2, sc2tog) x 8 (24)
Slip stitch into the next stitch, then tie off and leave a long train of yarn. Fill the cow’s muzzle with toy safe stuffing and set it to one side.
Making The Cow’s Head
Your Highland Cow’s head will be made using the chunky red yarn and 5mm crochet hook.
Round 1
Make a magic circle of eight stitches (8)
Round 2
2sc x 8 (16)
Round 3
(1sc, 2sc) x 8 (24)
Round 4
(1sc x 2, 2sc) x 8 (32)
Round 5
1sc x 32 (32)
Round 6
(1sc x 3, 2sc) x 8 (40)
Round 7 – 10
1sc x 40 (40)
Round 11
(1sc x 4, 2sc) x 8 (48)
Round 12 – 13
1sc x 48 (48)
Round 14
(1sc x 5, 2sc) x 3, 1sc x 30 (51)
Round 15
(1sc x 6, 2sc) x 3, 1sc x 30 (54)
Round 16
(1sc x 7, 2sc) x 3, 1sc x 30 (57)
Round 17 – 18
1sc x 57 (57)
Round 19
(1sc x 8, 2sc) x 3, 1sc x 30 (60)
Round 20
(1sc x 8, sc2tog) x 3, 1sc x 30 (57)
Round 21
(1sc x 7, sc2tog) x 3, 1sc x 30 (54)
Round 22
(1sc x 6, sc2tog) x 3, 1sc x 30 (51)
Round 23
(1sc x 5, sc2tog) x 3, 1sc x 30 (48)
Round 24
(1sc x 4, sc2tog) x 8 (40)
Round 25
(1sc x 3, sc2tog) x 8 (32)
Round 26
(1sc x 2, sc2tog) x 8 (24)
You are now going to attach the muzzle. Using a long thread of the oat shade of yarn, weave in and out of the circumference of the muzzle to attach it to the initial magic circle area of the head.
Once the muzzle is attached, sit the head on a flat surface and place the safety eyes. Initially put them both in and look to see if they are symmetrical before you stick the backs on.
When you are happy they are well placed, attach the backings then fill the head with toy stuffing.
Use a length of yarn sewn in through the front and out of the back of the muzzle to create nasal pit definition.
Round 27
(1sc, sc2tog) x 8 (16)
Round 28
sc2tog to close. Leave a tail of yarn to insert back into the head.
Crocheting Highland Cow Ears
The ears of your Highland Cow will also be made in chunky red yarn using the 5mm crochet hook.

Round 1
Make a magic circle of six stitches (6)
Round 2
2sc x 6 (12)
Round 3
(1sc, 2sc) x 6 (18)
Round 4
(1sc x 2, 2sc) x 6 (24)
At the end of the round, make a slip stitch into the next stitch, cut off a long tail of yarn and use this to sew around three stitches of the circumference of the ear to the head of the cow. Stitch further around if you find the circle is too floppy.
Crocheting the Highland Cow’s Body
Your Highland Cow’s body will be crocheted using the 5mm hook and red shade of chunky yarn.

Round 1
Make a magic circle of eight stitches (8)
Round 2
2sc x 8 (16)
Round 3
(1sc, 2sc) x 8 (24)
Round 4
(1sc x 2, 2sc) x 8 (32)
Round 5 – 7
1sc x 32 (32)
Round 8
(1sc x 3, 2sc) x 8 (40)
Round 9 – 12
1sc x 40 (40)
Round 13
(1sc x 4, 2sc) x 8 (48)
Round 14 – 20
1sc x 48 (48)
Round 21
(1sc x 5, 2sc) x 8 (56)
Round 22 – 26
1sc x 56 (56)
Round 27
(1sc x 6, 2sc) x 8 (64)
Round 28 – 29
1sc x 64 (64)
Round 30
(1sc x 6, sc2tog) x 8 (56)
Round 31
(1sc x 5, sc2tog) x 8 (48)
Round 32
(1sc x 4, sc2tog) x 8 (40)
Round 33
(1sc x 3, sc2tog) x 8 (32)
Round 34
(1sc x 2, sc2tog) x 8 (24)
Round 35
(1sc, sc2tog) x 8 (16)
Fill the body firmly with toy stuffing, leaving a gap of around half an inch at the top. When you’ve closed you can squeeze the body to even distribute the filling.
Round 36
sc2tog to close. Tie of the yarn, and weave the loose end back into the body.
Crocheting The Front Legs
Begin with your oat yarn and 5mm crochet hook.

Round 1
Make a magic circle of six stitches (6)
Round 2
2sc x 6 (12)
Round 3
(1sc, 2sc) x 6 (18)
Round 3
(1sc x 2, 2sc) x 6 (24)
Round 4
1sc x 24 into the back loop only (BLO)
Round 5
(1sc x 2, sc2tog) x 6 cc to red (18)
Round 6 – 24
1sc x 18 (18)
Round 25
(1sc, sc2tog) x 6 (12)
Fill with toy stuffing, leaving the top four rows empty.
Round 26
sc2tog to close.
Crochet The Back Legs
This is a very similar crochet pattern to the front legs, but gives wider hooves to your cow. Begin with your oat yarn and 5mm crochet hook.
Round 1
Make a magic circle of six stitches (6)
Round 2
2sc x 6 (12)
Round 3
(1sc, 2sc) x 6 (18)
Round 4
(1sc x 2, 2sc) x 6 (24)
Round 5
(1sc x 3, 2sc) x 6 (30)
Round 6
1sc x 30 BLO (30)
Round 7
(1sc x 3, sc2tog) x 6 (24)
Round 8
1sc x 24 (24)
Round 9
(1sc x 2, sc2tog) x 6 cc to red (18)
Round 10 – 24
1sc x 18 (18)
Round 25
(1sc, sc2tog) x 6 (12)
Fill with toy stuffing, leaving the top four rows empty.
Round 26
sc2tog to close.
How To Crochet Highland Cow Horns
This will be where you use your lighter weight, finer wool yarn. Use your white yarn and 4mm crochet hook. Try to keep the tension fairly tight. You’ll define the shape by sewing once you’ve completed them.

Round 1
Make a magic circle of six stitches (6)
Round 2 – 4
1sc x (6)
Round 5
2sc x 6 (12)
Round 6 -11
1sc x 12 (12)
Round 12
(1sc, 2sc) x 6 (18)
Round 13 – 37
1sc x 18 (18)
Round 38
(1sc, sc2tog) x 6 (12)
Fill with toy stuffing.
Round 39
sc2tog to close, leaving a long tail of yarn for later sewing.
Giving the crocheted horns some shape
Take the tail of yarn and attach a yarn needle. Push the needle through round 39, emerging around two thirds of the way along the horn. Bring the needle to stitch around four rounds back towards your starting point.
Weave back and forth between those two rounds to create a kink in the horn. Tie off to secure it into the shape you desire.
Sewing The Crochet Highland Cow Together
I sewed my crochet highland cow together with a steel yarn needle. Attach the features to the face first, adding the ears then the horns afterwards. Follow this by joining the head to the body, and the limbs in pairs to ensure they stay symmetrical.

Crochet Highland Cow’s Hair
Highland cows have this amazing, shaggy coat. It’s especially notable around their faces, and droops low like bangs over their eyes.
I created my crochet cow’s hair using a 4mm crochet hook and two strands of yarn. Around a third of the time I paired an oat with a rust strand, the rest of the time I just doubled up the rust.

- Hold two strands of yarn together.
- Insert the crochet hook into a space. This can be either between the horns, or along the front side of the horns or the ears.
- Pick up the yarn strands with the hook, twist and pull through until you have a loop protruding.
- Then hook the cut end of the yarn, and pull through completely until tightly knotted.
- Snip off the yarn at the skein, then cut the yarn length to your desired level on the cow’s face.
Let me know in the comments section if this isn’t clear, and I’ll be happy to make a short video detailing the method.
I grew up rurally, and my Dad’s best friend had a herd of these amazing creatures. They were beautiful yet strangely wild in appearance. I hope I’ve captured just a bit of their awesome essence in my amigurumi Highland Cow! I hope you have as much fun making this crochet cow pattern as I did designing it!
Happy Crocheting,
Lucy Kate, x
And now that you’re done – why not make him a sheepy buddy!
*The products linked in this pattern were carefully selected by Lucy Kate Crochet. If you decide to purchase using the links provided, we may earn a small commission on that sale. This is at no extra cost to you.

What does ” round 7-10″ mean? In Cow’s head?
Hi Laura, So about the typo! I’ve fixed it for you now, it’s just a single crochet into each stitch of the round for those rounds. You might need to refresh your page to see my changes. Hope that helps! x
Hi Lucy,
I’m a little confused with the ears. Are there only 4 rounds? And if so, how do you “finish” the ears to attach them?
Thank you!
Hi Caitlyn, Work out from the magic circle in a round until you reach the end of round four. Then you can make a slip stitch into the next stitch, cut off a long tail of yarn and use this to sew around three stitches of the circumference to the head of the cow. Hope that makes sense, I’ll add more description to the pattern so it’s clearer for people!
Hi, How do I print this pattern ?
Hi Rhonda, You can print screen, but I don’t currently have a PDF version available. It’s something we’re working on, which will make printing the pattern much easier in future!
Hi
Just wondering how to attach the head to the body and limbs to the body, I have tried and very floppy. Also what do you do for a tail.
Lorraine
Hi Lorraine, I’ve got a video showing how I sew the limbs on here: https://youtu.be/s6KsnSWmZM0?si=qNn-nopH7Al8Xh0L
Hope that helps! Lucy Kate, x
Hi,
I’m confused on how to do the hair. Could you please do a video?
I love this pattern!
Thank you!
Hi Kiara, Sorry it wasn’t clear – I’ve added this to my list of videos to make! So pleased to hear you enjoyed the pattern 🙂
Thank you for this fabulous pattern. A friend sent me a picture and asked if I could make the highland cow. I think I can do this. What is the finished (approx) size?
Also could this be made entirely with worsted weight? (of course I know it would be smaller.
Once again thank you for the pattern it is written quite straightforward and will be easy to follow.
Thanks Deb! I’ve just grabbed the highland cow from my daughter’s bed, and he’s 10 inches tall in his sitting position (although he’s probably squashed down a little from when I made him!) You can absolutely make him in worsted weight yarn, I recommend using a hook that’s 0.5mm smaller than the one recommended on the packaging from experience. Hope you enjoy making him!
I love this pattern – making a highland cow for my husband.
The only thing that confuses me is the horns (I’ve made them but it’s the shaping that I’m not sure of). Could you do a video of this bit please? And maybe attaching the head to the body?
Thank you so much
Erica
How are you sewing the head to the body, please.
Hi Kathy, I don’t have a specific tutorial on sewing for the guide but you can follow my methodology in this video. Hopefully that will help! https://youtu.be/PeK3VEnOSOo