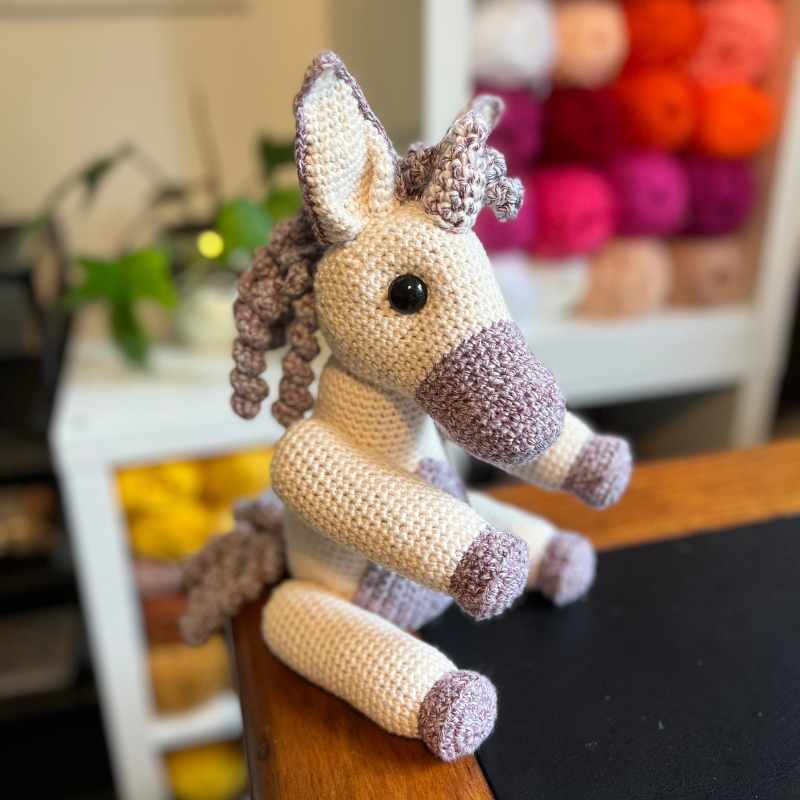
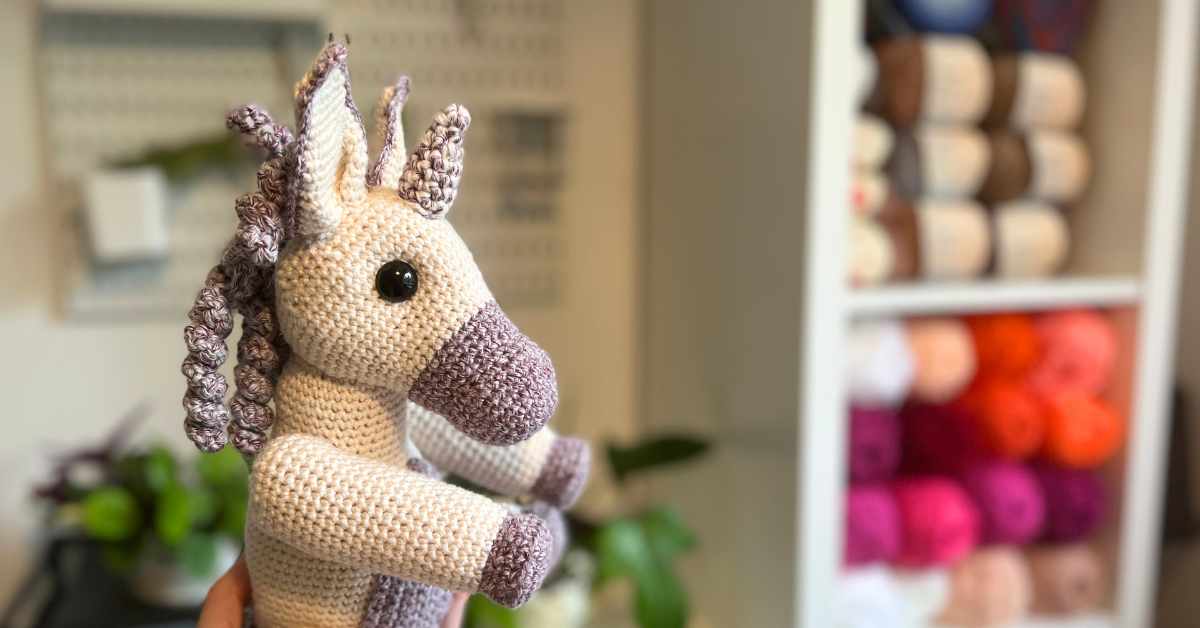
Unique Crochet Unicorn Pattern

My free crochet unicorn pattern has a unique twist. I set out when I originally designed it to lean into the glittery, shiny, rainbow, super extra level unicorn theme. But when I began, it turned out that I much preferred this toned back, muted color palette. And it really works!
This pattern is surprisingly quick to work up given the fairly large size.
If you like this pattern, it’s actually one of a set of four, also including a horse, donkey and zebra. You can also find a cute simple version of a crochet unicorn here.
Your Kit List
Here’s what I used to create my crochet unicorn design:
- Hobbii Happy Place almond (white) yarn
- Hobbii Happy Place aubergine (purple) yarn
- Hobbii Happy Place licorice (gray) yarn
- 3.5mm crochet hook
- 5mm crochet hook
- 3mm crochet hook
- Toy safe stuffing*
- Yarn or tapestry needle*
- 12mm safety eyes*
Techniques and Tutorials
If you’re new to amigurumi, or crochet in general, then here’s a quick guide to the abbreviations I will use in this unicorn pattern and links to instructions for those techniques.
- magic circle
- sc – single crochet
- 2sc – two single crochets into one stitch
- sc2tog – use a single crochet to join two stitches together
- ch – chain
- turn – rotate the piece and work back into it
- cc – color change
- sk – skip the next stitch
- surface crochet
Crochet Unicorn Pattern
This crochet unicorn is hooked up in stages, with a little hand sewing used to bring everything together.
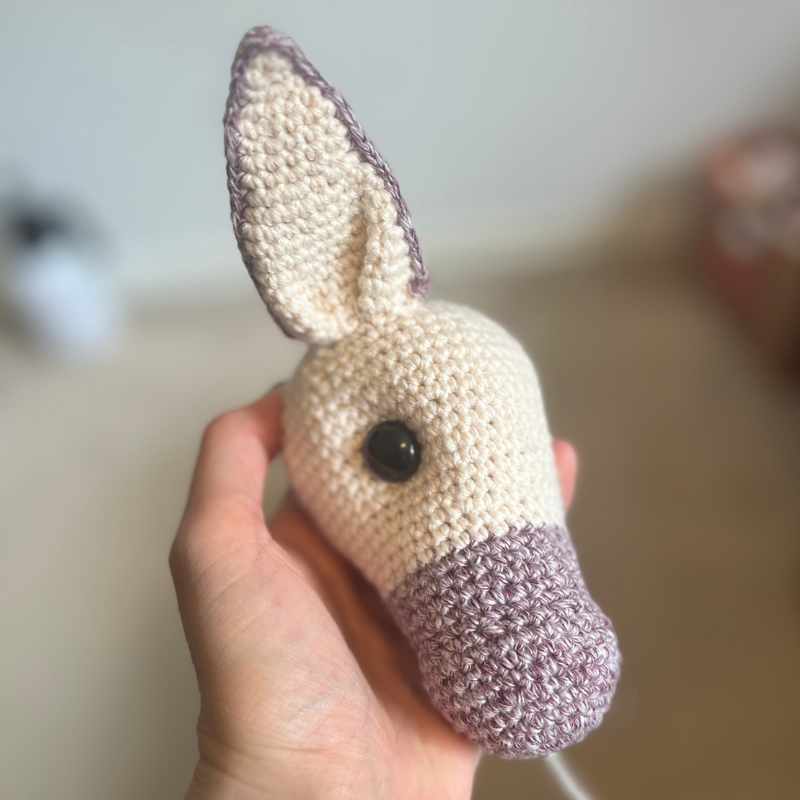
Crocheting Your Unicorn’s Head
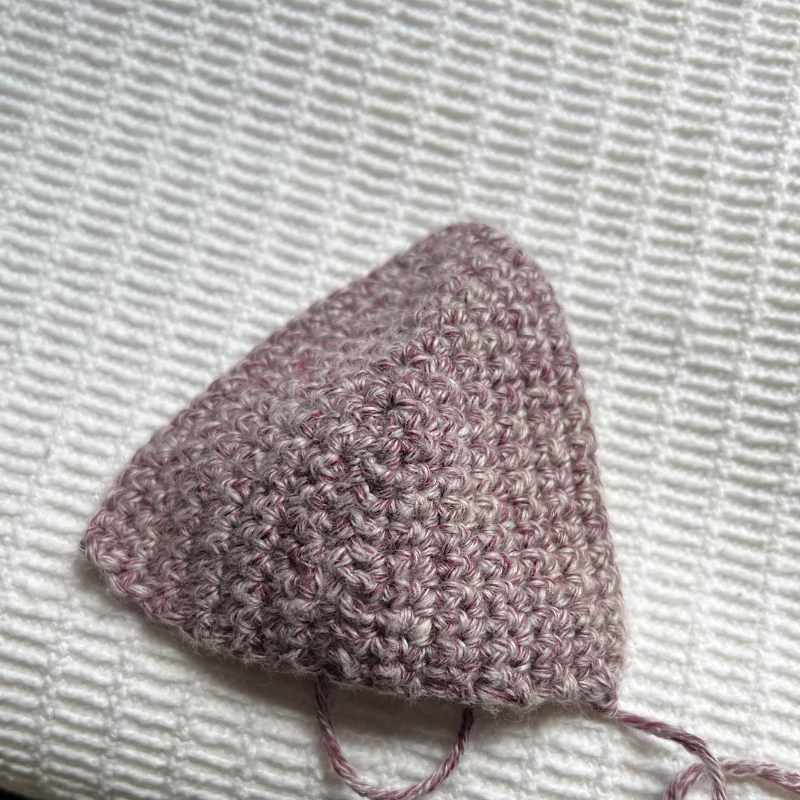
You are going to begin the unicorn with her muzzle. Grab your purple yarn and a 3.5mm crochet hook. We’ll kick off with a magic circle.
Round 1
Make a magic circle of eight stitches (8)
Round 2
2sc x 8 (16)
Round 3
(1sc, 2sc) x 8 (24)
Round 4 – 5
1sc x 24 (24)
Round 6
(1sc x 2, 2sc) x 8 (32)
Round 7 – 9
1sc x 32
Round 10
(1sc x 2, sc2tog) x 8 (24)
Round 11
1sc x 24
Round 12
(1sc x 2, 2sc) x 8 (32)
Round 13 – 15
1sc x 32
cc white
Round 16 – 17
1sc x 32
Round 18
(1sc x 3, 2sc) x 8 (40)
Round 19 – 20
1sc x 40
Round 21
(1sc x 4, 2sc) x 8 (48)
Round 22 – 24
1sc x 48
Round 25
(1sc x 5, 2sc) x 8 (56)
Round 26 – 28
1sc x 56
Round 29
(1sc x 5, sc2tog) x 8 (48)
Round 30
1sc x 48
Round 31
(1sc x 4, sc2tog) x 8 (40)
Round 32
1sc x 40
Round 33
(1sc x 3, sc2tog) x 8 (32)
Round 34
1sc x 32
Stuff the muzzle up to the level that you are going to insert your eyes.
You’ll want the safety eyes to be approximately a third of the circumference apart, and around the level of your round 24 stitches. I tightened the eyes into the head just attaching a strand of yarn under the eye backing. This makes them a little indented.
Round 35
(1sc x 2, sc2tog) x 8 (24)
Round 36
(1sc, sc2tog) x 8 (16)
Fill the rest of the head with toy stuffing.
Round 37
sc2tog to close, then tie off.
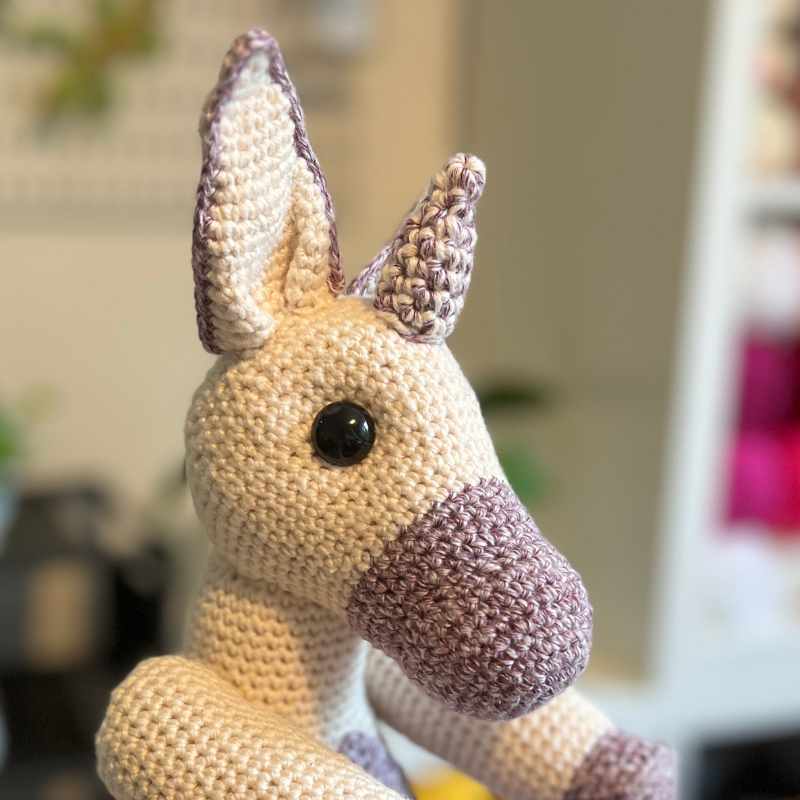
Crochet Unicorn Ears
The main body of the ears are crocheted with the 3.5mm crochet hook and white yarn.
Round 1
Make a magic circle of six stitches (6)
Round 2 – 3
1sc x 6
Round 4
2sc x 6 (12)
Round 5 – 7
1sc x 12
Round 8
(1sc, 2sc) x 6 (18)
Round 9 – 14
1sc x 18
Round 15
(1sc x 2, 2sc) x 6 (24)
Round 16 – 19
1sc x 24
Round 20
(1sc x 3, 2sc) x 6 (30)
Round 21
1sc x 30
Edging the ears
Lay your ear pieces onto a desk in front of you and gently press them flat. Then take each bottom corner and fold them in. Sew the ear into this shape.
Now pick up your purple yarn and a 3mm crochet hook, and surface crochet around the edge of the ear to define it.
Attaching the ears
Sew the ears so that they sit around four stitches apart at the top of the head.
The Unicorn Horn
I tried so many different methods of making the horn before I settled on this simple style, but I’m really pleased with how it came out.
You’ll be working with two strands together, one of white and one of purple. Grab a 5mm crochet hook for this part only.
Round 1
Make a magic circle of four stitches (4)
Round 2
1sc x 4 (4)
Round 3
(2sc, 1sc) x 2 (6)
Round 4
(2sc, 1sc) x 2, 1sc x 2 (8)
Round 5 – 8
1sc x 8 (8)
You can now stuff the horn and sew it onto the forehead, sitting centrally between the levels of the ears and eyes.
Crocheting the Unicorn’s Body
Crochet your unicorn’s body in white yarn with the 3.5mm crochet hook. You’ll add the patch when it’s done.

Round 1
Make a magic circle of eight stitches (8)
Round 2
2sc x 8 (16)
Round 3
(1sc, 2sc) x 8 (24)
Round 4
(1sc x 2, 2sc) x 8 (32)
Round 5 – 16
1sc x 32
Round 17
(1sc x 3, 2sc) x 8 (40)
Round 18 – 19
1sc x 40
Round 20
(1sc x 4, 2sc) x 8 (48)
Round 21 – 24
1sc x 48
Round 25
(1sc x 5, 2sc) x 8 (56)
Round 26 – 42
1sc x 56
Round 43
(1sc x 5, sc2tog) x 8 (48)
Round 44
(1sc x 4, sc2tog) x 8 (40)
Round 45
(1sc x 3, sc2tog) x 8 (32)
Round 46
(1sc x 2, sc2tog) x 8 (24)
Round 47
(1sc, sc2tog) x 8 (16)
Fill with toy safe stuffing.
Round 48
sc2tog to close
The Patch
We’ll make your unicorn’s patch by crocheting back and forth around a chain. The 3sc is a cluster that you’ll make into the top of the chain, before continuing the crochet down the other side. When you reach the end of each round, you’ll flip the strip and work back around again.
Round 1
Ch11, sk, 1sc x 9, 3sc, 1sc x 9
Turn
Round 2
Ch1, sk, 1sc x 9, 3sc, 1sc x 10
Turn
Round 3
Ch1, sk, 1sc x 10, 3sc, 1sc x 11
Turn
Round 4
Ch1, sk, 1sc x 11, 3sc, 1sc x 12
Turn
Round 5
Ch1, sk, 1sc x 12, 3sc, 1sc x 13
Turn
Round 6
Ch1, sk, 1sc x 13, 3sc, 1sc x 14
Turn
Round 7
Ch1, sk, 1sc x 14, 3sc, 1sc x 15
Turn
Round 8
Ch1, sk, 1sc x 15, 3sc, 1sc x 16
Turn
Round 9
Ch1, sk, 1sc x 16, 3sc, 1sc x 17
Turn
Round 10
Ch1, sk, 1sc x 17, 3sc, 1sc x 18
Turn
Round 11
Ch1, sk, 1sc x 18, 3sc, 1sc x 19
Turn
Round 12
Ch1, sk, 1sc x 19, 3sc, 1sc x 20
Turn
Now cut a long tail of yarn at the end, and sew patch onto the front of your unicorn’s body. The flat edge should sit in line with how the body would sit upright once the limbs have been added. Try to make sure the pointed top of the patch points towards the center of the unicorn’s chin.
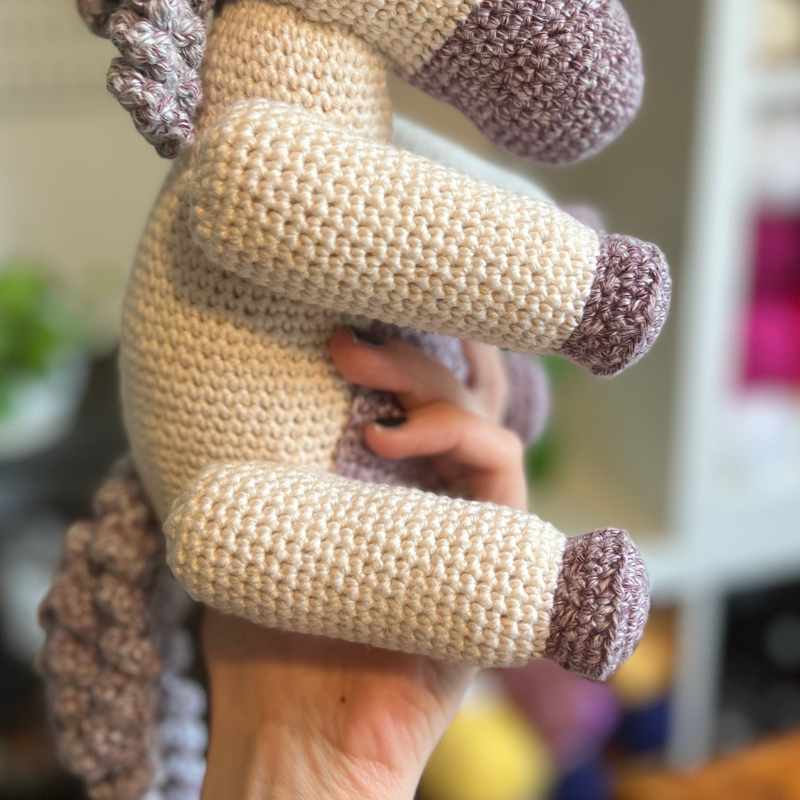
Unicorn’s Arms and Legs
Use the pattern below for the arms and legs. Begin your limbs in purple yarn, and using your 3.5mm crochet hook.
Round 1
Make a magic circle of eight stitches (8)
Round 2
2sc x 8 (16)
Round 3
(1sc, 2sc) x 8 (24)
Round 4
(1sc x 2, 2sc) x 8 (32)
Round 5
BLO (1sc x 2, sc2tog) x 8 (24)
Round 6
1sc x 24
Round 7
(1sc, sc2tog) x 8 (16)
Round 8
1sc x 16
cc white
Round 9
(1sc, 2sc) x 8 (24)
Round 10 – 32
1sc x 24
Round 33
(1sc, sc2tog) x 8 (16)
Fill with toy stuffing.
Round 34
sc2tog to close
Attach the limbs
Your unicorn’s limbs can now be hand sewn onto the body. Put the arms at around level of the body and place the legs so that your unicorn toy will sit upright.
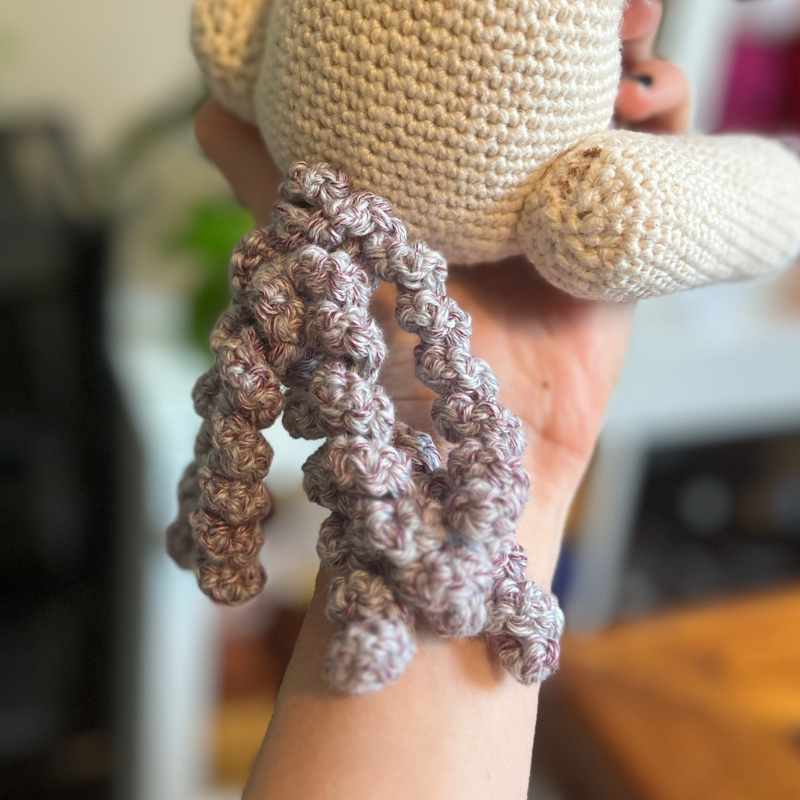
The Tail
You are going to crochet the tail with a strand of gray and a strand of purple, using your 5mm crochet hook.
The tail is composed of a group of chains with single crochets into them.
Row 1
Ch50, turn, sk, 1sc x 49
Row 2 – 4
Ch45, turn, sk, 1sc x 44
Row 5 – 6
Ch40, turn, sk, 1sc x 39
To attach the tail, sew the beginning stitches of the chains together in a group, then sew that group directly onto your unicorn’s butt!
Lucy Kate, x
Crocheting the Mane
The mane is also crocheted with the 5mm hook and a strand of gray and a strand of purple yarn. You will crochet it in a similar way to the tail, but you’ll leave a train of chain loops between each section of hair so that you can sew it onto the back of the head in a line.

Row 1
Ch21, turn, sk, 1sc x 20
Row 2
Ch31, turn, sk, 1sc x 29
Row 3
Ch25, turn, sk, 1sc x 23
Row 4 – 10
Ch35, turn, sk, 1sc x 33
Use the white strand to sew the hair onto the back of the head, as this will blend with the neck a little better.
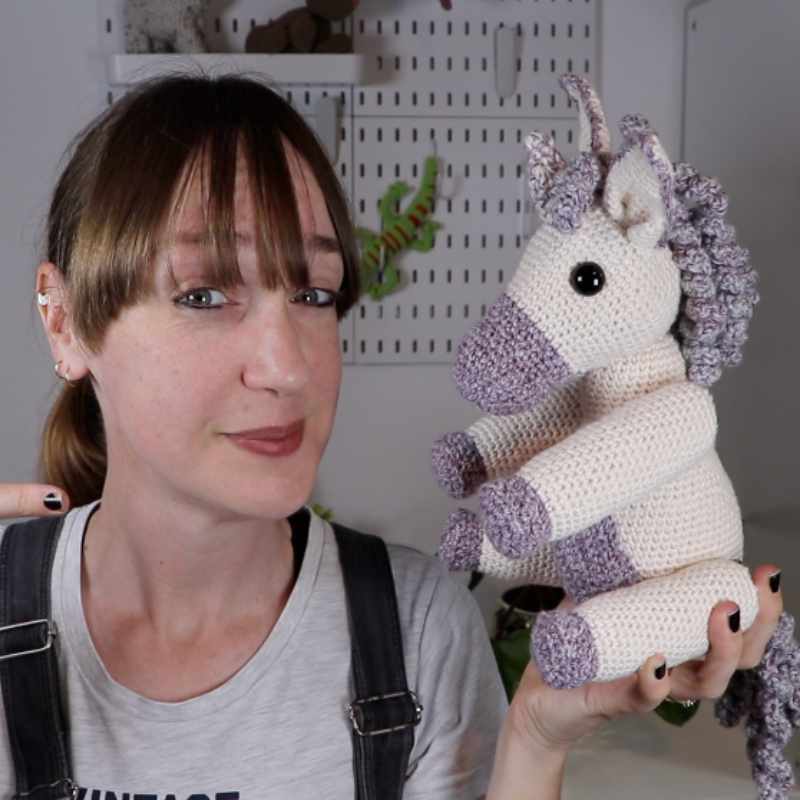
Happy Crocheting!
*The products linked in this pattern were carefully selected by Lucy Kate Crochet. If you decide to purchase using the links provided, we may earn a small commission on that sale. This is at no extra cost to you.
Will this still turn out ok if I use chenille yarn? X
It should still work, but it will look quite different to my images. Still cute though, I think! I’ve not tried it in chenille, so if you give it a go I’d love it if you’d be happy to email me some pictures!
Thanks for the reply. I had a change of heart and I am using DK Yarn instead lol! I have to be in the mood for chenille and the mood passed I am afraid! 🙂
I am a novice at this sort of thing, so would appreciate knowing how to attach the head to the body.
Also, is the sewing of the legs (and head) to the body done with yarn? Is there a specific technique?
I am enjoying this project, learning a lot! Thank you.
I am glad to hear you’re enjoying it! Sewing is done with yarn, yes. Ideally the same one that you used for the construction. You can find instructions for sewing here: https://lucykatecrochet.com/amigurumi-sewing
Thank you so very much! I’ve had a quick look at the instructions you offer, and am delighted to have every bit of advice. No one else seems to provide that! I am definitely one of those people who happily beaver away producing parts, even modifying* patterns to suit my whim, but I totally balk at the final assembly. (I still have a bag of granny squares that were never joined into an afghan!)
*(For example, on your unicorn, I have contoured the legs to look more horsey, and I have opted for multicoloured embroidery floss strands joined to a tassle to create the tail and more coloured floss to be woven into a strip of curtain fringe trim for the mane. We’ll see if that was a wise move when it all comes together!)