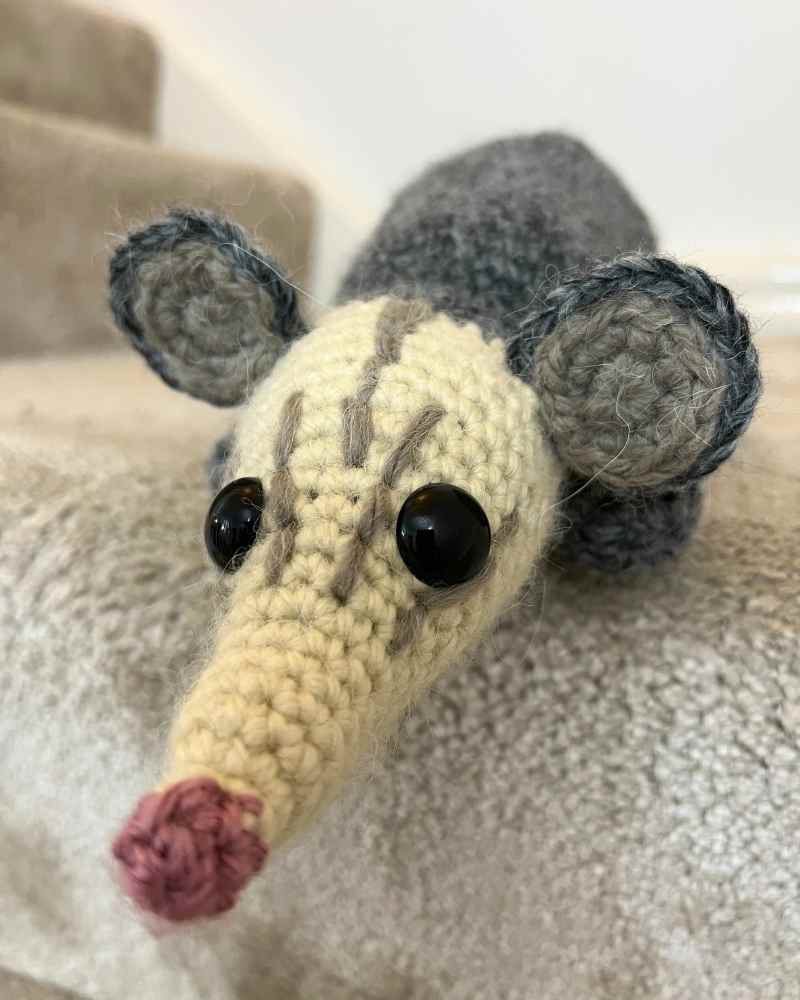
Free Crochet Opossum Pattern
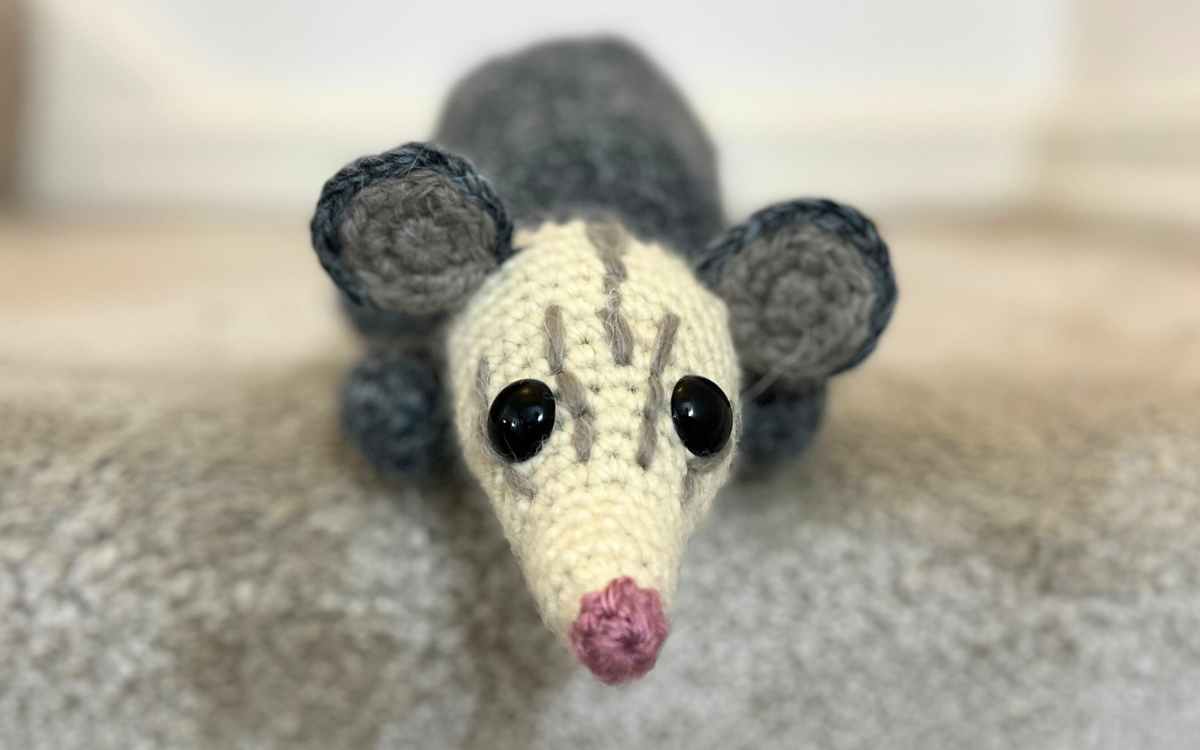
My crochet opossum pattern is cute, simple and beginner friendly. The distinctive markings are made with hand sewing, and you’ll have just a few straightforward color changes to make as you crochet the body and head. You’ll use aran yarn, which is fairly thick and soft to work with, and a larger 5mm crochet hook.
If you’re brand new to crocheting, you might want to check out this guide to basic crocheting techniques before we begin.
Crochet Equipment List
Here’s a list of what I used to produce this pattern. You might also want to grab some stitch markers to keep your place, although scraps of yarn tend to do the job nearly as well.
- 50g Knit Craft, Leader of the Pac, Aran yarn in cream
- 50g Knit Craft, Leader of the Pac, Aran yarn in charcoal
- 5g Knit Craft, Leader of the Pac, Aran yarn in pink
- 10g Knit Craft, Leader of the Pac, Aran yarn in mink
- 5mm crochet hook
- Two safety eyes*
- Toy safe stuffing*
- Yarn needle*
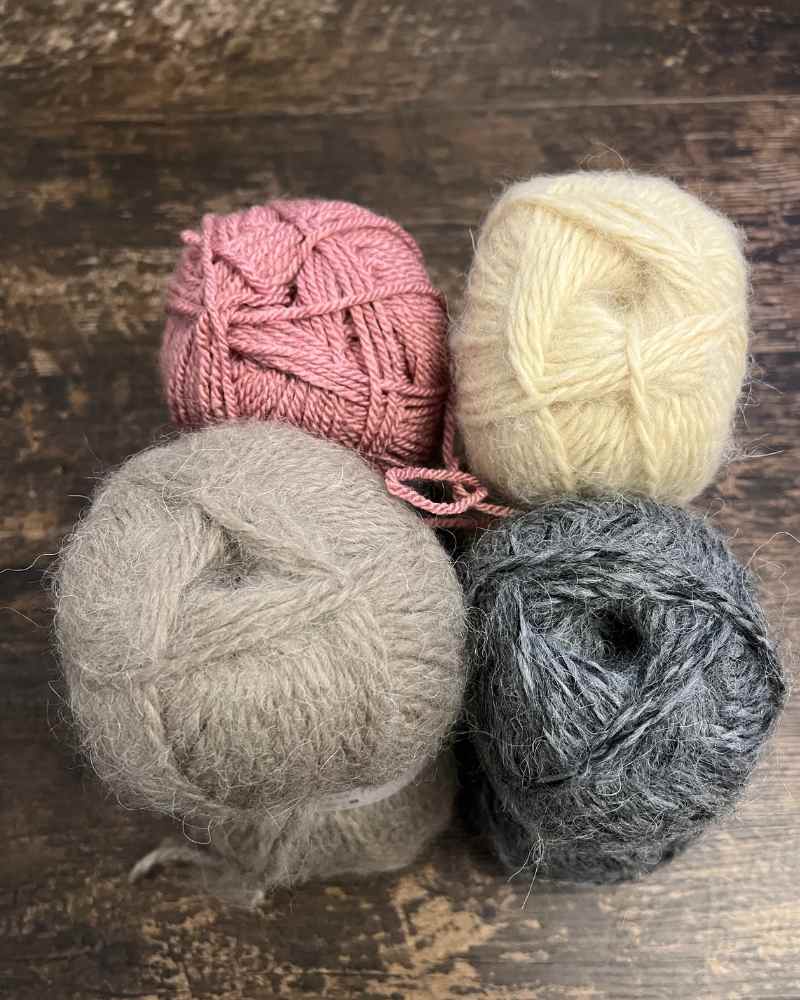
It’s absolutely fine to use another aran weight yarn if you can’t get hold of this brand.
Pattern notes
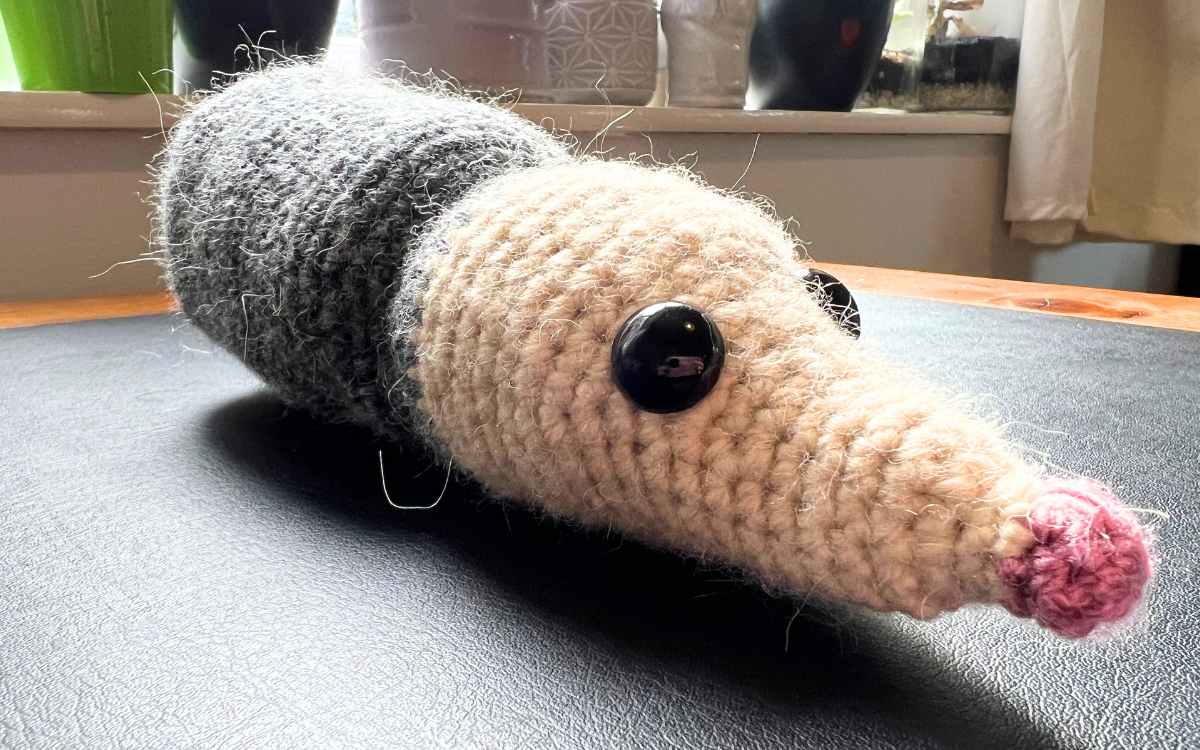
I love how the yarn gives the amigurumi opossum an almost fluffy texture, but it can make it a little trickier to see your stitch places in the round. However, I’ve found that you quickly get your eye in, and it’s not a big deal. This yarn brand if you use the same is also very nice to work, running easily through your fingers as you hook.
You’ll need to make the individual pieces from magic rings, and if you haven’t done this technique before you can find an instructional video here:
I’ve explained each crochet term the first time I’ve used it, and you can find more details on typical crochet abbreviations here.
Free Crochet Opossum Pattern
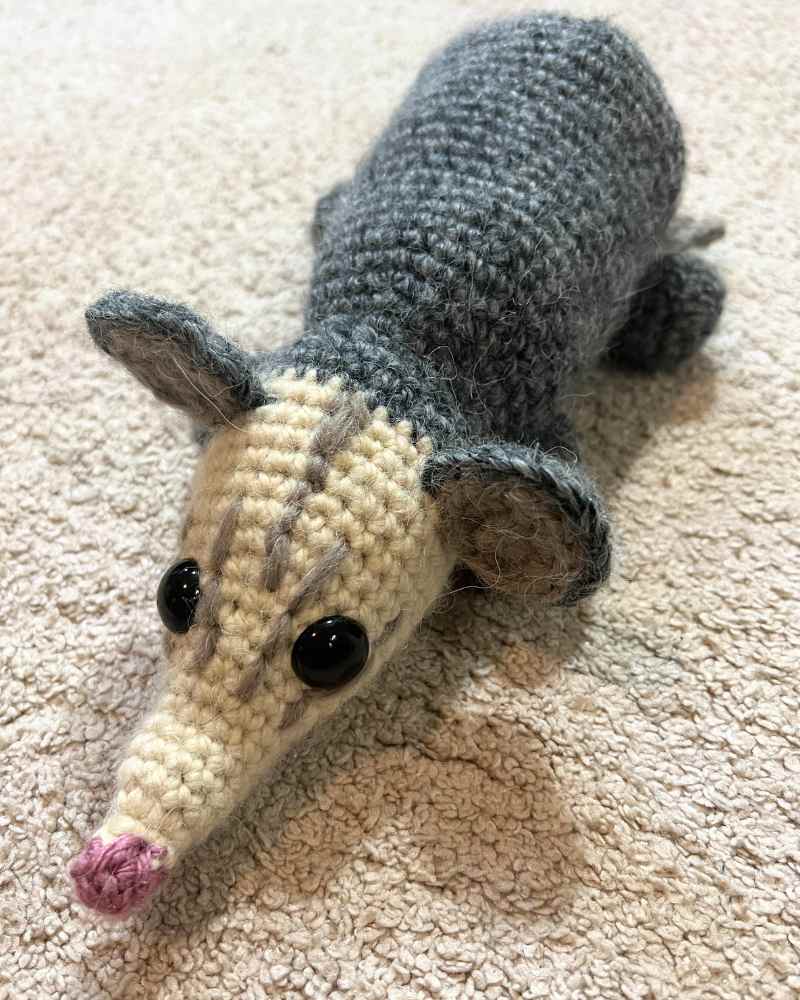
Your opposum will be crocheted in a few separate parts. The head and body are one section, then the legs, ears and tail are crocheted individually to be hand sewn together.

Crochet Opossum Head and Body
Begin working in your pink yarn, with the 5mm crochet hook.
Round 1
Make a magic circle of six stitches (6)
Round 2
Make one single crochet into each of the six stitches, then color change to the white yarn.
1sc x 6 cc to white (6)
Round 3 – 4
1sc x 6 (6)
Round 5
Put two single crochets into each stitch of the round, doubling the total to twelve.
2sc x 6 (12)
Round 6 – 9
1sc x 12 (12)
Round 10
Make one single crochet in the first stitch, then two into the next. Repeat two more times, then put one single crochet into the remaining six stitches of the round.
(1sc, 2sc) x 3, 1sc x 6 (15)
Round 11
1sc x 15 (15)
Round 12
(1sc x 2, 2sc) x 3, 1sc x 6 (18)
Round 13
1sc x 18 (18)
Round 14
(1sc x 3, 2sc) x 3, 1sc x 6 (21)
Round 15
(1sc x 4, 2sc) x 3, 1sc x 6 (24)
Round 16
(1sc x 5, 2sc) x 3, 1sc x 6 (27)
Round 17 – 18
1sc x 27 (27)
Round 19
(1sc x 6, 2sc) x 3, 1sc x 6 (30)
Insert the safety eyes into the front of the face. Put the head onto a flat surface so that you can see exactly where the forehead slopes up.
Round 20 – 21
1sc x 30 cc charcoal (30)
Round 22 – 23
1sc x 30 (30)
Round 24
Make one single crochet into the first three stitches, then single crochet the next two stitches together. Repeat for the duration of the round.
(1sc x 3, sc2tog) x 6 (24)
Round 25
(1sc x 2, sc2tog) x 6 (18)
Round 26
(1sc x 2, 2sc) x 6 (24)
Round 27
(1sc x 3, 2sc) x 6 (30)
Round 28
(1sc x 4, 2sc) x 6 (36)
Round 29 – 43
1sc x 36 (36)
Round 44
(1sc x 5, 2sc) x 6 (42)
Round 45
(1sc x 6, 2sc) x 6 (48)
Round 46
1sc x 48 (48)
Round 47
(1sc x 6, sc2tog) x 6 (42)
Round 48
(1sc x 5, sc2tog) x 6 (36)
Round 49
(1sc x 4, sc2tog) x 6 (30)
Round 50
(1sc x 3, sc2tog) x 6 (24)
Round 51
(1sc x 2, sc2tog) x 6 (18)
Fill with toy safe stuffing, using the end of your crochet hook to push the stuffing in all the way to the head end if necessary.
Round 52
(1sc, sc2tog) x 6 (12)
Round 53
sc2tog to close.
Crochet Opossum Ears
You’re going to crochet your opossum ears in two parts.
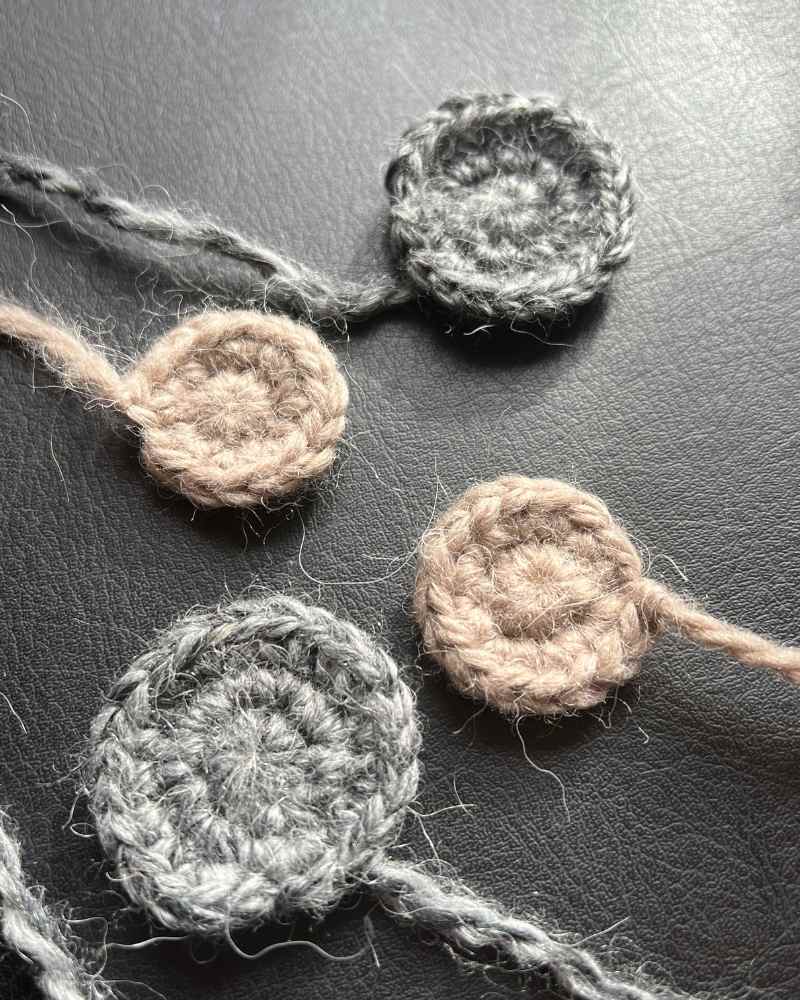
Outer ear
Work with the charcoal yarn and 5mm crochet hook.
Round 1
Make a magic circle of eight stitches (8)
Round 2
2sc x 8 (16)
Round 3
(1sc, 2sc) x 8 (24)
Slip stitch into the next stitch, tie off and cut a long tail of yarn for sewing.
Inner ear
Use your mink yarn and 5mm crochet hook.
Round 1
Make a magic circle of eight stitches (8)
Round 2
2sc x 8 (16)
Slip stitch into the next stitch, tie off and cut a long tail of yarn for sewing.
Sewing the ears together
Lay your two ear pieces, with the smaller on top of the larger. Line up the close point on both, so your inner ear is off-center.
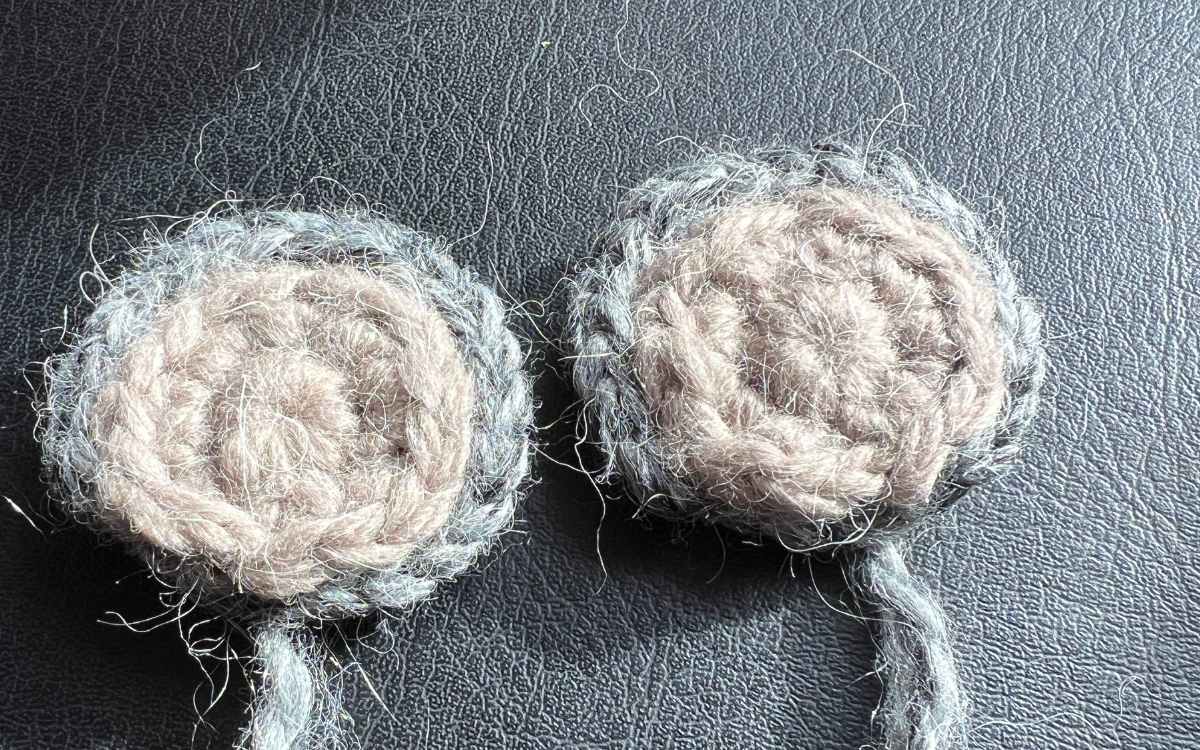
Thread your yarn into your needle, and weave in and out of both pieces. Securely tie off the yarn, and thread the loose end back inside the ear piece.
Crochet Opossum Legs
Your opossum has identical front and back legs, so just crochet four using the following pattern. Work with your 5mm crochet hook and the charcoal colored yarn.
Round 1
Make a magic circle of eight stitches (8)
Round 2
2sc x 8 (16)
Round 3 – 5
1sc x 16 (16)
Round 6
sc2tog x 4, 1sc x 8 (12)
Round 7
1sc x 2, sc2tog, 1sc x 9 (11)
Round 8 – 10
1sc x 11 (11)
Fill up to round 7 with toy stuffing. You’ll need to flatten those top rounds, and sew directly across when you attach it to the body.
How To Crochet The Opossum’s Tail
To crochet your opossum a tail, use your mink yarn and a 5mm crochet hook. I’ll break down the instructions a little differently for this section, as it isn’t worked in standard rounds.
- Chain 21
- Skipping the first chain space, put a single crochet into each stitch in the chain
- Flip the chain over
- Single crochet each stitch to the adjacent chain space on the original chain
- OR using your yarn needle, sew the tail together in the same manner.
Sewing Your Amigurumi Opossum Together
Lay out the pieces of your opossum on a surface in front of you. There should be the head and body section, four legs, a tail and the ears that you have already sewn.

I always begin by attaching the ears. Line them up using the eyes, attach the yarn needle to the tail of the magic circle’s thread and weave it in and out against the surface of the head. You’ll need to sew about a quarter of the ear’s edge to your opossum.
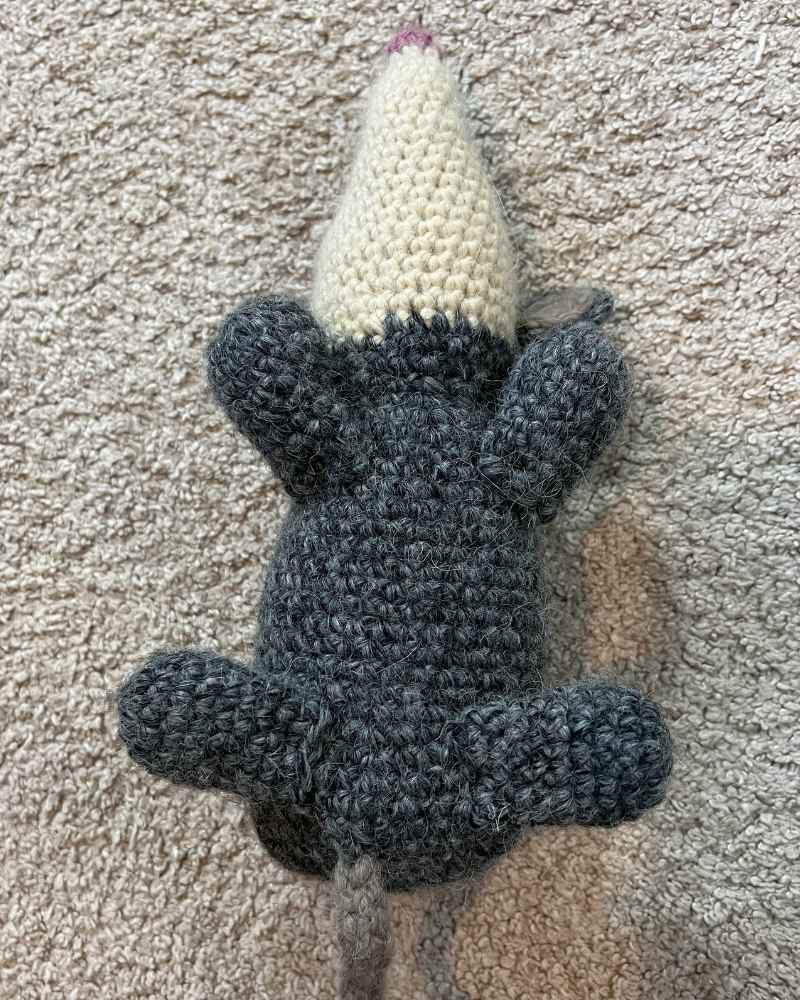
Then line up the legs so that they are symmetrical, and again weave the yarn needle in and out of the body and end of each leg.
Finally you can attach the tail to the back end, this will likely just require a simple knot. Any loose ends of yarn should be hooked back into the toy.
My Crocheted Opossum
This pattern was unique for me, in that I didn’t make it with anyone in particular in mind. I was reading about the differences between an opossum and possum, and decided I wanted to see if I could make a crocheted version that was anywhere near as cute! It’s certainly won my son over, however!

I’d love to see how your toys turn out if you’d care to share a picture on my Facebook page or Ravelry, and do let me know in the comments section here how you found the pattern.
Happy Crocheting!
Lucy Kate, x

What is the measurement of this opossum?
Hi Jackie, I think the opossum is about 12 inches long, but my son has put it somewhere and I can’t see where! So I’ll track the opossum down, and then measure him up for you as soon as I discover where it’s gone!
I’m actually going to try the Giraffe in January/February.
I took part in the pattern testing for the giraffe – it’s a lot of fun and he’s such a charming character when finished! I hope you love it too 🙂