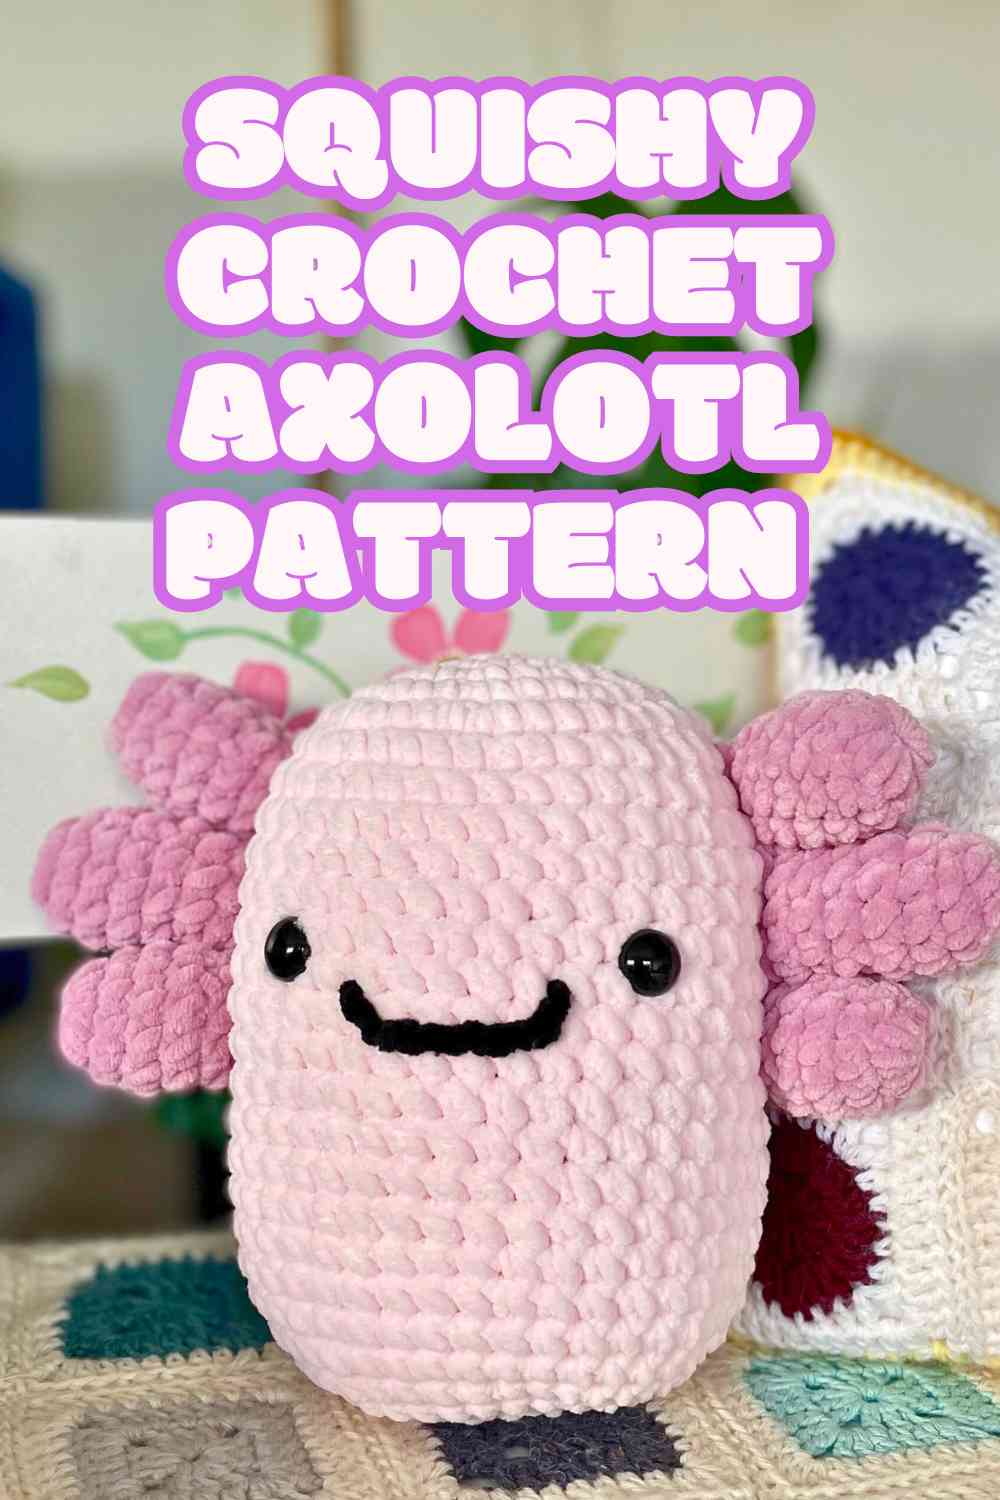
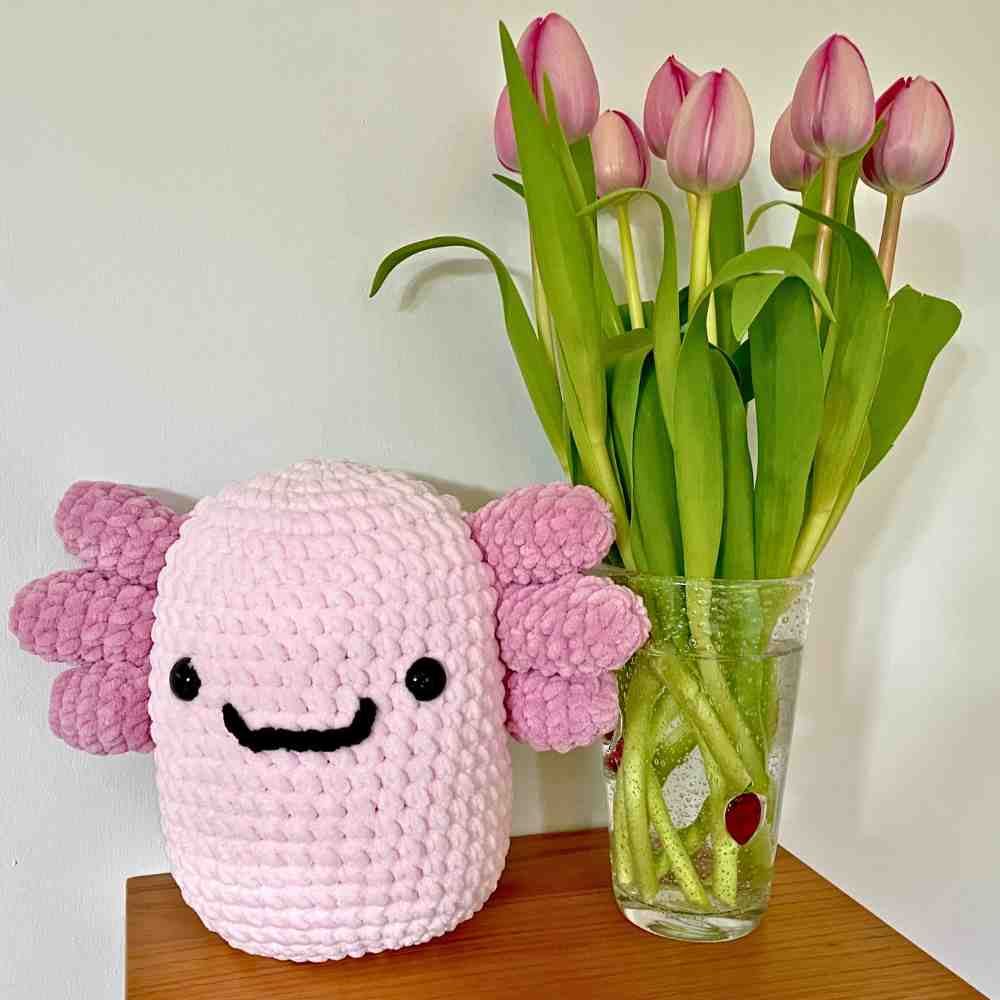
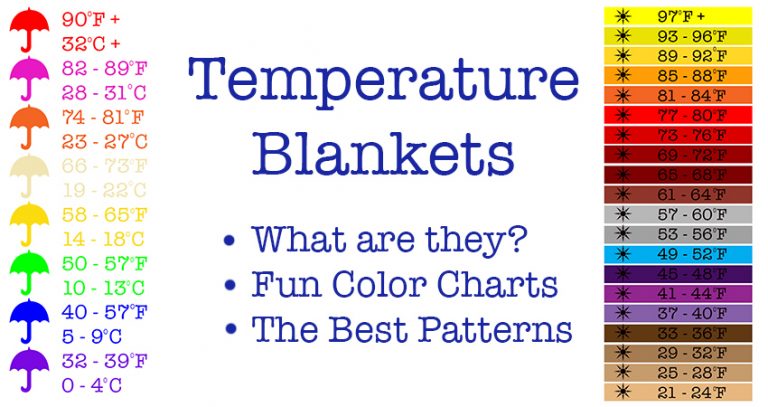
Squishy Crochet Axolotl Pattern
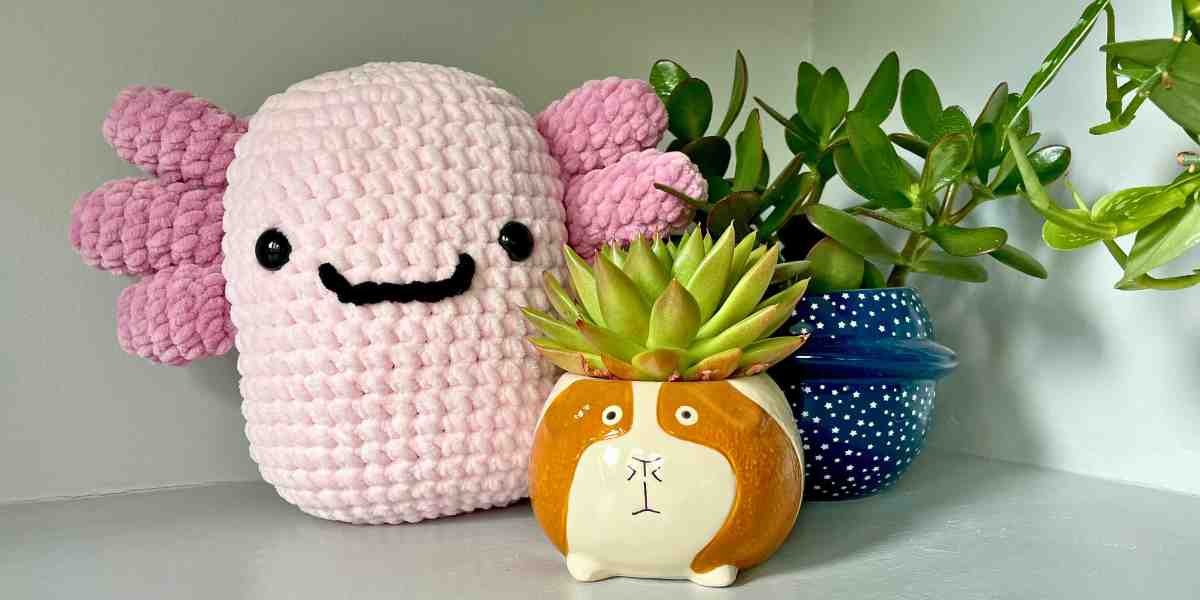
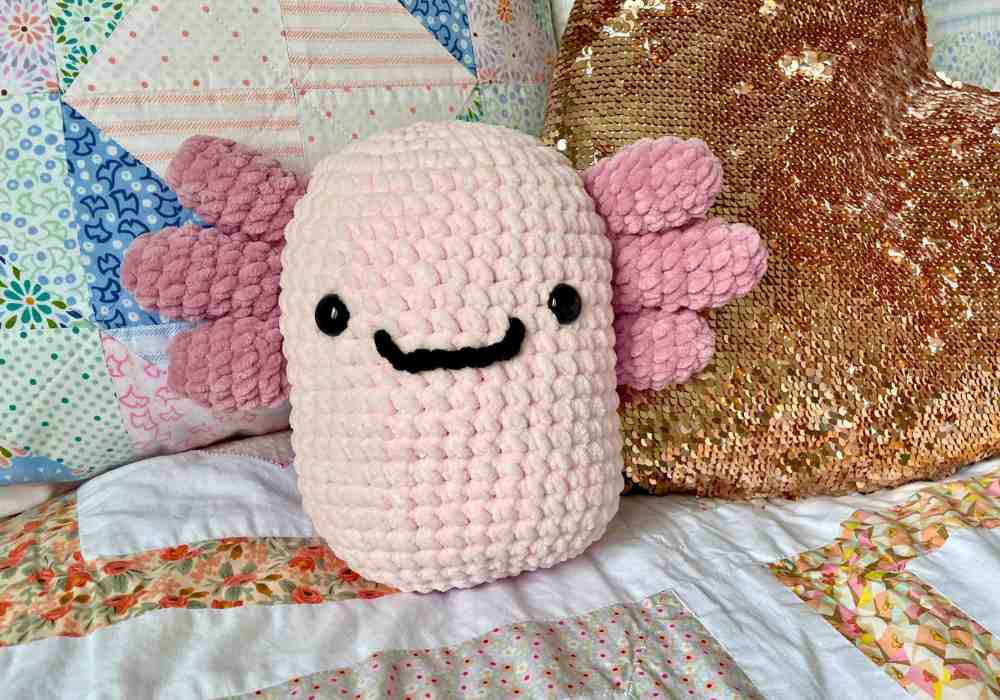
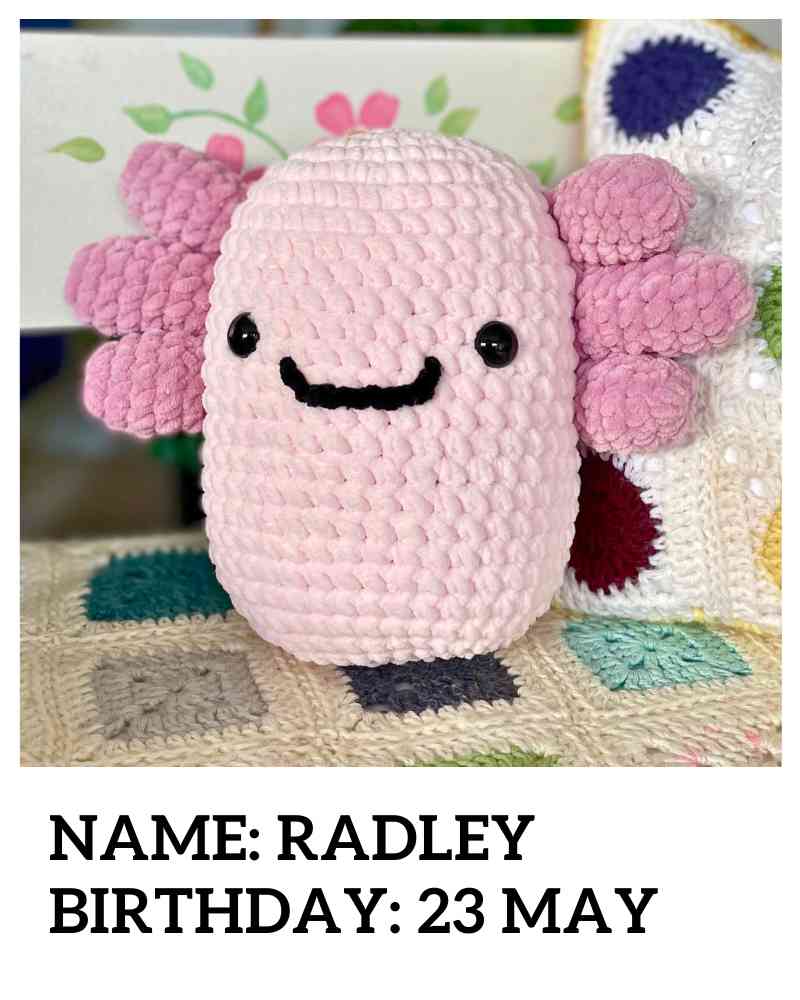
Hello there! This is Radley, my squishy crochet axolotl pattern. I’m so proud of him, I honestly think I grinned from start to finish as I was developing his pattern! But then who could look at any axolotl without smiling? They’re just the strangest, most endearing creatures. This crochet pattern is very accessible and beginner-friendly for anyone who’s new to amigurumi. The body shape has a flattened base, which means these cute companions can stand up unaided – perfect for cuddly toys, cute ornaments, and friendly mascots.

Materials
To make your own squishy axolotl, you’ll need:
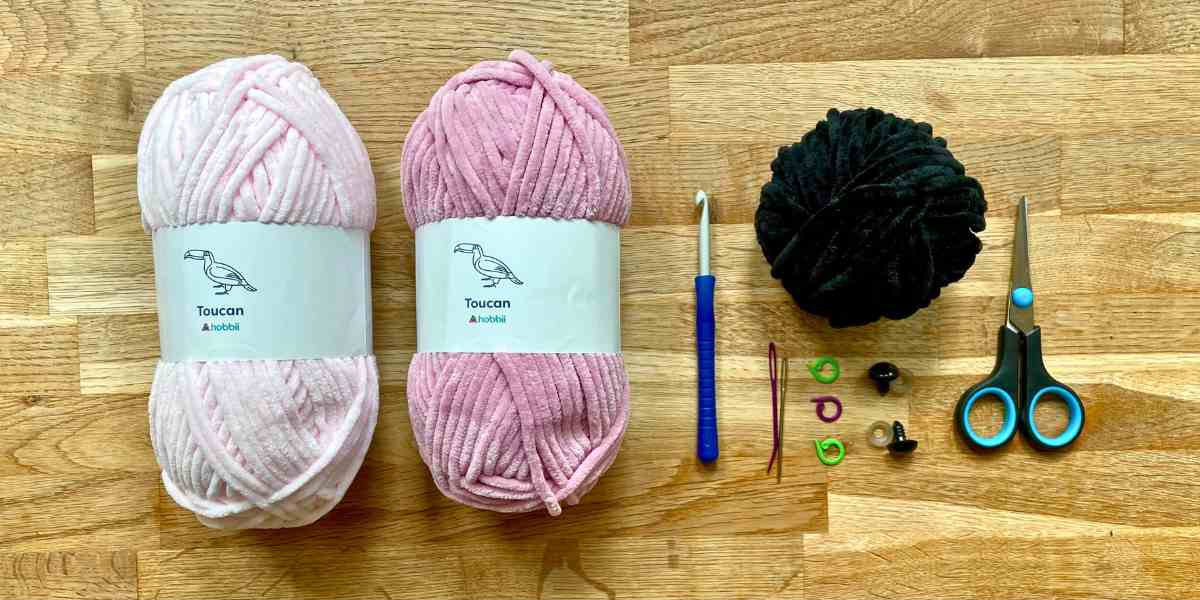
- Yarn for the body and gills (see notes on yarn color below). I used Hobbii’s Toucan yarn in light pink and lavender.
- A corresponding crochet hook* (see notes on yarn weight below)
- Safety eyes* (see notes on eyes below)
- Yarn scraps for embroidering the mouth
- Polyester toy stuffing*
- Darning needle*
- Scissors
Choosing your yarn: colors
I’ve chosen a barely-there pink for my axolotl’s body, and a more saturated pinky-purple for its external gills. I was inspired by the colors of leucistic axolotls, which are probably the best known and the most widely kept as pets. But the most common color for axolotls in the wild is greeny-brown, with black gills. Or you might make a xanthic axolotl, which has a gray body and black gills. Perhaps you’ll even be inspired by the blue axolotls in Minecraft, or invent a new color type all of your own!
Choosing your yarn: weight
My axolotl is made with super bulky yarn, and stands about 7” tall. You can easily make a bigger or smaller axolotl simply by using a heavier or lighter yarn.
- DK yarn makes an axolotl roughly 4” tall, which looks cute sitting on a desk or shelf
- Worsted yarns make an axolotl around 5” tall
- Bulky yarns make a 6” axolotl
- Jumbo yarns make axolotls 8-10” tall – big enough to use as a throw pillow!
Since my axolotl is destined to be a cuddly toy for my daughter, I’ve chosen a soft, squashy chenille yarn. But cotton, acrylic, and wool yarns will be just as effective. This is definitely a pattern you can adapt to make the most of materials you already have!
Eyes
Safety eyes are sold in lots of different diameters, and you’ll need to pick a pair to match the scale of your axolotl. These sizes are a guide, and a couple of millimeters bigger or smaller will work just as well, if you already have them:
- For an axolotl made in DK or worsted yarn, use 12mm eyes, or thereabouts.
- For an axolotl in bulky or super bulky yarn, use 16mm eyes, or close.
- And if you’re using a jumbo yarn, try 20mm eyes or larger (‘jumbo’ is a bit of a catch all category for all yarns heavier than super bulky, so might be worth making up the body, then deciding what size eyes will fit).
Pattern notes
This pattern is written in standard American crochet terms. The stitches you need to know are:
Ch chain
Sl st slip stitch
Sc single crochet
Inc increase (make 2 single crochets in the same space)
Dec decrease
Since the pattern decreases rapidly at the base, I recommend using an invisible decrease to minimize the appearance of gaps:
- Insert your hook into the front loop only of the next two stitches (fig. 1).
- Yarn over, and draw through both front loops (two loops remaining on hook).
- Yarn over and draw through both loops on hook (fig. 2)

Squishy crochet axolotl pattern
Like most amigurumi projects, Radley’s parts are made in spiraling rounds. Let’s make the body first, and then the external gills.
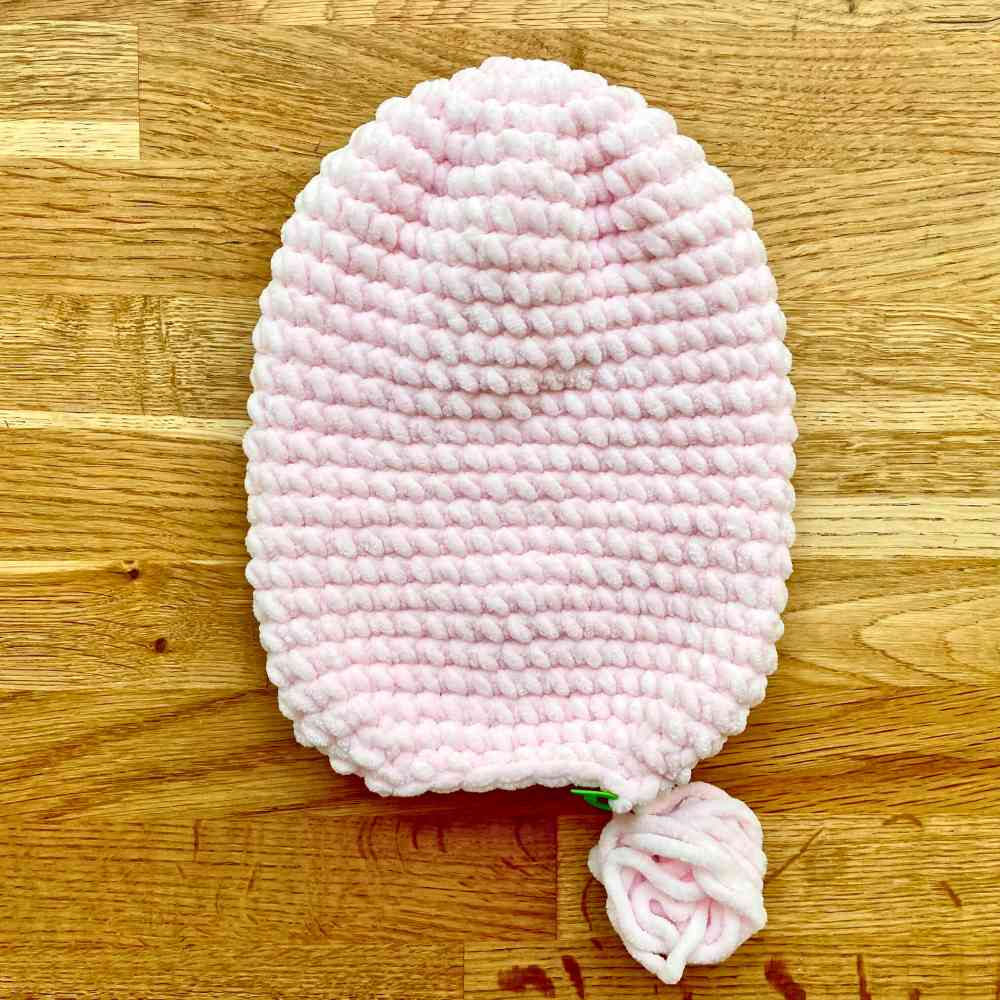
The body
You can start all of your axolotl’s parts with either a magic circle, or by chaining four stitches and making a slip stitch into the furthest stitch from the hook, to make a four-chain loop. Usually I prefer a magic circle for its simplicity, but a 4-chain loop is easier to tighten if you’re using a fluffy or chenille yarn.
- Magic circle or ch 4 and sl st to join.
- 1st round: Ch 1, sc 8 into the magic circle or 4-ch loop (8 sts)
- 2nd round: 8 inc (16 sts)
- 3rd round: *1 sc, inc* 8 times (24 sts)
- 4th round: *2 sc, inc* 8 times (32 sts)
- 5th round: *3 sc, inc* 8 times (40 sts)
- Rounds 6 – 23: Sc all the way round
- 24th round: 3 dec, sc 8, 6 dec, 8 sc, 3 dec (28 sts)
- 25th round: 3 dec, sc 2, 6 dec, 2 sc, 3 dec (16 sts)
- Put a stitch marker into the loop on your hook, and cut your yarn leaving a 24 inch tail.
Set the body to one side for a moment, and let’s get to work on the gills!
Gills
Axolotls are unique among amphibians in that they keep their external gills and stay living in water when they reach adulthood. All the rest develop internal lungs and move out onto land. Axolotl’s external lungs are feathery, to provide maximum surface area for absorbing oxygen from the water.
But I’ve come up with a solid, squashy alternative which is simpler to make, and looks in keeping with the rest of Radley’s cuddly profile. They would look fantastic in fluffy, fur-effect yarn like Sirdar’s Alpine yarn. But I’m using yarn I already have, and I think a smooth finish is still very effective.
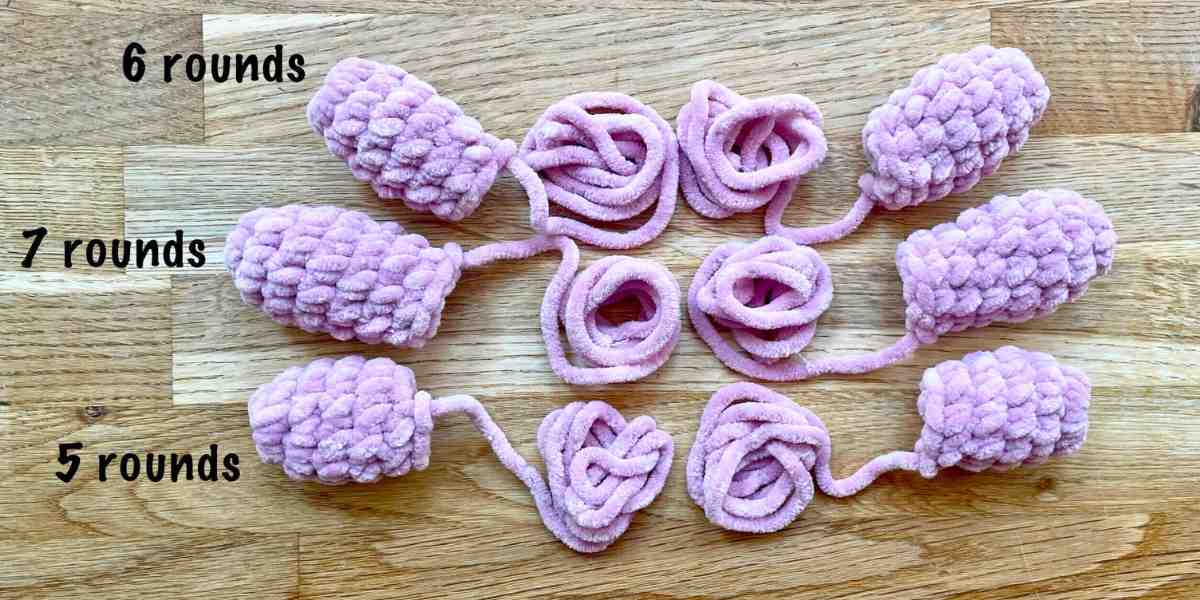
Top gills
Make two.
- Magic circle or ch 4 and sl st to join.
- 1st round: Ch 1, sc 8 into the magic circle or 4-ch loop (8 sts)
- 2nd round: *Sc 3, inc* twice (10 sts)
- 3rd & 4th rounds: Sc all the way round
- 5th round: *Sc 3, dec* twice (8 sts)
- 6th round: Sc all the way round
Sl st once, cut the yarn leaving a long tail for sewing, and pull the yarn tail all the way through the stitch.
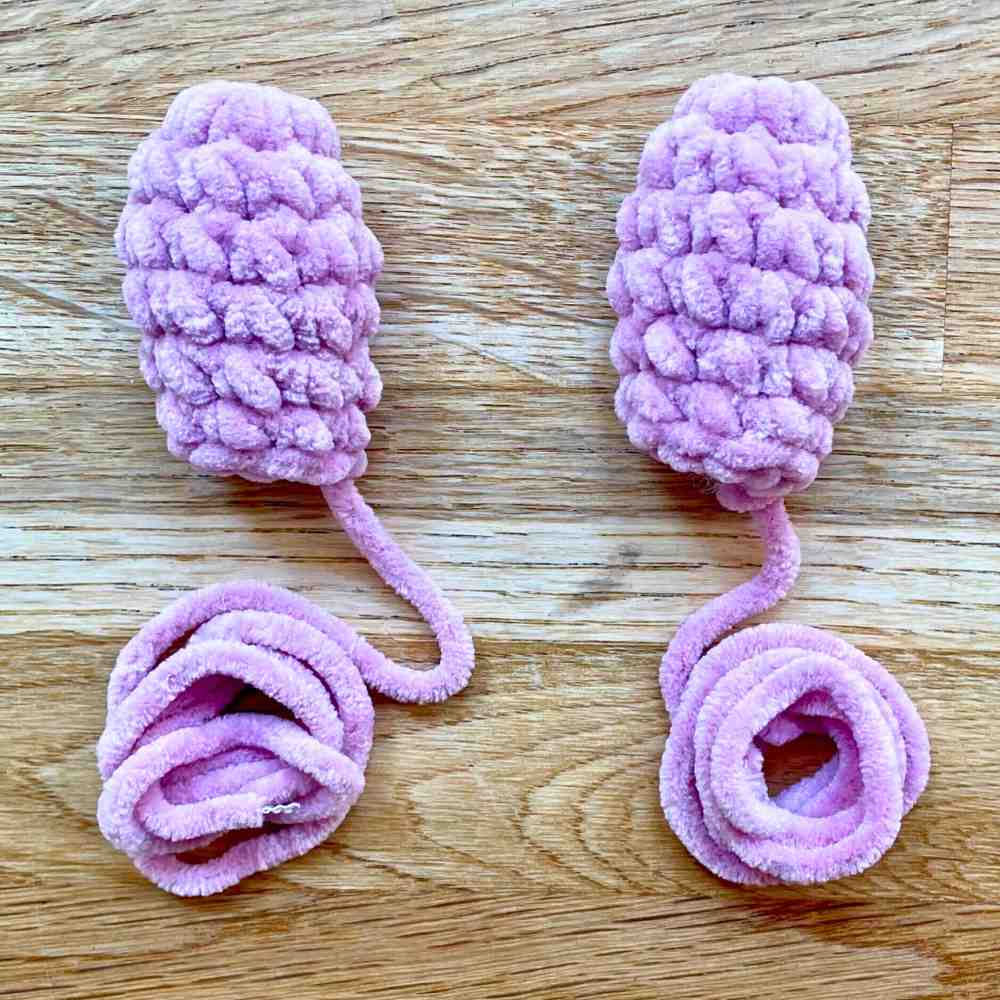
Middle gills
Make two.
- Make a magic circle or ch 4 and sl st to join.
- 1st round: Ch 1, sc 8 into the magic circle or 4-ch loop (8 sts)
- 2nd round: *Sc 3, inc* twice (10 sts)
- 3rd & 4th rounds: Sc all the way round
- 5th round: *Sc 3, dec* twice (8 sts)
- 6th & 7th rounds: Sc all the way round
Sl st once, cut the yarn leaving a long tail for sewing, and pull the yarn tail all the way through the stitch.
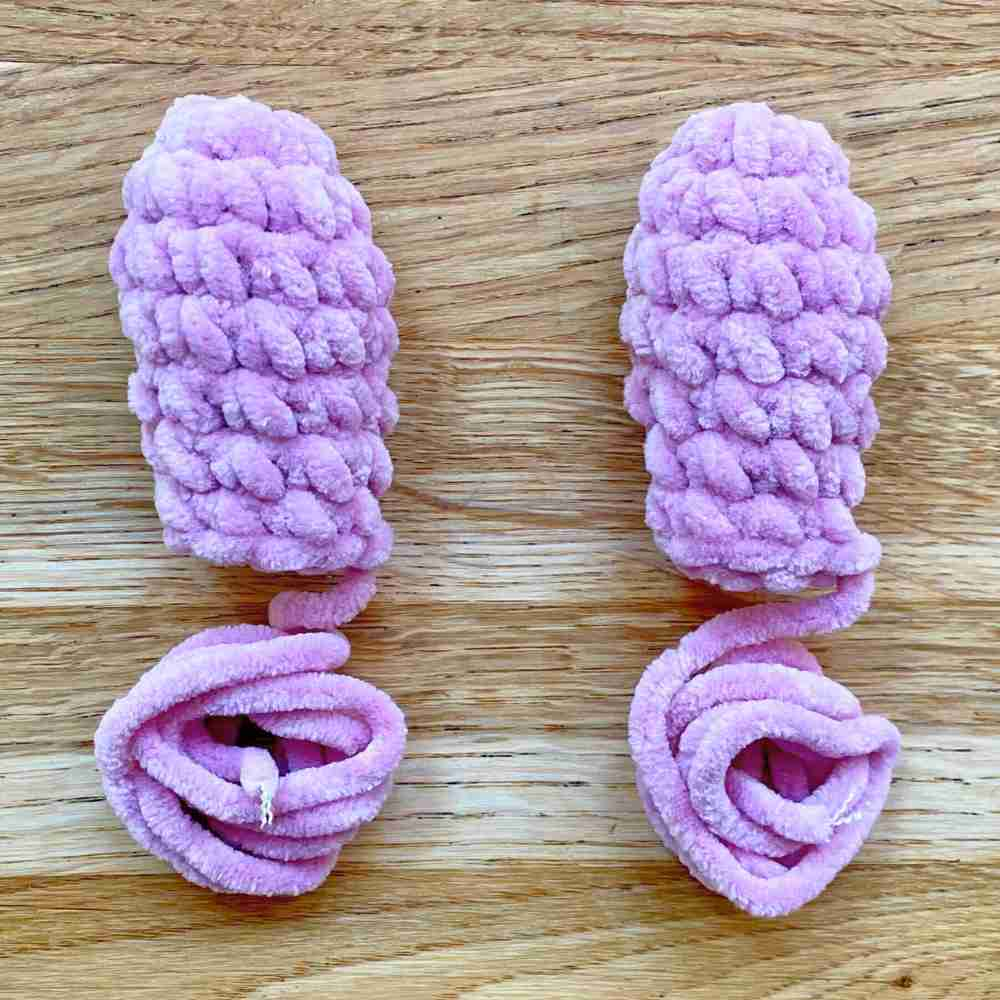
Bottom gills
Make two.
- Make a magic circle or ch 4 and sl st to join.
- 1st round: Ch 1, sc 8 into the magic circle or 4-ch loop (8 sts)
- 2nd round: *Sc 3, inc* twice (10 sts)
- 3rd & 4th rounds: Sc all the way round
- 5th round: *Sc 3, dec* twice (8 sts)
Sl st once, cut the yarn leaving a long tail for sewing, and pull the yarn tail all the way through the stitch.
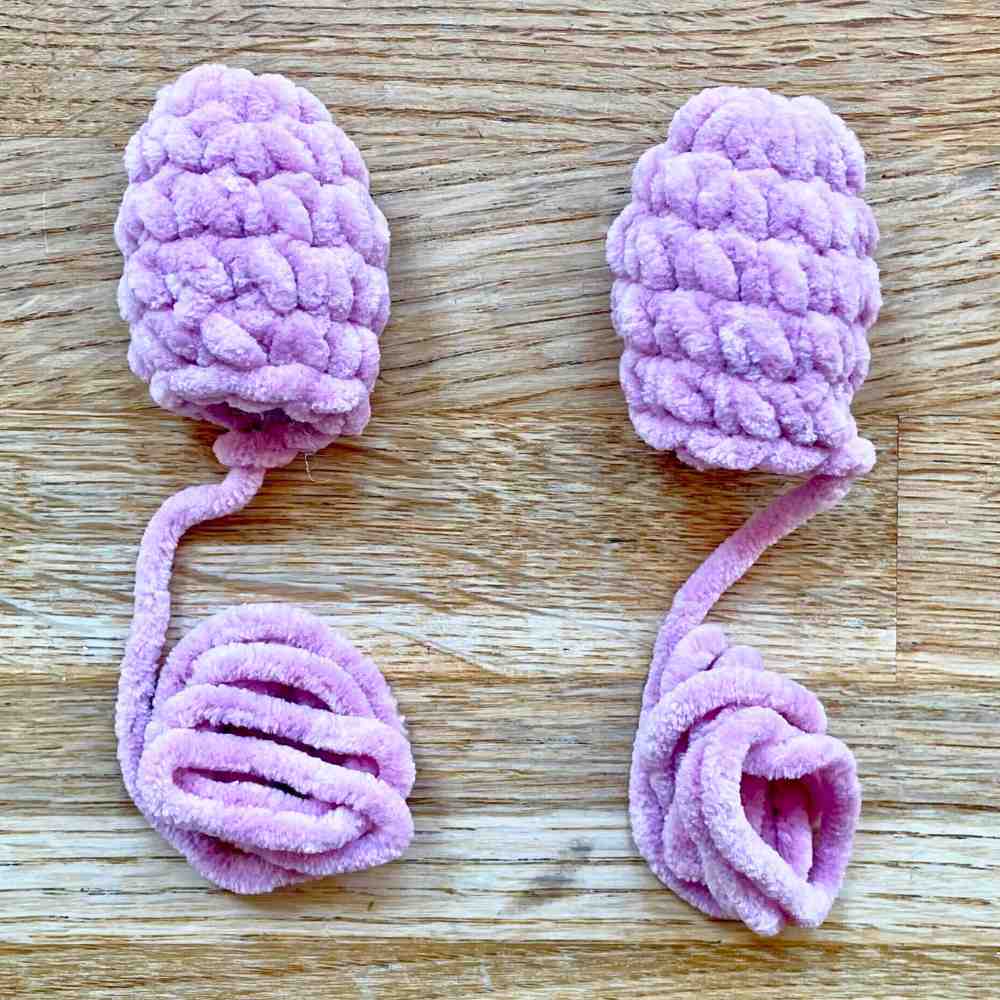
Fill all of the gills with just enough stuffing to give them shape (they don’t need to be very firmly stuffed), and they’re ready to organize on the sides of your axolotl’s body like this:
Assembling your axolotl
Now let’s start bringing your axolotl to life!
First spread the body out flat in front of you, and position the safety eyes 9 stitches apart, between rows 11 and 12. Press the backs on firmly. Then stuff the body as firmly as you can without stretching the stitches.
Using the yarn tail, make one more round:
- 26th round: 8 dec, 1 sl st (8 sts).
Close the body with mattress stitch, through the front loops only of the remaining stitches. The first picture below shows where the stitches go (the needle is already in position to make the first stitch). With smoother yarns you can make all of the stitches loosely then pinch the start point and pull the yarn in the other direction to tighten them up. But for chenille yarns you’ll probably need to tighten them one at a time.
Joining the gills
With the body closed, it’s time to join the gills. Start with one of the top gills, and position it 5 rows down from the center of the top of the head.
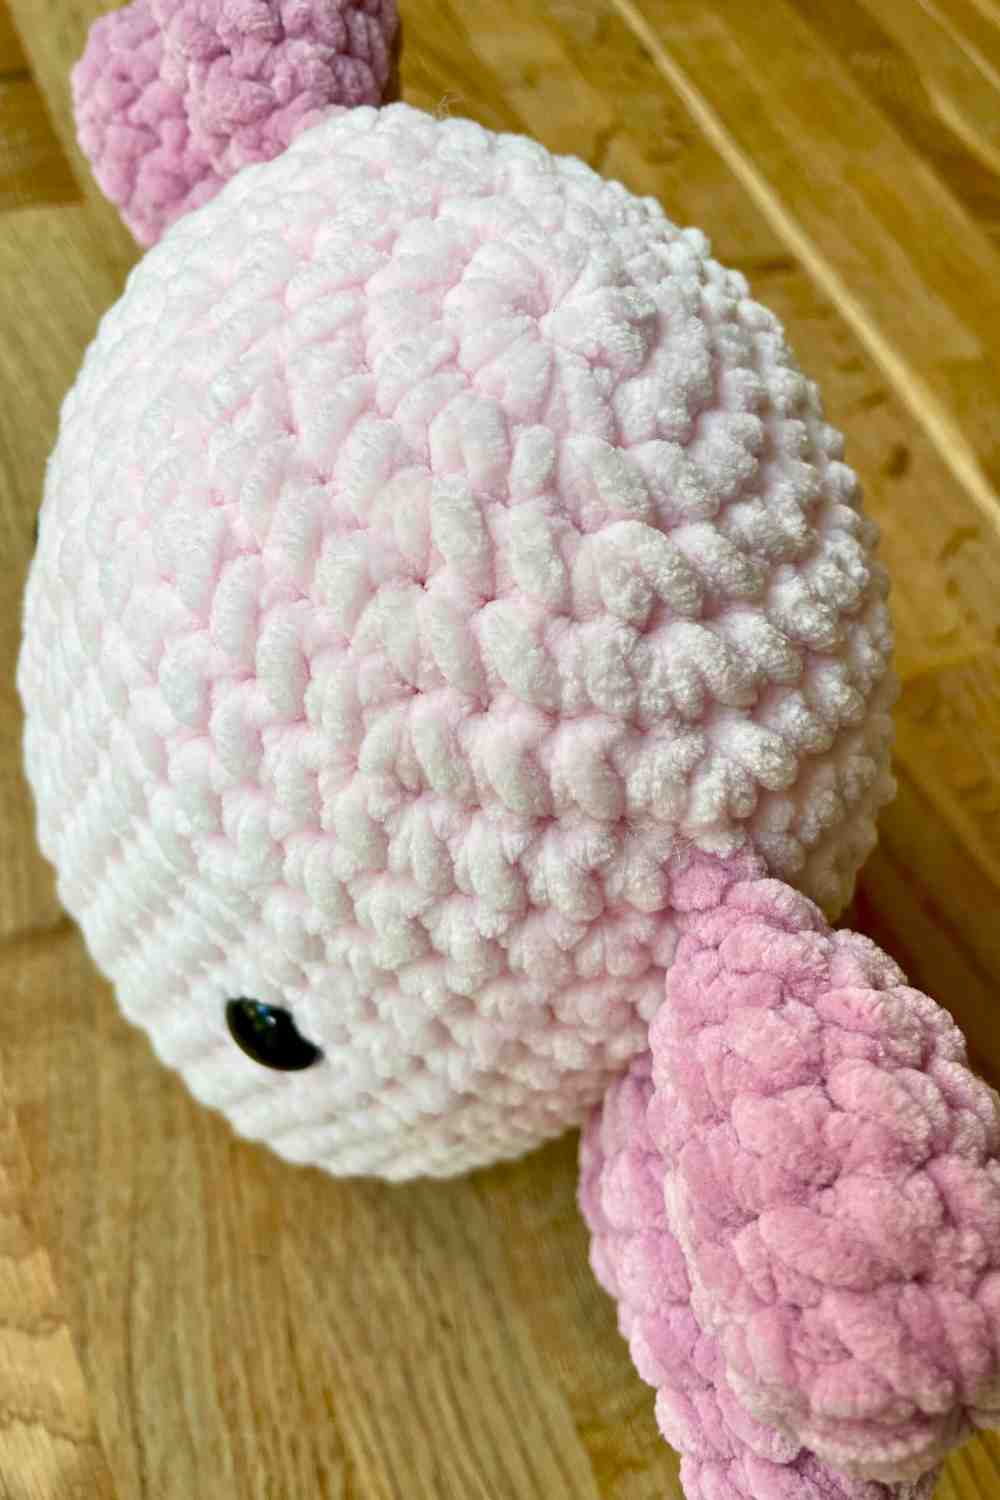
Hold the opening of the gill closed, so that you have two rows of four stitches to sew through. Sew the gill onto the body with four stitches, each one going into the gap between two rows on the body, and through one stitch on either side of the gill. When you’re finished the gill should end up covering 3 rows of the body. Join the middle gill immediately below the top gill, and the bottom gill immediately below the middle gill. In total, they should span 9 rows, and the bottom of the middle gill and top of the bottom gill should line up with the eyes.
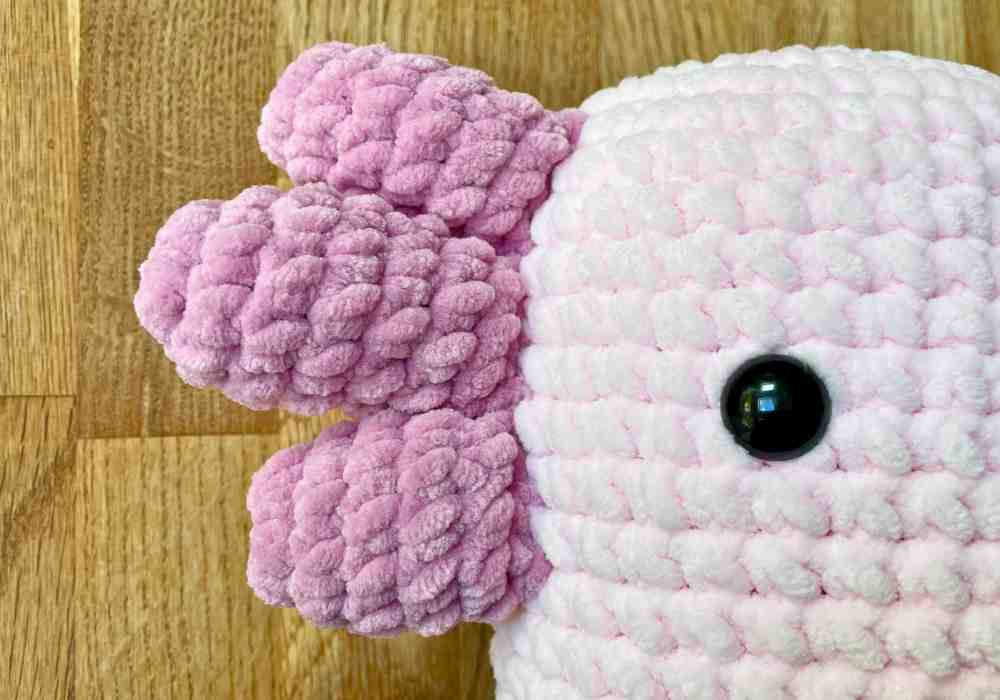
Attach the other three gills on the other side of the body.
TIP: As you look down on the body from above, join the gills ever so slightly forward of the widest point of the body.

Embroidering the mouth
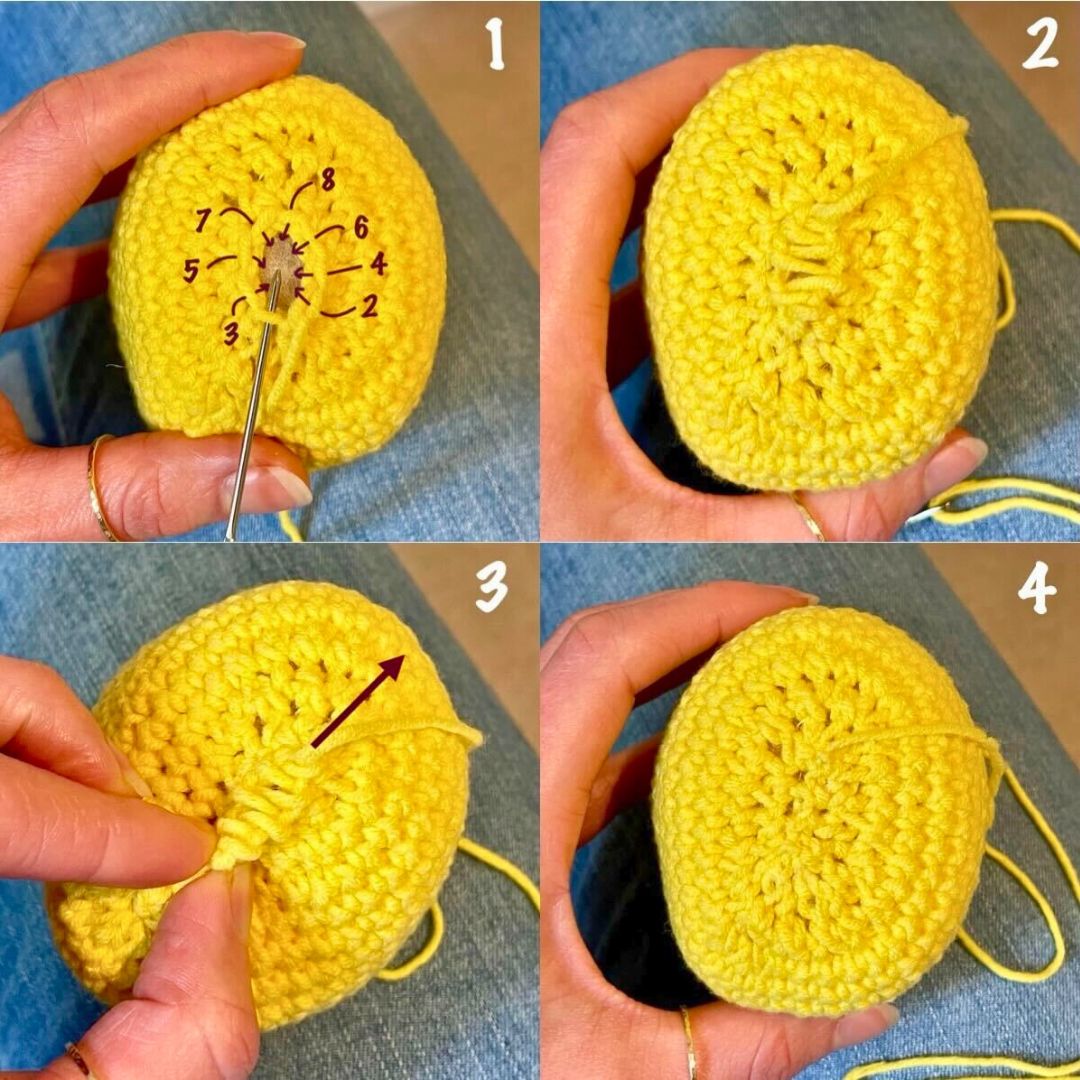
Axolotls have wide heads and wide mouths, so we’re going to capture their likeness with a lovely wide smile. If you also enjoy embroidery, you’ll recognize the method I’ve used as whipped back stitch. But if that’s a completely new term to you, don’t worry – I’m going to walk you through it.
Start by joining your black yarn to the body. Thread it onto a darning needle and under the stitch shown in picture 1. Tie the yarn ends together, leaving just enough space below the knot for the yarn to turn around the stitch. Insert the needle as shown in picture 2. As you pull it through, the knot in the yarn will spin around and end up inside the body (picture 3).
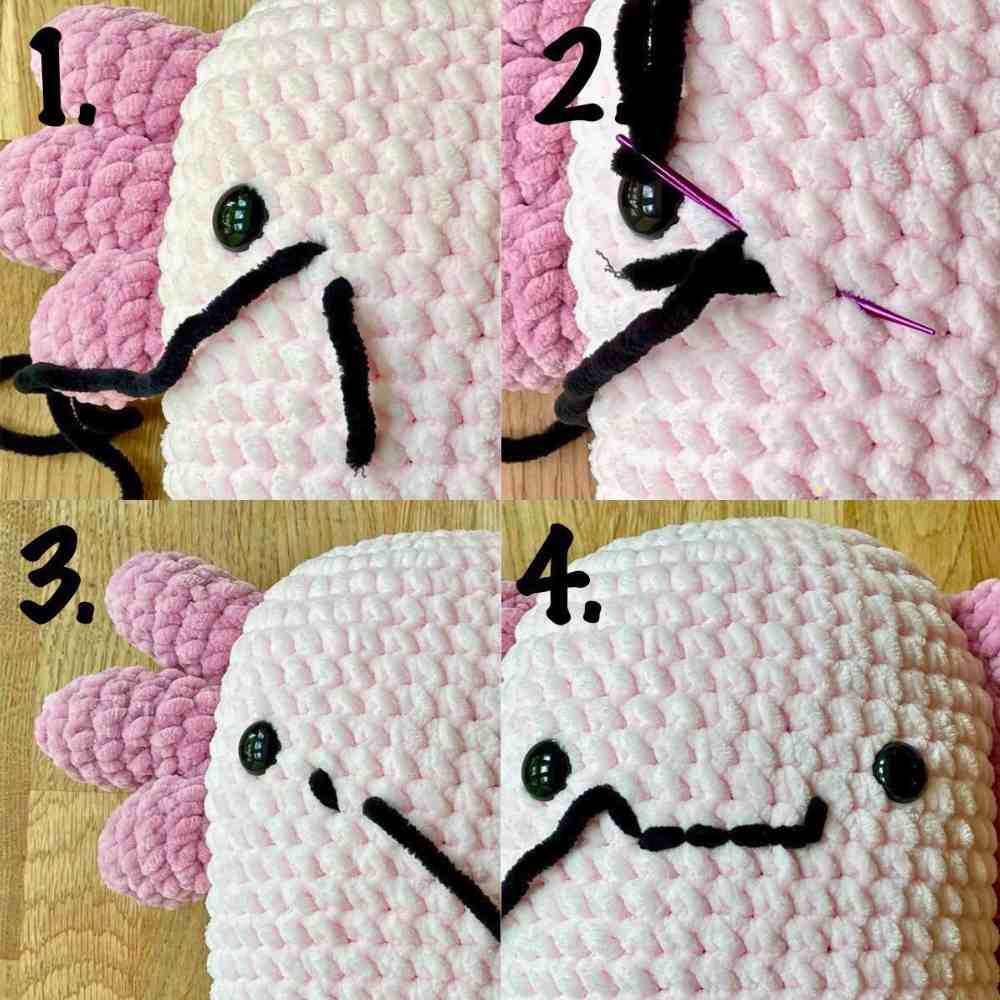
Make the rest of the smile in back stitch, and after the final stitch return the needle through the starting point (picture 4).
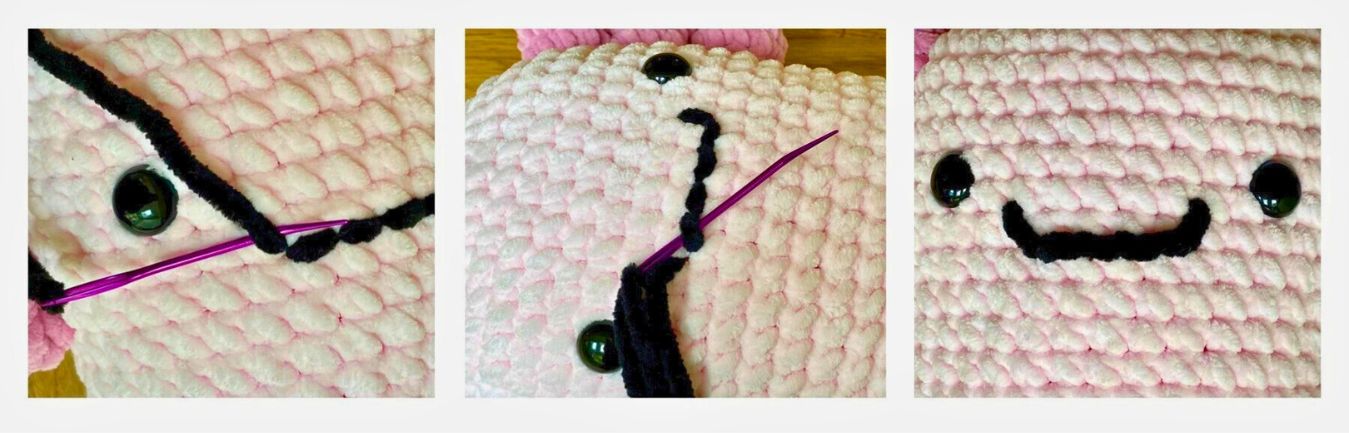
Now we’ve got off to a great start, but the mouth could do with looking a little bolder. So, tuck the yarn under the first stitch from right to left (left, below), and then under all the remaining stitches from left to right (middle, below). When you get back to the other side, tie off the yarn and poke the tail inside the body (right, below).
You’ve done it!
It’s time to give your awesome finished axolotl and squash and a squeeze, and maybe even give it a name.
Squishy crochet axolotl pattern summary
I hope you’ve enjoyed following this pattern. If you’re on social media and you’re happy sharing your results, we’d be thrilled to see them, so please tag Lucy’s Facebook or Instagram. The basic body shape is the same as for my other squishy crochet patterns.
- Cat
- Owl
- Bear
- Ice pop
- Strawberry
- Bubble tea
*The products linked in this pattern were carefully selected by Lucy Kate Crochet. If you decide to purchase using the links provided, we may earn a small commission on that sale. This is at no extra cost to you.


Love this pattern as my kids love axolotls! I do believe there is a typo for the 5th round on the body. You have “1 sc, Inc” but when I did that I got way too many stitches after looking at it more closely I think it is supposed to be “3 sc, inc”?
Hi Jamie,
I’m so glad you like it! And of course, you are absolutely right about that typo! I do apologise! I’m going to correct it right now 🙂
Sarah x
Adorable! Thank you for sharing the pattern. What size hook did you use? I want to make one with a bulky size 6 chenille yarn.
Hi Brenda, Sarah used a 6mm crochet hook for her axolotl, and I recommend you use the size suggested on your yarn packet (or possibly a 1mm smaller depending on your tension). Hope that helps! Lucy Kate, x
Hi there, starting round 24 and I am unsure of how you are getting from 40 stitches down to 28 with the number of decreases and sc listed for row 24. Could you please explain that row a bit better, should I be doing additional sc to finish out the row?
Hi Ally,
I’ve just double checked the maths, and here’s how it works out:
3 dec uses 6 stitch spaces from round 23
8 sc uses 8 stitch spaces from round 23
6 dec uses 12 stitch spaces from round 23
8 sc uses 8 stitch spaces from round 23
3 dec uses 6 stitch spaces from round 23
6 + 8 + 12 + 8 + 6 = 40 stitch spaces from round 23 used
3 + 8 + 6 + 8 + 3 = 28 stitches created
If you’ve still got a stitch left at the end of the round, I think the most likely explanation is that when you’re making the 8 single crochets, you’re putting the first one into a stitch space you already used as part of the decrease that came before it. For example, stitch spaces 5, 6 and 7 from round 23 are occupied with a decrease (across spaces 5 and 6) then a single crochet (in space 7) in round 24. But I think you may have made the decrease in spaces 5 and 6, then added the single crochet in space 6 as well. It’s really easily done – especially if you’re using fluffy yarn and the invisible decrease method!
I hope that makes sense, let me know if it gets you back on track!
Sarah