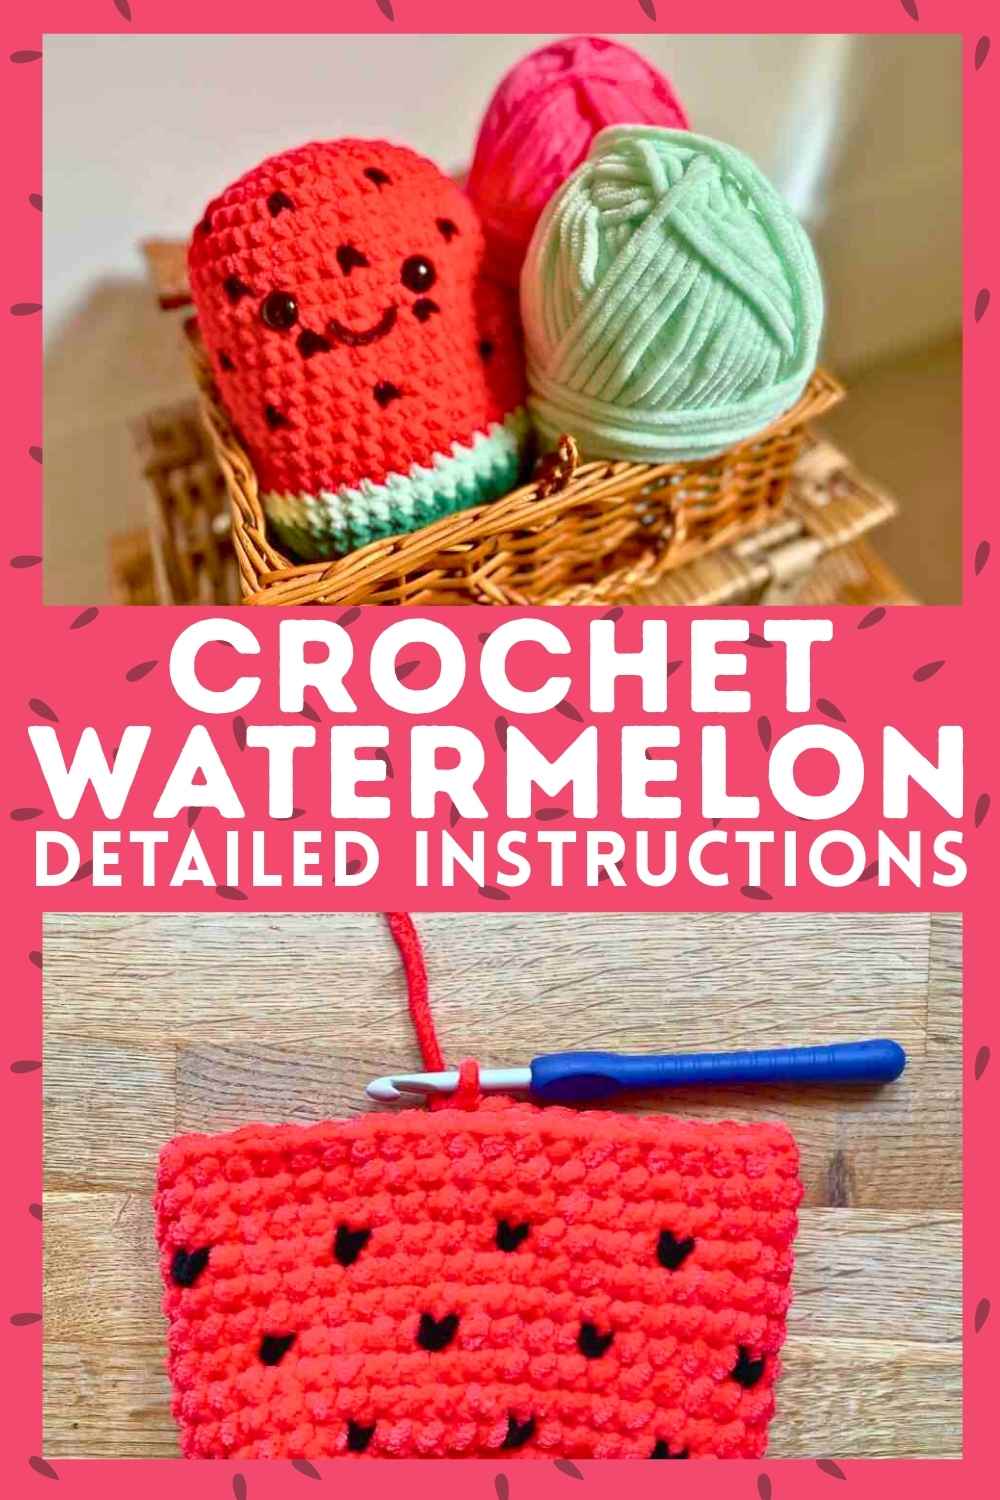
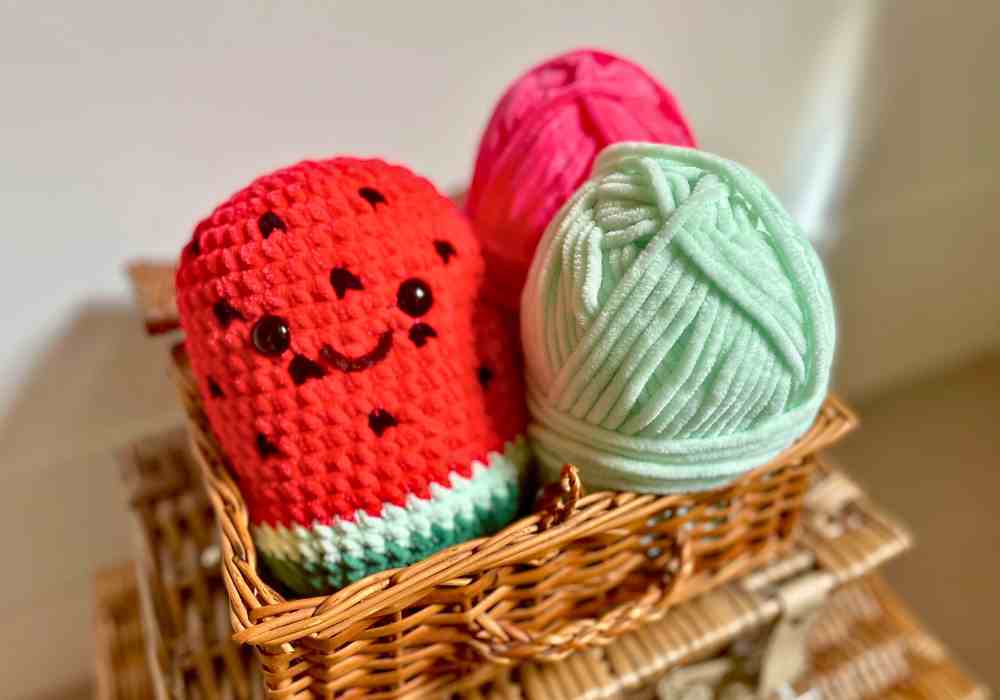
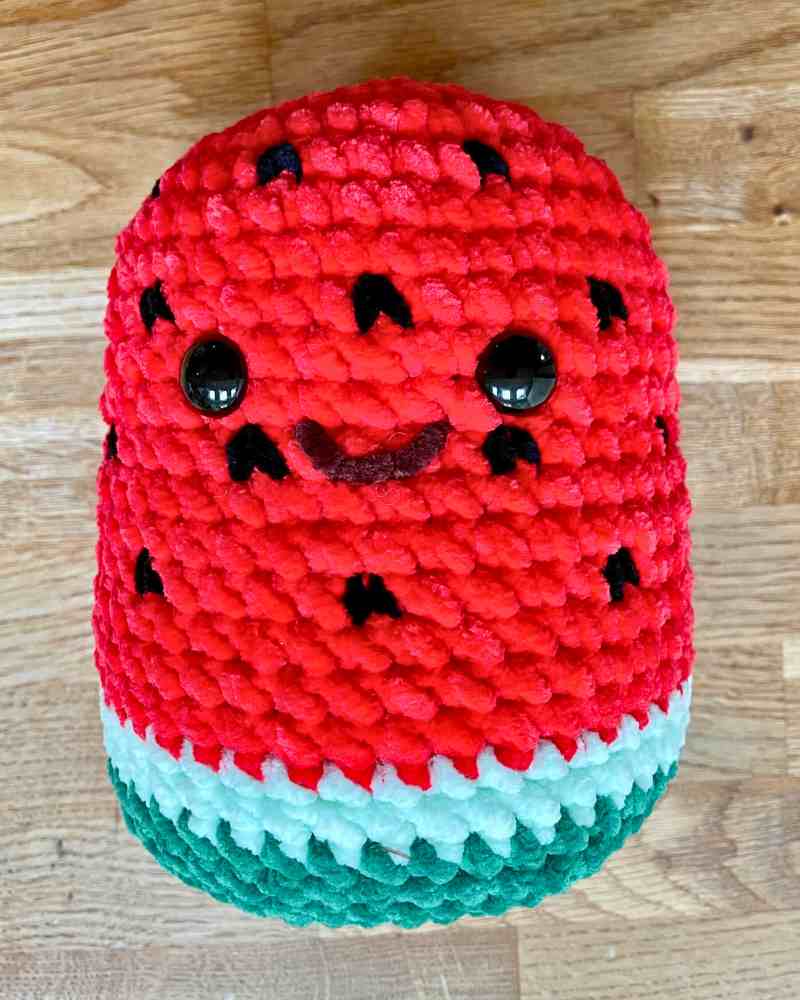
Free Squishy Crochet Watermelon Pattern
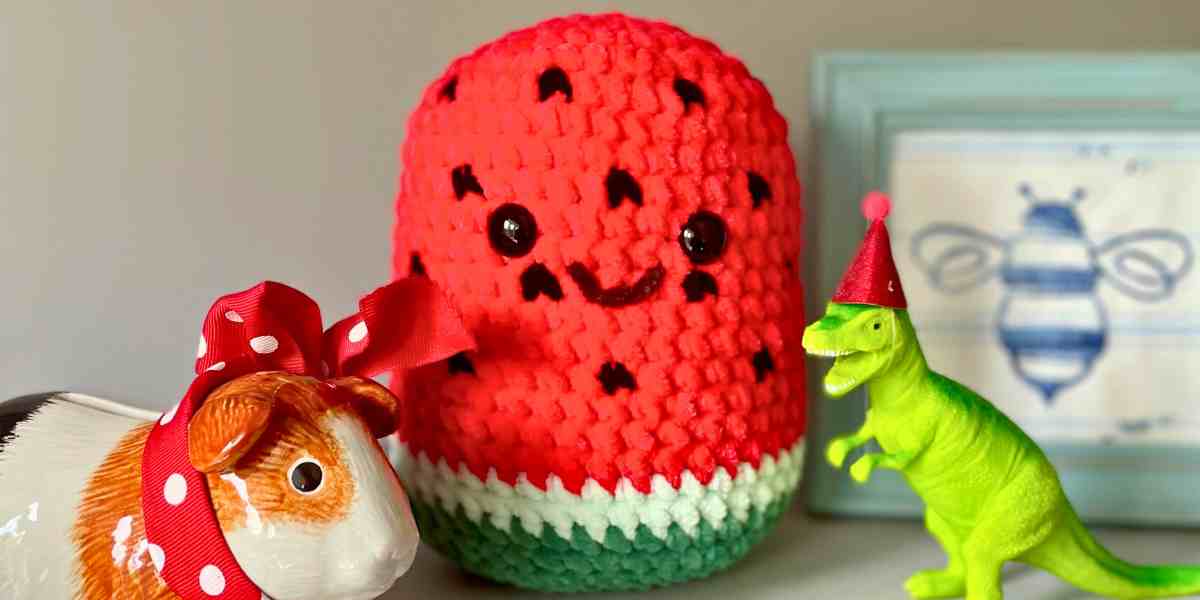
Hello! This is Lana, my squishy crochet watermelon pattern. She gets her name from the Latin name for the watermelon plant: Citrullus lanatus. She’s a fun and easy amigurumi project for summer – I was definitely in the same mood when I made her as when I made my strawberry and ice pop squishies!

She’s made in one single piece, but with some fancy color work to create her distinctive looks. Fancy doesn’t mean difficult here though – this pattern is based entirely on single crochet, and extremely beginner friendly!
Materials
To make your own mouth watering slice of watermelon, you’ll need yarns of the same weight in:
- Red or deep pink for the flesh. I used Hobbii’s Toucan yarn in red.
- Black for the seeds. I used King Cole’s Yummy* yarn in black.
- Dark green for the skin. I used Hobbii’s Toucan yarn in sage.
- Light green or white for the rind (light pink would also be an effective alternative). I used King Cole’s Yummy* yarn in mint.
You’ll also need:
- A scrap of brown yarn to embroider the mouth.
- Safety eyes*
- A crochet hook to match your yarn. Unless you already crochet tightly, use a hook once size smaller than the yarn wrapper suggests. This will make your fabric robust enough to stuff later, without the stuffing poking through the stitches.
- Toy stuffing*, such as PolyFil.
- Stitch markers, or yarn scraps to help track your progress.
Size
You can choose any weight of yarn you like to make your squishy watermelon. The weight you choose will determine how big your squishy turn out:
- DK yarns make a watermelon slice approximately 4” (10cm) tall. These look super cute sitting on a shelf or bar.
- Worsted yarns make a watermelon slice roughly 5” (12.5cm) tall.
- Bulky yarn watermelons turn out around 6” (15cm) tall.
- Super bulky yarn melons end up about 7” (17.5cm) tall.
- Jumbo yarn squishies could end up anything between 8 and 10” tall – the jumbo yarn category is a bit of a catch all for anything thicker than super bulky!
You’ll also need to choose safety eyes the right size to match the finished proportions of your squishy.
- Use 12mm eyes or thereabouts with DK and worsted yarns.
- Use 16mm eyes (or close) with bulky and super bulky yarns.
- And use 20mm eyes or larger with jumbo yarns.
Lana is made from super bulky yarns, so she’s 7” tall, and has 16mm eyes.
Pattern notes
This pattern is written in standard American crochet terms. The only ones you need to be familiar with are:
Ch chain
Sl st slip stitch
Sc single crochet
Inc increase (make 2 single crochets in the same space)
Dec decrease
Since the pattern decreases rapidly at the base, I recommend using an invisible decrease to minimize the appearance of gaps:
- Insert your hook into the front loop only of the next two stitches (fig. 1).
- Yarn over, and draw through both front loops (two loops remaining on hook).
- Yarn over and draw through both loops on hook (fig. 2).

The squishy crochet watermelon pattern
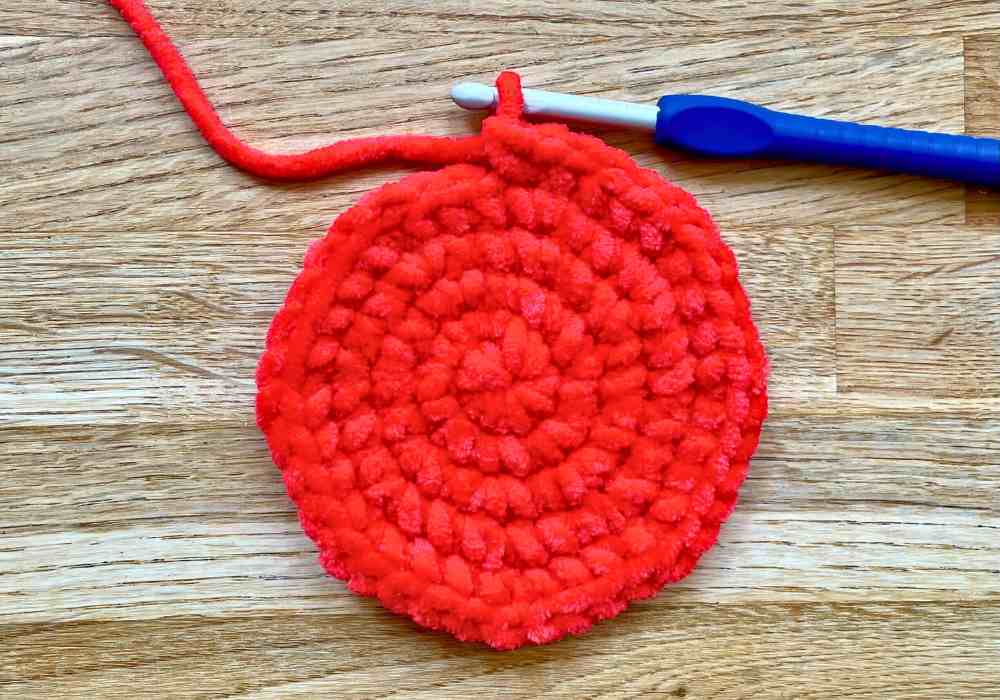
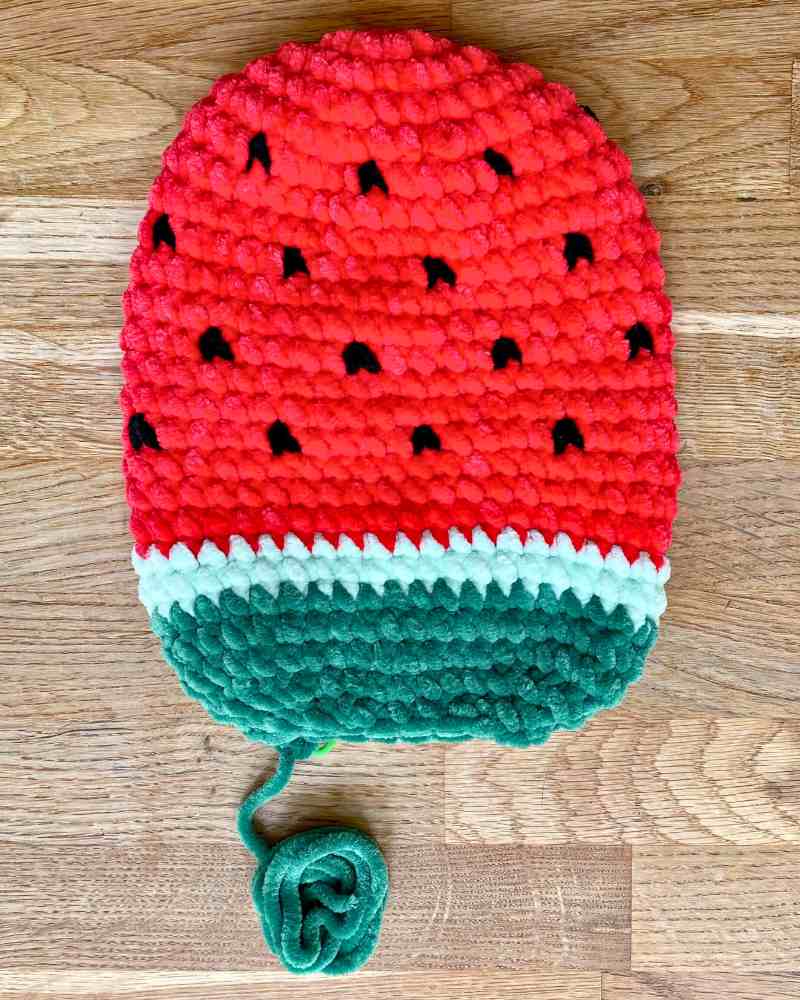
Now let’s get down to business! This squishy is worked all in one piece, from the top down. So start with your red or deep pink yarn. Begin by making a magic circle, or by making 4 chain stitches and slip stitching into the first one, to form a loop. You can use whichever you prefer, but if you’re using a chenille yarn like me, I find a 4-ch loop is easier to tighten.
- 1st round: Ch 1, sc 8 into the magic circle or 4-ch loop (8 sts)
- 2nd round: 8 inc (16 sts)
- 3rd round: *1 sc, inc* 8 times (24 sts)
- 4th round: *2 sc, inc* 8 times (32 sts)
- 5th round: *3 sc, inc* 8 times (40 sts)
Adding seeds
Rounds 6 to 23 are worked in single crochet all the way around, without any more increases. But it’s time to start adding some seeds! Starting with the first stitch of round 6. To make a seed we’re going to make a single crochet with black legs, and red top loops. Don’t worry, it’s very simple!
Insert the hook into the next stitch (the first of round 6) and draw through a loop of black yarn:
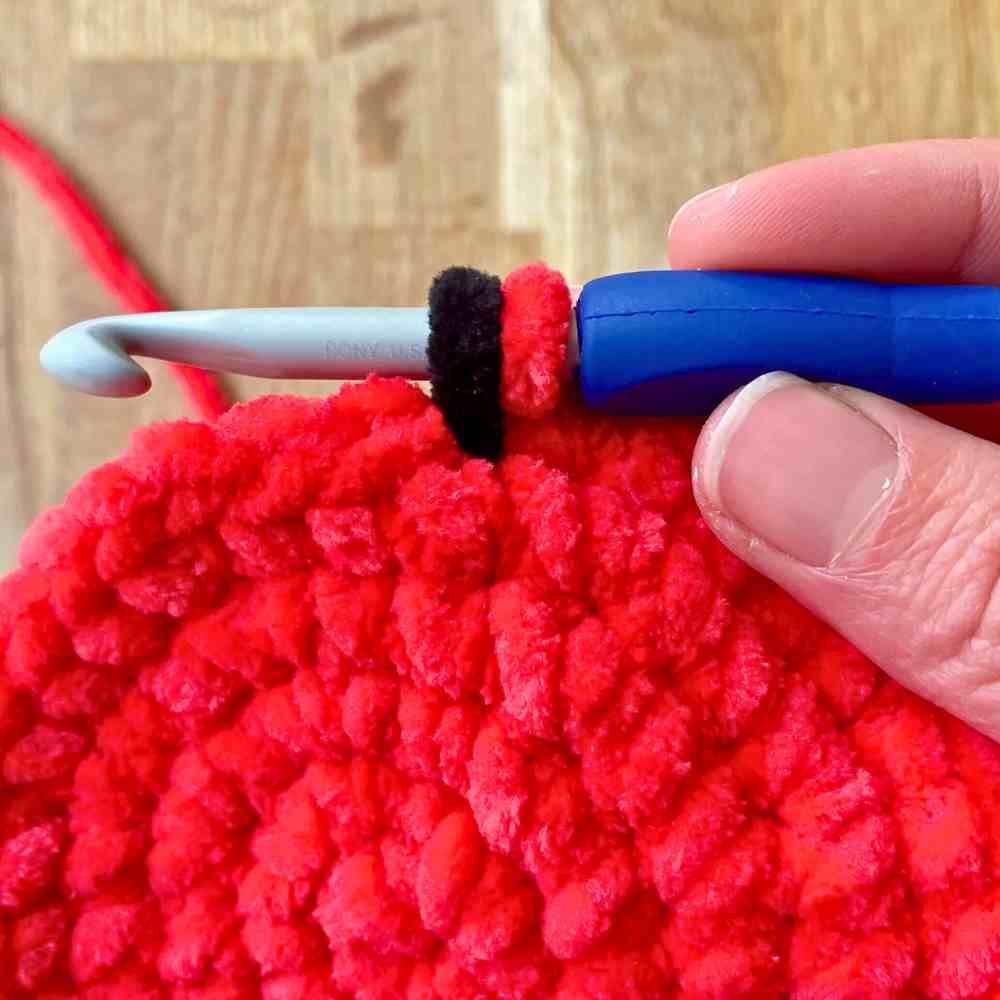
Now bring the red yarn over the hook:
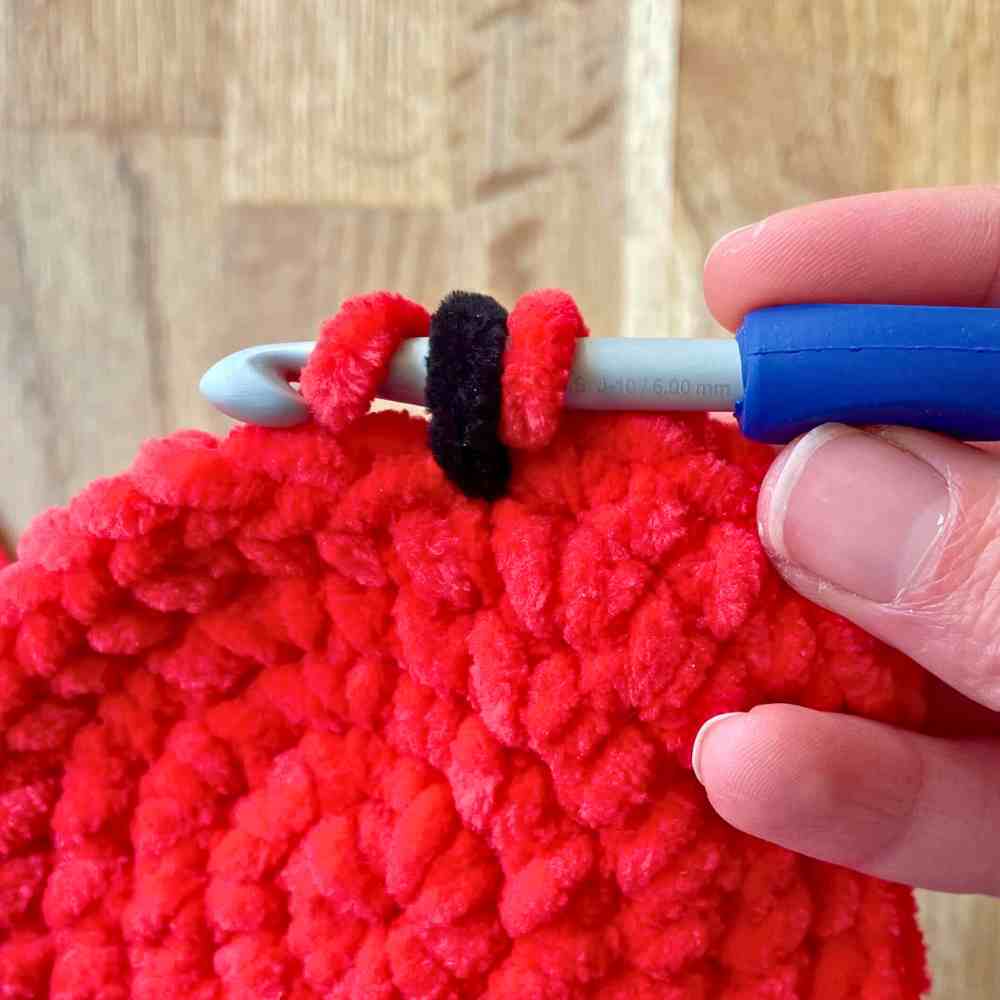
And pull it through the other two loops:
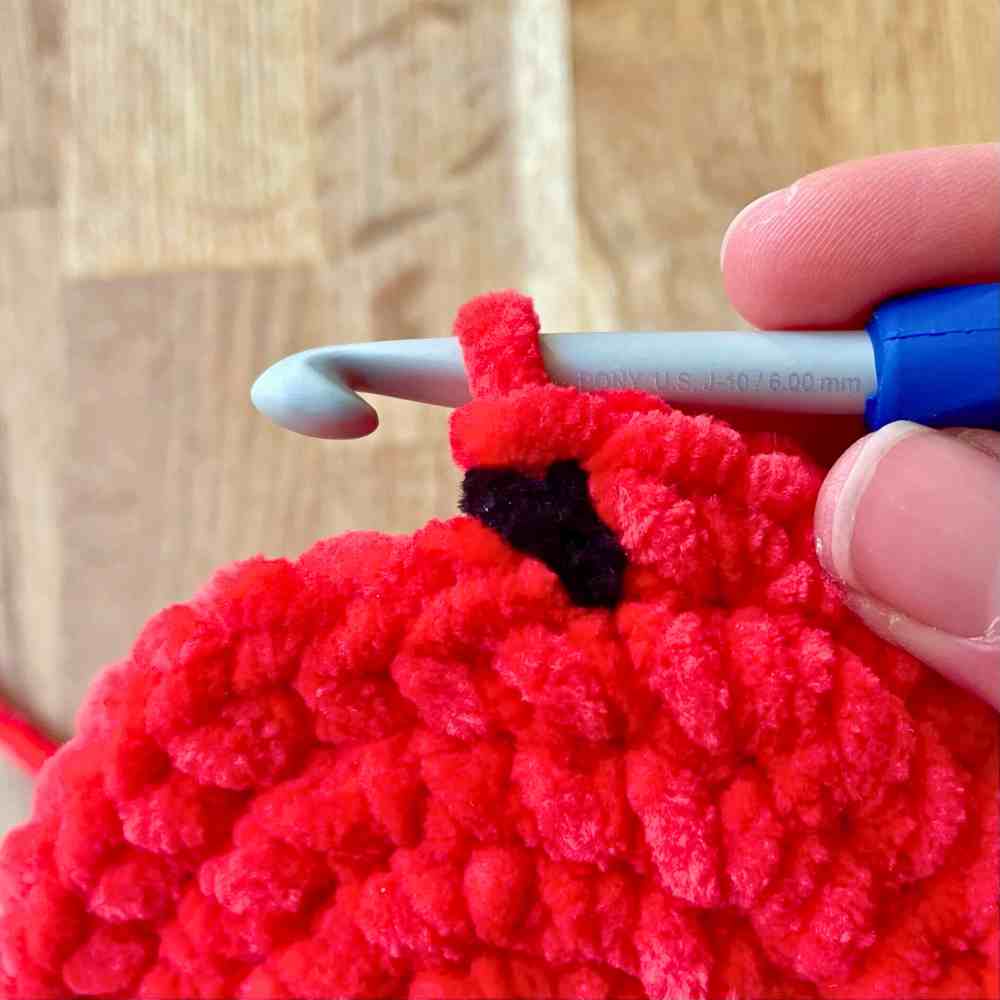
I find it helps to think of it like this: in making a single crochet, we bring the yarn over the hook two times. Use black the first time, and red the second. And that’s it. If you’ve ever been unsure which bits of a stitch are the legs and the top loops, you know now!
Now make four normal red stitches. For the rest of round six, follow this pattern 7 more times: one stitch with a seed, four red stitches. You will end up with 8 seeds, and finish on 4 red stitches. Here’s how the front looks half way round (after this, it won’t lie flat enough to photograph!):
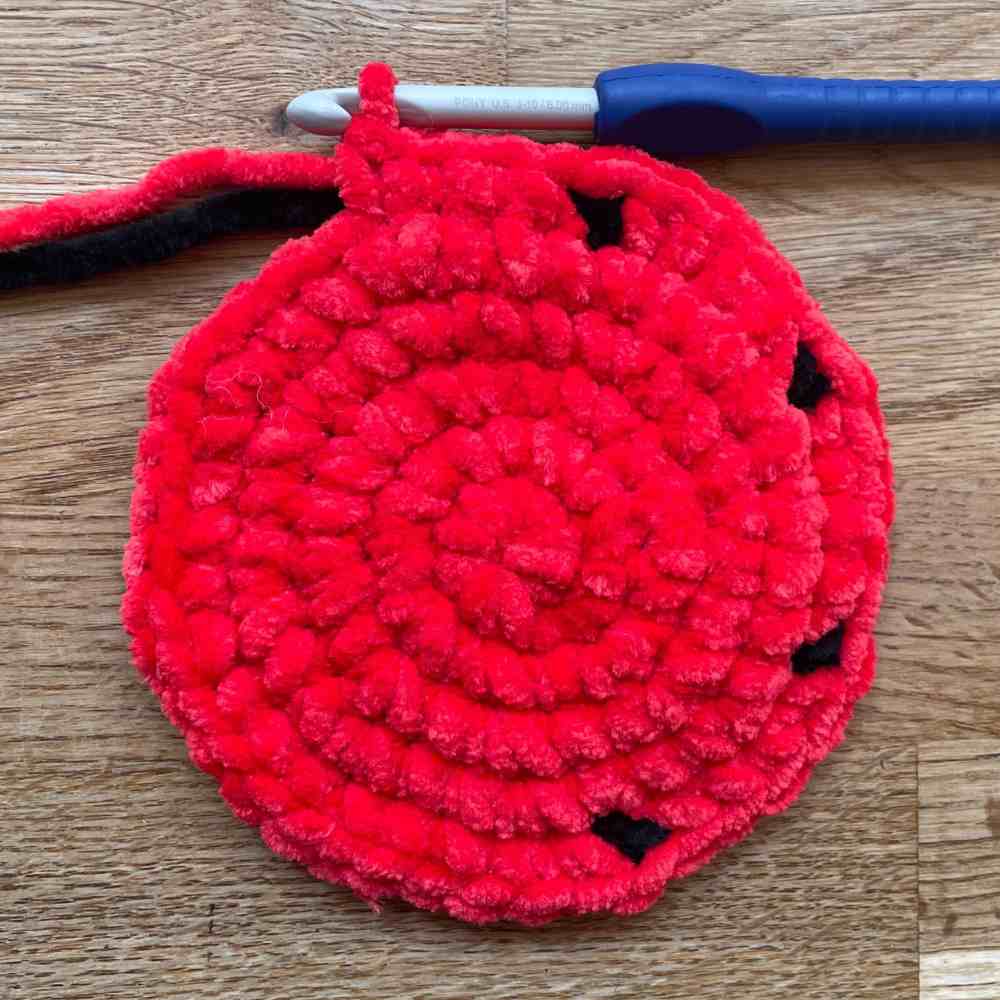
And here’s how it looks on the wrong side. The lengths of black yarn between the seeds are known as floats – make sure you don’t pull them too tight, or your finished watermelon will have puckers in it.
TIP: Put a stitch marker in the last stitch of the row, and move it up each time you add a row until you finish row 15 – it’s really easy to lose track of the pattern otherwise!
What next?
The seed pattern continues over the next 12 rounds:
- 7th & 8th rounds: Sc all the way round in red.
- 9th round: *Sc 3 red stitches, make one stitch containing a black seed, sc 1 red stitch* 8 times.
- 10th & 11th rounds: Sc all the way round in red.
- 12th round: *Sc 1 red stitch, make one stitch containing a black seed, sc 3 red stitches* 8 times.
- 13th & 14th rounds: Sc all the way round in red.
- 15th round: *Sc 4 red stitch, make one stitch containing a black seed* 8 times.
- 16th – 18th rounds: Sc all the way round in red.
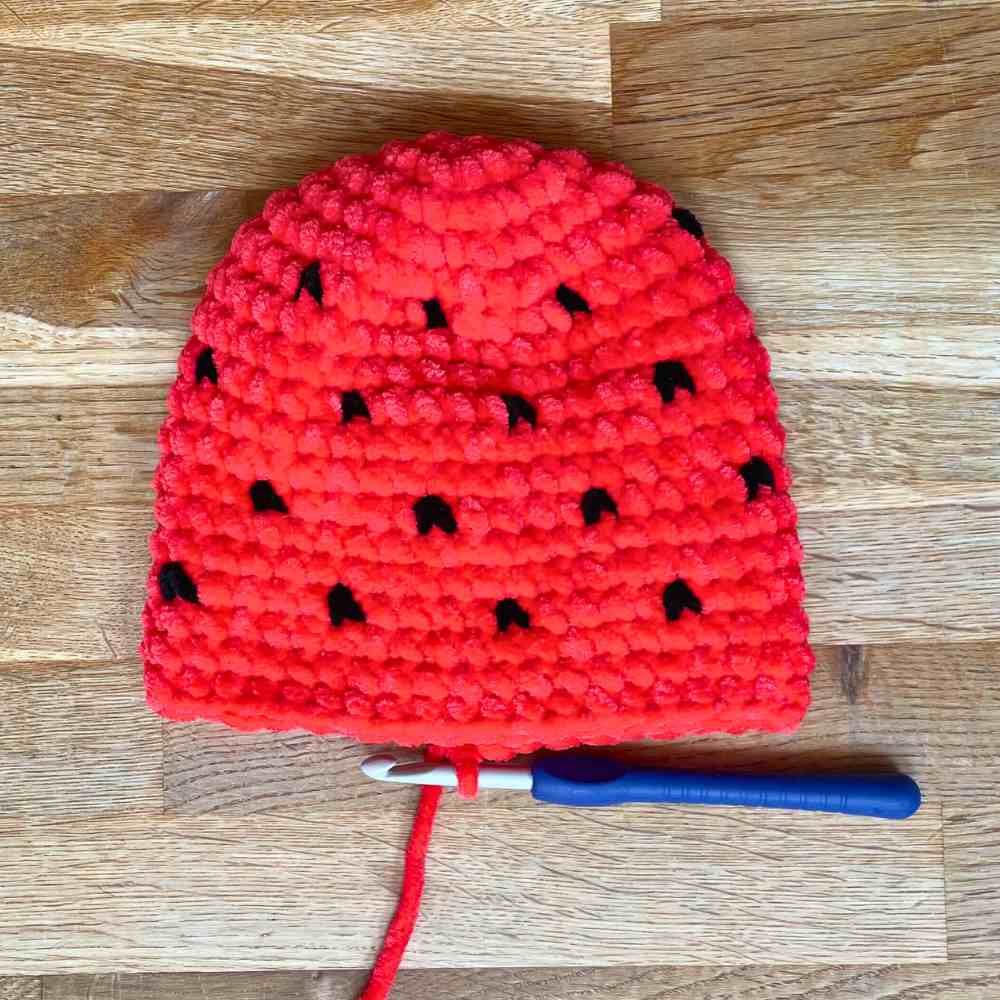
Changing color
Next come two rounds of white or light green for the watermelon’s rind, and six decreasing rounds of dark green for the skin. I’ve used a simple color change – dropping the previous color and picking up the new one in between the last stitch of one round and the first stitch of the next round. The result is quite a zig-zaggy line, but I’m happy with that in this pattern – there are few crisp, straight lines in nature! But if you’d rather have a straighter line, I’ve described a technique for achieving one in my squishy ice pop pattern.
- Change color to light green
- 19th & 20th rounds: Sc all the way round.
- Change color to dark green.
- 21st – 23rd rounds: Sc all the way round.
- 24th round: 3 dec, sc 8, 6 dec, 8 sc, 3 dec (28 sts)
- 25th round: 3 dec, sc 2, 6 dec, 2 sc, 3 dec (16 sts)
- Put a stitch marker into the loop on your hook, and cut your yarn leaving a 24 inch tail.
Checking the tension of your seed stitches
Now’s a good time to check the tension of the stitches containing seeds. If they’re a bit too tight on the right side, tuck your darning needle underneath the the legs and give them a little tug outwards. And if they’re a bit loose on the right side, give the floats on the inside a little tug with your fingers.
Adding the eyes
Now spread the watermelon out flat in front of you, with the color changes at the back. Position the eyes 6 stitches apart, between rows 10 and 11. They should fall neatly between the seeds. Press the backs on firmly.
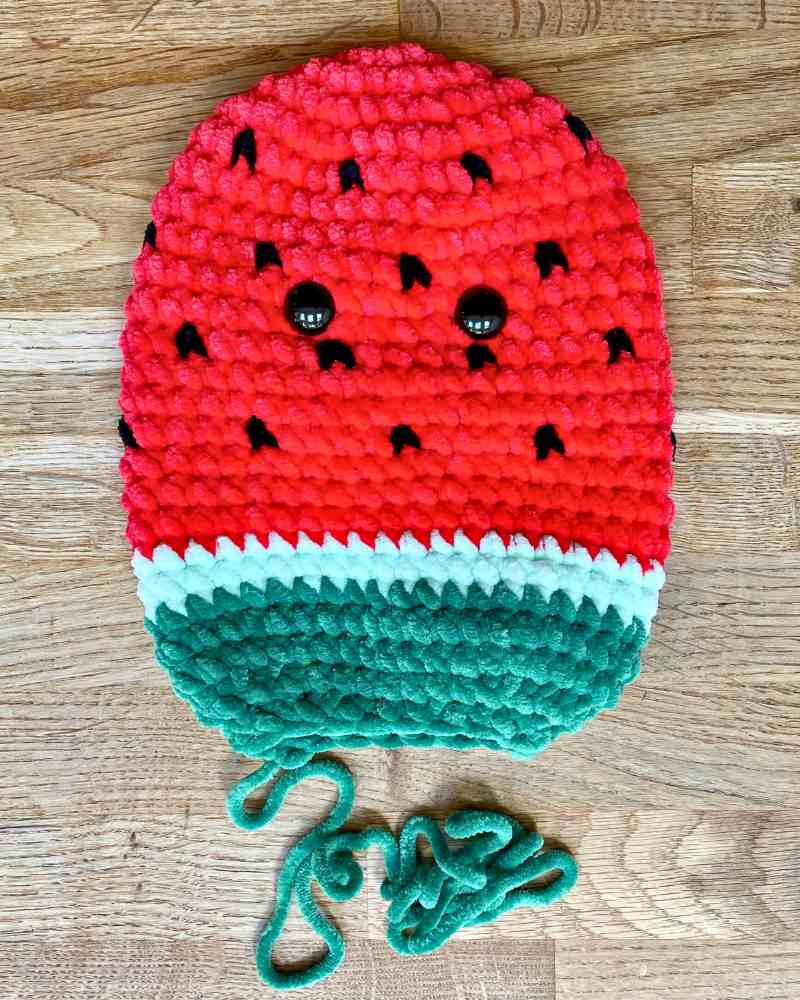
Stuffing and closing the body
Fill the body firmly with toy stuffing. It always squashes down more than you expect, but don’t add so much it stretches the stitches. Using the yarn tail, make one more round.
- 26th round: 8 dec, 1 sl st (8 sts)
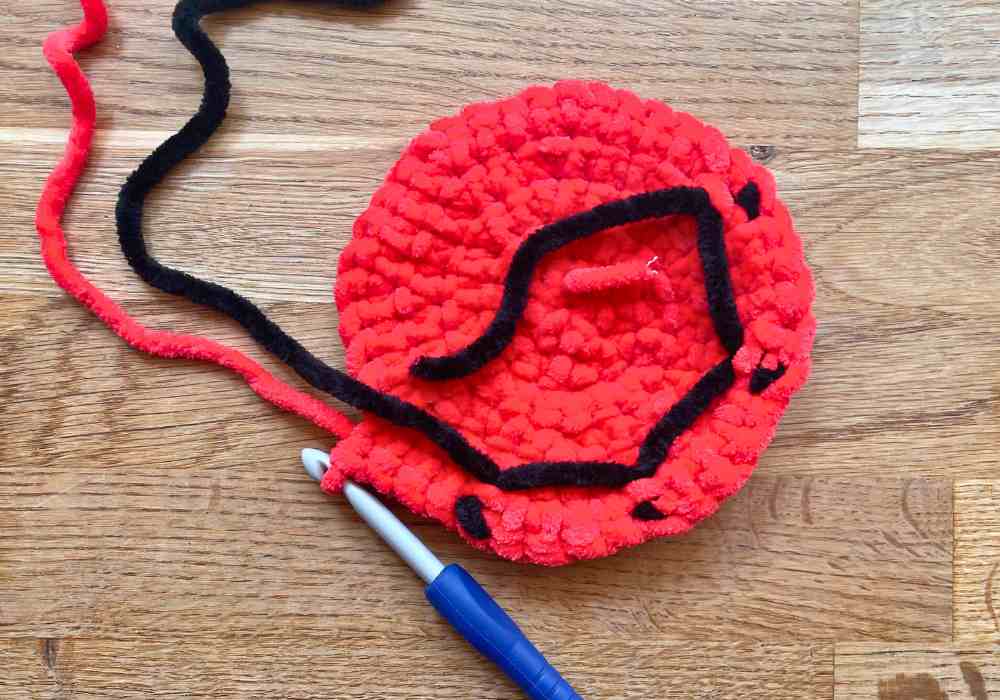
Poke in a little more stuffing if it will fit, and close the hole with mattress stitch through the front loops only of the stitches. Mattress stitch is a great invisible join for crochet, but if you haven’t used it before, here’s where the stitches go:
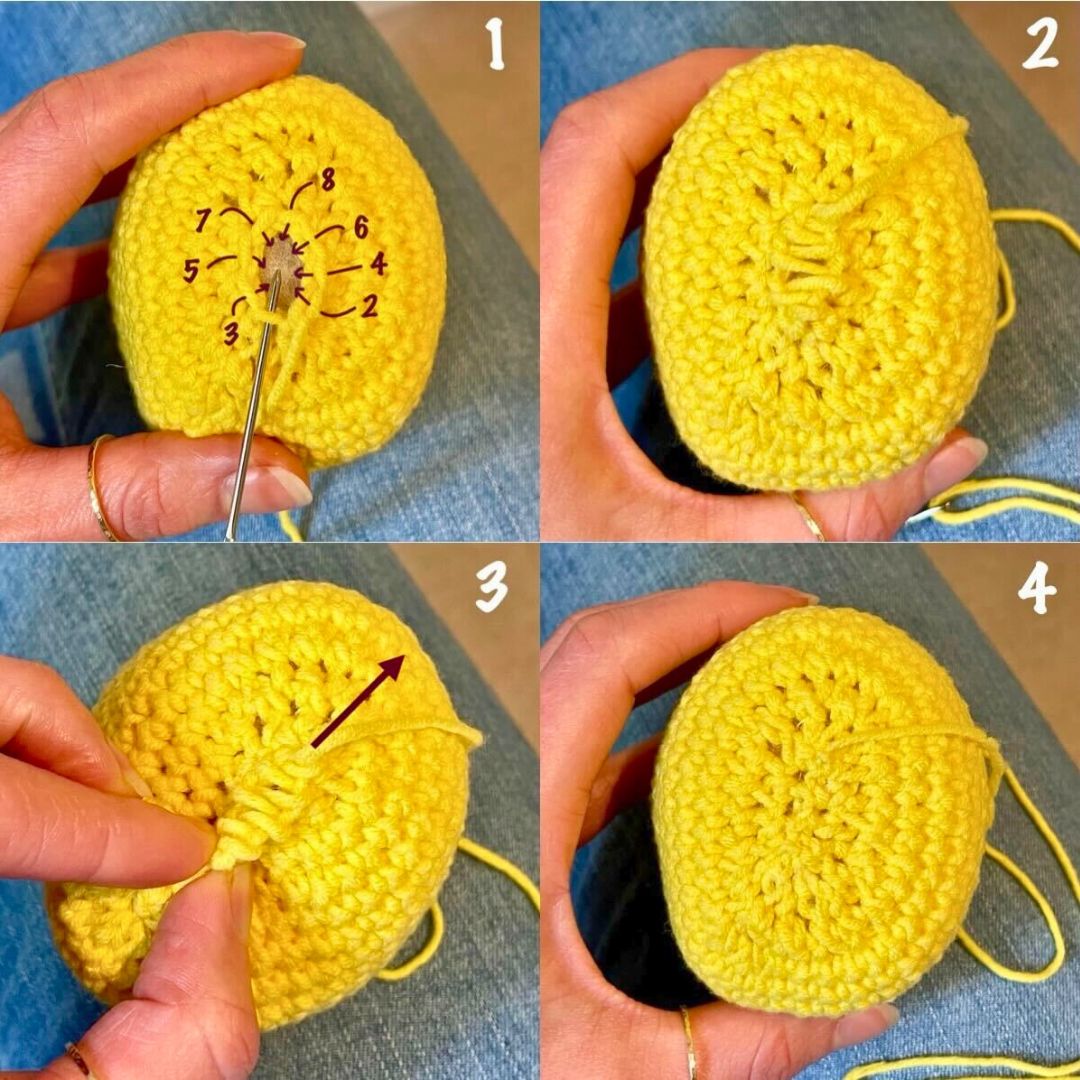
Make them loosely at first so you can easily see where to put them all, then either tighten them one at a time, or pinch the beginning of the seam and pull the yarn tail in the other direction to zip it right up. Then tie off the yarn, and poke the tail inside the body.
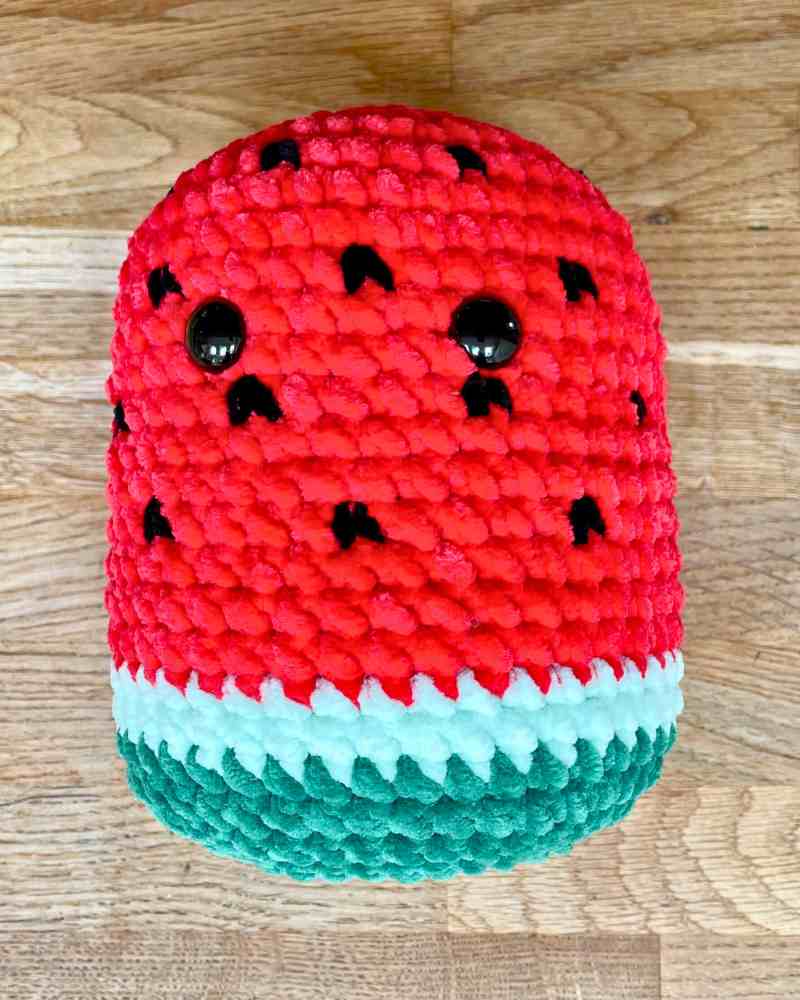
Adding a smile
There’s just one step left to go – adding a winsome smile. Embroider the mouth using a darning needle and your scrap of brown yarn. I like to push the needle through from the back of the body to start, and go back out through the same spot at the back of the body to finish. Then you can just knot the ends together and poke them inside your squishy, where the stuffing will anchor them in place. I’ve included some photos to illustrate that approach in my squishy bubble tea pattern.
Finished!
I hope you enjoyed following this pattern as much as I enjoyed developing it. I think it really embodies everything that’s cute, kitsch, kawaii, and fun. She’s definitely a favorite with my biggest squishy critic – my 10 year old daughter. If you make your own, I’d love you to tag Lucy on Facebook or Instagram so I can see how it turns out. Happy crocheting!
*The products linked in this pattern were carefully selected by Lucy Kate Crochet. If you decide to purchase using the links provided, we may earn a small commission on that sale. This is at no extra cost to you.