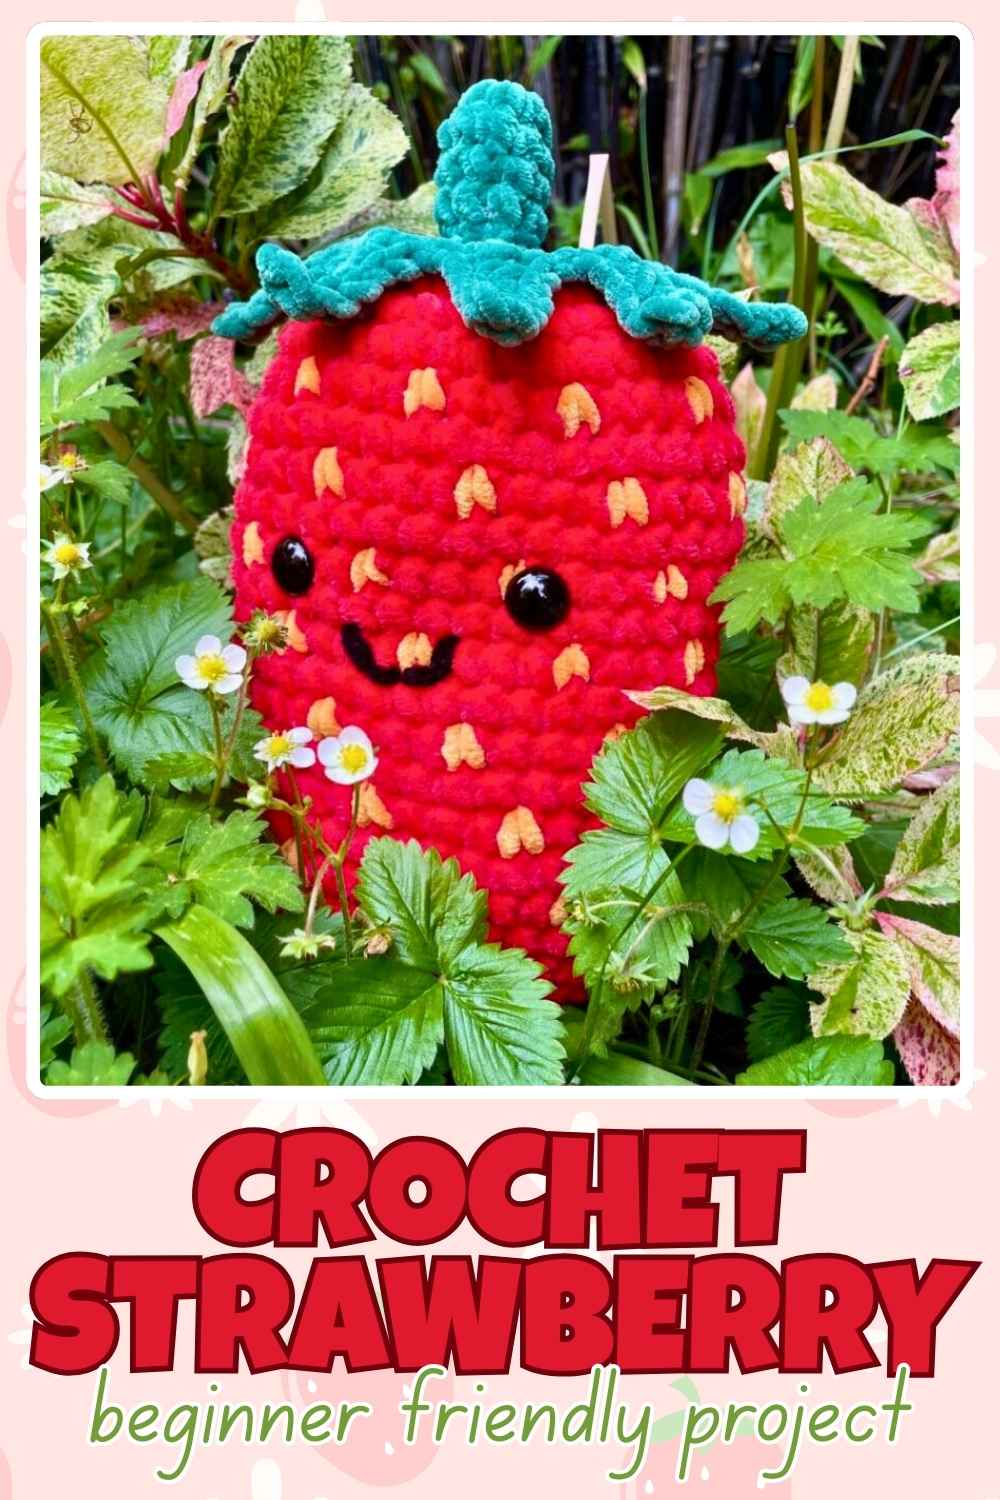
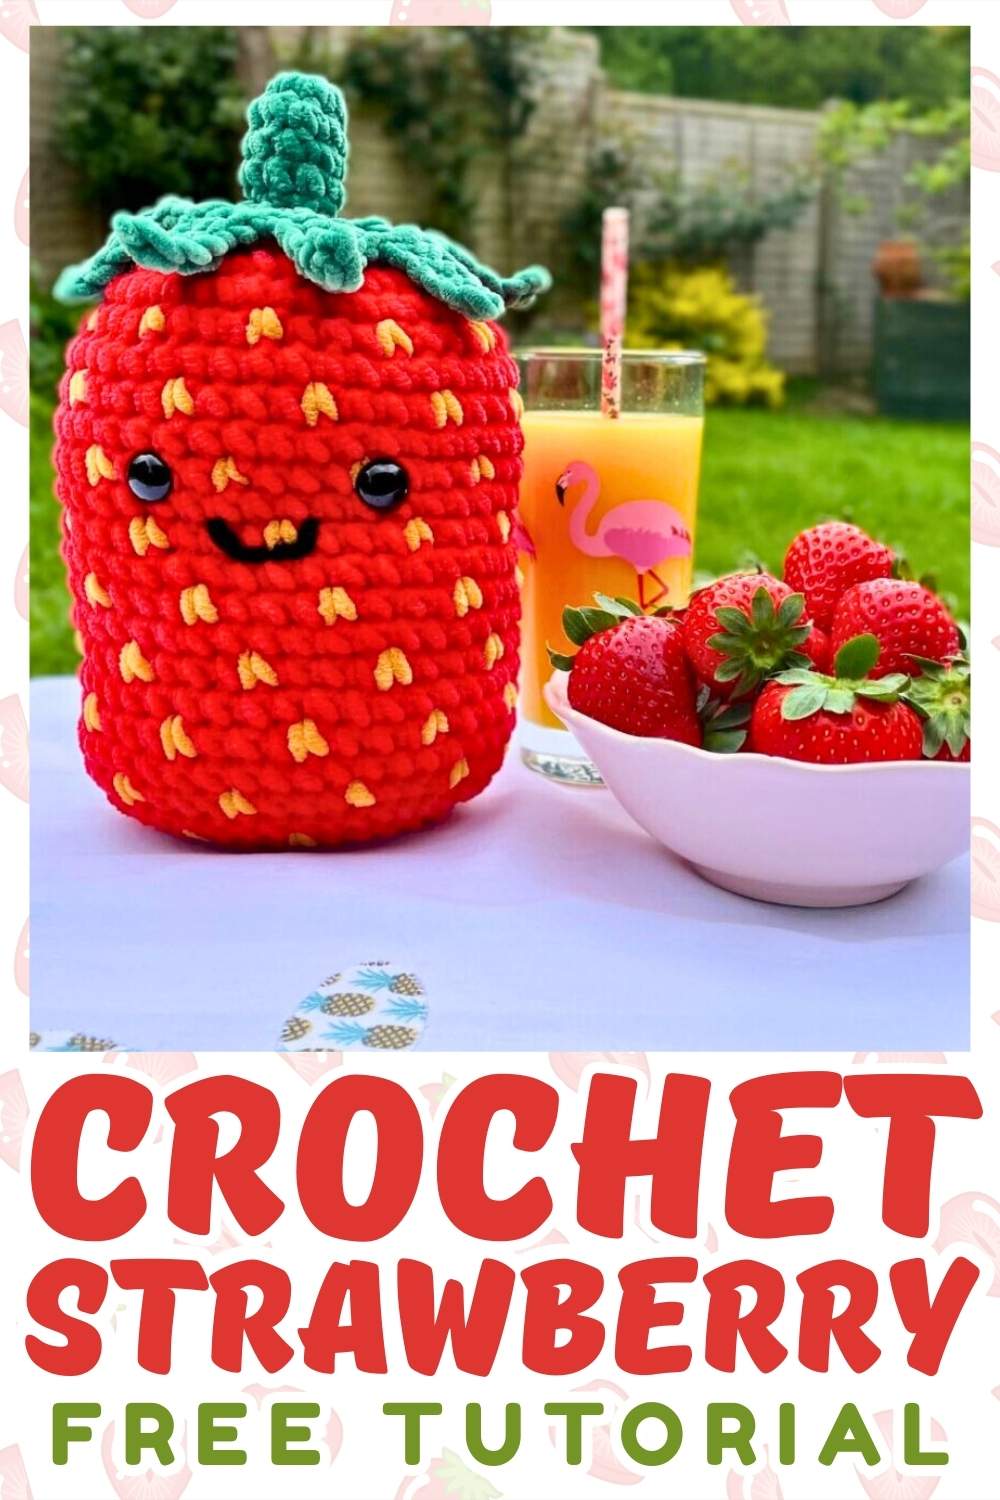
Squishy Crochet Strawberry Pattern
Hi there, and welcome to my completely free squishy crochet strawberry pattern! It’s spring time where I am right now, and I’m definitely channeling the sunshine vibes into my crochet projects.
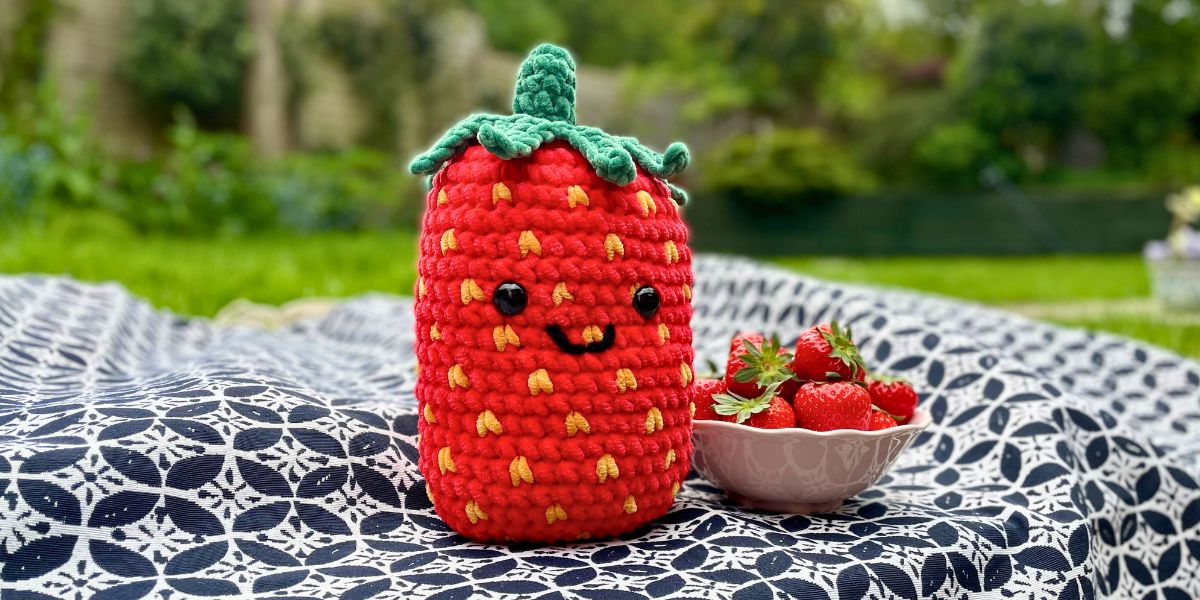
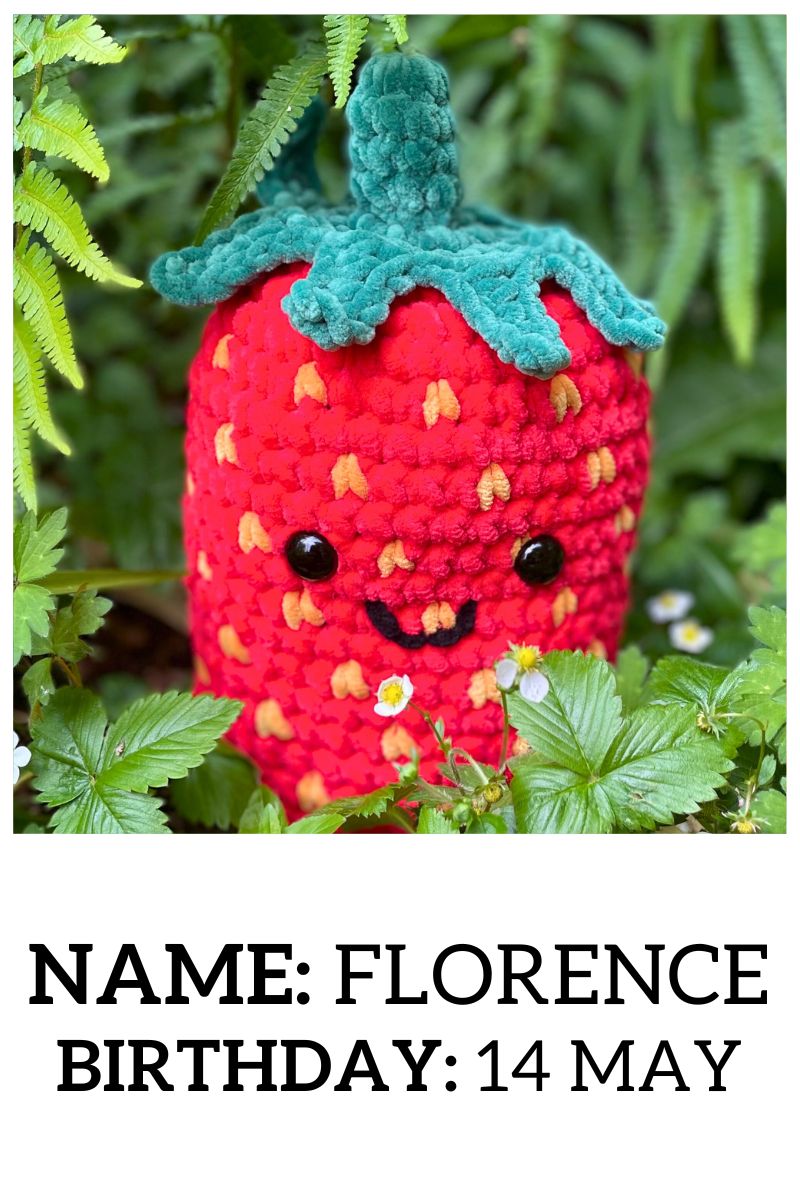
Florence the strawberry follows on from Fabian the ice pop, and she’s named after the Florence strawberries I have growing on my plot at our local community garden. I think she also embodies everything cute and quirky which makes a brilliant amigurumi project. I really don’t think I could be happier with how she turned out. So if you’d also like a strawberry for all seasons, why not make one too? It’s dead simple, and I’ll take you through it step by illustrated step.

Materials
Florence is made with super bulky chenille yarn. I use these a lot for squishy patterns because I make them with my plushie-obsessed daughter in mind, and chenille yarns are really tactile and appealing to children. But you can crochet your own strawberry with any weight or fiber you like. A strawberry made with DK yarn would be a sweet ornament to give to someone who loves gardening, for example. And a strawberry made from durable, bulky cotton yarn could be a kitsch door stop, if you add a bag of dry rice with the stuffing to give it some weight.
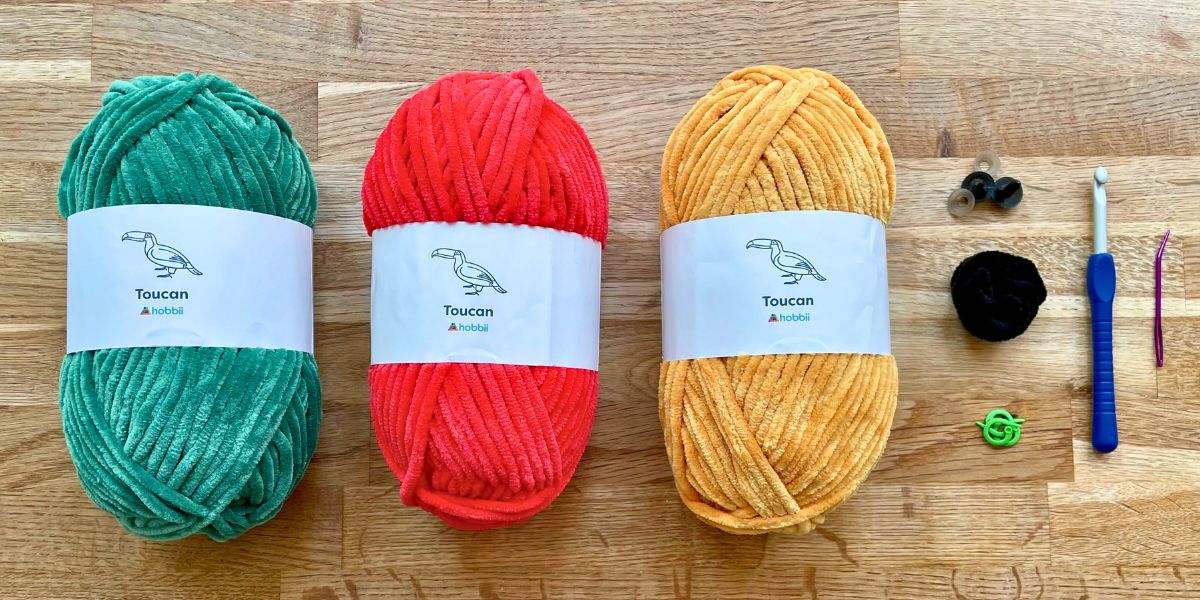
Here’s what you’ll need to get started:
- Yarn in red, yellow and green. These should all be the same weight. I’m using Hobbii’s Toucan yarn for the first time, in the shades red, mustard, and sage. The colors are spot on, but honestly my first impression of this yarn is that I’m not sure how well it’s going to hold it’s shape.
- A small quantity of black yarn for the mouth. I’m using King Cole’s Yummy yarn*, which is the same weight as Toucan. But you could double up a finer yarn from your stash, to get roughly the right weight here, and it doesn’t need to match exactly.
- Safety eyes*. Mine are ⅝” (16mm), but I’ll include notes about sizing up or down, below.
- Crochet hook. Unless you naturally crochet tightly, it’s a good idea to go one size smaller than your yarn calls for – it prevents the stuffing from peeping between the stitches later. So, I’m using a size J (6mm) hook.
- Stitch markers (yarn scraps will do just fine).
- Darning needle (the bent tip on mine is helpful, but not essential).
- Hi-loft polyester toy stuffing* (eg. Polyfil)
- Scissors
Pattern notes
This pattern uses standard U.S. crochet terms. The ones you’ll need to be familiar with are:
Ch chain
Sl st slip stitch
Sc single crochet
Hdc half double crochet
Dc double crochet
Inc increase (make two single crochet in the same stitch)
Dec decrease
For amigurumi projects I like to use an invisible decrease: insert the hook through the front loops only of the next two stitches (fig. 1), yarn over and draw through two loops, yarn over and draw through both remaining loops (fig. 2).

The bottom of the strawberry decreases from 40 to 8 stitches over just three rows so it can stand up unaided, and the invisible decrease really helps prevent that rapid change from looking gappy.
Sizing
Florence is 7” tall, not including her stalk. She is, arguably, a bit long for a strawberry. But it’s a simple truth of plush toys that longer shapes are more satisfying to cuddle than small round ones! I’ve included pattern notes for making your strawberry a bit shorter and more in proportion with an actual strawberry I you want though.
If you use a different yarn, here’s roughly what height you can expect your strawberry to be:
- DK yarn – 4” tall
- Worsted yarn – 5” tall
- Bulky yarn – 6” tall
For DK and worsted yarns, use ½” (12mm) safety eyes.
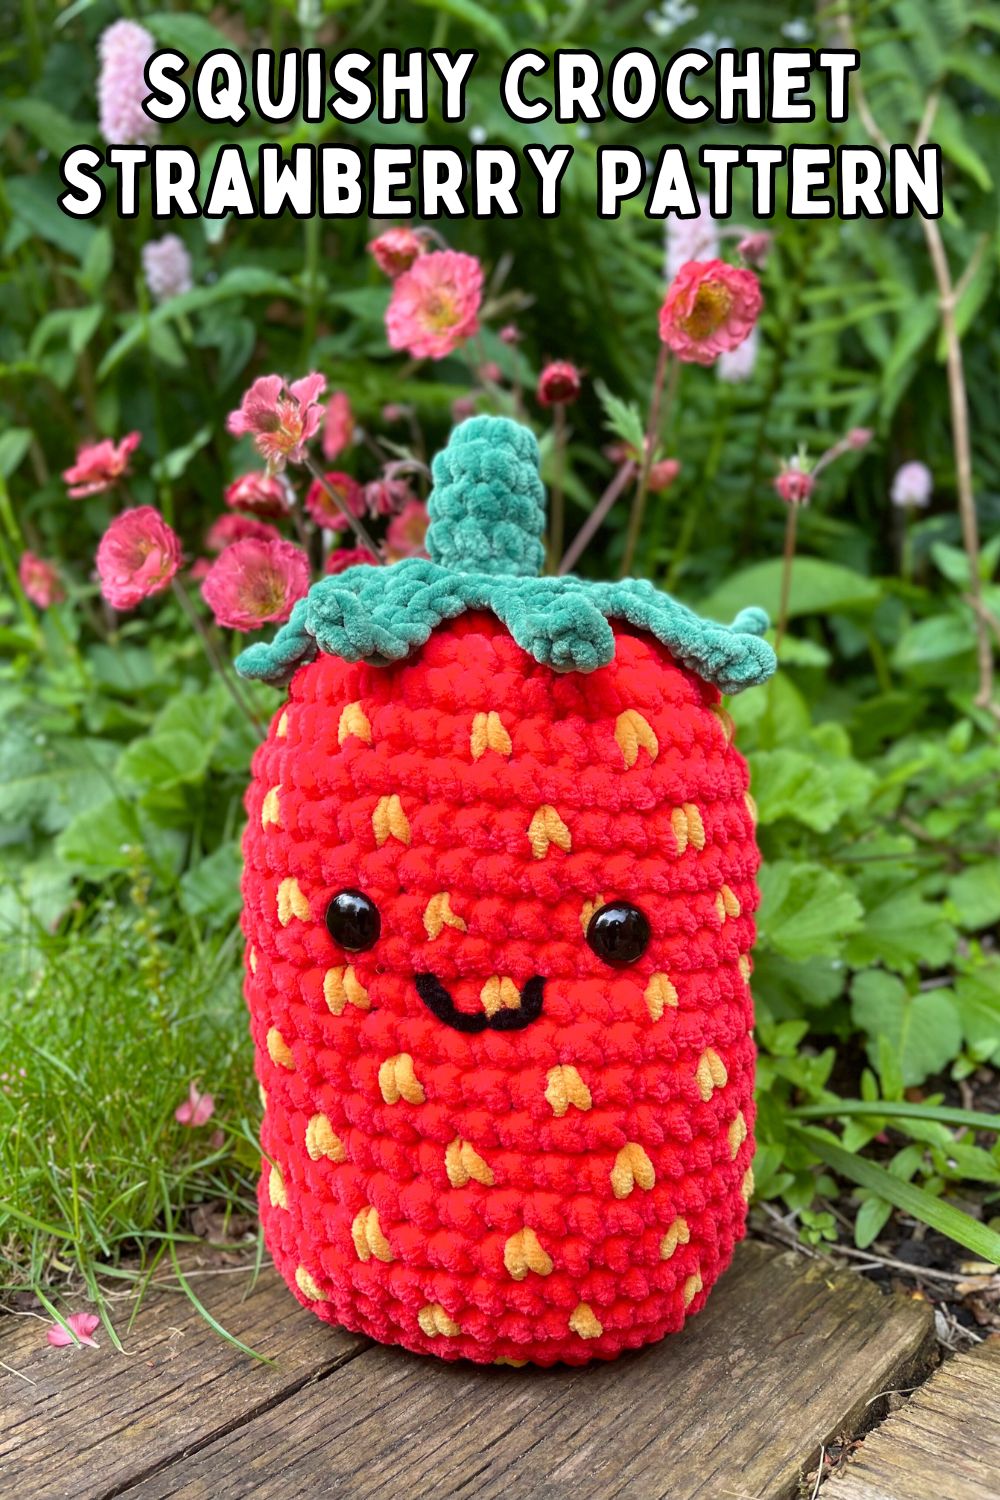
Squishy crochet strawberry pattern
To make your own strawberry, the body, stalk and calyx (that’s the leafy bits!) are each made separately, then sewn together.
The body
Starting with your green yarn:
- Magic circle or ch 4 and sl st into the 1st ch to make a loop. I prefer a magic circle with smooth yarns, and a 4-chain loop for fluffy yarns like this one.
- 1st round: Sc 8 into the center of the magic circle or 4-ch loop. (8 sts)
- 2nd round: Inc 8. (16 sts)
- 3rd round: *1 sc, inc* 8 times (24 sts)
- Cut the green yarn leaving a 3” tail, and switch to the red yarn.
- 4th round: *2 sc, inc* 8 times (32 sts)
- 5th round: *3 sc, inc* 8 times (40 sts)
- 6th round: Sc all the way round
Pause here, and gently knot the end of the green yarn and the start of the red yarn together, to secure them. Then it’s time to introduce one of your strawberry’s defining features!

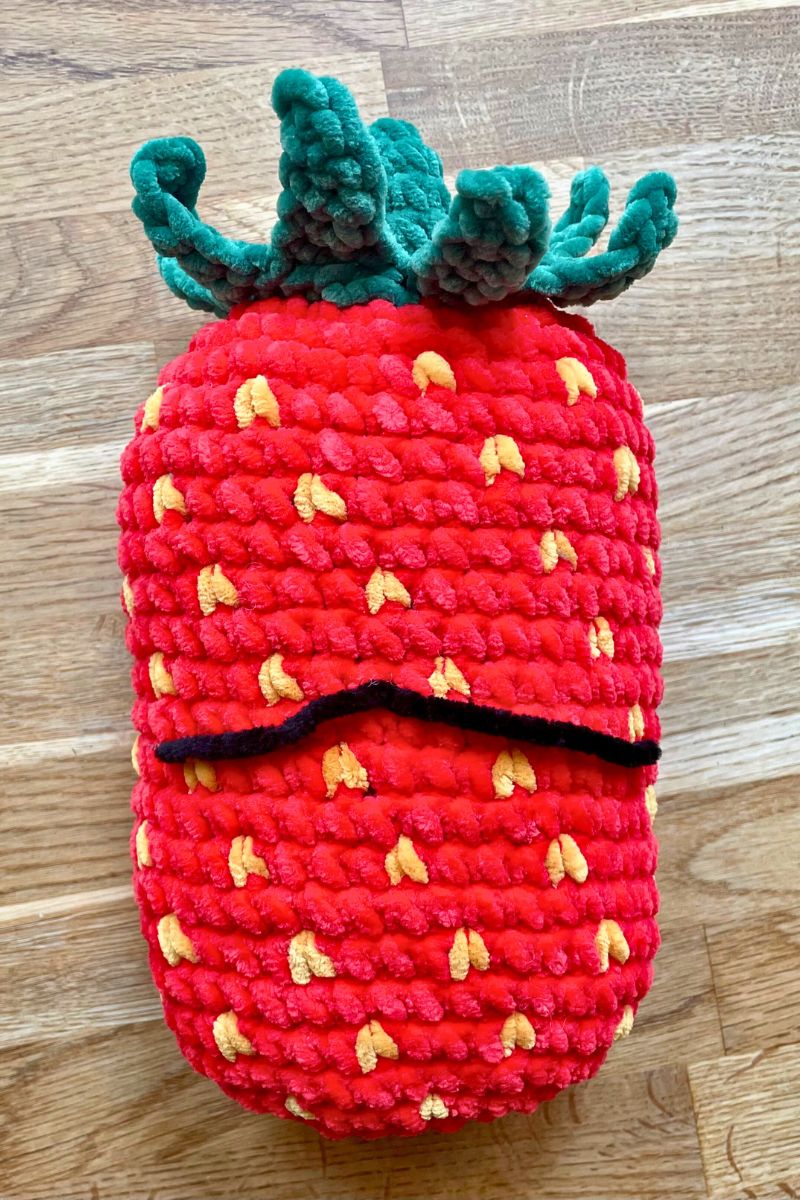
Adding in the seeds
Round 7 onwards is single crocheted all the way around, and it’s time to start adding in the seeds. To do this, we’re going to use the yellow yarn to make the legs of every fourth stitch, and carry the yarn inside the body from one stitch to the next. Don’t worry if that isn’t a skill you’ve tried before, it’s really simple and I’ve got photos to help.
The first stitch of round 7 is going to be one with yellow legs, and here’s how it’s made:
- Insert your hook into the next stitch, and draw through a loop of the yellow yarn. You’ll have one yellow loop and one red loop on your hook.
- Loop the red yarn over the hook, and draw it through both the yellow and red loops.
- The stitch is complete and you’re left with one red loop on the hook.
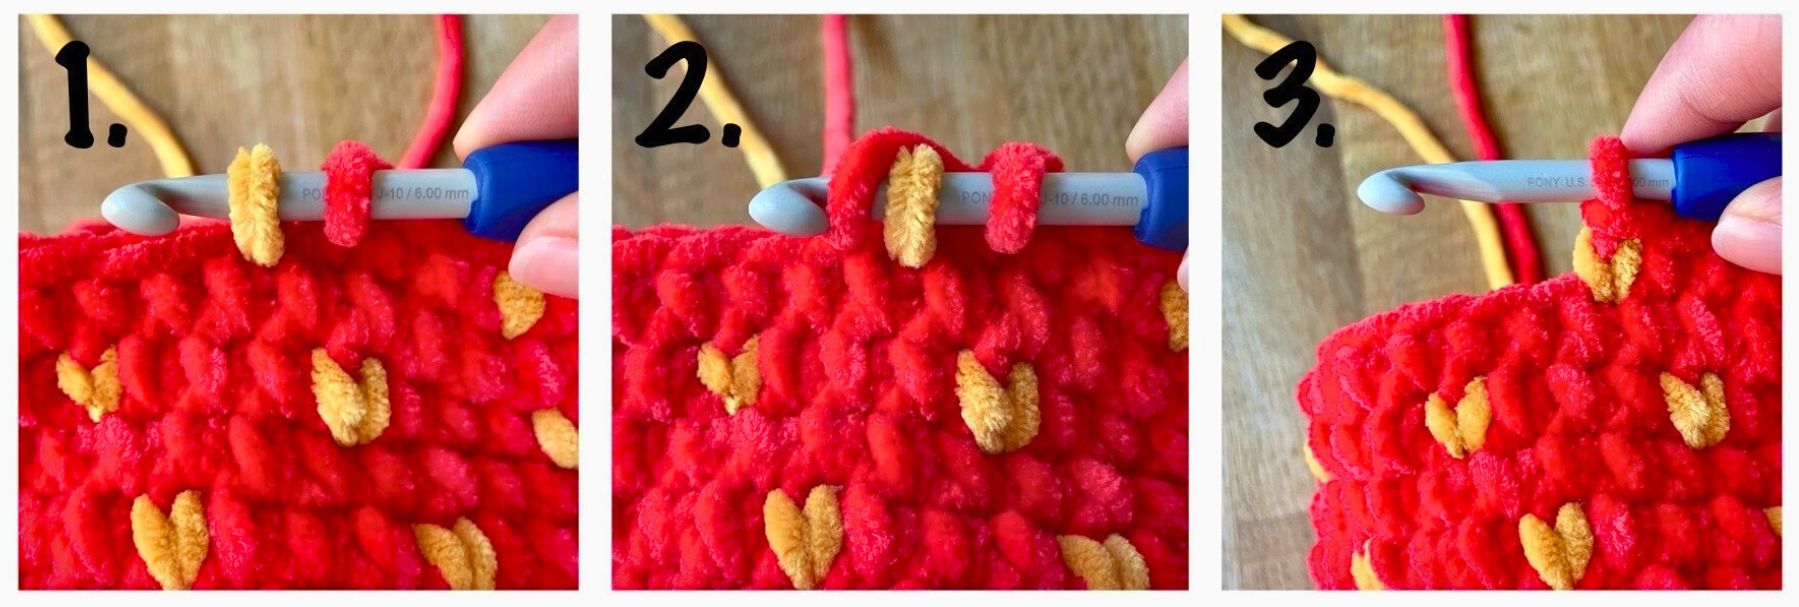
Another way of looking at it is that when you make a single crochet, there are two times when you bring the yarn over the hook. Use yellow the first time, and red the second time.
Now keep the yellow yarn at the back of your work (or the inside of your toy – however you like to think of it) and make three single crochets with the red yarn. Unlike in tapestry crochet, you don’t need to worry about trapping the yellow yarn inside those stitches.
Finishing the round
Keep repeating this pattern for the rest of the round. The pattern is a four stitch repeat (one stitch with yellow legs, three red stitches), and the round has 40 stitches. So you should make 10 seeds in total, and finish with three red stitches. Take care to carry the yellow yarn from one stitch to the next without pulling it too tightly, or wrapping it round the red yarn. Turning your work inside out is a good way to make sure that you’ve left enough slack.

Those sections of yellow yarn leading from one stitch to the next are called floats, and it’s better for them to be a little too long than too short. If they’re too short, it will distort the shape of your strawberry when you add the stuffing.
Spacing the rest of the seeds
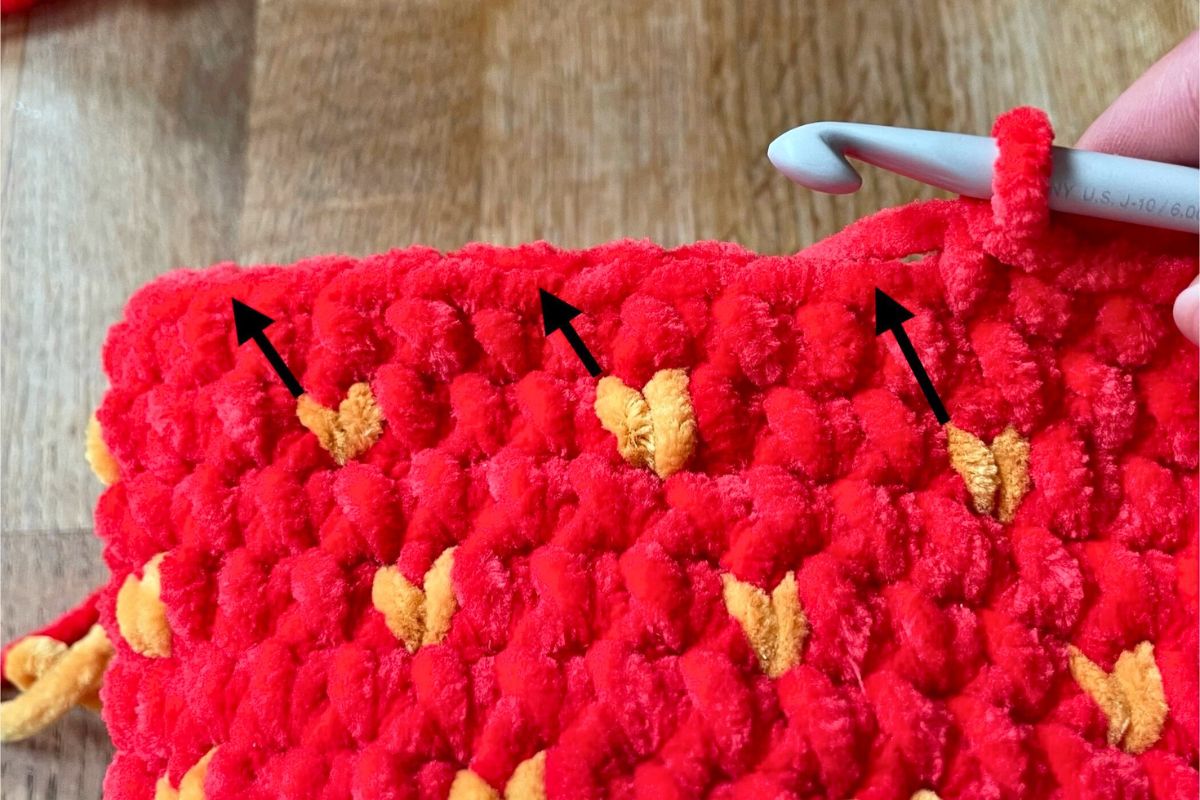
We’re only going to add seeds on alternate rows, so for round 8 single crochet all the way around in red. Then from round 9 onwards, there’s a really simple trick for knowing when to add another seed.
See how each seed is a little V-shape? And from the top of the left arm of the V, another stitch keeps going at the same angle. That stitch points at the place where you should make the next seed. It won’t be there when you finish the row, so you’ll know it’s time to make another red row without seeds. And as soon as it reappears, start adding seeds again. Easy!
Getting the desired length for the body
Follow the pattern above until you’ve added 8 rows of seeds, finishing on a row of red stitches. For a shorter strawberry, more in keeping with the proportions of strawberries in nature, make 6 rows of seeds and finish on a row of red stitches. Now spread the body out flat in front of you, with the green-red color join facing upwards and in the center.
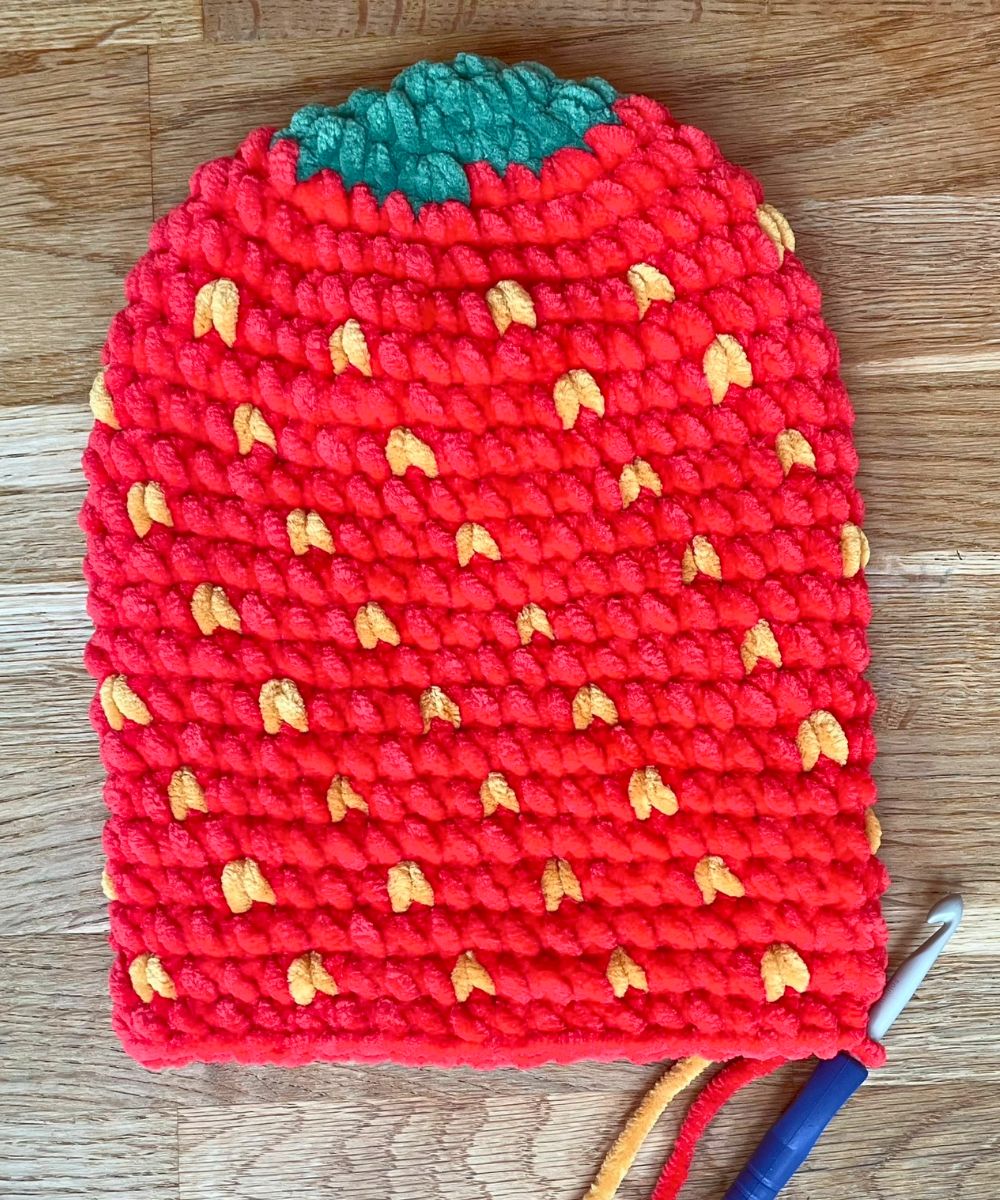
Here’s mine, and you can see that the last seed stitch I made (bottom right, nearest the handle of my hook) is quite far from lining up with the red-green color change at the top of the body. That’s because the pattern for staggering the seeds adds an extra stitch into every other row, and gradually shifts the starting point of the seed rows. If you’re making a shorter strawberry the effect won’t be as pronounced, but it will still be there.
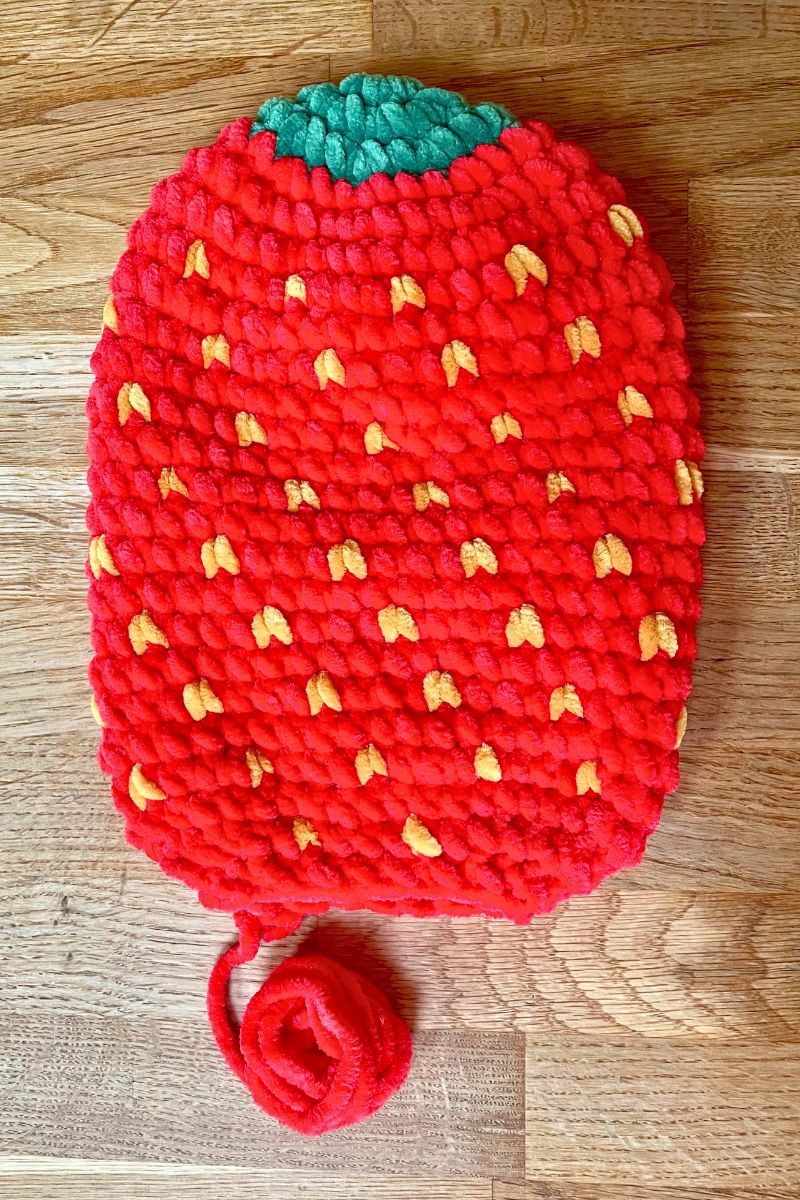
Wherever your last row of red stitches finishes, add more stitches until you can spread your work out like mine, with the red-green color change in the center, and your most recent stitch right in the bottom right hand corner (of left hand corner, if you crochet left handed).
Closing the body
The next step is to start closing the strawberry’s body. But first, I found it improved the appearance of my seed stitches to reach inside the body and gently rake my fingers across all those yellow floats. It just pulled the stitches a little tighter and more uniform on the outside. You might not need to do this – perhaps gently tug one or two loops, and see what effect it has before you pull on them all!

- 1st closing round: 3 dec, sc 8, 6 dec, 8 sc, 3 dec (28 sts). Make the decreases in red yarn only, but add yellow seeds into the single crochets, where they continue the pattern correctly (using the relationship to the previous seeds illustrated above). At the end of this round, cut the yellow yarn and tie it off.
- 2nd closing round: Using the red yarn only 3 dec, sc 2, 6 dec, 2 sc, 3 dec (16 sts).
- Put a stitch marker into the loop on your hook, and cut your yarn leaving a 24 inch tail.
- Lay the body out flat with the red-green color join at the back, and the two pair of sc from the previous row (highlighted in bold above) lined up.
- Insert the safety eyes into the body 11 rows down and 7 stitches apart, and push the backs on securely.
- Stuff the strawberry firmly, but taking care to avoid snagging the yellow floats as you push it in.
- 3rd closing round: Dec 8 (8 sts).
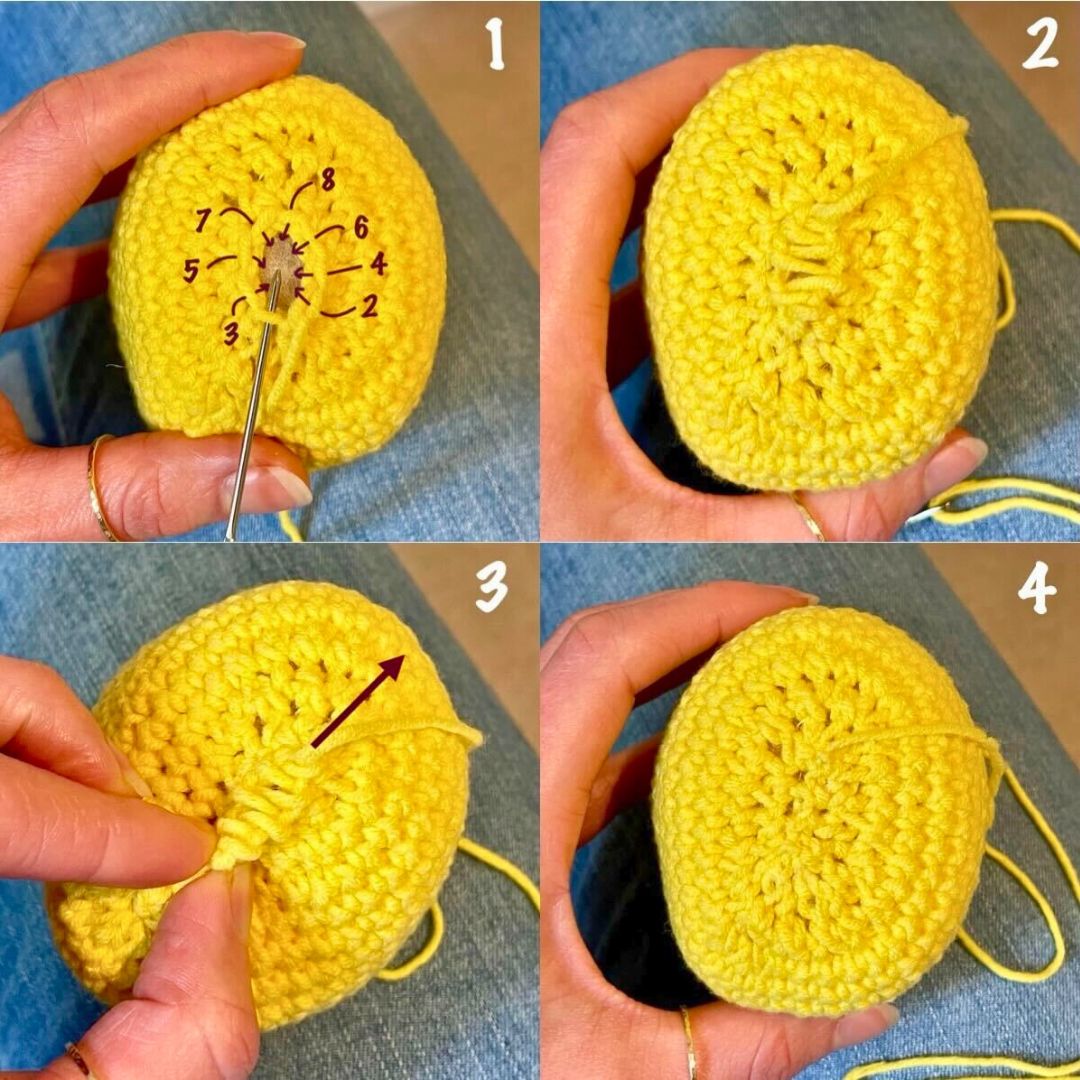
- Picture the eight remaining stitches as two rows of four running from one side of your squishy to the other, and join them with mattress stitch.
If you haven’t made a mattress stitch join before, fig. 1 shows where to make each stitch – the needle is already in the first stitch. Make the stitches loosely, then pinch the start of your join firmly and pull the yarn tail in the opposite direction. The hole should zip right up! Tie off the yarn, trim the tail, and poke it inside the body.
The calyx
Did you know that the ring of tiny leaves around the top of the strawberry is all called the calyx, and each individual leaf is called a sepal? I didn’t until I started writing up this pattern! Florence’s calyx is made in one continuous ribbon, which is sewn onto the body when it’s finished.
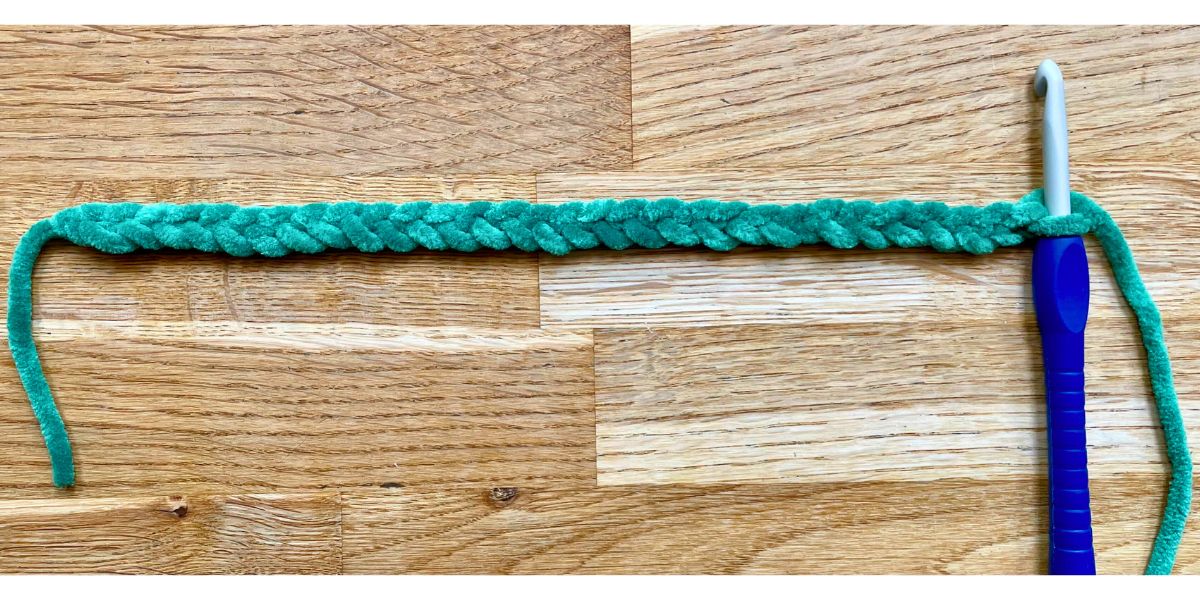
Using your green yarn, make a foundation chain of 30. The first 24 will be the bottom edge of the calyx, and the 6 closest to your hook are going to form one edge of the first sepal. That will be important later!
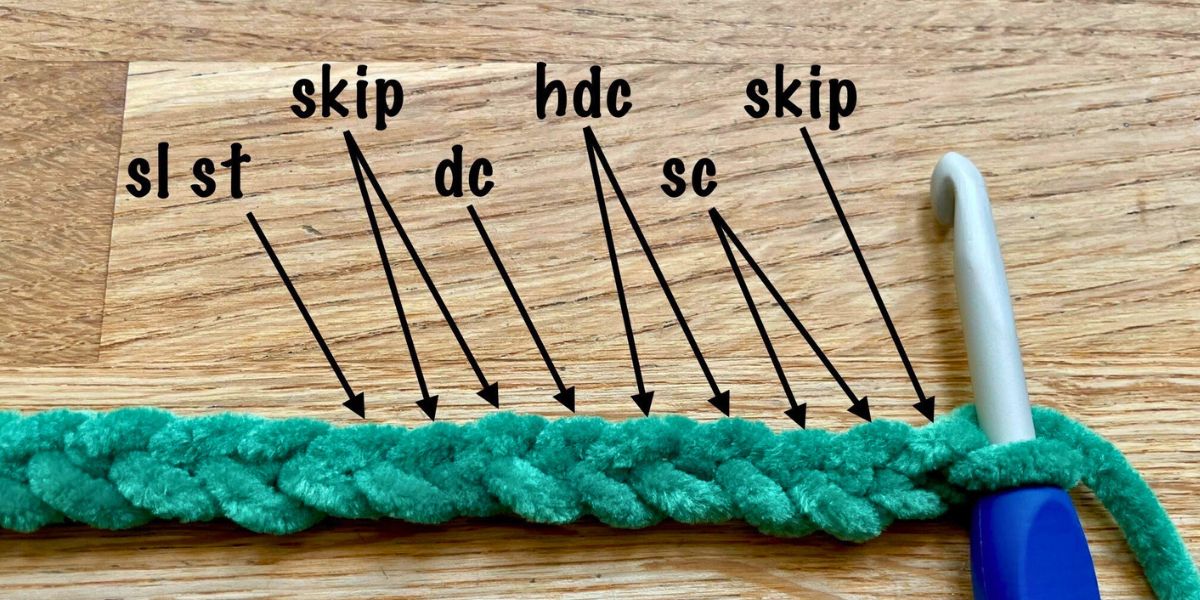
Skip the first chain from the hook, then 2 sc, 2 hdc, dc. Skip two more chains, and sl st into the 3rd chain along to anchor the sepal onto the foundation chain.
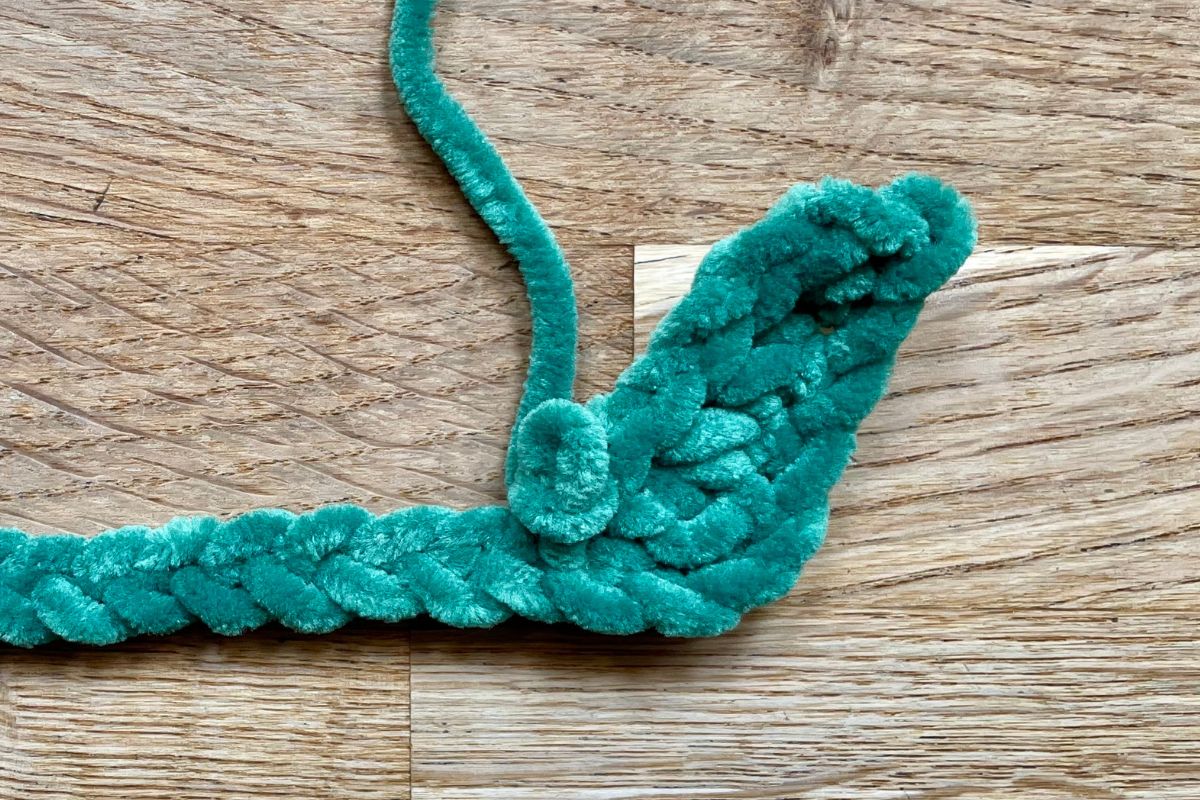
Here’s how that should look. I’ve wiggled my hook free to give you a proper view, but you don’t need to remove your hook!
To make the next sepal, ch 6, then repeat the same sequence: skip the first chain from the hook, then 2 sc, 2 hdc, dc. Skip two more stitches on the foundation chain, and sl st into the 3rd chain to anchor the new sepal. Keep adding sepals until you reach the end of the foundation chain – you should end up with eight.
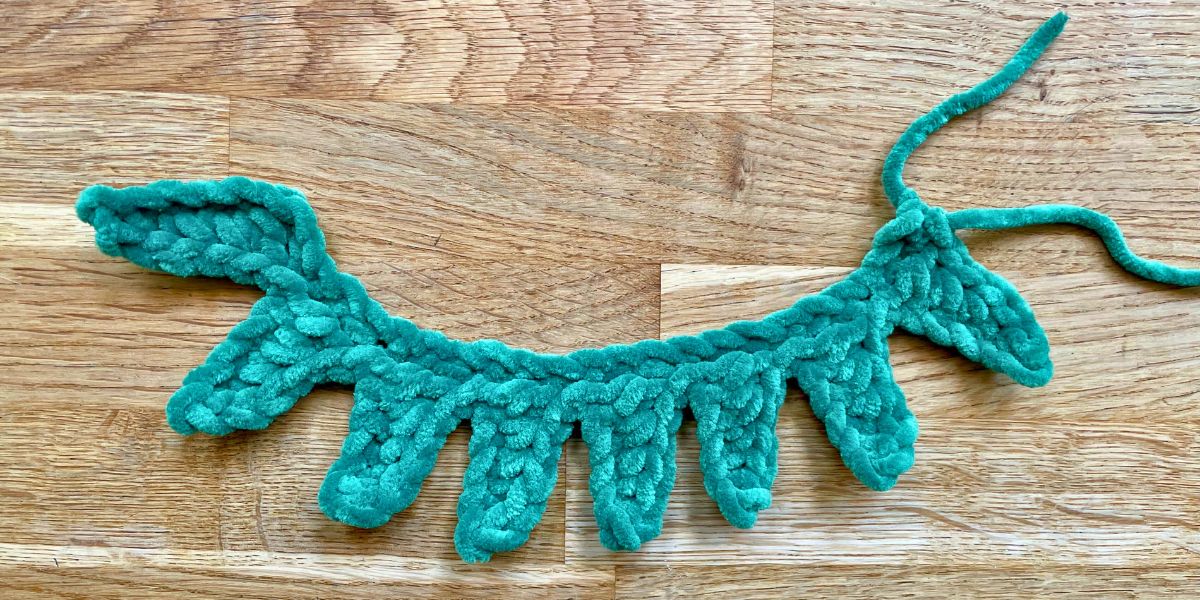
After the last slip stitch, cut your yarn leaving a long tail for sewing, and pull the tail all the way through the slip stitch. Keep the the short yarn tail at the beginning of the foundation chain for now as well, and thread the long tail onto a darning needle.
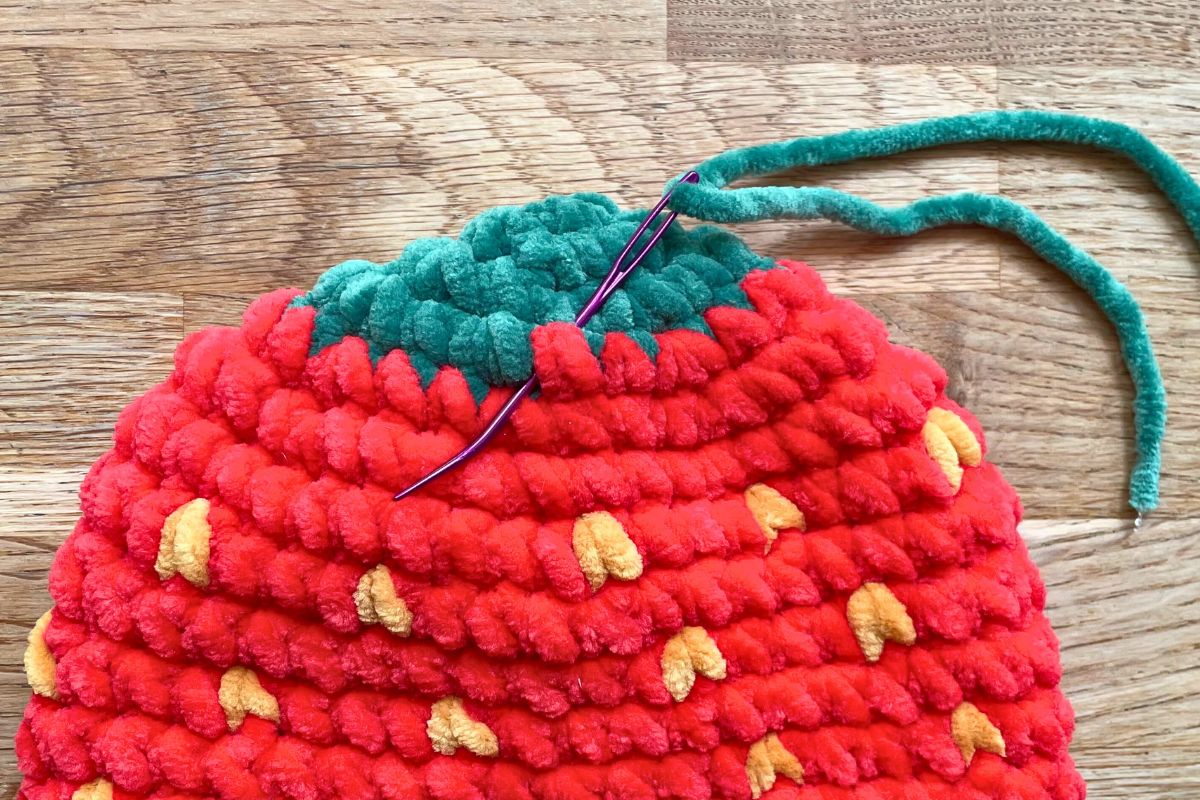
Joining the calyx to the body
Sew the calyx onto the body at the juncture between the green and red yarn. I like to start where the color change is, with a stitch that goes like this:
Then tuck your needle downwards through the next stitch on the calyx (left, below), and sideways underneath the next stitch on the body (right, below).
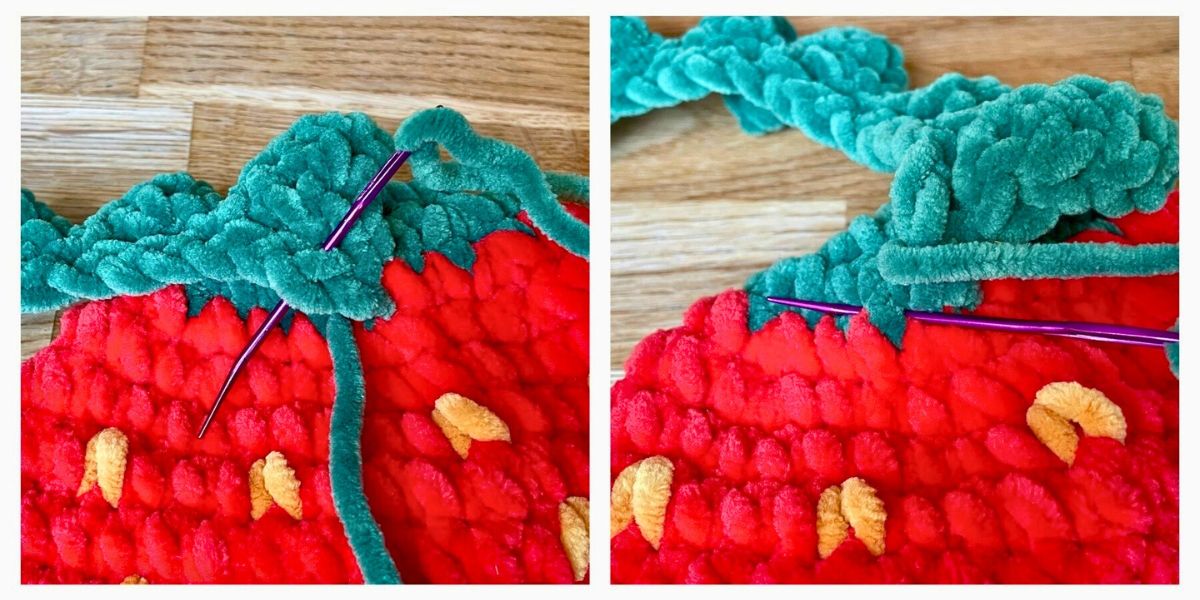
Since your calyx ribbon is 24 stitches long, and you’re joining it around the edge of round 3, which is 24 stitches round, they should line right up. When you get back to the start, tie the two yarn tails together, trim them to a couple of inches long, and poke them inside the body.
TIP: If the calyx doesn’t lie flat, steam it gently with an iron – but be careful not to melt the fibers!
It’s really starting to come together now!
Adding the smile
I always add the mouth to my amigurumi projects near the end. Partly because it’s a bit nerve-wracking, and partly because I love seeing how it brings the whole project to life. My squishy strawberry’s smile follows the grid pattern in her stitches, and it’s just four stitches long:

Start by threading your black yarn onto a darning needle, then push it all the way through from the back of the body to the place where your first stitch is going to start. Embroider the mouth, and when you make the last stitch, push the needle all the way through to the back of the body, so the yarn comes out at the same place it went in.
Knot the two yarn tails together, trim the ends, and poke them inside the body.
The stem
Adding the stem is probably the easiest bit of the whole pattern. With your green yarn:
- Magic circle or 4-chain loop to start.
- Round 1: 8 sc into the circle or loop.
- Rounds 2 – 4: 8 sc
- Sl st once, cut the yarn with a long tail for sewing, and pull the yarn all the way through the slip stitch.
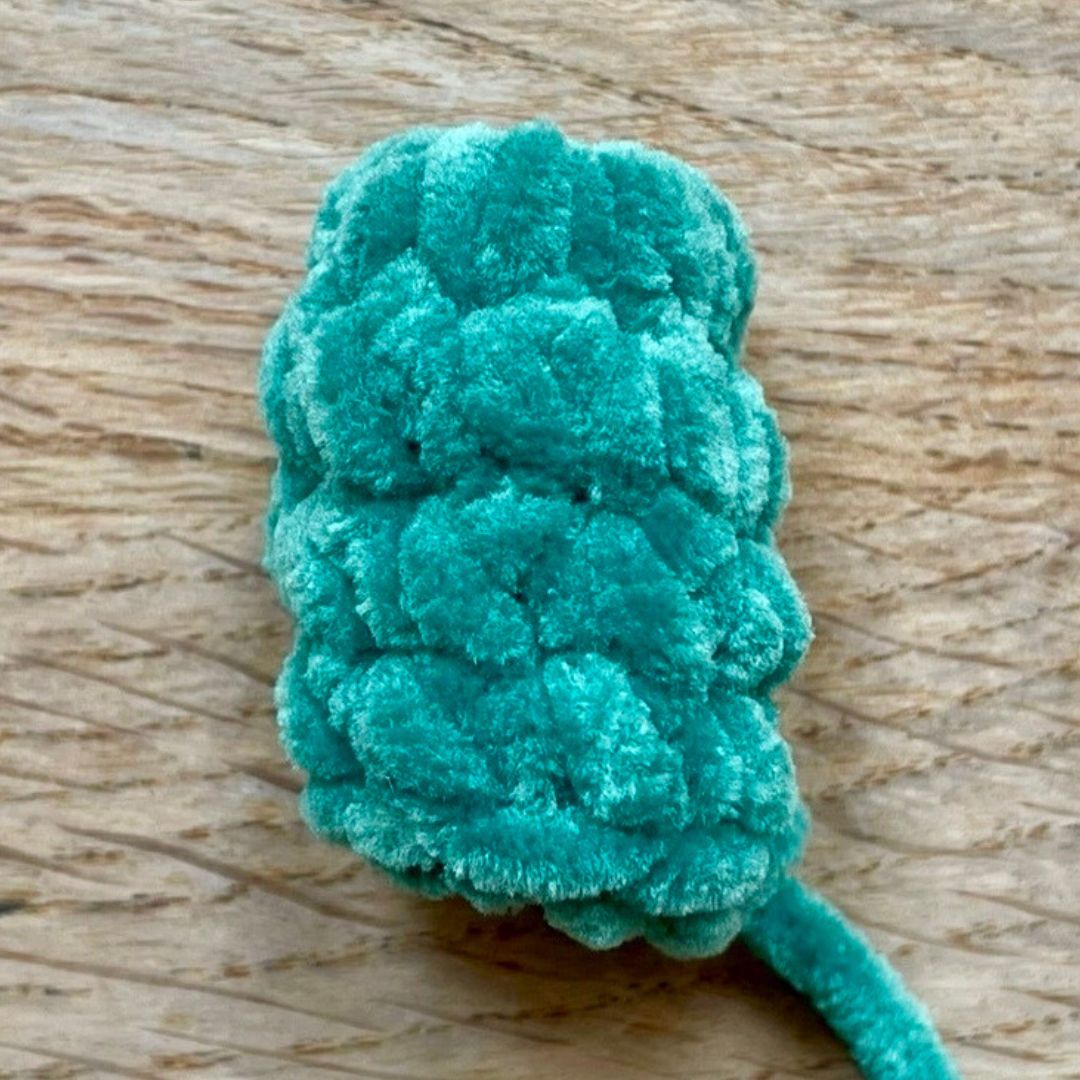
Stuff the stalk with Polyfil, and sew it onto the top of the body, following the outline of round 1 to make sure it’s central.
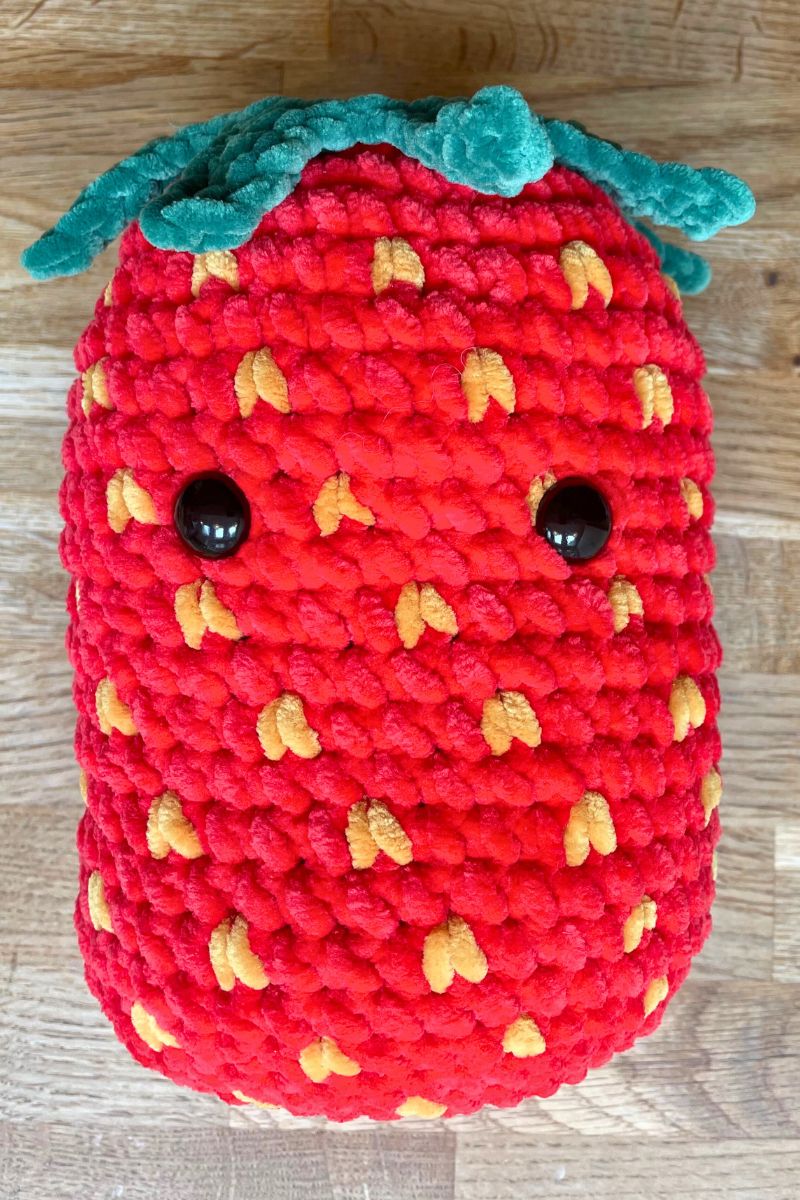
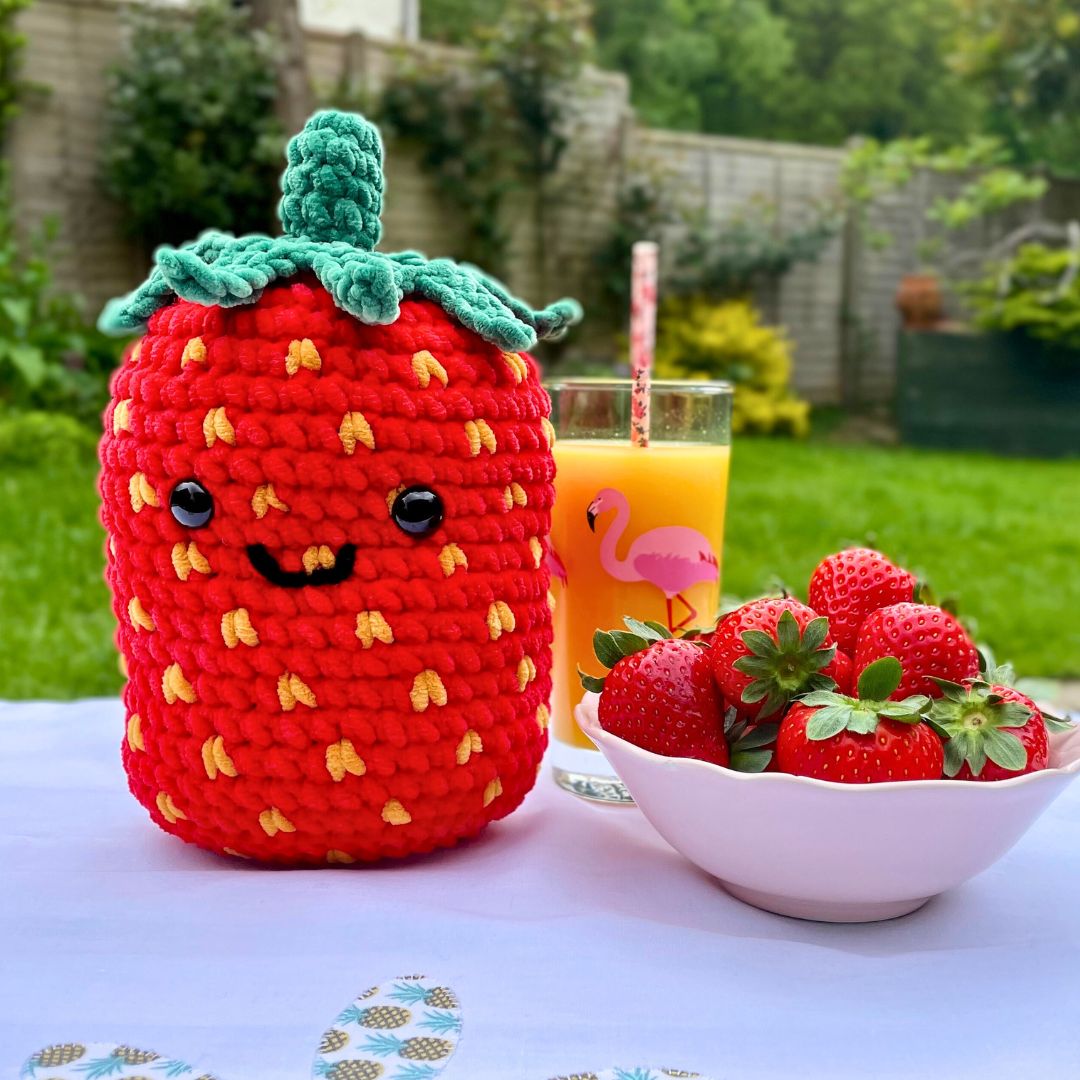
You’ve done it!
Your squishy crochet strawberry is complete! Give it a squash, then stand back and admire it.
Squishy crochet strawberry pattern – summary
Now you’ve reached the end of the pattern, I’m going to let you in on a secret. This was my first time alternating between one color and another in the same row, and carrying yarn as loose floats on the wrong side of my work. Getting the tension right always felt far too intimidating in the past, but I’ve been experimenting with fair isle knitting as well, and do you know what? It’s always worth having a go! It wasn’t as daunting as I expected after all, and you’ll never get the hang of anything until you try it. I think I need reminding of that more often!
Florence is a real cutie and I’m sure your strawberry will be too. Please show us how it looks by tagging us on Lucy’s Facebook or Instagram.
*The products linked in this pattern were carefully selected by Lucy Kate Crochet. If you decide to purchase using the links provided, we may earn a small commission on that sale. This is at no extra cost to you.


