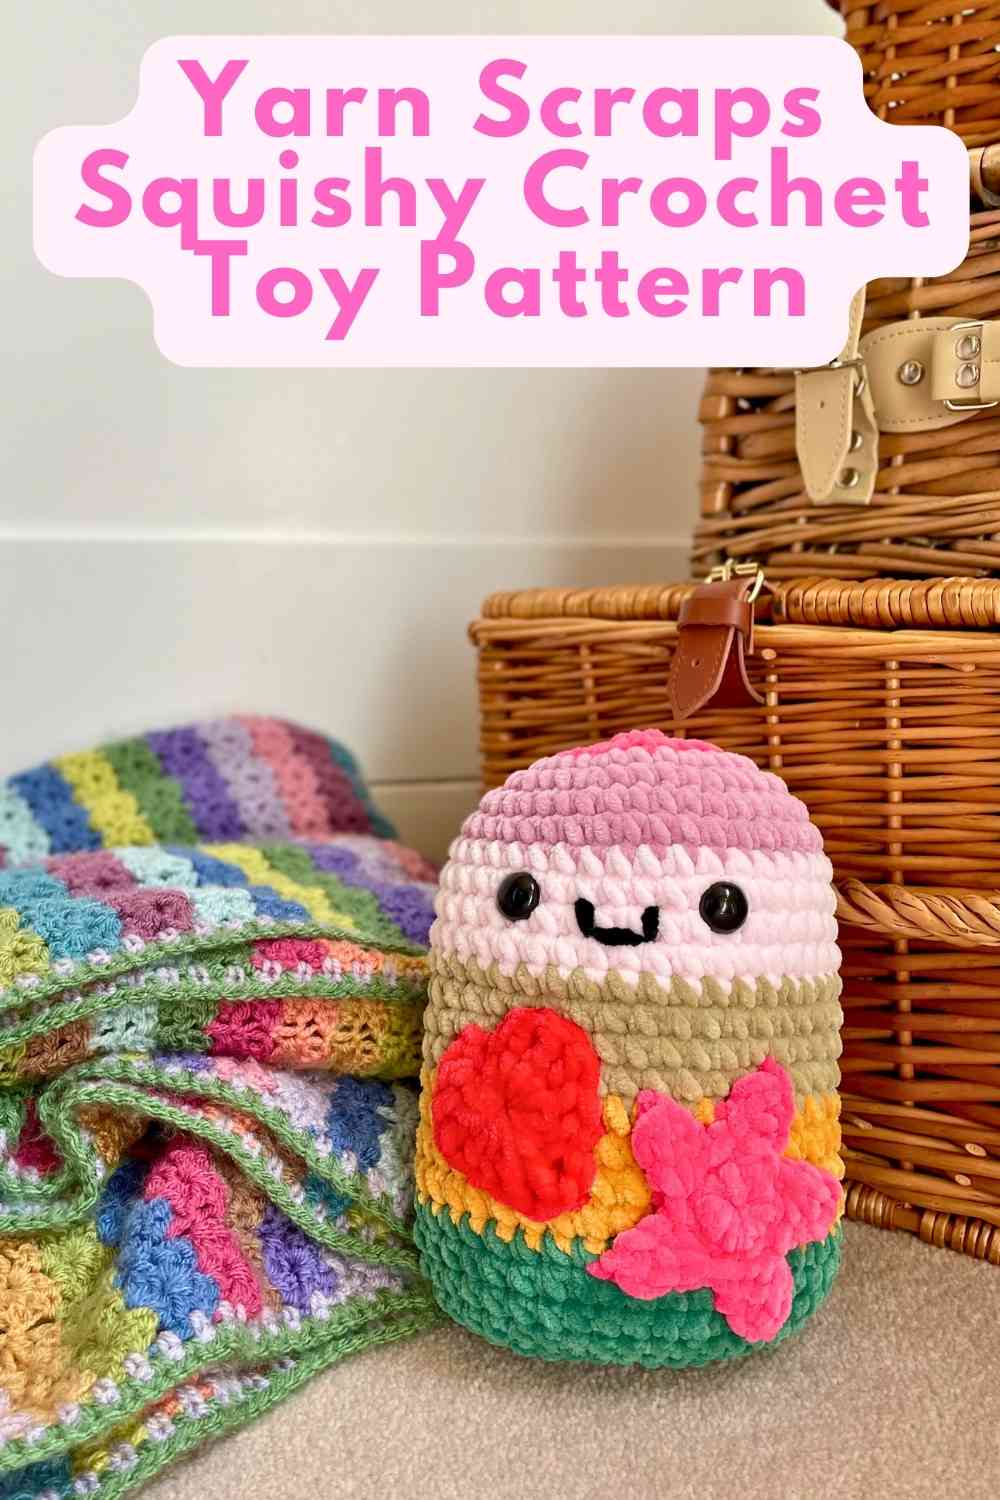
Yarn Scraps Squishy Crochet Toy Pattern
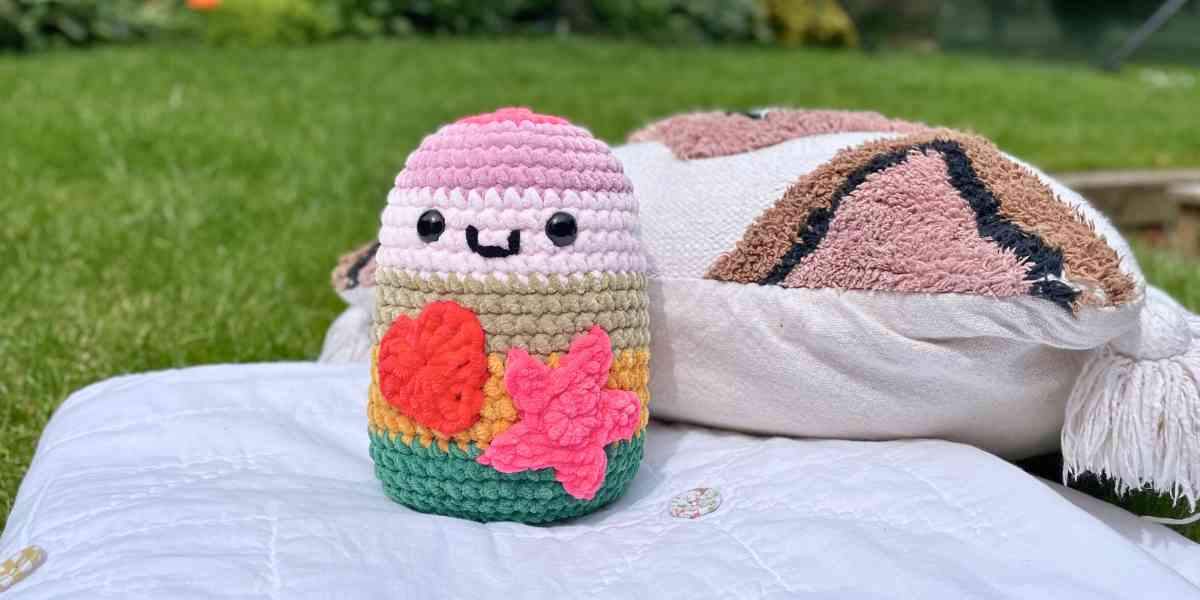
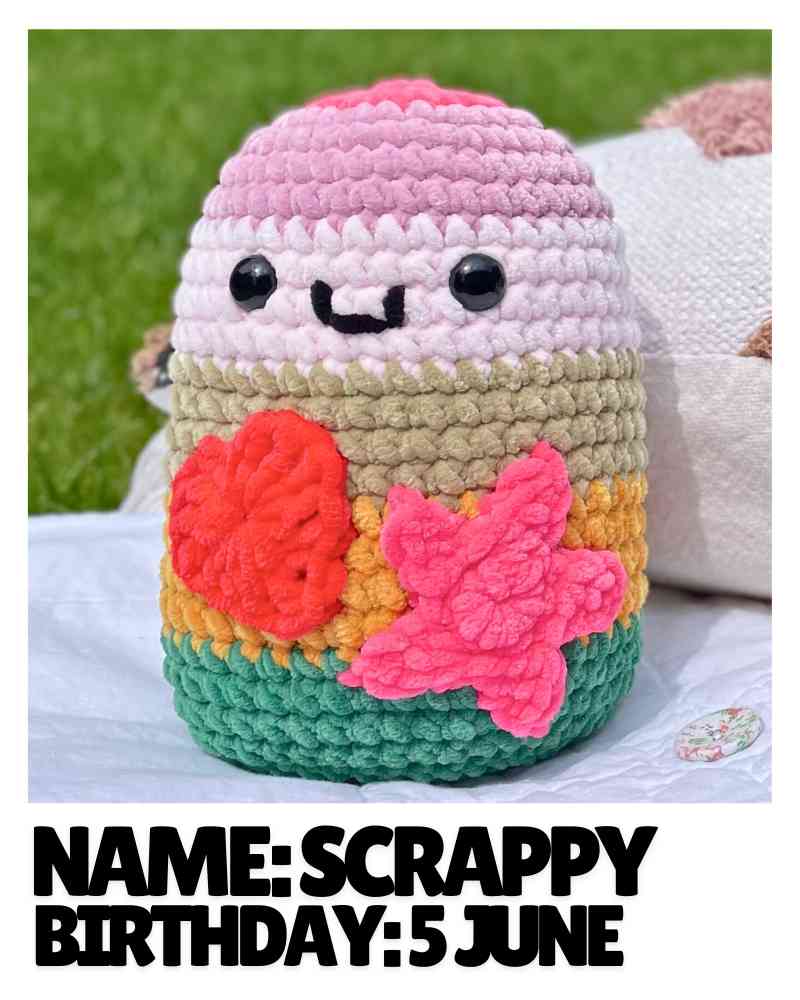
Hi! Welcome to my squishy crochet toy pattern for using up yarn scraps. I have named mine Scrappy – luckily his design is more imaginative than my capacity for coming up with names!
Scrappy was borne out of an emotional funk, which was causing me some creative block. I was struggling to design a squishy that actually resembled anything (like a bear, or a strawberry). All I really felt like doing to cheer myself up was grabbing some armfuls of colorful yarn, and seeing where they took me. So that’s exactly what I did!
The result was brilliantly stash-busting, and also very joyful to work on. My favorite touch is the little pocket on Scrappy’s back. It’s perfect for leaving little love notes or confidence-boosting messages in. Perhaps for a kid who’s anxious at school, a teen about to sit some big exams, or anyone else you love. I’m also thinking of introducing it to my 10 year old daughter as a kind of crochet worry monster. Obviously it won’t eat her problems, but it can carry them away for her, and maybe help her share any concerns that she doesn’t feel able to talk about.
Anyway, that’s enough philosophy about where this pattern came from, let’s get on with making it! Or perhaps one of his squishy chick or bunny pals…?
Choosing yarns
You can make your own scrappy squishy from any yarns you have leftover in your stash, but all the yarns you use for the body ought to be the same weight. You can use different weights to make the patches and embellishments though. I started by pulling some likely candidates out of my yarn boxes and onto the floor.
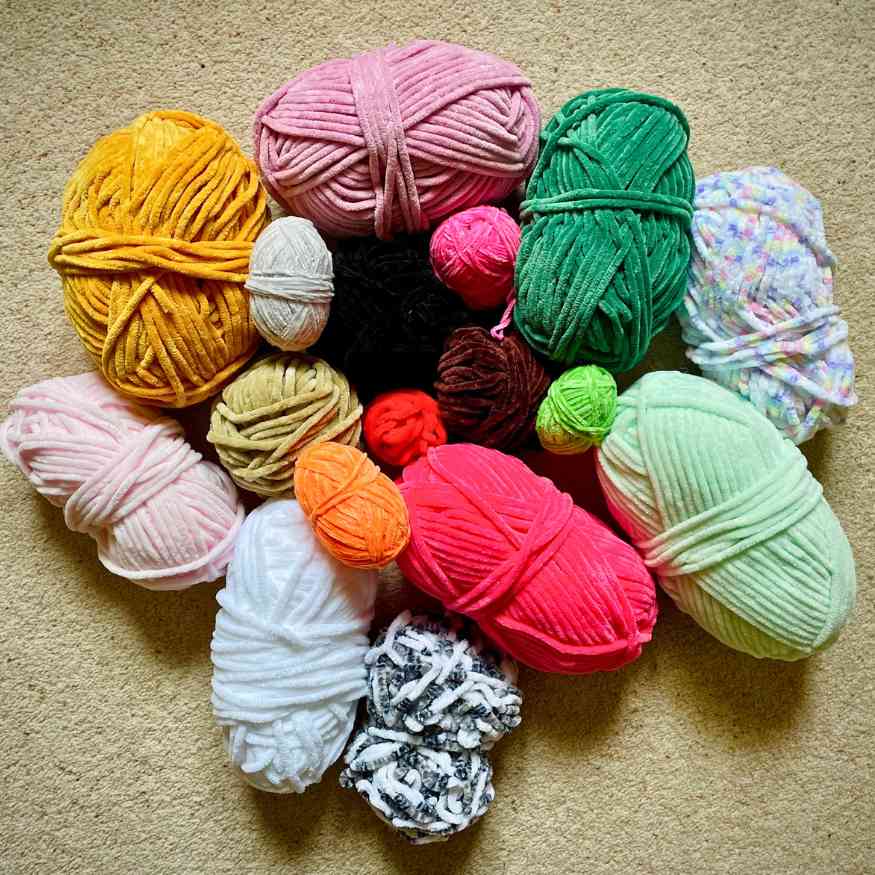
I did laugh at how the black yarn in the middle looks like a black hole in this photo, sucking all my yarn into it. If you saw the state of the rest of my stash, you could believe there’s a black hole in there somewhere! After much arranging and rearranging, I settled on these six colors, in this order:
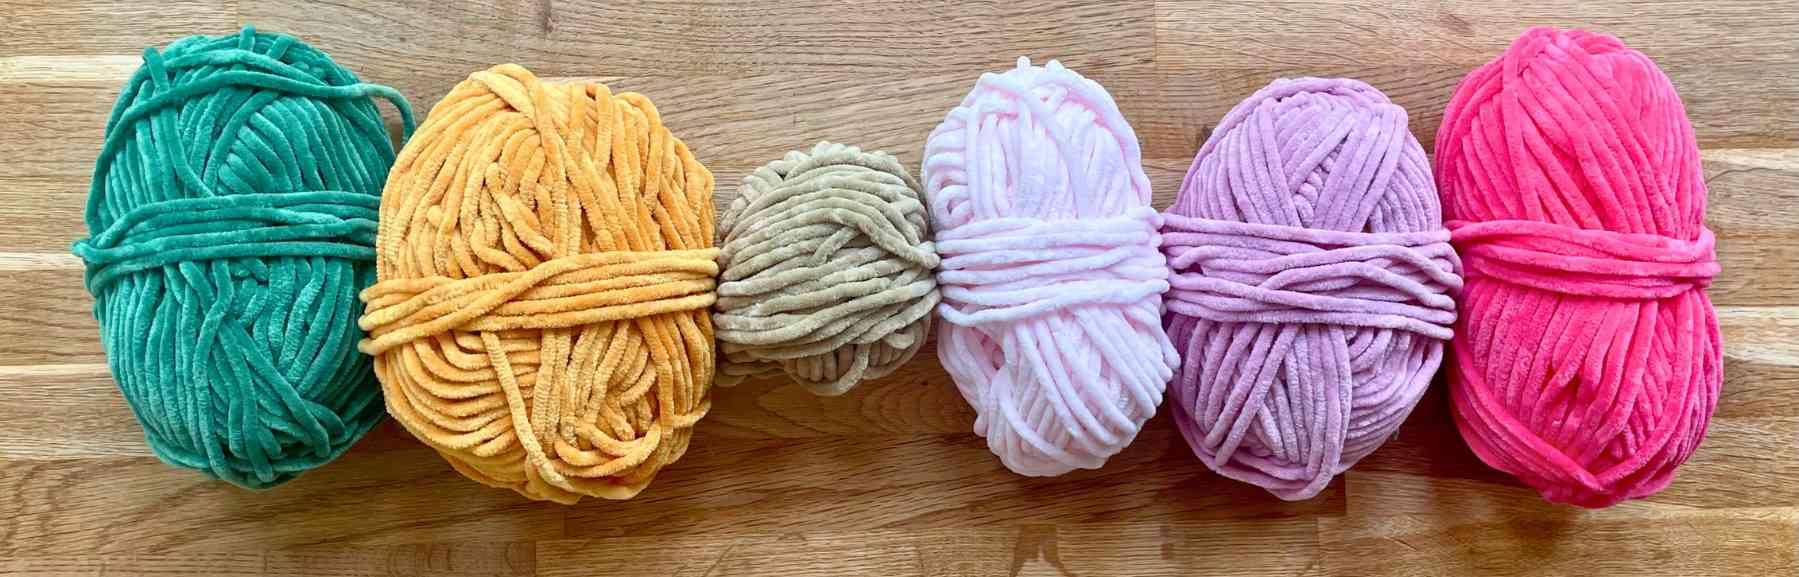
These are all super bulky chenille yarns. I love them for making projects like this, because they’re so soft and tactile – they have a high cuddle-ability factor! But you can use any yarn, in any weight. Made in hard wearing cotton yarn and with a bag of rice inside, this pattern could be a cute and quirky door stop. Or you could pick yarns to match the colors of your favorite sports team, and make a cute mascot that’s big enough to cuddle, or small enough to sit on a desk or shelf.
- DK yarn squishies made to this pattern will be about 4” tall.
- Worsted yarn squishes will be about 5” tall.
- Bulky yarn squishies will be about 6” tall.
- Super bulky squishies like Scrappy will be about 7” tall.
- And jumbo yarn squishes will be 9” tall or more – the jumbo yarn category is a bit of a catch-all for anything heavier than super bulky!
Additional materials
I also used:
- A size J crochet hook. This is one size down from the recommendation on the yarn wrappers, so that I could stuff Scrappy firmly, without the filling poking out between his stitches. Unless you already crochet very tightly, I recommend that you also size down for this project.
- Stuffing. Such as Polyfil, or similar.
- 16mm safety eyes. These work for bulky and super bulky yarn squishes following this pattern. For lighter weight yarns try 12mm eyes instead, and for jumbo yarns try 20mm eyes.
- Stitch markers
- A darning needle
- Scissors
- Pins
Pattern notes
This pattern uses standard American crochet terms. The ones you’ll need to be familiar with are:
Ch chain
Sl st slip stitch
Sc single crochet
Hdc half double crochet
Dc double crochet
Tr treble crochet
Inc increase (make 2 sc in the same space)
Dec decrease
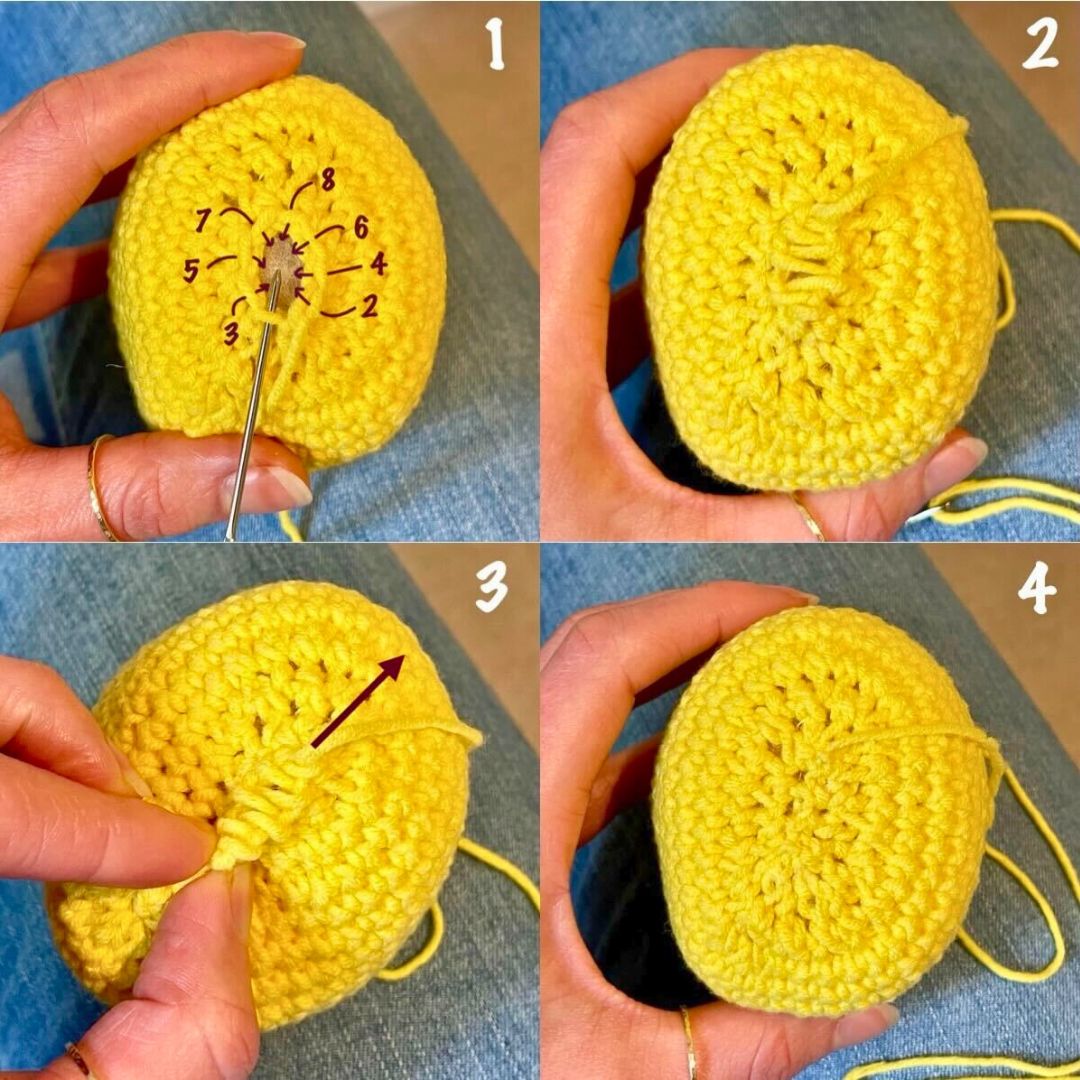
Lucy’s written a guide to the basic crochet stitches here, and single, double and treble crochet stitches here. For the decreases, use the invisible decrease technique: insert the hook into the front loop only of the next two stitches (fig. 1 below), yarn over and draw through those two front loops (two loops left on hook), yarn over and draw through both loops (fig. 2 below).

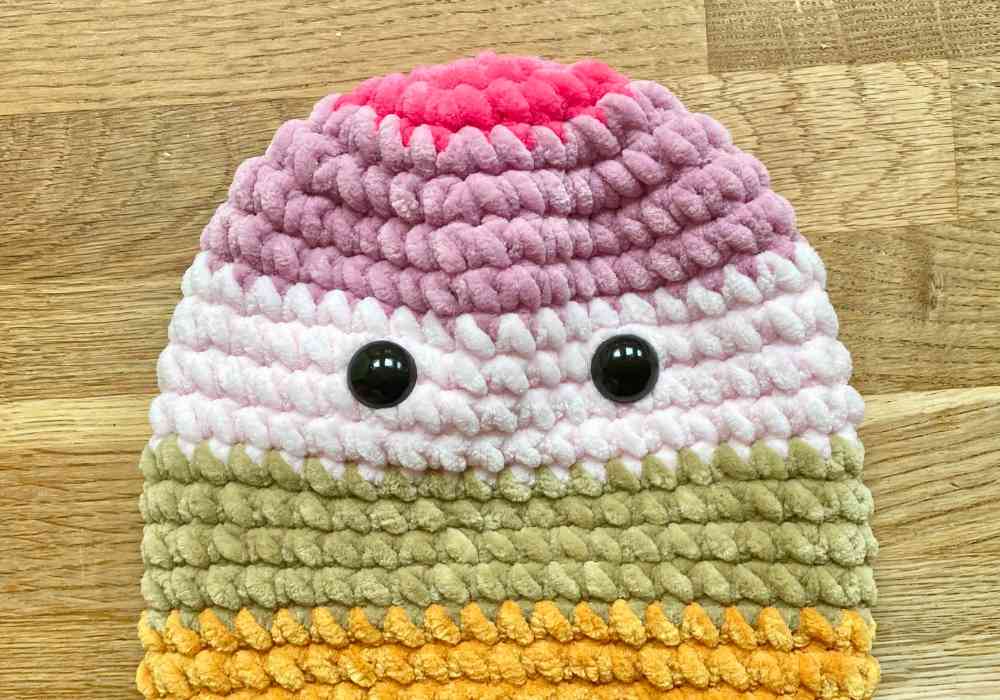
Body
Start the body with a magic circle, or chain 4, and slip stitch into the furthest chain from the hook to make a loop. Whilst I usually prefer the magic loop method, I always use the 4-ch loop with fluffy chenille yarns. It’s much easier to pull tight when the first round is finished.
- 1st round: Ch 1, sc 8 into the magic circle or 4-ch loop (8 sts)
- 2nd round: 8 inc (16 sts)
- 3rd round: *1 sc, inc* 8 times (24 sts)
- Color change: I make a simple color change, since there are still more increases to make in the next round.
Making a simple color change
For the last stitch of round 3, draw a loop of your current color through first (left, below). Then loop your new color over the hook (center, below) and finish the single crochet. At the end of the stitch, you’ll be left with one loop of the new color on your hook (right, below).
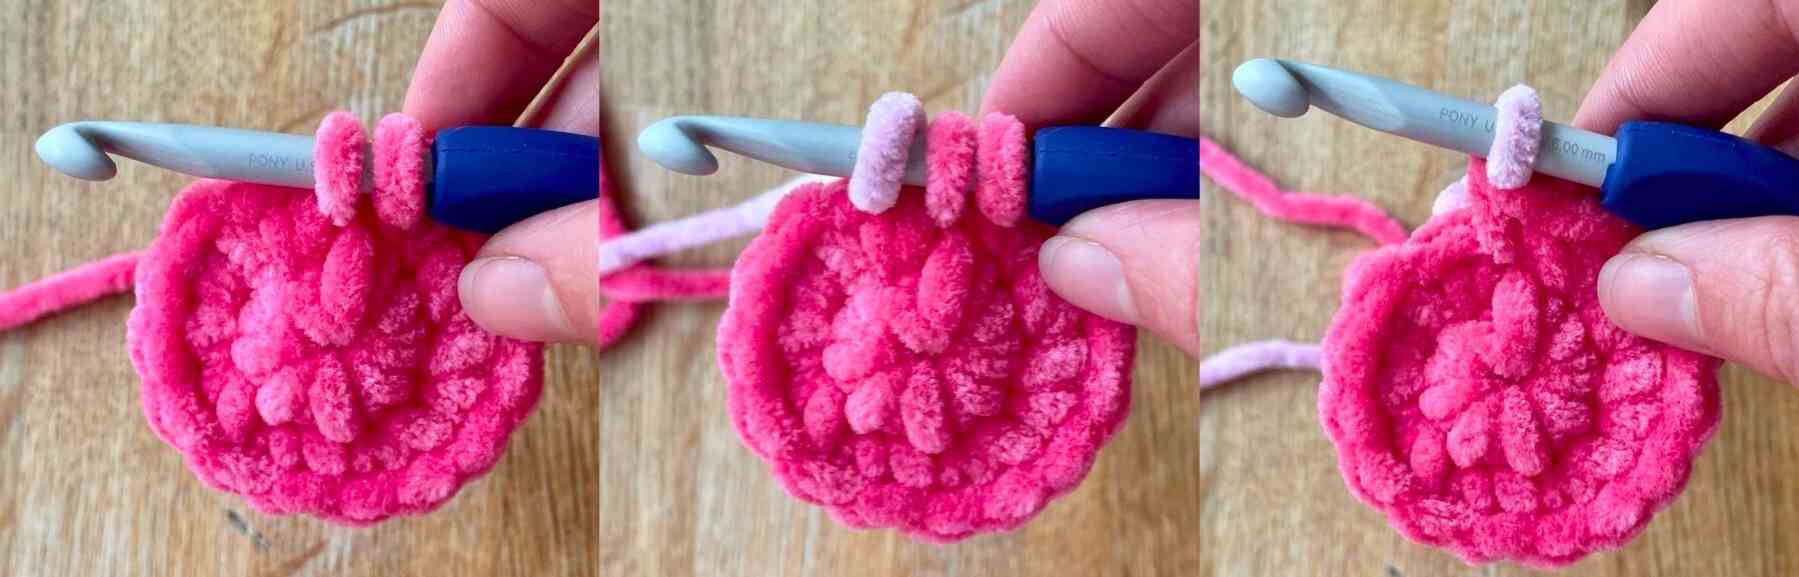
Once you’ve made a few stitches, cut the old yarn and tie the old and new ends together.
Continuing the body
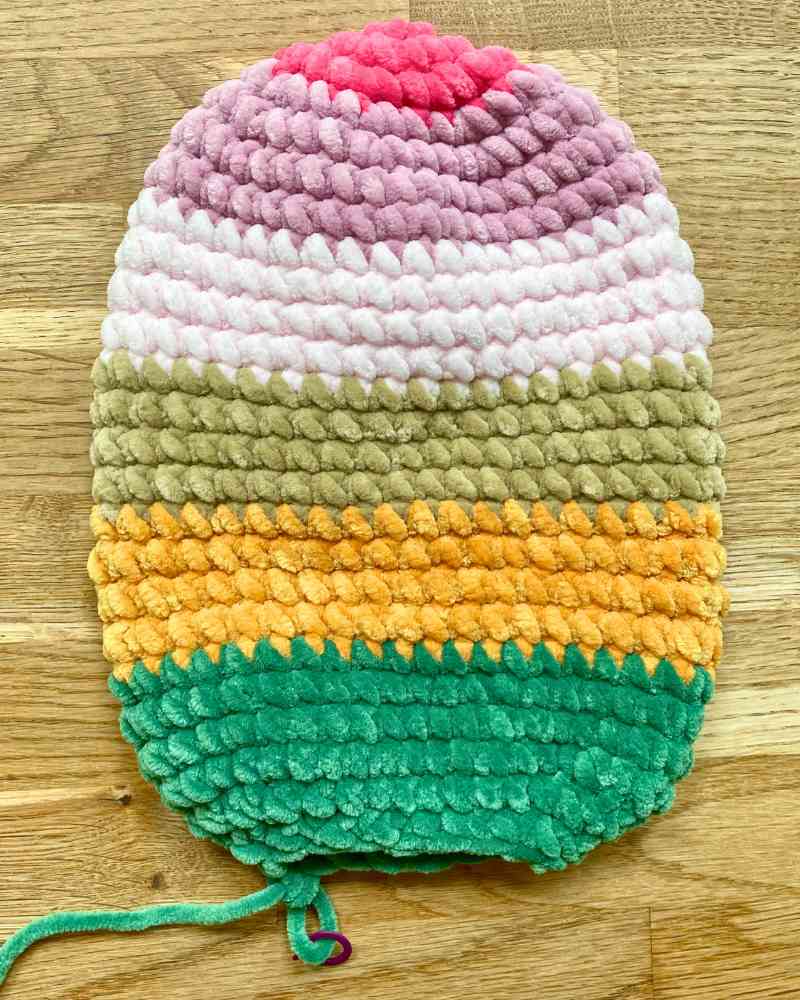
- 4th round: *2 sc, inc* 8 times (32 sts)
- 5th round: *3 sc, inc* 8 times (40 sts)
- Rounds 6 & 7: Sc all the way round
- Change color
- Rounds: 8 – 11: Sc all the way round
- Change color
- Rounds: 11 – 15: Sc all the way round
- Change color
- Rounds 16 – 20: Sc all the way round
- Change color
- Rounds 21 – 23: Sc all the way round
- 24th round: 3 dec, sc 8, 6 dec, 8 sc, 3 dec (28 sts)
- 25th round: 3 dec, sc 2, 6 dec, 2 sc, 3 dec (16 sts)
- Put a stitch marker into the loop on your hook, and cut your yarn leaving a 24 inch tail.
Making more, or fewer, stripes
I’ve used six leftover yarns in my stash to make six color changes. But I don’t want you to feel limited by my choices, so for a squishy with a different number of stripes, here’s where to make your color changes:
- 3 stripes – change colors at the start of rows 11 and 18.
- 4 stripes – change colors at the start of rows 9, 14, and 19.
- 5 stripes – change colors at the start of rows 8, 12, 16, and 20.
- 7 stripes – change colors at the start of rows 4, 7, 10, 13, 16, and 19.
- 8 stripes – change colors at the start of rows 3, 6, 9, 12, 15, 18 and 21.
If you’re making 3, 4, or 5 stripes, you might also prefer to use the method for changing color that I use in my squishy ice pop pattern. It makes a straighter line than a simple color change, but you can’t use it in rows that still have increases to be worked.
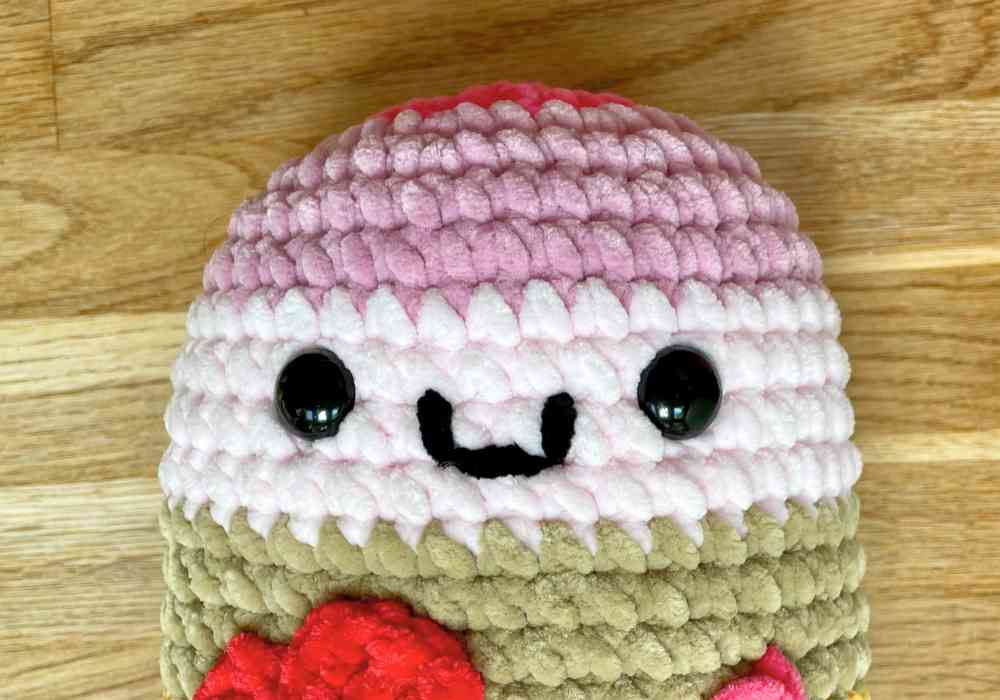
Adding the eyes, and closing the body
I’ve positioned the safety eyes between rows 9 and 10, and 7 stitches apart. If you’ve made a different number of stripes, you could position them a row lower, if it looks better. Push the backs on securely, and stuff the body firmly. I prefer to stuff the body now, before adding patches and decorations. It’s easier to position the patches accurately and effectively once you can see the final 3D shape.
Crochet one more round:
- 26th round: 8 dec, sl st (8 sts)
Pull the yarn tail all the way through the slip stitch, and use it to sew up the hole using mattress stitch though the front loops only. If you haven’t used mattress stitch to join crochet before, the first picture below shows where to make the stitches:
Make the stitches loosely at first, so you don’t lose sight of where the next one goes (picture 2). Then either pull them tight one at a time, or pinch firmly at the start, and pull the yarn tail firmly in the other direction to zip the hole right up (picture 3). This works best with smooth yarns – fluffy ones tend to snag.
Tie off the yarn tail and poke it into the body. Then let’s decorate your squishy with some cute patches.
Making a heart shape patch
Scrappy’s heart is achieved with a single round of stitches into a magic circle or 4-ch loop.
- Magic circle or 4-ch loop.
- Ch 2, tr 3, dc 3, ch 1, tr 3, ch 1, dc 3, tr 3, ch 2.
- Sl st into the center of the heart, cut the yarn leaving a long tail for sewing, and pull the yarn right through the sl st.
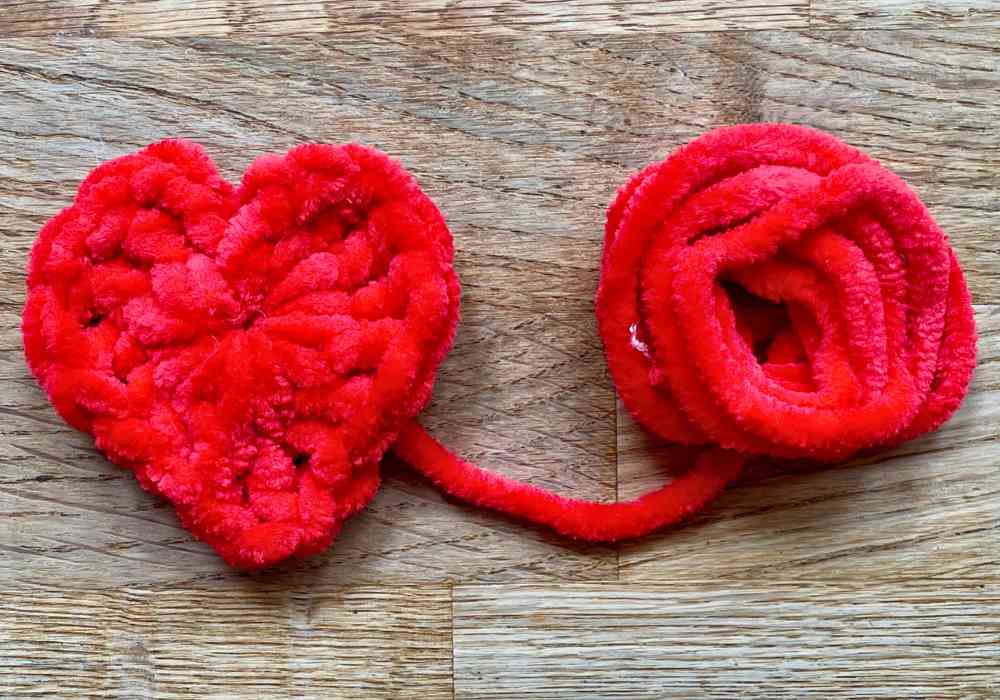
For a larger heart shape patch, try following the instructions for my modern heart granny square, stopping at the end of round 2.
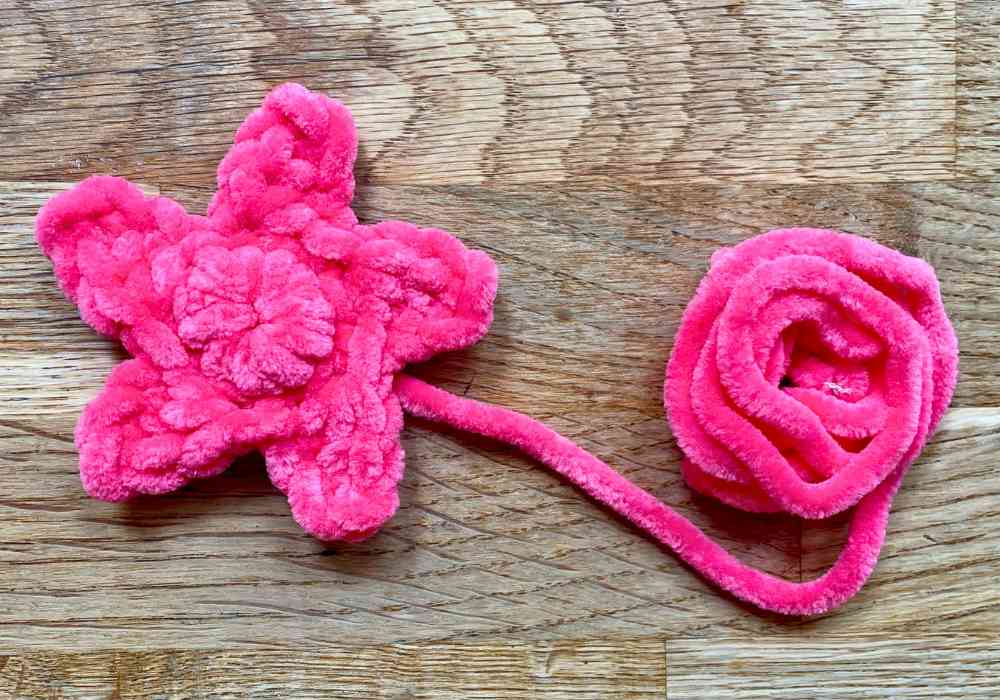
Making a star shape patch
The star shaped patch is worked in two rounds:
- Magic circle or 4-ch loop to start
- 1st round: Ch 1, sc 10 into the magic circle or 4-ch loop
- 2nd round: *Ch 4, sc into the 3rd chain from the hook, hdc into the 4th chain from the hook. Skip one stitch on round 1, and slip stitch into the next.* Repeat 5 times.
When you get to the end, cut the yarn and pull the yarn tail right through the last slip stitch. Then flip your star over and thread the yarn under some stitches, heading away from that corner:
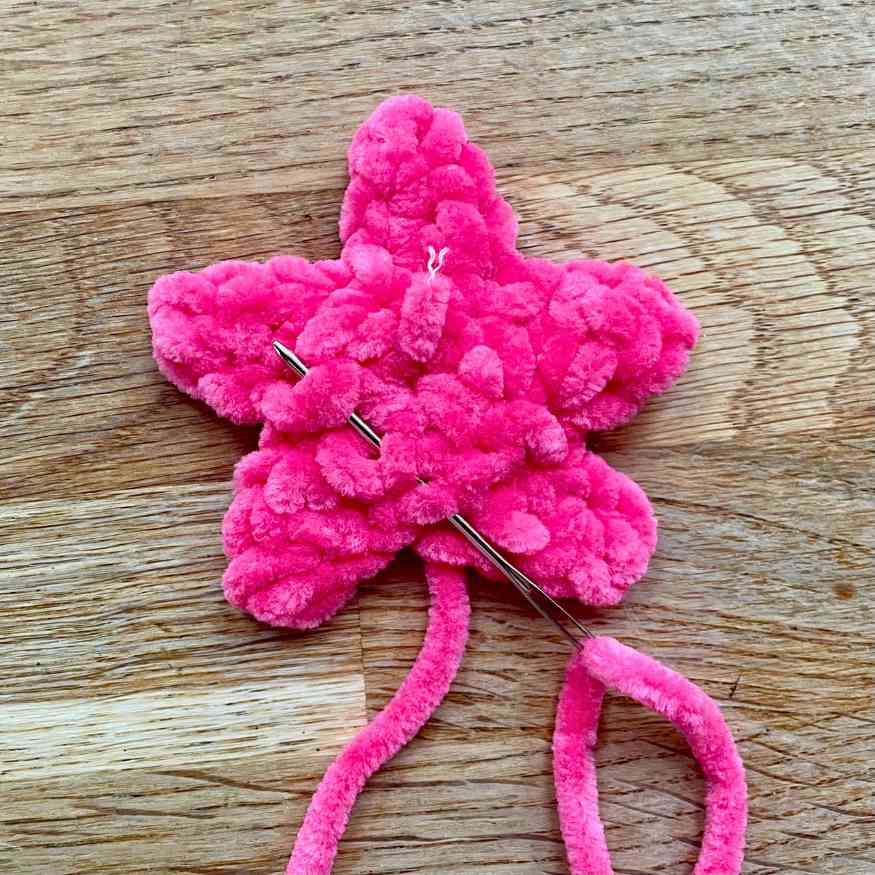
Gently pull it tight to give the last corner as much definition as the rest.
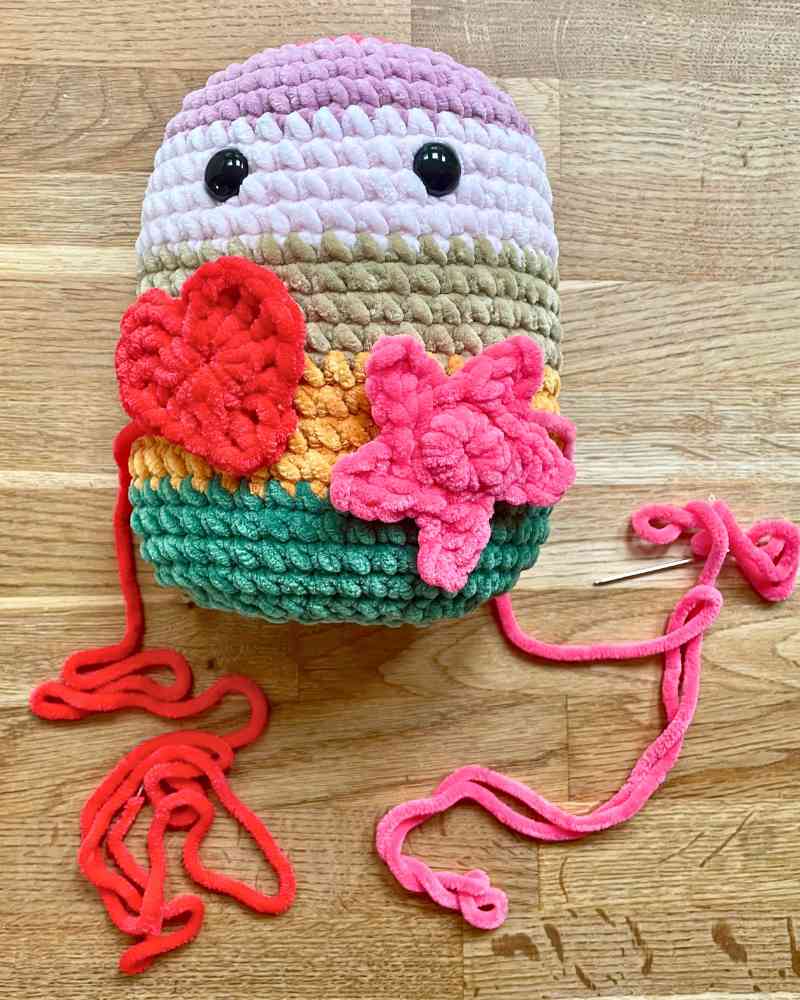
Now you can position the patches on your squishy, and use the yarn tails to sew them down. Sew them down through the back loops only, to keep their outlines looking sharp.
Some more ideas
Hearts and stars aren’t the only embellishments you can add to your scrap yarn squishy.
- Simple square or circle patches sewn on with contrasting stitches make for an endearingly patched-up, patchwork look.
- Use surface crochet to spell out someone’s initial or even as a foundation for 3D embellishments. I’m keen to surface crochet a small circle of slip stitches on Scrappy’s head and use them as the foundation for petals, so she has a cute flower in her hair (not that she has hair). But I don’t have a yarn color I want to use for it yet. I’ll update this pattern at the bottom if it happens!
- Add buttons, woven patches, pin badges, rosettes or ribbons – anything pretty, or with special sentimental value.
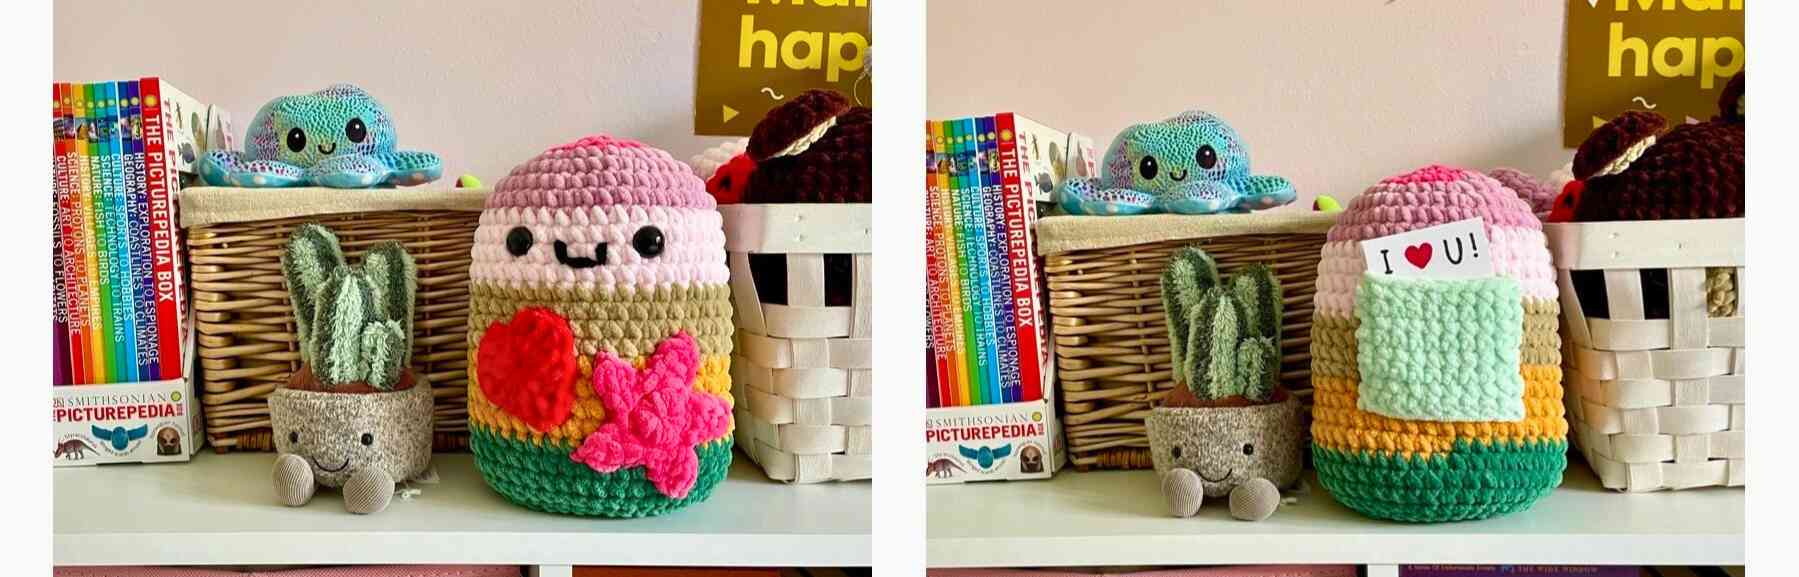
Adding a pocket
The piece de resistance for this plushie is the pocket on its back. Obviously it’s optional – if you’re making a stripey mascot in your team’s colors, you might not want one. You could also use this method to add a pocket to any of my other squishy patterns – do you know someone who would like to receive their own axolotl-gram, or message delivered by owl?
On the back of your squishy, use pins to mark the corners of your pocket. It’s going to turn out smaller than you expect, so if in doubt, err on the large side. Starting at the bottom edge, and working from right to left (if you’re right handed, or left to right, if you’re left handed) insert your hook under the stitch at the corner of your square. Pull through a loop of yarn (below left).
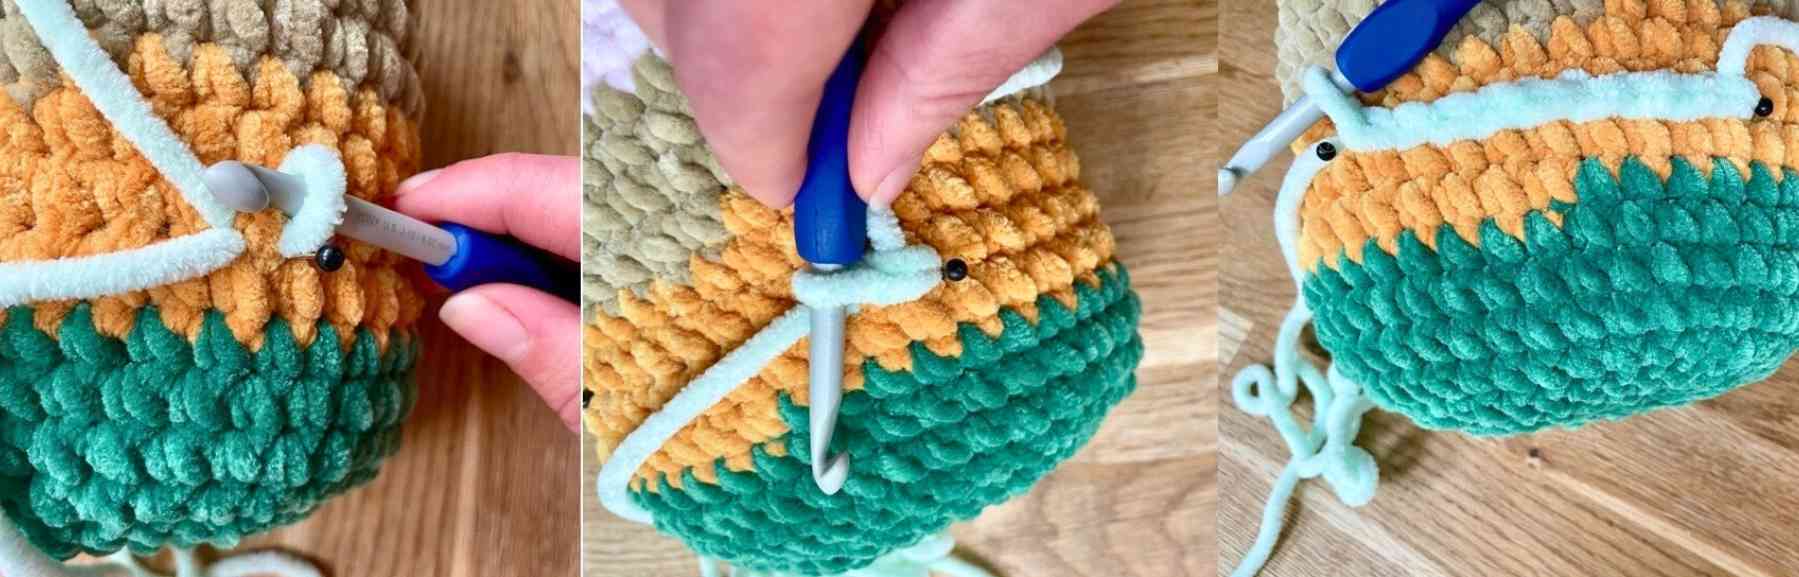
Leave a long yarn tail for sewing up the side of the pocket later, and insert your hook under the next stitch along. Make a slip stitch by pulling a loop of yarn under the stitch and through the loop already on your hook (above center). Work your way right along to the other corner (above right).
Make a chain stitch to turn, then skip that chain and single crochet into all the slip stitches on the back of your squishy. Work back and forth in rows of single crochet until your pocket is the desired height, finishing in the opposite corner to where you started. Cut the yarn leaving a long tail.
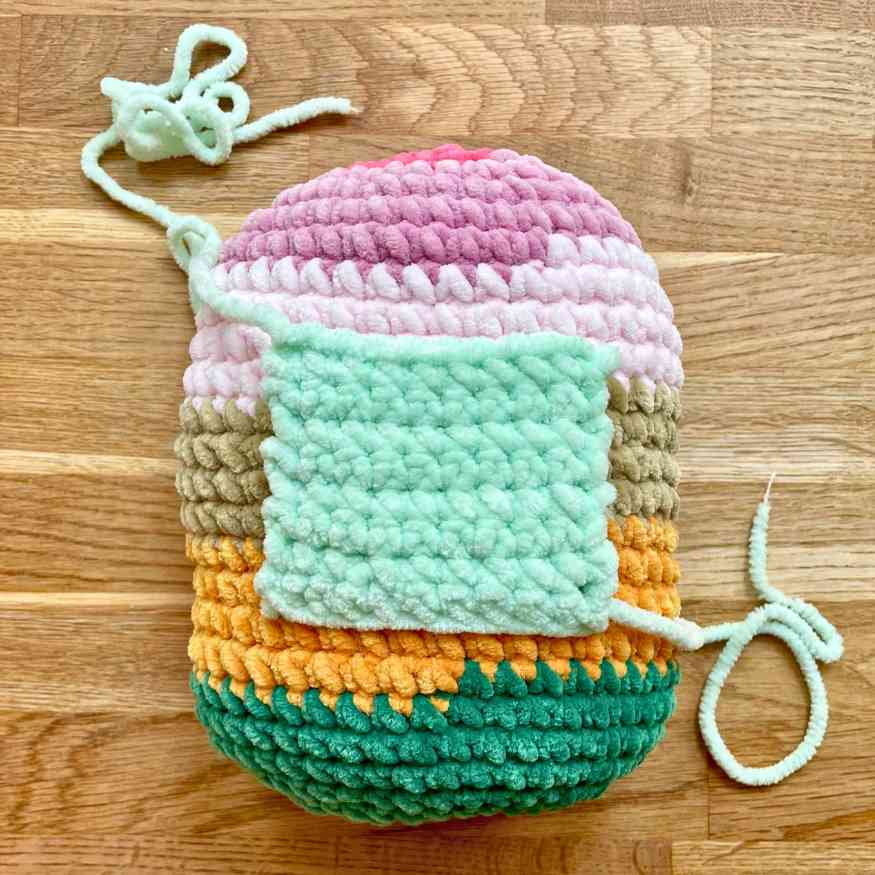
Use the yarn tails to sew down the sides of the pocket, then tie them off and tuck them inside the body.
Adding a mouth
I’ve got one more finishing touch to add, and that’s a winsome smile. Scrappy’s smile is made from three stitches. Start by feeding the yarn through your squishy’s body, from back to front, leaving a 3″ tail at the back for tying off later. Make the smile following the grid pattern in single crochet stitches – two stitches wide, and one row tall. Feed the yarn out through the body again, so it comes out in the same spot it went in. Tie the two tails together so the know it flush with the back of the squishy, then trim the ends and poke the knot and ends inside the body.
And you’re done!
It’s time to admire your finished creation. I wonder if you’ll come up with a more creative name than I did? If you’re on social media, please tag Lucy in a photo of your scrappy wonder on Instagram or Facebook.
Yarn scraps squishy crochet toy pattern – summary
Making this squishy really cheered me up when I needed something a bit fun, silly, and endearing in my life. I hope making one will put a smile on your face too, and you’ll be inspired to cover it in all kinds of beautiful or meaningful embellishments. Happy crocheting!