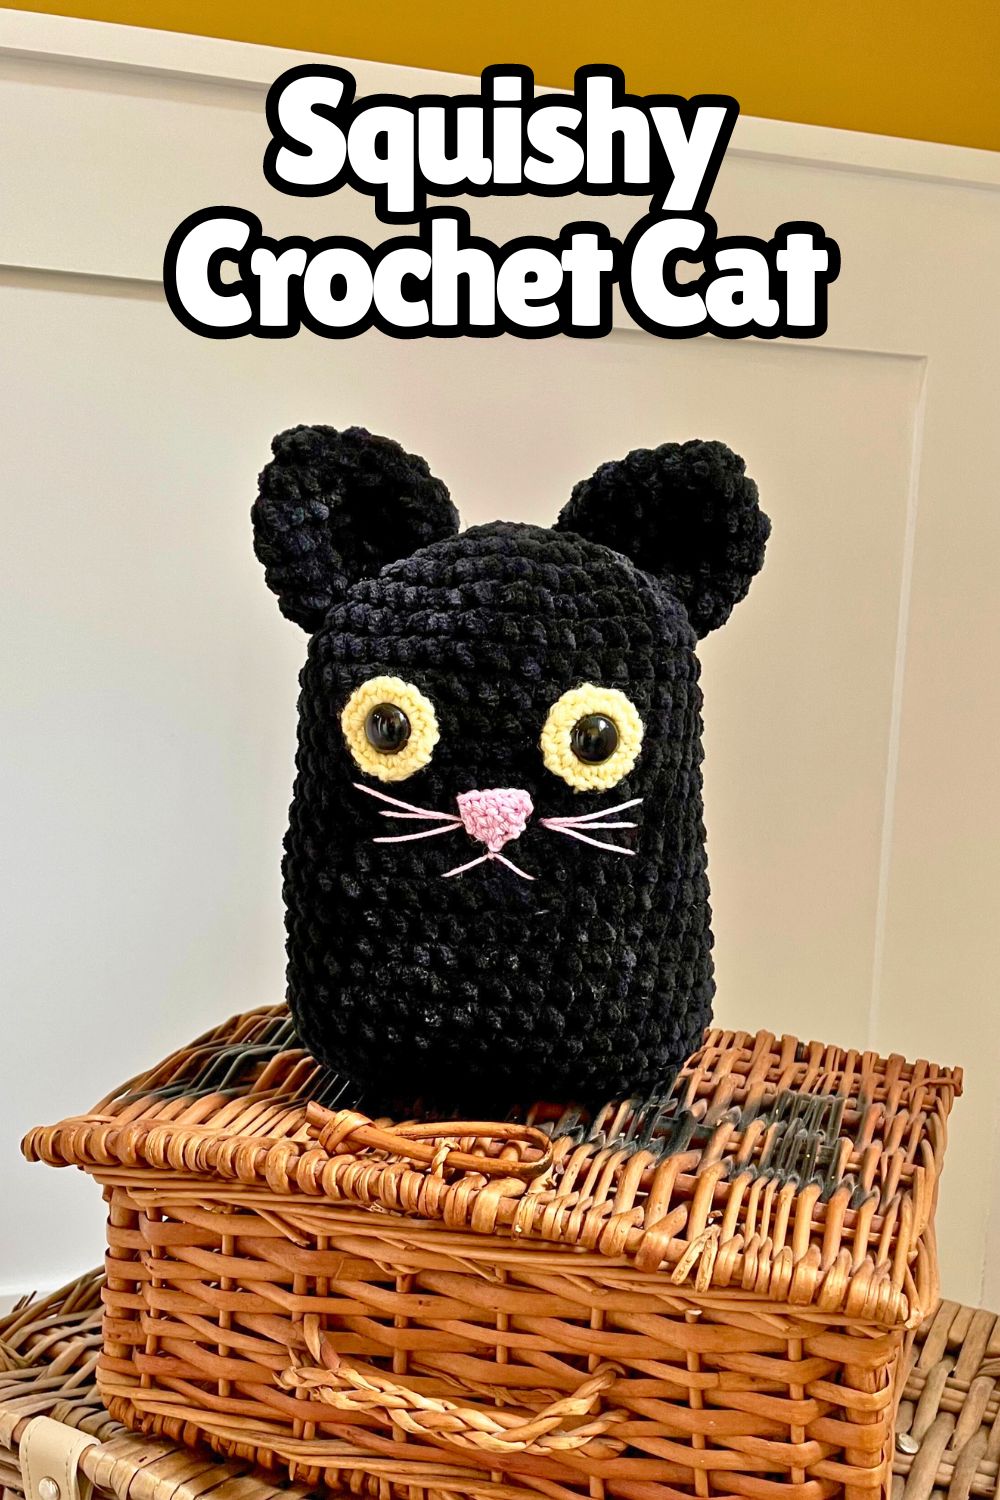
Squishy Crochet Cat Pattern

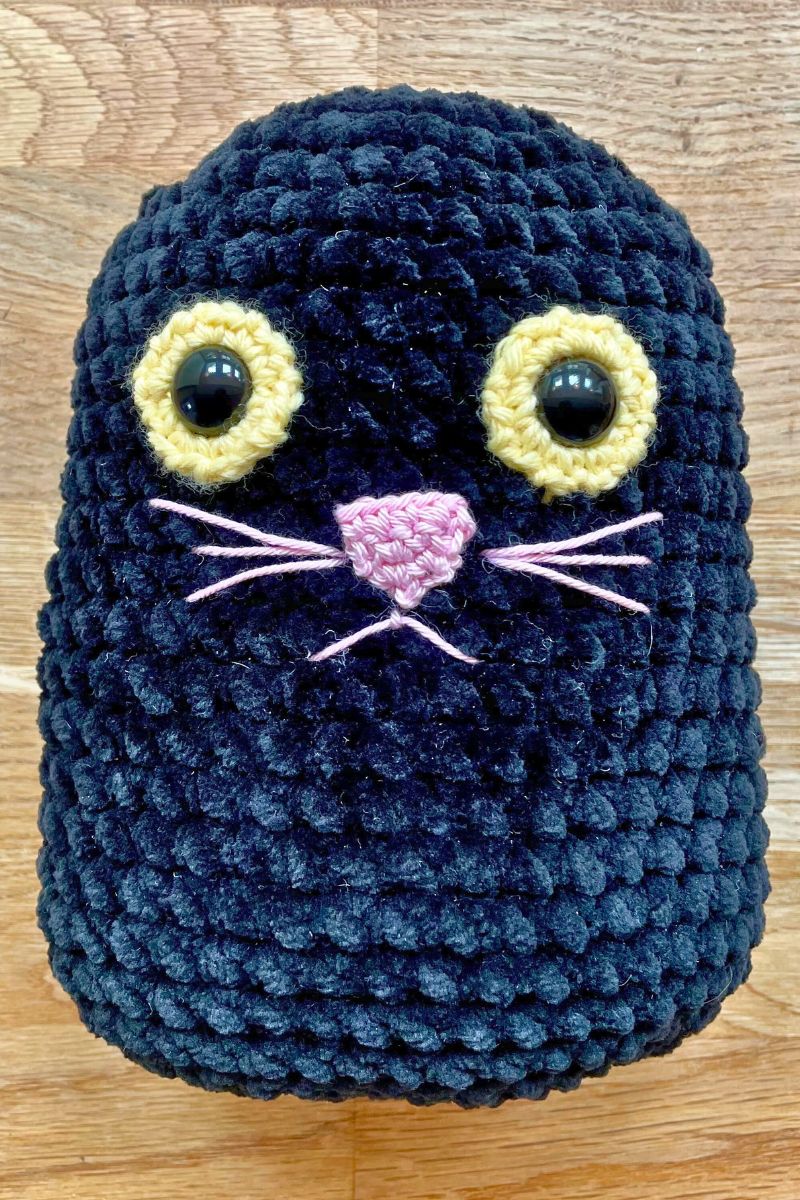
Hi there, let me introduce you to Wilfred, my squishy crochet cat pattern! If you’re looking for a really simple, entry-level amigurumi project, he’s your guy. Thanks to his flat butt, he’s also exceptionally versatile. I’ve made him in a thick, fluffy yarn, and my daughter loves cuddling him at bedtime.
You could make him in a lightweight smooth yarn and sit him on the desk or bookshelf of any cat lover. You could even make him from a hard wearing bulky cotton, pop a small bag of rice in with his stuffing, and use him as an ever-vigilant door stop!
He also goes beautifully with my similarly squishy owl pattern! And if you’ve got a real furry kitty pal at home, they would love it if you made them a cat bed or hammock too!
You will need
Wilfred isn’t complicated – either in his wide-eyed outlook on the world, or his construction. If you have any crochet experience at all, it’s likely you could make a version of him with supplies you already have. You’ll need:
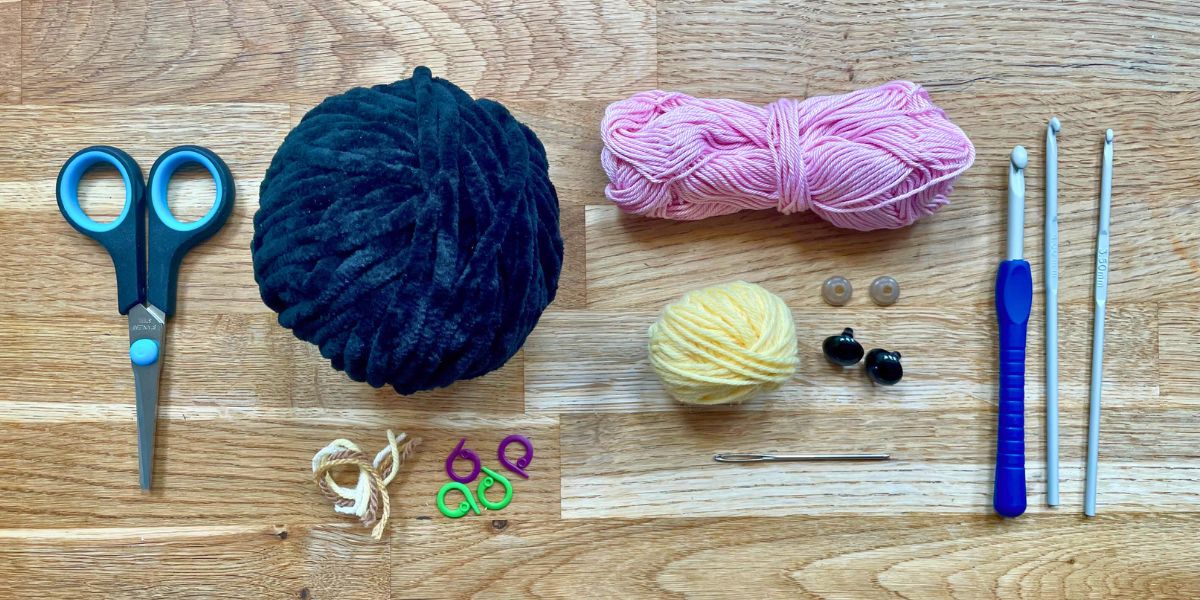
- Enough yarn to make a matching body and ears for your squishy cat. I used ⅔ of a ball (65g/85yds) of King Cole Yummy yarn* in black. But you can use any yarn you like!
- Small quantities of contrasting yarn in a lighter weight for the eyes, nose and whiskers. I used Scheepjes Merino Soft DK* in the shade de Goya for the eyes, and Patons 100% cotton DK* in nougat for the nose and whiskers.
- Crochet hooks to match your yarns. If the yarn wrapper gives a range of sizes, use the smallest recommended size. Likewise if your tension tends to be loose, use a hook one size smaller than usual for this project. This is to prevent the stuffing peeping through your crochet when the cat is finished.
- Safety eyes*. I used ⅝” (16mm) eyes, and they would still have worked if I’d used bulky yarn. ½” (12mm) would be more appropriate for a squishy cat made with DK or worsted yarn, and ⅜” (10mm) for anything smaller.
- Poly-fil, or an equivalent toy stuffing*.
- Stitch markers or yarn scraps to keep track of your progress.
- Scissors
- A darning needle
How big will it be?
This depends on what yarn and hook size you use. King Cole Yummy yarn is super bulky, and I used a size J (6mm) hook. Wilfred is roughly 7” tall excluding its ears. In DK yarn using an E hook (3.5mm) your cat would be just shy of 4” tall. You could use a 4 ply yarn and make a squishy cat small enough to turn into a key ring, or a jumbo yarn and it would be big enough to use as a quirky throw pillow!
Pattern notes
My squishy crochet cat pattern uses only simple techniques, and a small amount of sewing. The only stitch instructions you need to know are:
Ch chain
Sc single crochet
Sl st slip stitch
Inc increase (make 2 sc in the same place)
Dec decrease
I recommend using the invisible decrease technique:
- Insert your hook through the front loop only of the next stitch, then through the front loop only of the following stitch (fig.1). 3 loops on hook.
- Yarn over and draw through two loops. Two loops remaining on hook.
- Yarn over and draw through both remaining loops (fig. 2).

If you’re completely new to crochet, Lucy’s written a handy dandy guide to the other basic techniques.
Let’s get started!
My squishy crochet cat pattern

To make your own squishy cat, you’ll make up the body in rounds until it’s 90% done, add the eyes and nose, stuff and close the body, then add the mouth, whiskers and ears. You can add all the features before stuffing the body if you prefer and it makes the sewing easier for you, but I find it’s easier to position them accurately if you add them last.
The body
- Make a magic circle.
- 1st round: Ch 1, sc 8 into the magic circle (8 sts)
- 2nd round: 8 inc (16 sts)
- 3rd round: *1 sc, inc* 8 times (24 sts)
- 4th round: *2 sc, inc* 8 times (32 sts)
- 5th round: *3 sc, inc* 8 times (40 sts)
- Rounds 6 – 23: Sc all the way round
- 24th round: 3 dec, sc 8, 6 dec, 8 sc, 3 dec (28 sts)
- 25th round: 3 dec, sc 2, 6 dec, 2 sc, 3 dec (16 sts)
- Put a stitch marker into the loop on your hook, and cut your yarn leaving a 24″ tail.

For a shorter squishy crochet cat, start decreasing from round 21, instead of round 24.
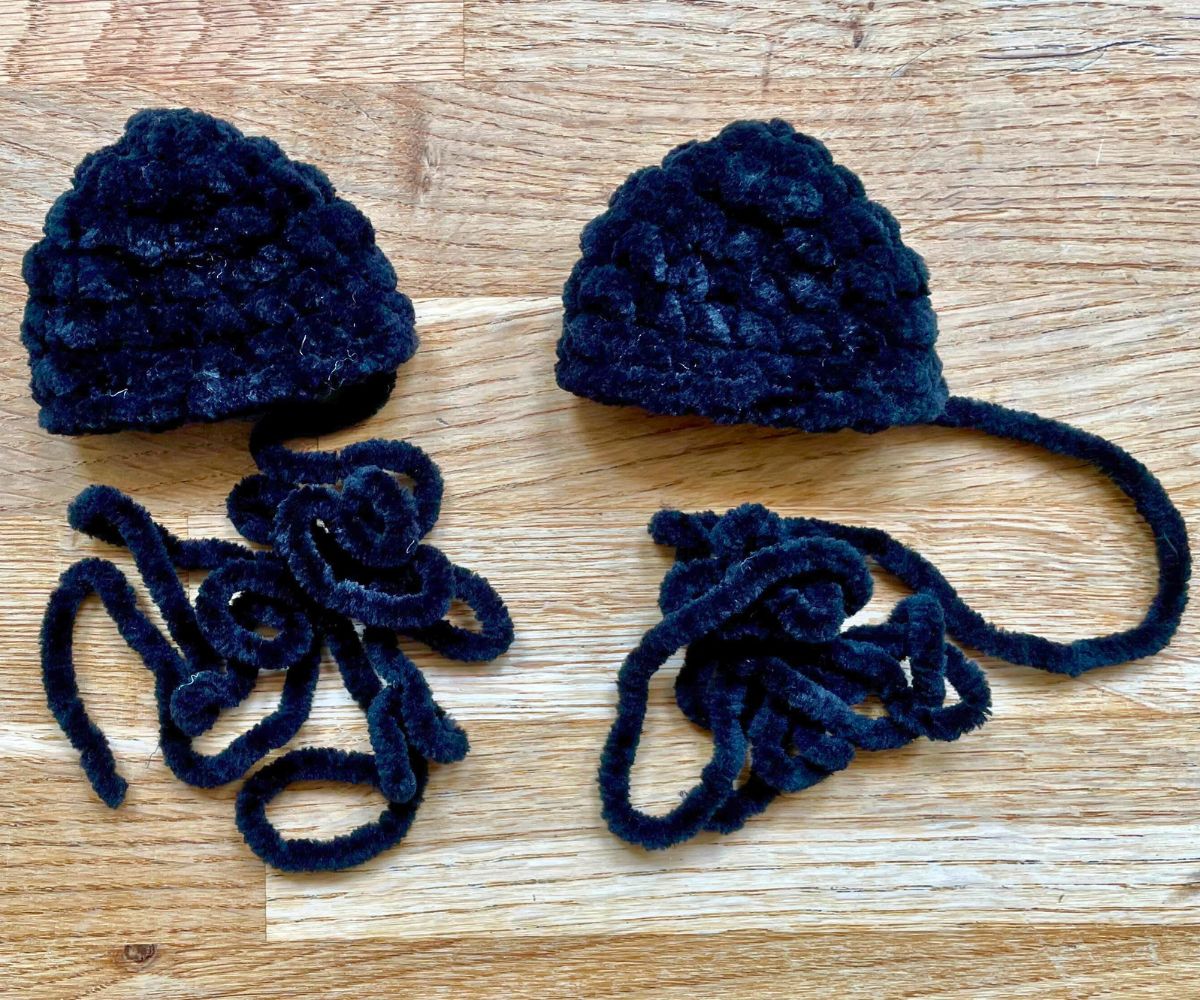
The ears
Make two, using the same yarn you used for the body.
- Make a magic circle.
- 1st round: Ch 1, sc 5 into the magic circle (5 sts)
- 2nd round: 5 inc (10 sts)
- 3rd round: *1 sc, inc* 5 times (15 sts)
- Rounds 4 – 6: Sc all the way round
- Sl st once, cut the yarn leaving a long tail for sewing, and pull the yarn tail all the way through the slip stitch.
The irises
Make two, using one of your contrasting yarns.
- Make a magic circle.
- 1st round: Ch 1, sc 8 into the magic circle (8 sts)
- 2nd round: 8 inc (16 sts)
- Sl st once, cut the yarn leaving a long tail for sewing, and pull the yarn tail all the way through the slip stitch.

Nose
Unlike the other elements, the nose is worked in rows, rather than rounds. Make one, using your second contrasting yarn.
- Foundation chain: Ch 3
- Row 1: Skip 1st chain from the hook, sc 2 into both of the remaining chains.
- Rows 2 & 3: Sc across
- Cut the yarn leaving a long tail for sewing, and pull the tail all the way through the last stitch.

N.B. There are no turning chains at the beginning of rows 2 and 3. If you’re a regular crocheter, really suppress that urge to make them!
Now it’s time to bring your cat to life.
Assembling your squishy crochet cat
Lie the body of your cat in front of you. It should naturally want to flatten out, but just double check that the decreases fall at either side, and the two pairs of single crochets in the final round are lined up with each other in the center.
Positioning the eyes
Push the stalks of the safety eyes through the centers of the irises. Then push them into the body. They should enter the body between rows 10 and 11 (regardless of how tall you made it), and 6 stitches apart. Check how they look before you put the backs on.
Sew down the edges of the irises using their yarn tails. First feed the tail through to the inside of your cat. Feed it back up to the surface a short distance further around the edge of the iris – if in doubt, always feed it up slightly beneath the iris, rather than slightly away from it. Now insert the needle through the edge of the iris, behind the front and back loops of the outer row of stitches. Repeat all the way around the edge of the iris, then tie off the yarn tail inside the body.
Use the same approach to sew on the nose. You can add the mouth and whiskers now if you like, but I prefer to leave it until a little later.
Filling your cat
Pack your squishy cat firmly with Poly-fil, or any toy stuffing of your choosing. If you want him to have some weight so you can use him as a doorstop or book end, add a small plastic bag of sand, gravel or rice near the top of the stuffing (or at the bottom of the cat, depending on how you look at it!) Cover it with a thin layer of stuffing to prevent it from wearing through the base of your squishy cat.
To close the bottom of your cat:
- Round 26: 8 dec (8 sts)
- Use mattress stitch to join the two edges.
Mattress stitch join
To make a mattress stitch join, thread the needle inwards under each of the front loops in a ladder pattern from one side of the hole to the other. In first picture, the needle shows where the first stitch goes, and the numbered arrows show where to insert the needle next. You don’t need to pull the thread tightly just yet.
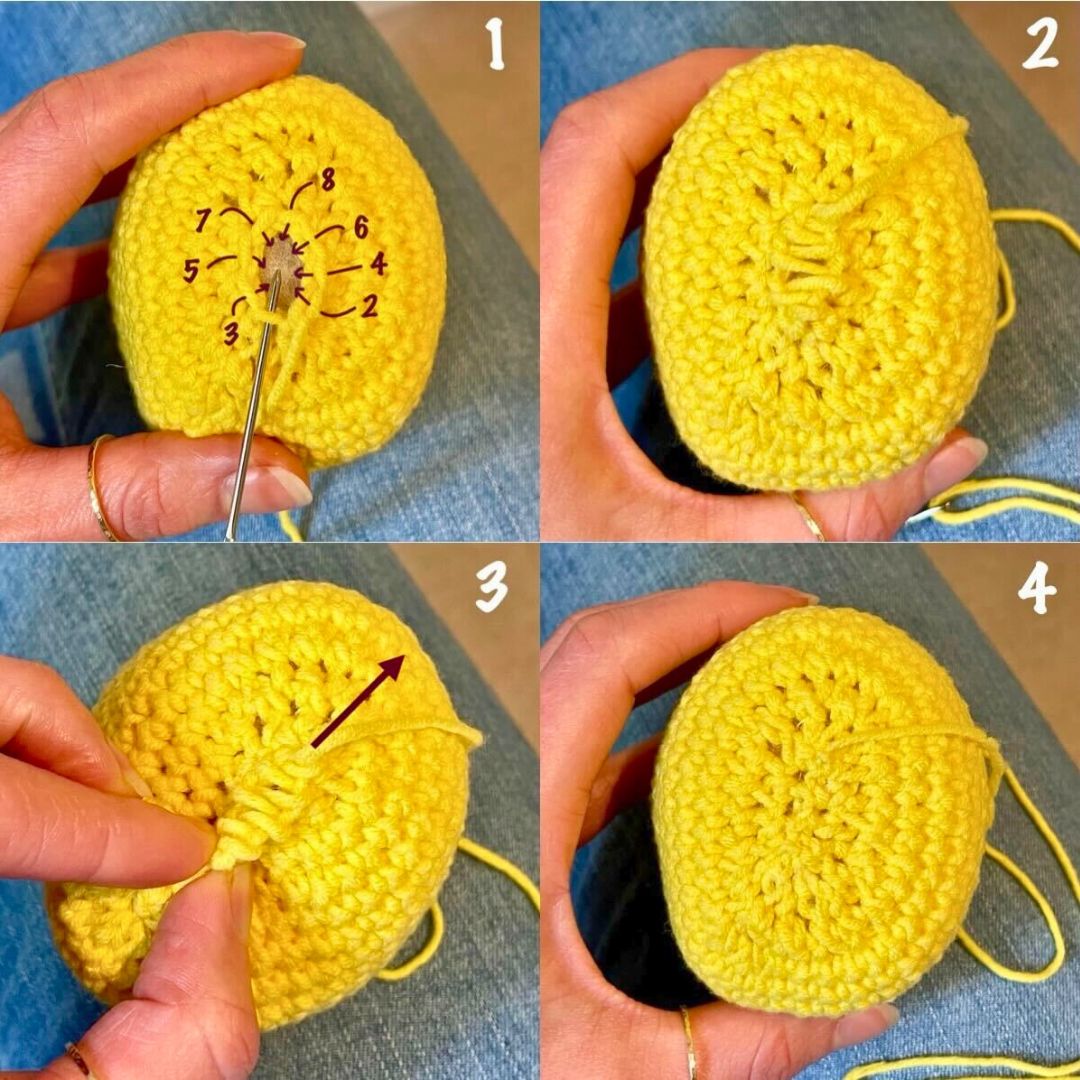
It’s very hard to see what’s going on in a photo of the King Cole Yummy yarn, so I’ve taken these photos of another project! Once you’ve threaded the needle through all the stitches, it should look something like picture 2.
Now, pinch side of the hole you started sewing from firmly, and pull the yarn tail away from in, in the direction of the arrow in picture 3. Your gap should zip right up, and look like picture 4. Tie off the yarn, and poke the tail inside the body. You’re nearly there now!
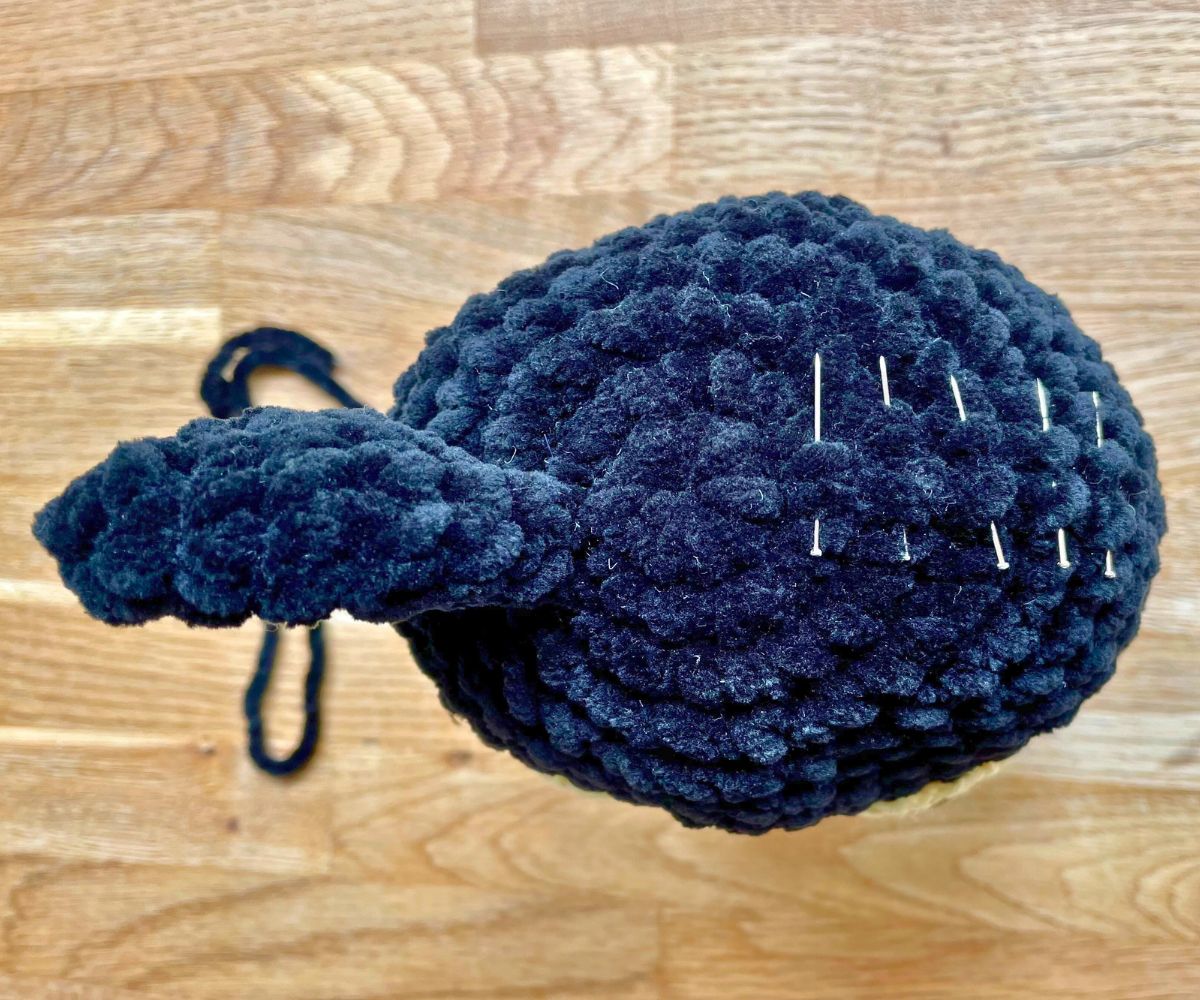
Sewing on the ears
Use the ears’ yarn tails to sew them onto the top of the head, about halfway back. This photo shows one attached ear, and a row of pins to illustrate where my stitches will go to sew on Wilfred’s second ear.
Finishing touches
To add a mouth and whiskers, thread a long piece of contrasting yarn onto a darning needle. Poke it into the back of the body, and out through the front right next to the nose. Make six long stitches for whiskers, going into the body at the farthest point, and coming out back next to the nose.
Make a horizontal stitch 4 single crochets wide and one row below the nose to form the mouth. Bring the needle up just below the tip of the nose, loop it around the mouth, and insert the needle back into the same spot. Push the needle all the way through to the back of the body, so the yarn comes out at the same place it went in. Tie the two ends together, trim the ends, and poke the knot back inside the body.
Done! Stand back and admire your work 🙂

Squishy cat crochet pattern – summary
Wilfred the cat is a brilliant beginner project is you love cute characters, but don’t feel ready to take on more complex amigurumi projects yet. He can be a stuffy for a child or a grown up who’s young at heart. A smaller Wilfred could be a lucky mascot on a shelf, and a bigger Wilfred could be a scatter pillow. He doesn’t even have to be called Wilfred! So whatever you’re going to call him, and whatever you’re going to do with him, please let us know in the comments box down below. Even better, take a photo of your squishy cat creation and tag us on Facebook or Instagram.
Most importantly of all – have fun, and love whatever you create!
*The products linked in this pattern were carefully selected by Lucy Kate Crochet. If you decide to purchase using the links provided, we may earn a small commission on that sale. This is at no extra cost to you.

Thank you for this pattern ! And also thank you for the tip of invisible decrease.
I was frustrated with the regular decrease that creates small holes, this technique is perfect 🙂