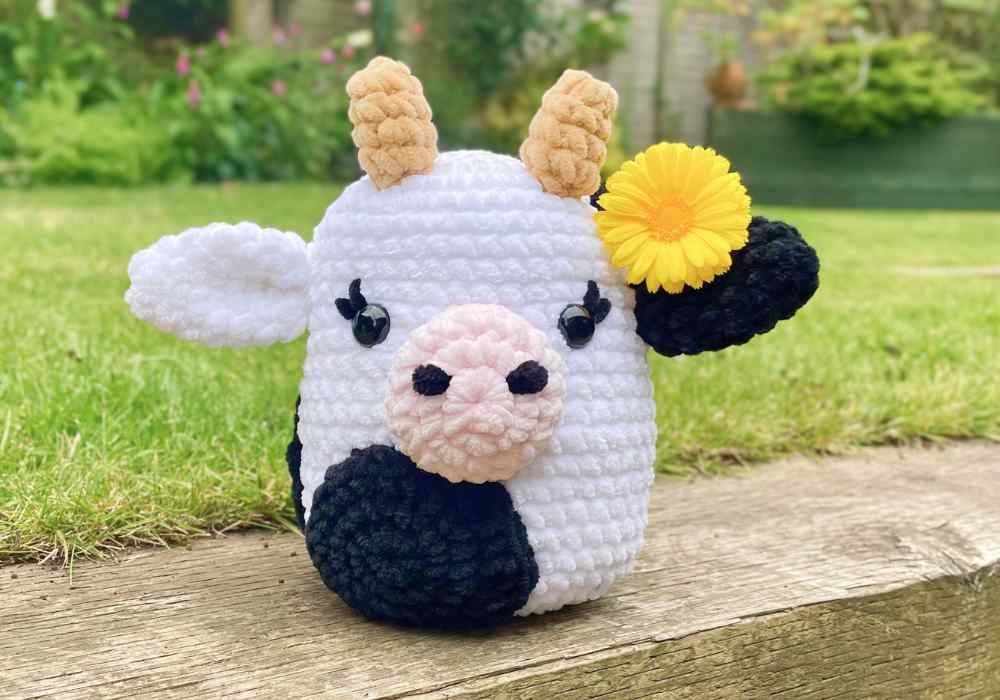
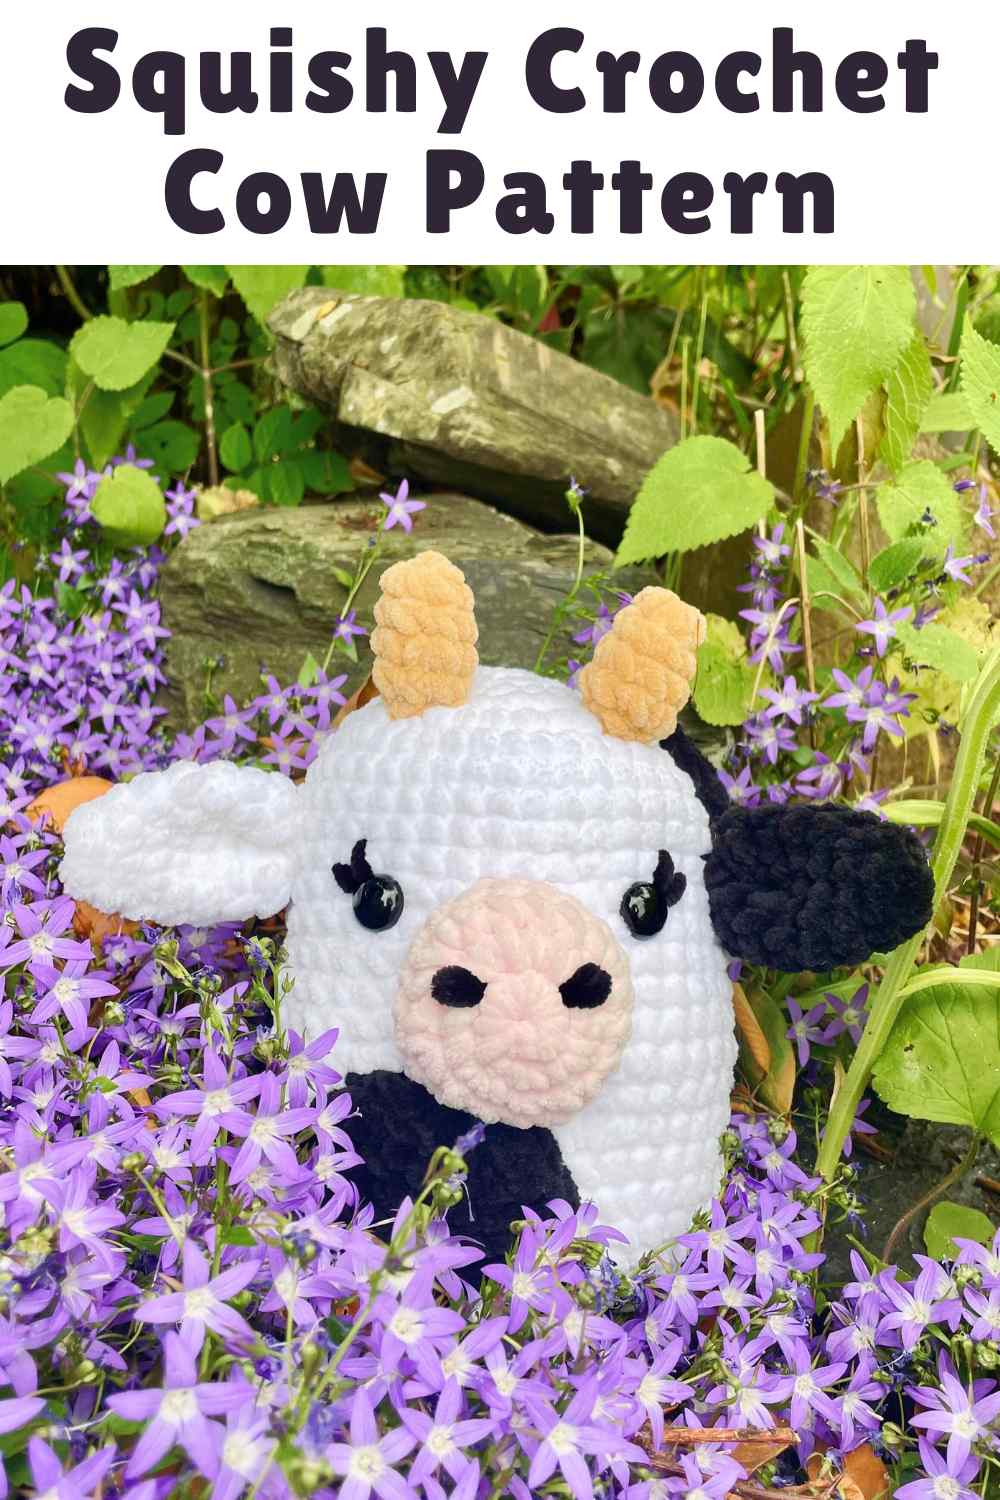
Squishy Crochet Cow Pattern
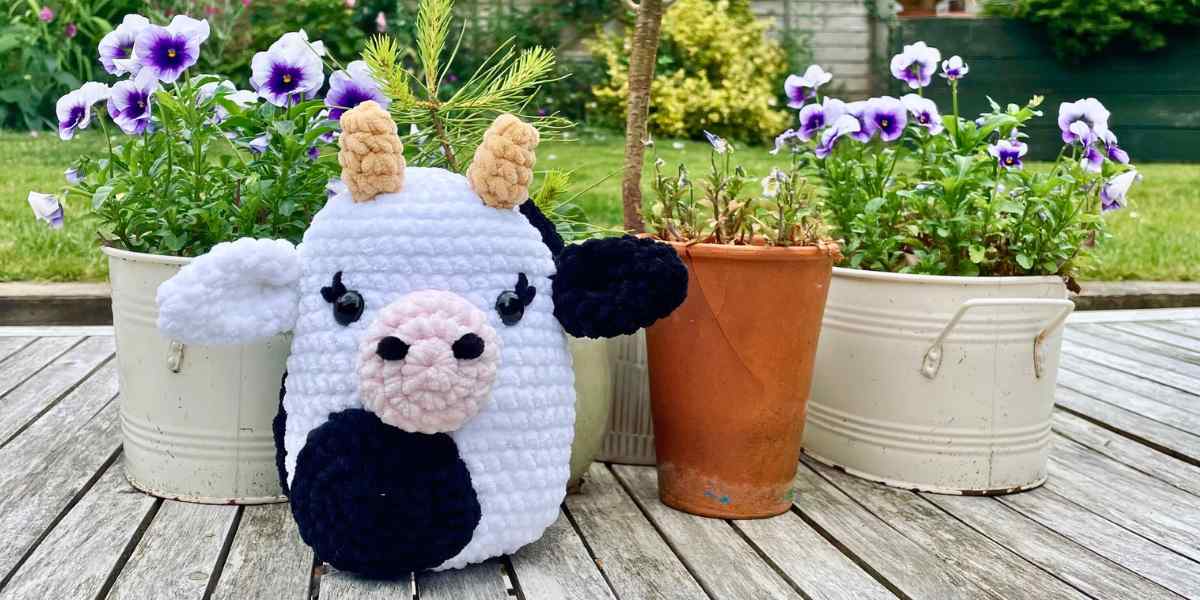
Hello and welcome to my squishy crochet cow pattern! If you’re new to crochet, or if like me you find the legs are enough to put you off other amigurumi cow patterns, then this is the project for you.

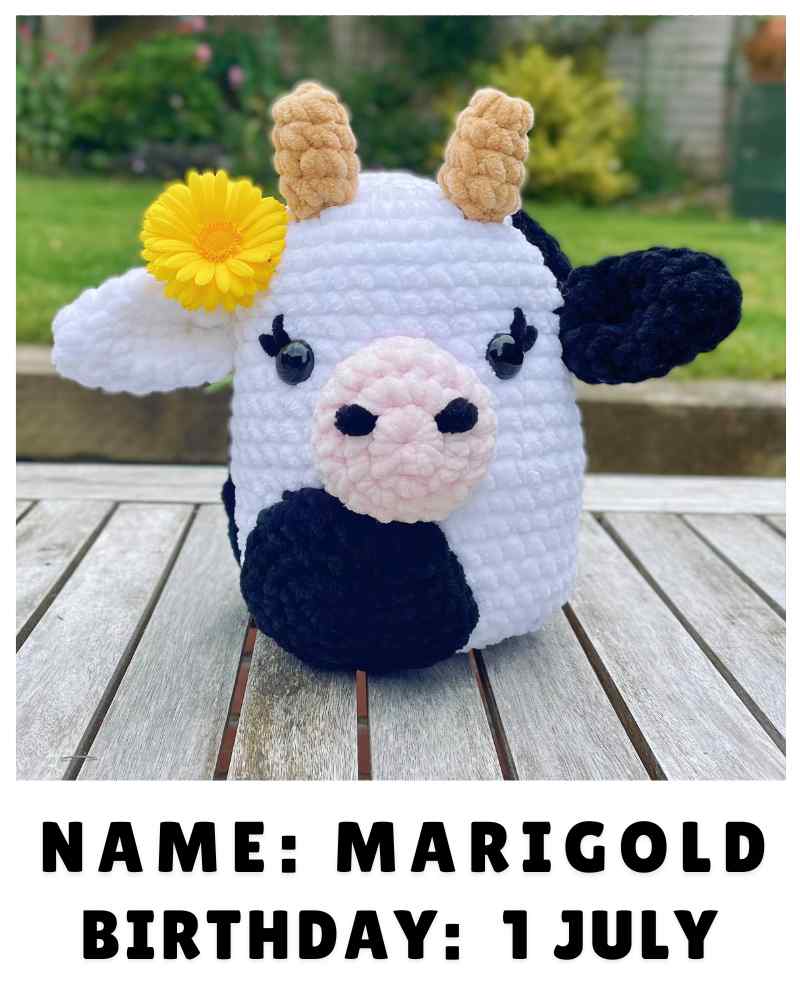
The result is cute and cuddly, but unmistakeably bovine. The pattern uses only simple crochet terms, and the size and pattern can be easily adapted to make a cow plush that’s a complete one-off.
Materials
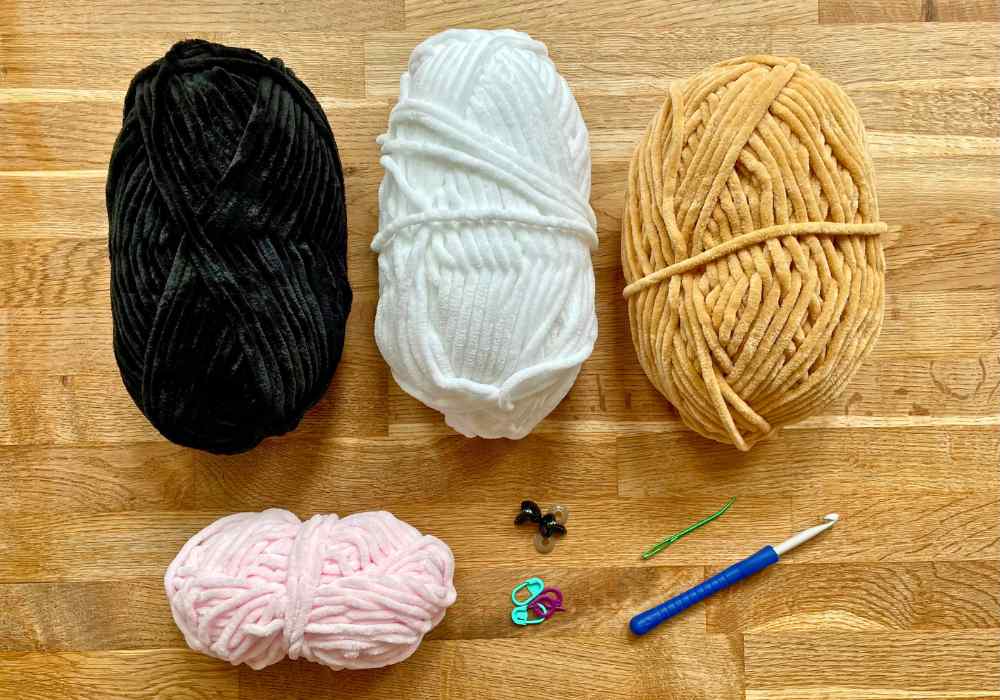
To make your own squishy cow you’ll need:
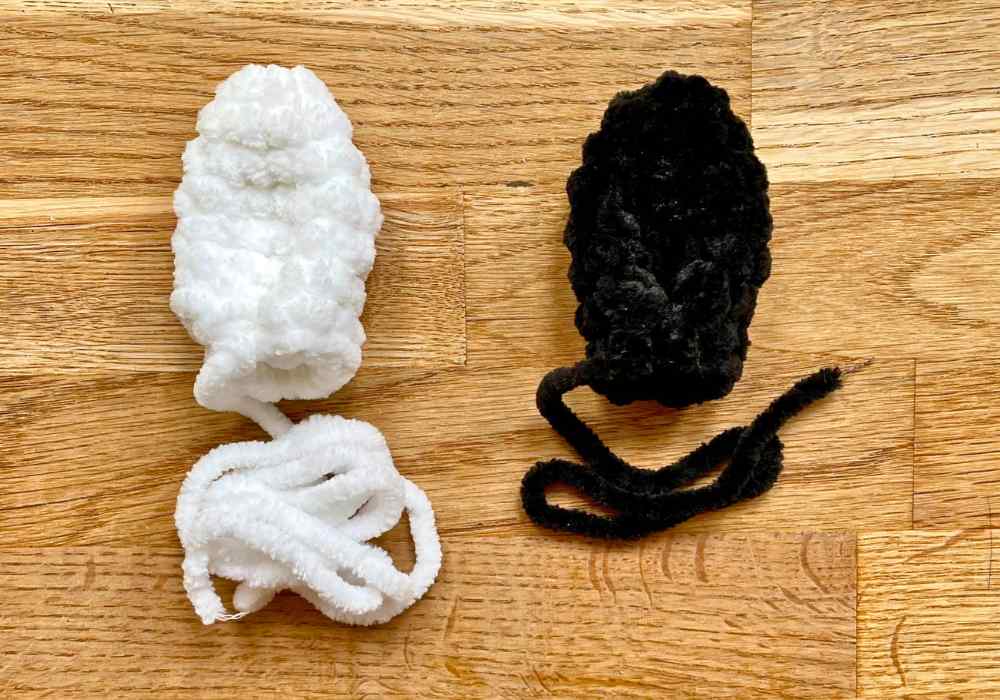
- White yarn. I’ve used King Cole yummy yarn, which is a super bulky chenille.
- Black or brown yarn for the markings. This needs to be the same weight as the yarn for the body – I’ve used King Cole Yummy yarn again.
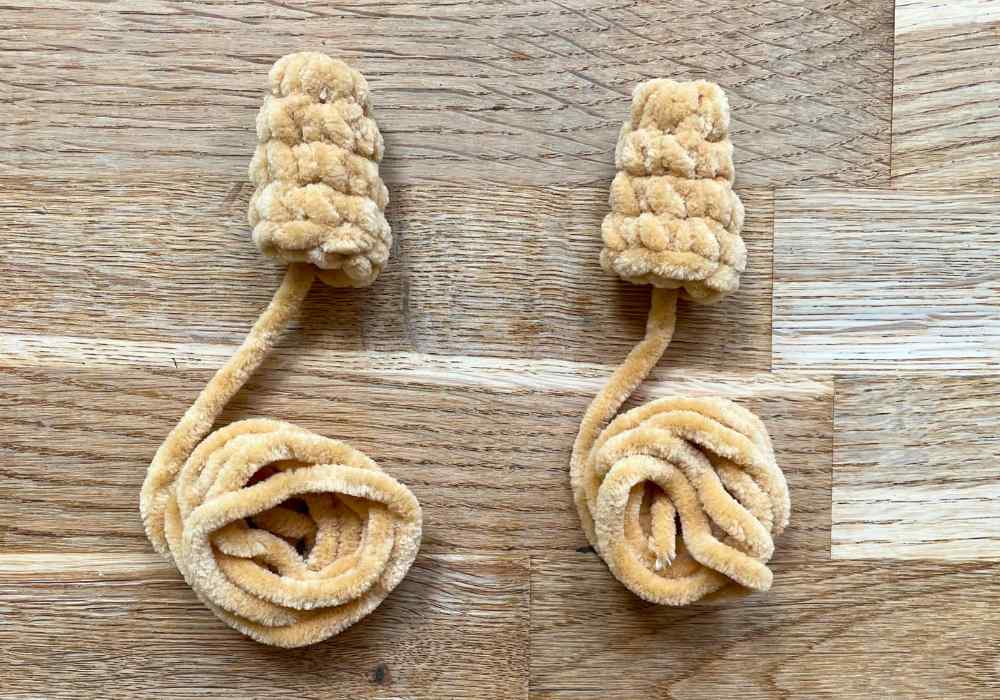
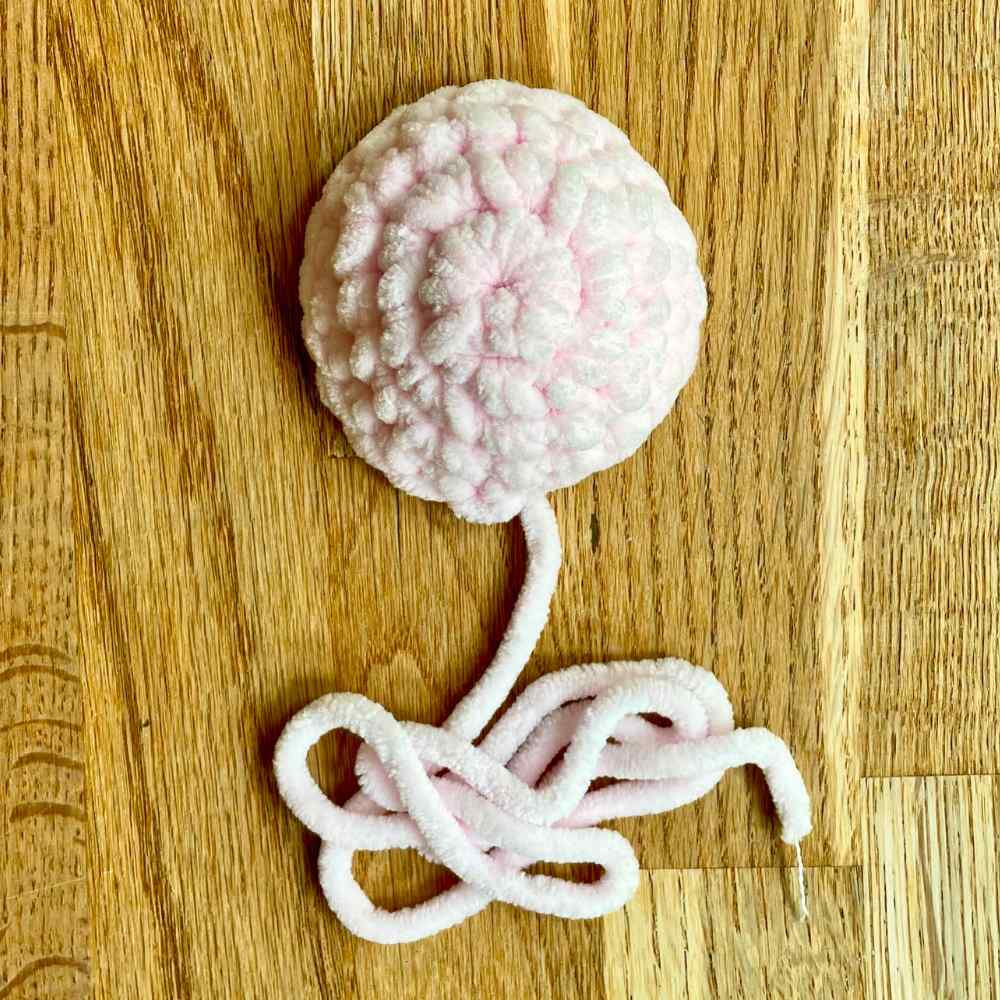
- Pink and light brown yarns for the muzzle and horns. These also needs to be the same weight as your other yarns – I’ve used Hobbii toucan yarn in light pink, and Cygnet jellybaby yarn in teddy bear.
- A crochet hook. To achieve a tight fabric that doesn’t allow the stuffing to peek through, use a hook one size smaller than the yarn wrapper recommends.
- Safety eyes. See notes on size, below.
- Toy stuffing.
- Darning needle.
You can choose any weight or fiber of yarn you like. Plush chenille yarns like I’ve used are especially cuddly, but tweed and boucle yarns are really attractive alternatives. The pattern works with any weight of yarn, but obviously the size of your cow will change according to what you choose.
- DK yarns make a cow roughly 4 inches tall.
- Worsted yarns make a cow roughly 5 inches tall.
- Bulky yarns make a cow about 6 inches tall.
- Super bulky yarns make a cow about 7 inches tall (like Marigold).
- And jumbo yarns produce a cow 8 inches tall or higher (jumbo is a bit of a catch all category for all sorts of mammoth options!)
NB. These are all rough estimates, and don’t include the horns!
Pattern notes
This pattern is written in standard U.S. crochet terms. The only stitches you need to be familiar with are:
Ch chain
Sl st slip stitch
Sc single crochet
Hdc half double crochet
Dc double crochet
Inc increase (make two single crochet in the same space)
Dec decrease
For your decreases, use the invisible decrease method: insert the hook into the front loop only of the next two stitches (fig. 1 below). Yarn over and draw through both (two loops remaining on hook), yarn over again and draw through remaining two loops (fig. 2 below).

Squishy crochet cow pattern
Your bouncy bovine is going to come together in several parts:
- Body
- Ears
- Horns
- Muzzle
- Patches
It’s quite the list, but each part taken by itself is very simple, so they add up quickly! You can start each one with either a magic circle or by making 4 chains and joining them in a loop with a slip stitch. Each piece is then made in spiraling rounds, so count the stitches in each round carefully or use a stitch marker to keep track of where the round ends.
Body
For a cow with patches (like mine, pictured throughout) make the body entirely in white yarn. For a striped cow, click here for pattern notes about color changes.
- Make a magic circle, or ch 4 and sl st to join.
- 1st round: Ch 1, sc 8 into the magic circle or 4-ch loop (8 sts)
- 2nd round: 8 inc (16 sts)
- 3rd round: *1 sc, inc* 8 times (24 sts)
- 4th round: *2 sc, inc* 8 times (32 sts)
- 5th round: *3 sc, inc* 8 times (40 sts)
- Rounds 6 – 23: Sc all the way round
- 24th round: 3 dec, sc 8, 6 dec, 8 sc, 3 dec (28 sts)
- 25th round: 3 dec, sc 2, 6 dec, 2 sc, 3 dec (16 sts)
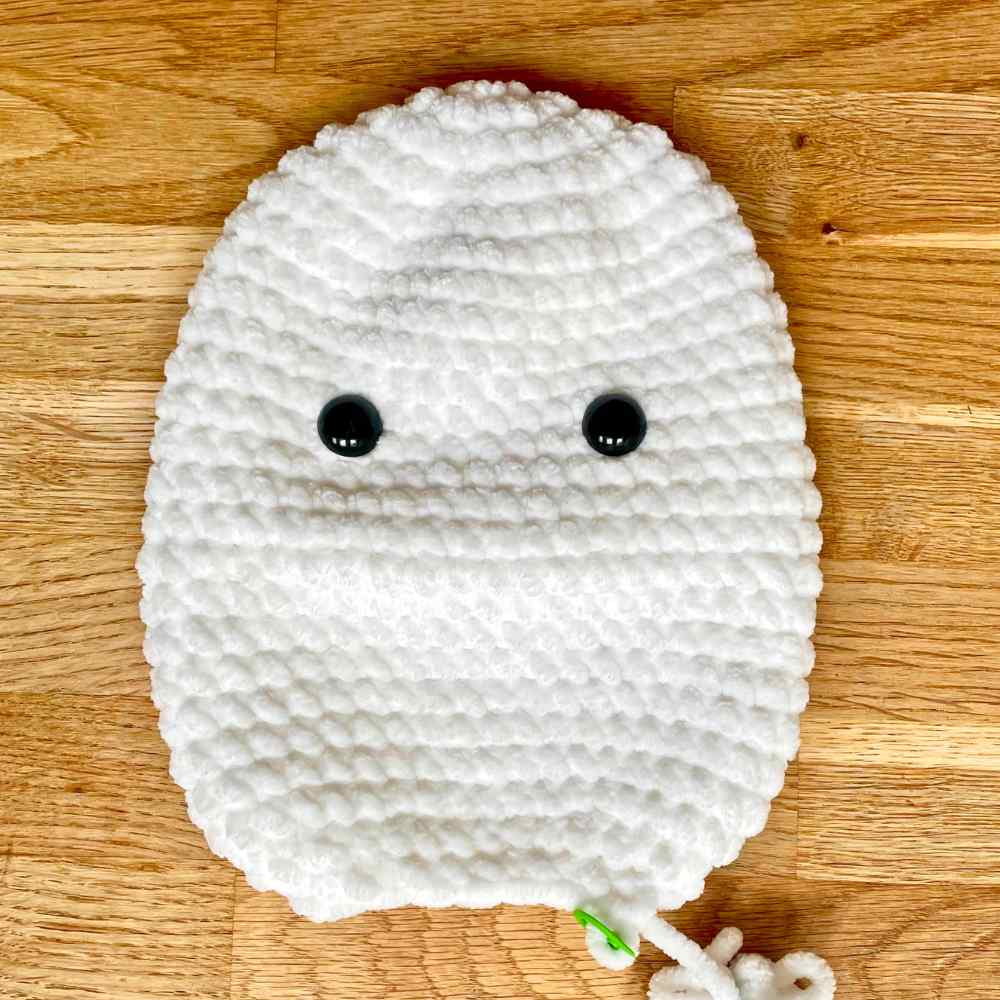
- Put a stitch marker into the loop on your hook, and cut your yarn leaving a 24 inch tail.

Ears
Make two – I’ve gone for one black and one white, but you can make them to match if you prefer!
- Make a magic circle, or ch 4 and sl st into the furthest chain from the hook to form a loop.
- 1st round: Ch 1, sc 8 into the 4-ch loop (8 sts)
- 2nd round: Sc all the way round (8 sts)
- 3rd round: *1 sc, inc* 4 times (12 sts)
- 4th & 5th rounds: Sc all the way round (12 sts)
- 6th round: *2 sc, inc* 4 times (16 sts)
- 7th round: Sc all the way round (16 sts)
- Slip stitch, skip 6 stitches, and slip stitch again, so the base of the ear folds round. Cut the yarn leaving a tail for sewing later, and pull the end right through the last slip stitch.
Horns
Make two in your light brown yarn.
- Make a magic circle, or ch 4 and sl st into the furthest chain from the hook to form a loop.
- 1st round: Ch 1, sc 6 into the 4-ch loop (6 sts)
- 2nd round: Sc all the way round (6 sts)
- 3rd round: *Sc 2, inc* twice (8 sts)
- Sl st, cut the yarn leaving a tail for sewing later, and pull the end right through the last slip stitch. Stuff each horn with a little toy stuffing.
Muzzle
Make one, using your light pink yarn.
- Make a magic circle, or ch 4 and sl st to join.
- 1st round: Ch 1, sc 8 into the magic circle or 4-ch loop (8 sts)
- 2nd round: 8 inc (16 sts)
- 3rd round: *Sc 2, inc* twice, sc 4, *inc, sc 2* twice (24 sts)
- 4th round: Sc 19, sl st.
Cut the yarn, leaving a long tail for sewing, and pull the tail right through the final slip stitch.
Patches
For me, the most fun part of developing this pattern was casting aside the rules of pattern and symmetry that are normally important in amigurumi, and experimenting with some freeform shapes for Marigold’s patches. Each patch starts with a regular circle, and finishes with an outer round that combines long and short stitches to give a wobbly edge. You don’t have to position those wobbles in exactly the same ways I did – the only thing you must remember is to increase the size of the last round by 8 stitches, so your patches remain flat!

To read these patterns, when a pair of stitches is in brackets, it means you make them in the same space – in other words, they replace a regular increase.
1st patch
- Make a magic circle, or ch 4 and sl st to join.
- 1st round: Ch 1, sc 8 into the magic circle or 4-ch loop (8 sts)
- 2nd round: 8 inc (16 sts)
- 3rd round: Sc, (hdc, dc), dc, (hdc, sc), sc, inc, sc, (sc, hdc), *dc, (dc 2)* twice, hdc, inc, sc, inc (24 sts).
- Sl st, cut the yarn, leaving a long tail for sewing, and pull the tail right through the final stitch.
2nd patch
Another way to make a patch which isn’t an unnaturally perfect circle is to leave your final round incomplete:
- Make a magic circle, or ch 4 and sl st to join.
- 1st round: Ch 1, sc 8 into the magic circle or 4-ch loop (8 sts)
- 2nd round: 8 inc (16 sts)
- 3rd round: *1 sc, inc* 8 times (24 sts)
- 4th round (incomplete): Hdc, dc, (dc 2), dc, hdc, inc, sc 2, (sc, hdc), dc 2, (dc, hdc), sc 2, inc
- Sl st, cut the yarn, leaving a long tail for sewing, and pull the tail right through the final stitch.
3rd patch
- Make a magic circle, or ch 4 and sl st to join.
- 1st round: Ch 1, sc 8 into the magic circle or 4-ch loop (8 sts)
- 2nd round: 8 inc (16 sts)
- 3rd round: *1 sc, inc* 8 times (24 sts)
- 4th round: *2 sc, inc* 8 times (32 sts)
- 5th round (incomplete): Sc 3, (hdc, dc), dc2, hdc, inc, sc, hdc, dc, (dc 2), dc 2, hdc, inc, sc 2, hdc, (dc 2), dc 2, hdc, inc
Don’t fancy patches?
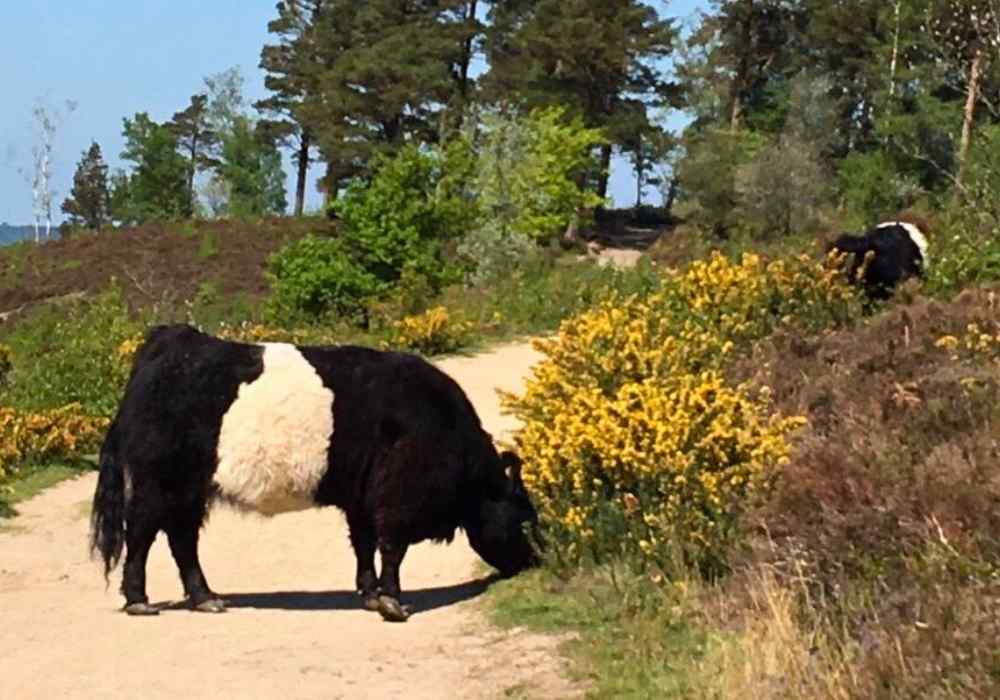
If patches don’t appeal to you, then you can leave them off – but my 10 year old daughter thinks this makes the pattern look more like a goat! Another alternative is to make your cow’s body with stripes. Three alternating stripes of black and white would resemble these beautiful Belted Galloway cattle I was lucky to encounter on a recent hike:
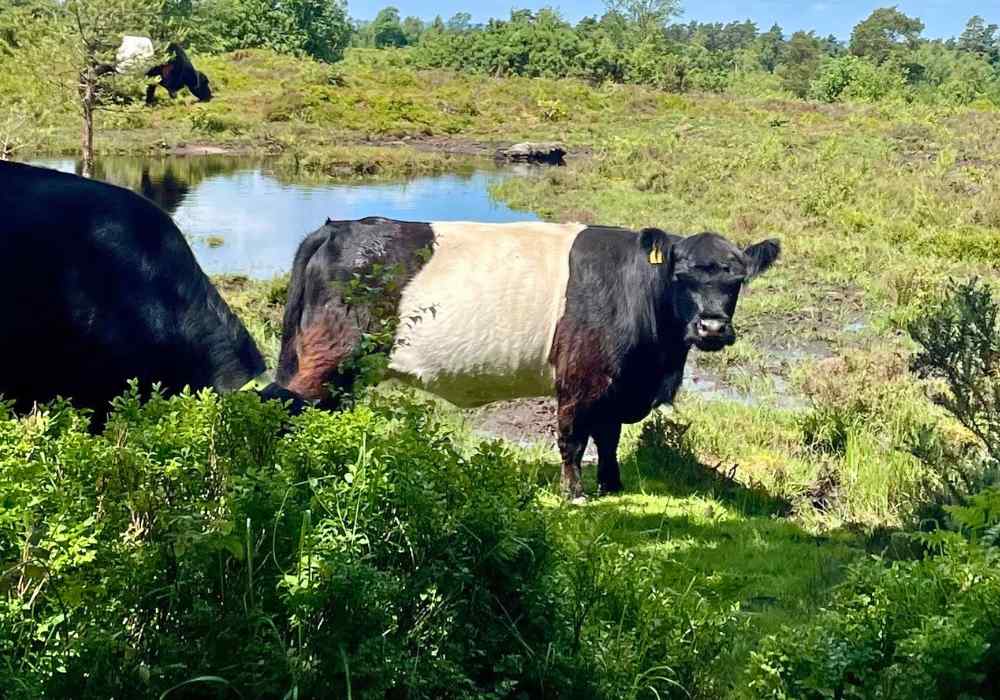
To achieve this look, start the body in black or brown yarn, switch to white at the start of round 10, and back to black or brown at the start of round 19.
Assembling your cow
Now you have a substantial pile of cow parts in front of you, it’s time to bring them to life! Start by laying the body out flat in front of you, with the opening at the bottom running from left to right. Position the eyes about 8 stitches apart, between rows 11 and 12.
Press the backs on securely, then fill the body firmly with toy stuffing. Picky your crochet hook back up for one last round:
- 26th round: Dec 8 (8 sts)
Slip stitch once, and pull the yarn tail right through the stitch. Thread the tail onto a darning needle and use it to sew the remaining stitches closed – mattress stitch through the front loops only works best.
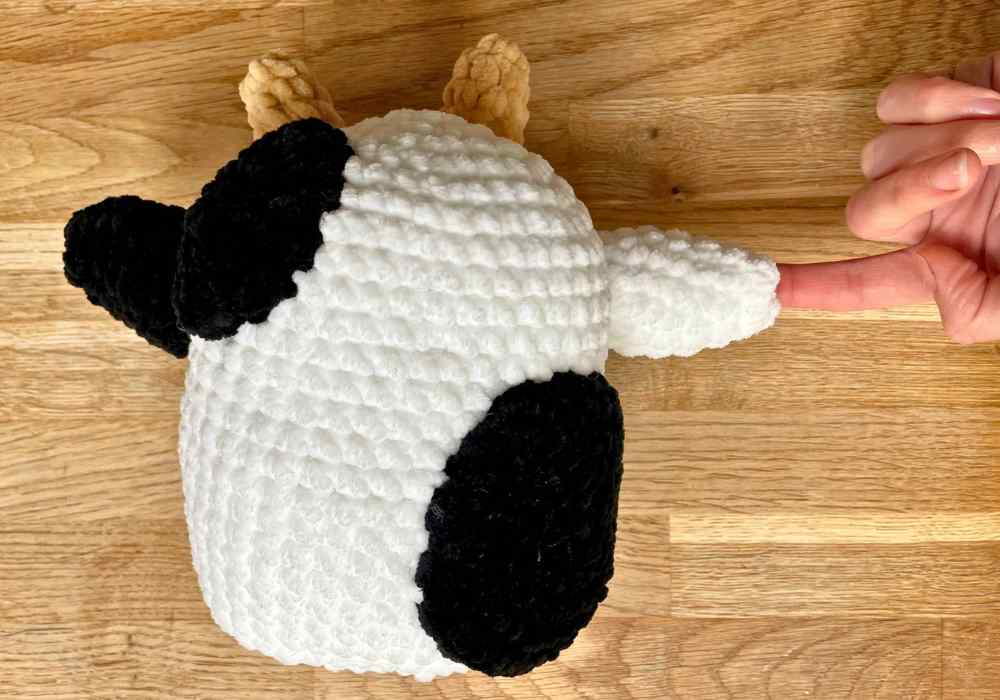
Attaching the ears and horns
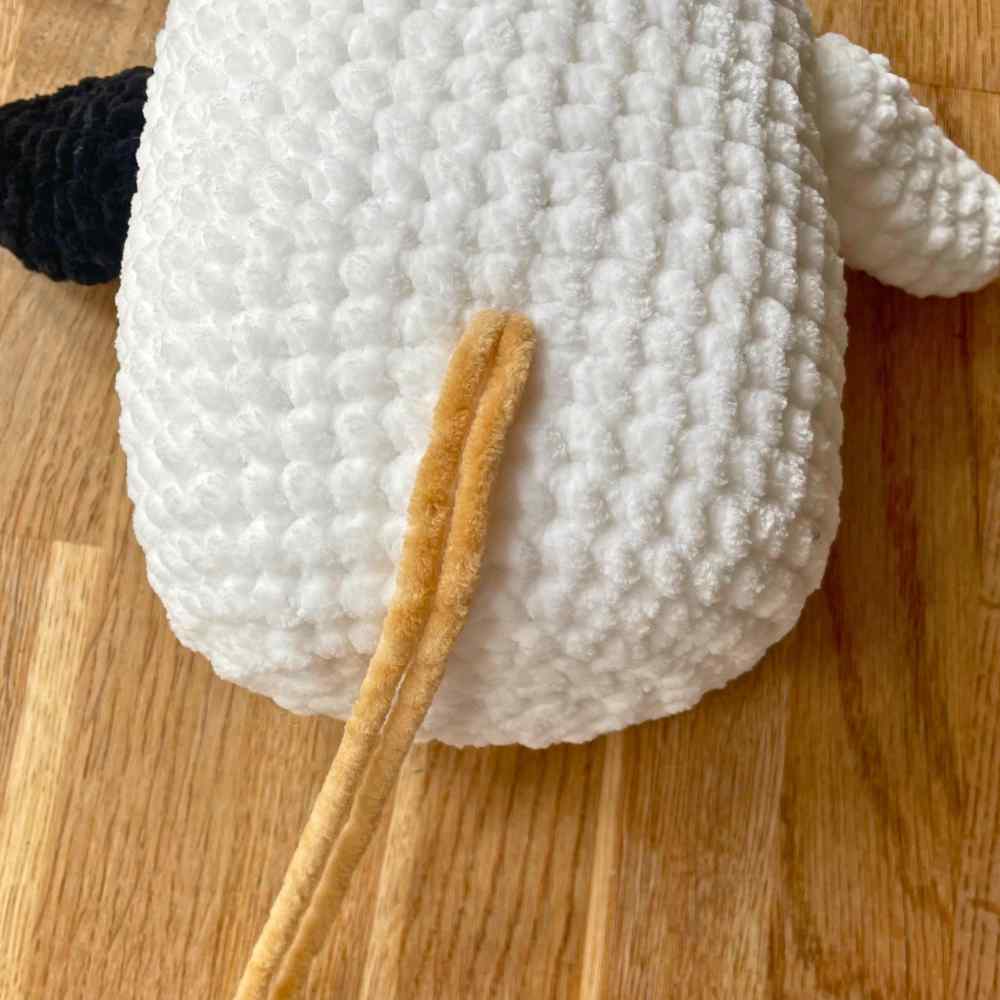
Next sew the ears onto the sides of the head, so that the bottom edge of the join is about level with the top of the eye. Join the horns to the top of the head slightly forwards of the ears, and directly above the eyes. For the ears and horns, I find the easiest thing to do is sew round the join, then feed the yarn tail out through the back of the body. When you’ve joined the second ear/horn, feed the yarn tail out through the same spot. Knot them together, trim the ends, and poke the knot back inside the body. The stuffing will anchor it in place.
Position the muzzle in front of you with the yarn tail towards your body. Use some black yarn to add nostrils – I’ve used the same black yarn I used for the ear and patches, but doubled up. Each nostril is a single stitch, and the yarn ends are tied together inside the muzzle. Then hold the muzzle in position against the body so that the yarn tail faces downwards, and the top of the muzzle sits about level with the tops of the eyes. Sew ¾ of the way round the edge, then poke some stuffing inside before you close the remaining gap.
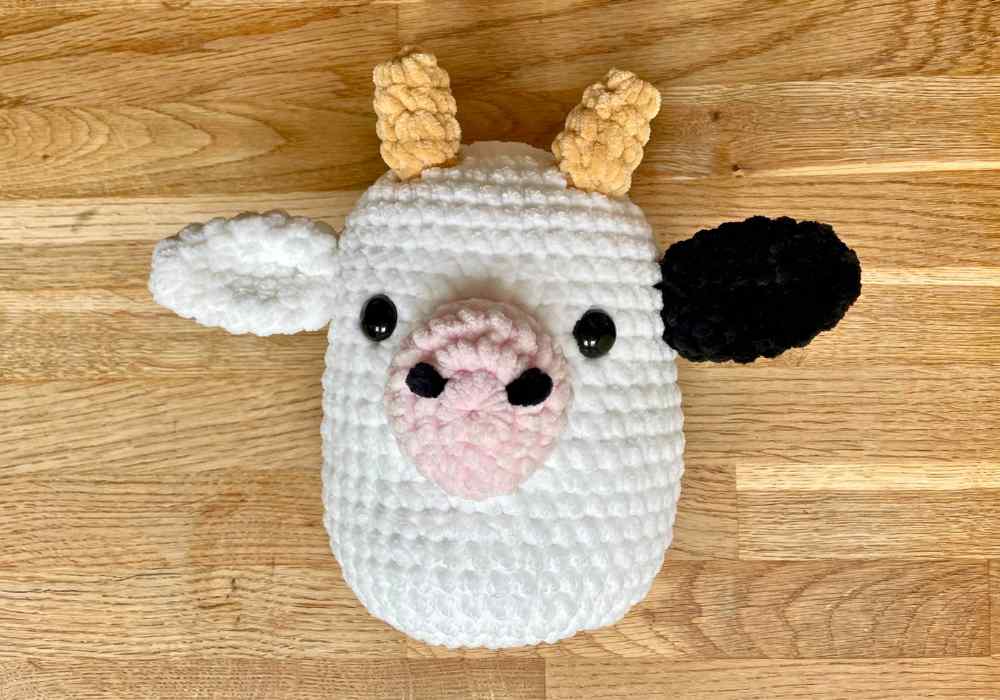
Eyelashes
Cows are famous for their fluttering long lashes, and I think our squishy deserves some too! Adding them is easy – cut a length of yarn about three times the width of your cow’s body. Tie a loose overhand knot in the center, and tighten it around the stem of the eye.
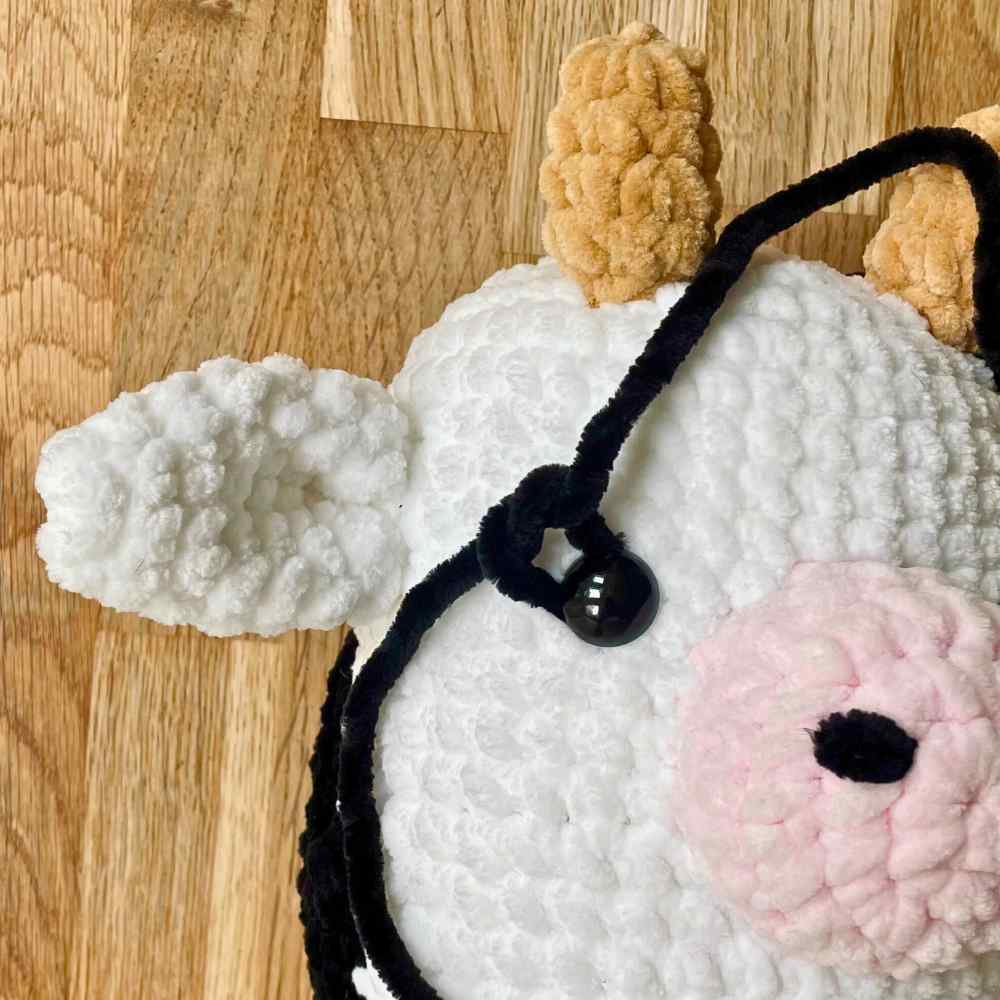
Use a darning needle to thread each end of the yarn right through the body, so they come out through the same spot – as with the ears and horns. Tie them together, trim the ends, and tuck the knot inside the body.
Sewing on the patches
Finally, arrange the patches and sew them in place. There are no rules here – this is the moment to make your cow completely one-of-a-kind.

Squishy crochet cow summary
I’ve really enjoyed coming up with an amigurumi interpretation of a cow without the fiddly legs. I think the results are pretty cute! For a more lifelike take on a crochet cow, take a look at Lucy’s shaggy highland cow, and Texas longhorn cow patterns. I love the how much possibility there is in crochet for such different interpretations of the same idea! If you’re on social media, we’d love to see how your own cow turns out – you can tag Lucy in a photo on Facebook or Instagram. Happy crocheting!
There’s more!
Don’t miss these other gorgeous squishy animal patterns!
Love the pattern and worked on a unicorn-but the body was just a large tube! How do you get this shape ?
Hi Kim, Sorry to hear the shape didn’t turn out as you’d expected. If you’d like to email me a picture of it to hello@lucykatecrochet.com I will see if I can work out what has happened 🙂