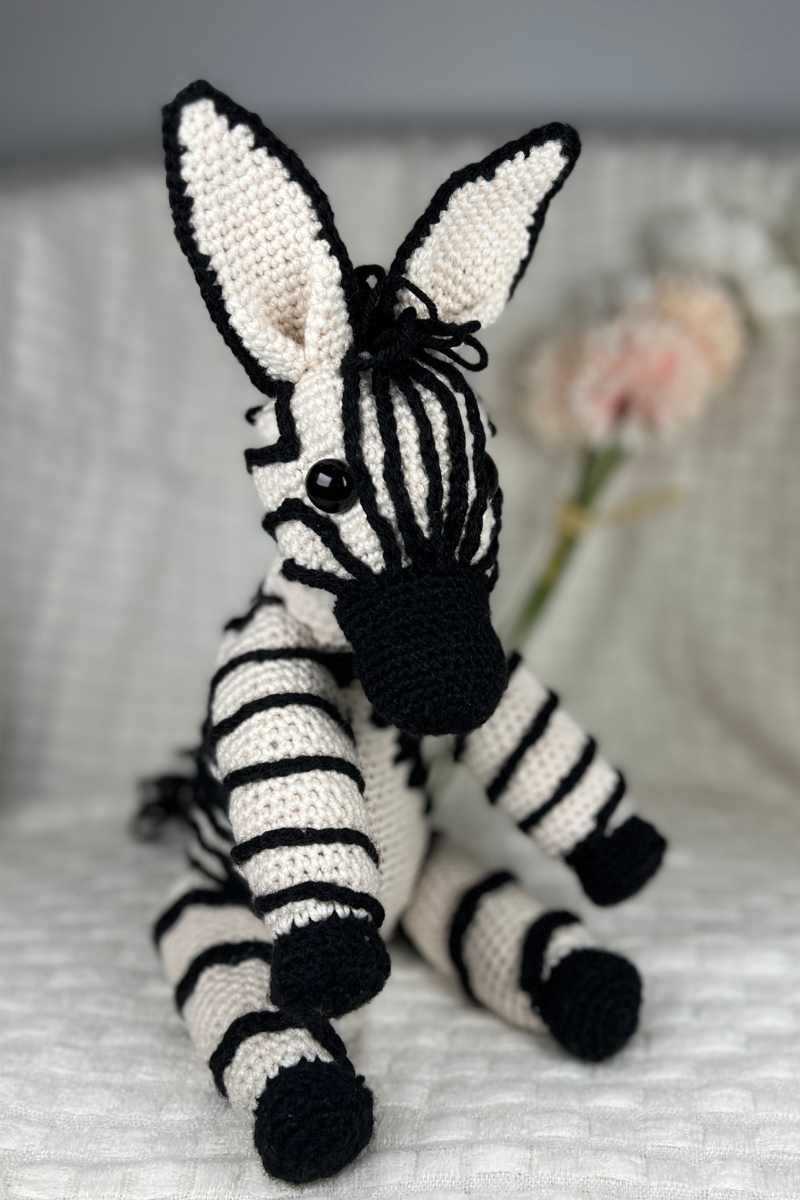
Unique Crochet Zebra Pattern

I’ve got to tell you, this crochet zebra is probably one of the most complicated patterns I’ve ever created. But, stay with me, it won’t be nearly so tricky for you to follow along with as it was for me to design! I’ll explain.

My free crochet zebra pattern has a unique twist. The stripes aren’t made with color changes, aside from the muzzle, they are all crocheted strips that are hand sewn onto the toy. This technique was a bit of a departure from the amigurumi norm for me, but it enabled me to produce markings that actually look like a real zebra. I didn’t want toy zebra stripes, I wanted the twists and angles of the real gorgeous creature. And I think I got pretty close.
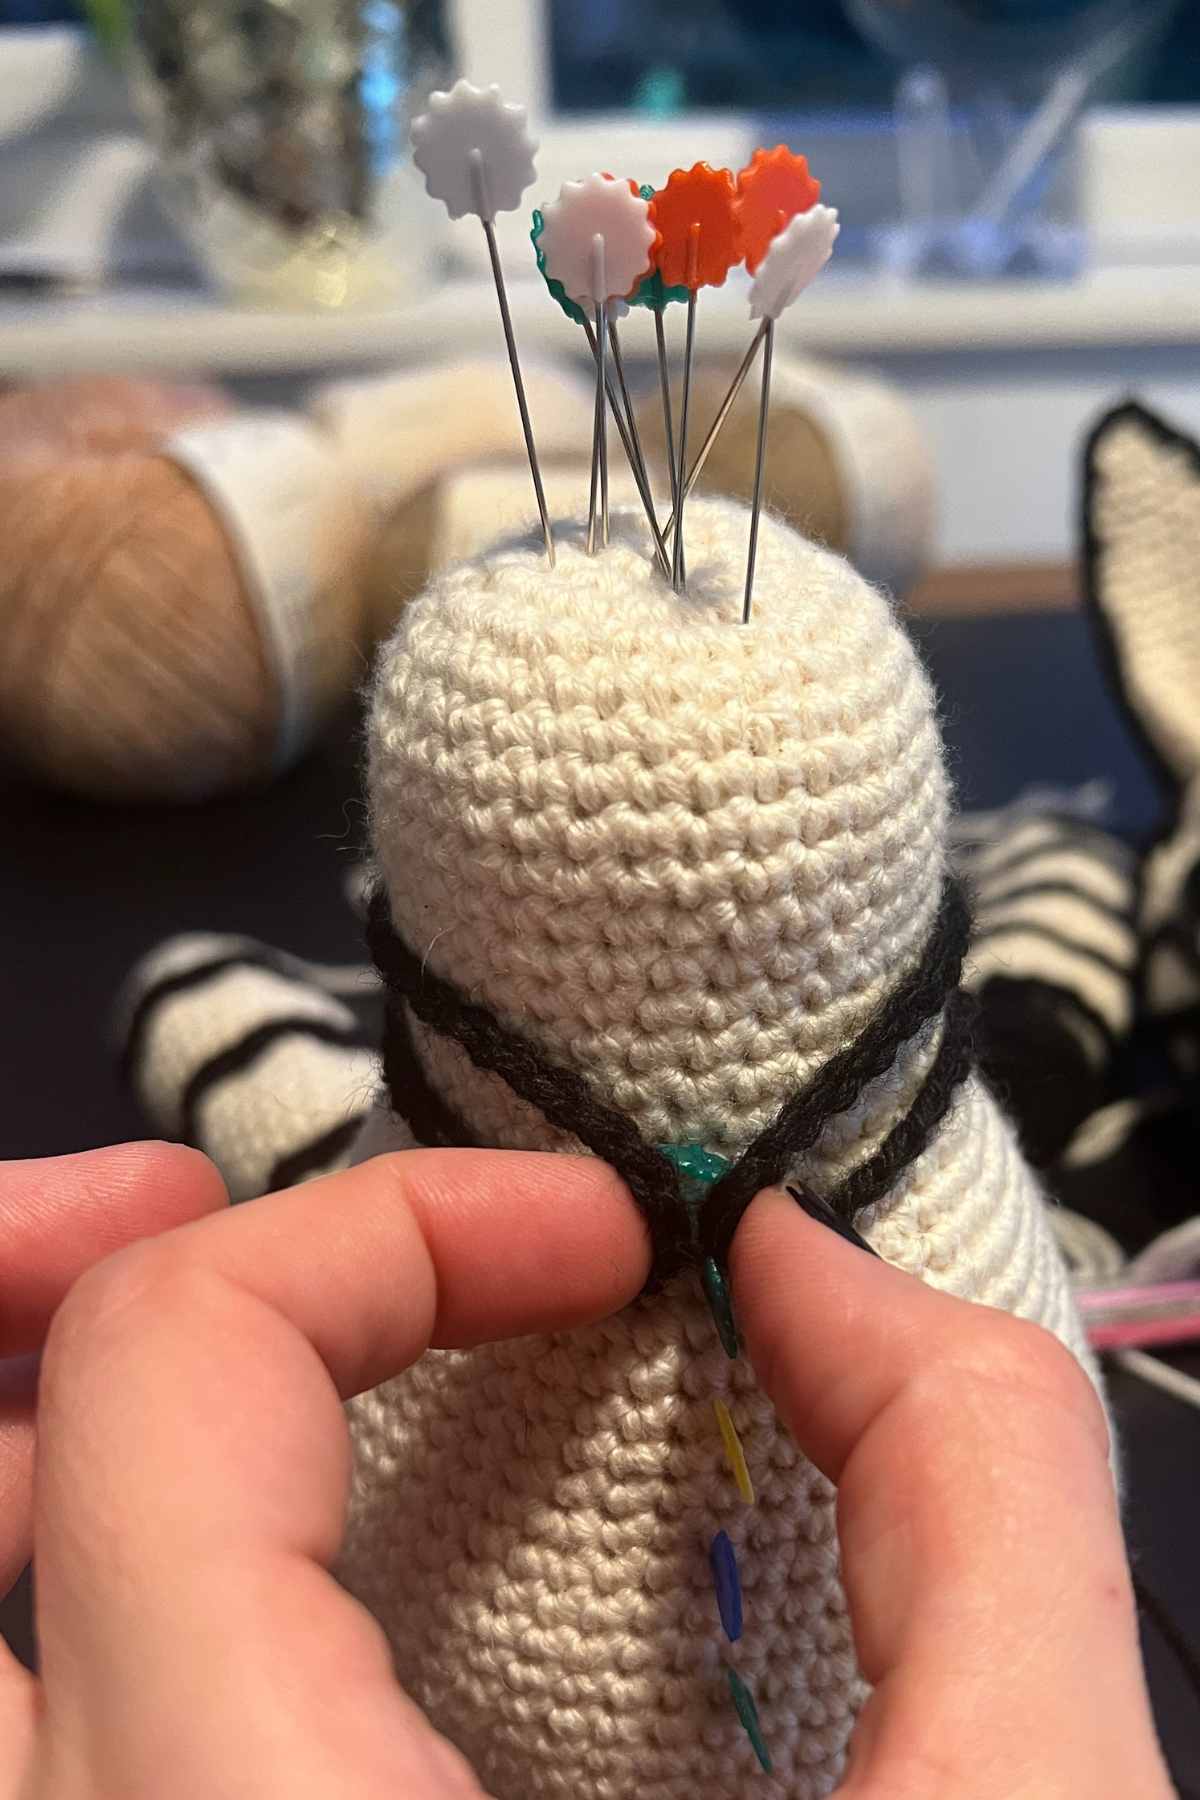
I’ve taken detailed photos of my design process from start to finishing touches for you to follow along with, just remember to have a bunch of pins handy as well as your usual crochet kit!
I created this toy as a gift for a family friend, who adored my daughter’s horse and son’s donkey from my previous designs.
What I Used
- 50g Sirdar Country Classic DK* black yarn
- 100g Happy Place DK almond yarn
- 3.5mm crochet hook
- 2.5mm crochet hook
- 16mm safety eyes*
- Tapestry needle
- Toy safe stuffing*
- Stitch markers
- Pins
I’ve shared the yarns I used, but you should be able to swap out of DK weight cotton blend black and white yarns and get a very similar effect.
Techniques and Terms
- sc – single crochet
- 2sc – two single crochets into the same stitch
- sc2tog – use one single crochet to join two stitches together
- slst – slip stitch
- sk – skip the next stitch
- ch – chain
- cc – color change
- surface crochet
- BLO – back loop only
The Crochet Zebra Pattern
You are going to crochet your zebra broadly speaking in three sections. There will be crocheting the body parts, crocheting the stripes, and sewing the stripes on and toy together. I’ll walk you through each bit, and if you have any questions drop them in the comments section below.
Crochet Zebra’s Head

You are going to begin the zebra’s head with the muzzle, starting off with the black yarn and 3.5mm crochet hook.
Round 1
Make a magic circle of eight stitches (8)
Round 2
2sc x 8 (16)
Round 3
(1sc, 2sc) x 8 (24)
Round 4 – 5
1sc x 24 (24)
Round 6
(1sc x 2, 2sc) x 8 (32)
Round 7 – 9
1sc x 32
Round 10
(1sc x 2, sc2tog) x 8 (24)
Round 11
1sc x 24
Round 12
(1sc x 2, 2sc) x 8 (32)
Round 13 – 15
1sc x 32
cc almond
Round 16 – 17
1sc x 32
Round 18
(1sc x 3, 2sc) x 8 (40)
Round 19 – 20
1sc x 40
Round 21
(1sc x 4, 2sc) x 8 (48)
Round 22 – 24
1sc x 48
Round 25
(1sc x 5, 2sc) x 8 (56)
Round 26 – 28
1sc x 56
Round 29
(1sc x 5, sc2tog) x 8 (48)

Round 30
1sc x 48
Round 31
(1sc x 4, sc2tog) x 8 (40)
Round 32
1sc x 40
Round 33
(1sc x 3, sc2tog) x 8 (32)
Round 34
1sc x 32
Insert your safety eyes into the face. I aim to have them about round 24, and approximately 20 stitches apart. You can tie the eyes together to draw them into the face if you’d like. I also recommend stuffing the muzzle at this point.
Round 35
(1sc x 2, sc2tog) x 8 (24)
Round 36
(1sc, sc2tog) x 8 (16)
Fill the rest of the head with toy stuffing.
Round 37
sc2tog to close, then tie off.
Adding the head stripes

Your head is going to have stripes made up of looped chains, that you’re going to sew onto the head. So you’ll make each chain length, slip stitch into the first stitch to join as a circle, place with pins and then sew them on.
You’ll need chains that are 12, 60, 40, 30 and 35 stitches in length. The chain 12 is the only one you won’t loop, it just goes straight up the head from muzzle to hairline.

Place them as shown in the pictures.

Zebra Ears
Create the ears in your almond yarn with the 3.5mm crochet hook.

Round 1
Make a magic circle of six stitches (6)
Round 2 – 3
1sc x 6
Round 4
2sc x 6 (12)
Round 5 – 7
1sc x 12
Round 8
(1sc, 2sc) x 6 (18)
Round 9 – 14
1sc x 18
Round 15
(1sc x 2, 2sc) x 6 (24)
Round 16 – 19
1sc x 24
Round 20
(1sc x 3, 2sc) x 6 (30)
Round 21
1sc x 30
Edging the ears

To give black definition to your ears, you are going to first fold them into shape. I do this by sewing the ear flat and joining the two bottom corners together in the center.
Now swap to your black yarn and grab your 2.5mm crochet hook. Starting at the head level, holding the ear flat as you want it, make single crochets around the circumference of the shape.
You can now sew your ears onto the top of the head, leaving a stitch wide gap at the top between them. Sew with your almond yarn, and using a tapestry needle for this finer work.
Crocheting the Body
Crochet your zebra’s body in almond yarn with the 3.5mm crochet hook.

Round 1
Make a magic circle of eight stitches (8)
Round 2
2sc x 8 (16)
Round 3
(1sc, 2sc) x 8 (24)
Round 4
(1sc x 2, 2sc) x 8 (32)
Round 5 – 16
1sc x 32
Round 17
(1sc x 3, 2sc) x 8 (40)
Round 18 – 19
1sc x 40
Round 20
(1sc x 4, 2sc) x 8 (48)
Round 21 – 24
1sc x 48
Round 25
(1sc x 5, 2sc) x 8 (56)
Round 26 – 42
1sc x 56
Round 43
(1sc x 5, sc2tog) x 8 (48)
Round 44
(1sc x 4, sc2tog) x 8 (40)
Round 45
(1sc x 3, sc2tog) x 8 (32)
Round 46
(1sc x 2, sc2tog) x 8 (24)
Round 47
(1sc, sc2tog) x 8 (16)
Fill with toy safe stuffing.
Round 48
sc2tog to close
Body stripes

Your body stripes will be created in the same way as the face stripes, but the placement is less fiddly. You’re going to make seven looped chains of 75.
Sew them onto the body, leaving naturally increasing white space at the center. This will be lined up with the face later on.
Zebra’s Arms
Begin your arms in black yarn, and using your 3.5mm crochet hook.
Round 1
Make a magic circle of eight stitches (8)
Round 2
2sc x 8 (16)
Round 3
(1sc, 2sc) x 8 (24)
Round 4
(1sc x 2, 2sc) x 8 (32)
Round 5
BLO (1sc x 2, sc2tog) x 8 (24)
Round 6
1sc x 24
Round 7
(1sc, sc2tog) x 8 (16)
Round 8
1sc x 16
cc almond
Round 9
(1sc, 2sc) x 8 (24)
Round 10 – 32
1sc x 24
Round 33
(1sc, sc2tog) x 8 (16)
Fill with toy stuffing.
Round 34
sc2tog to close
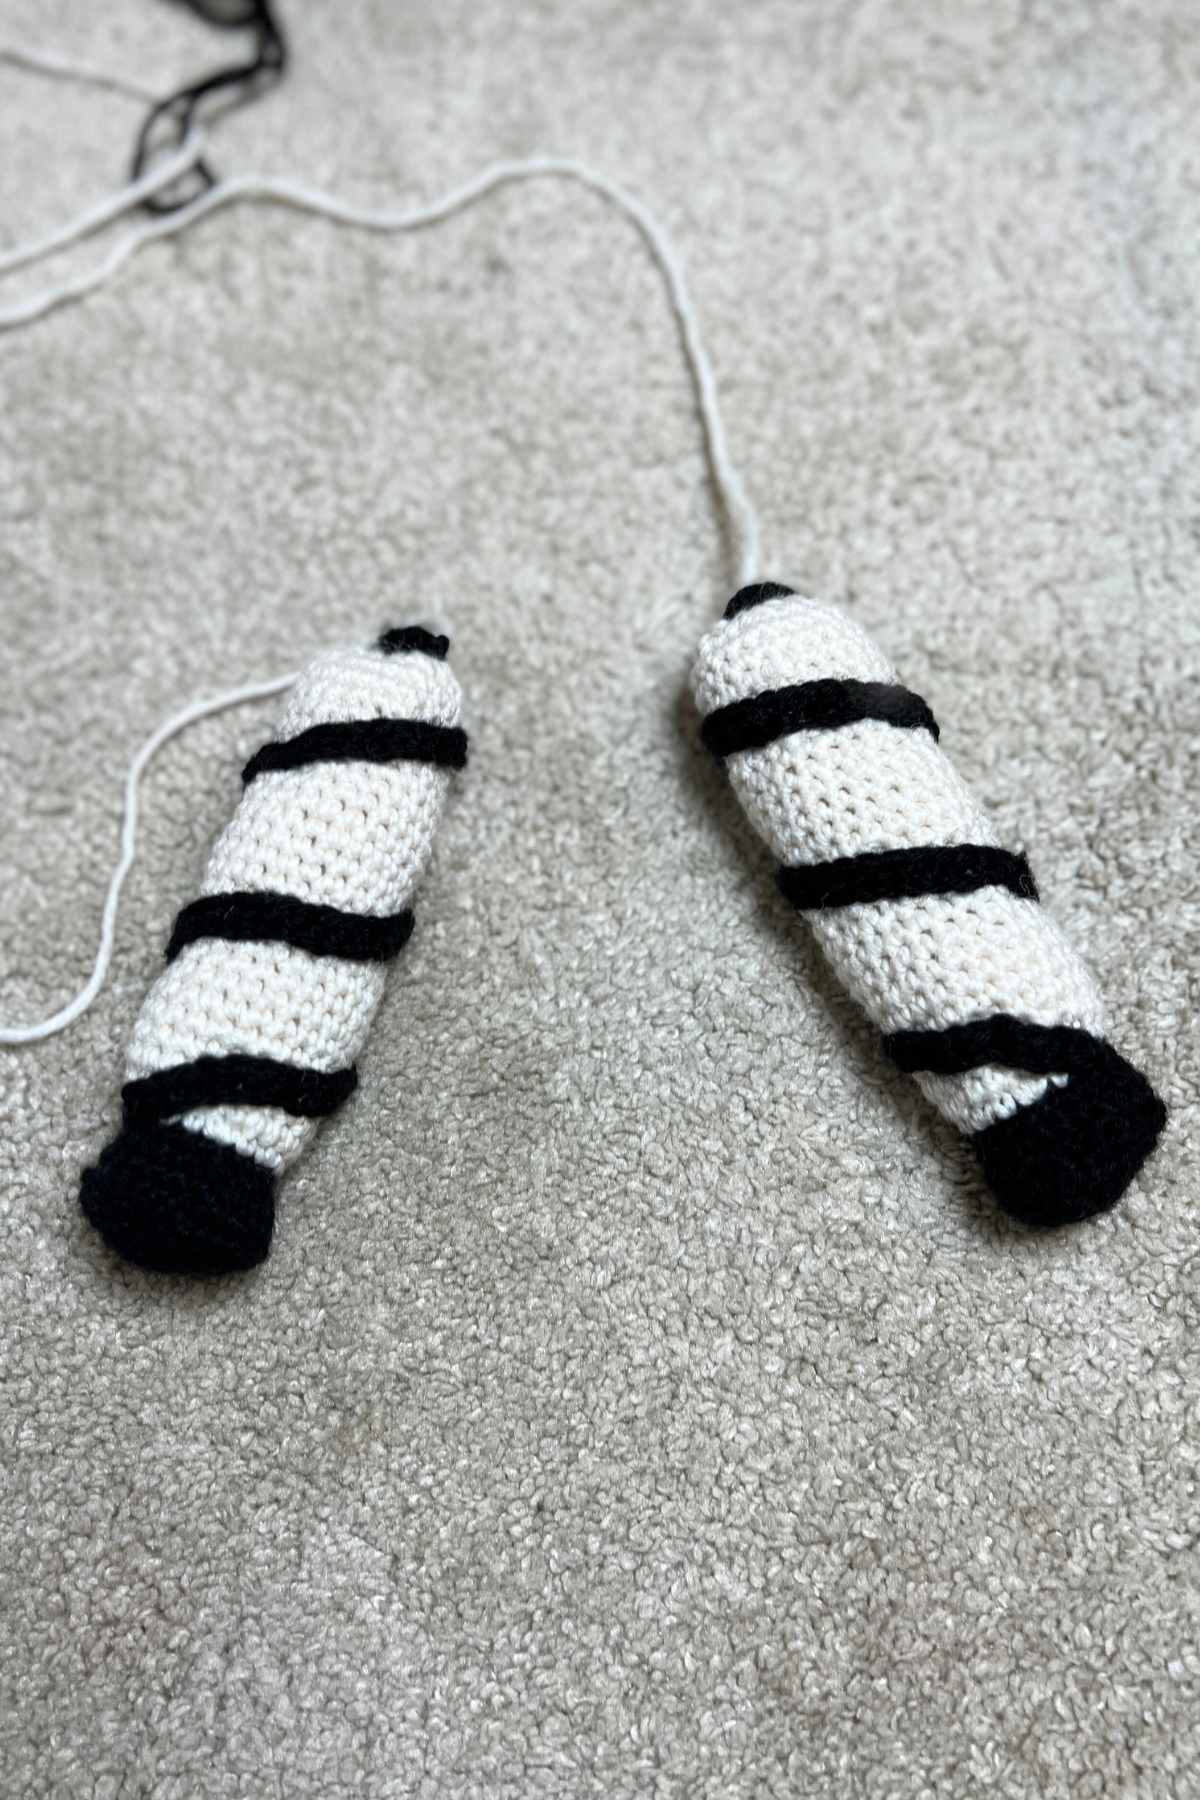
The arm stripes
Crochet your arm stripes as chains of 120 stitches for each arm. You will then need to hand sew the stripes in opposite directions on each limb.
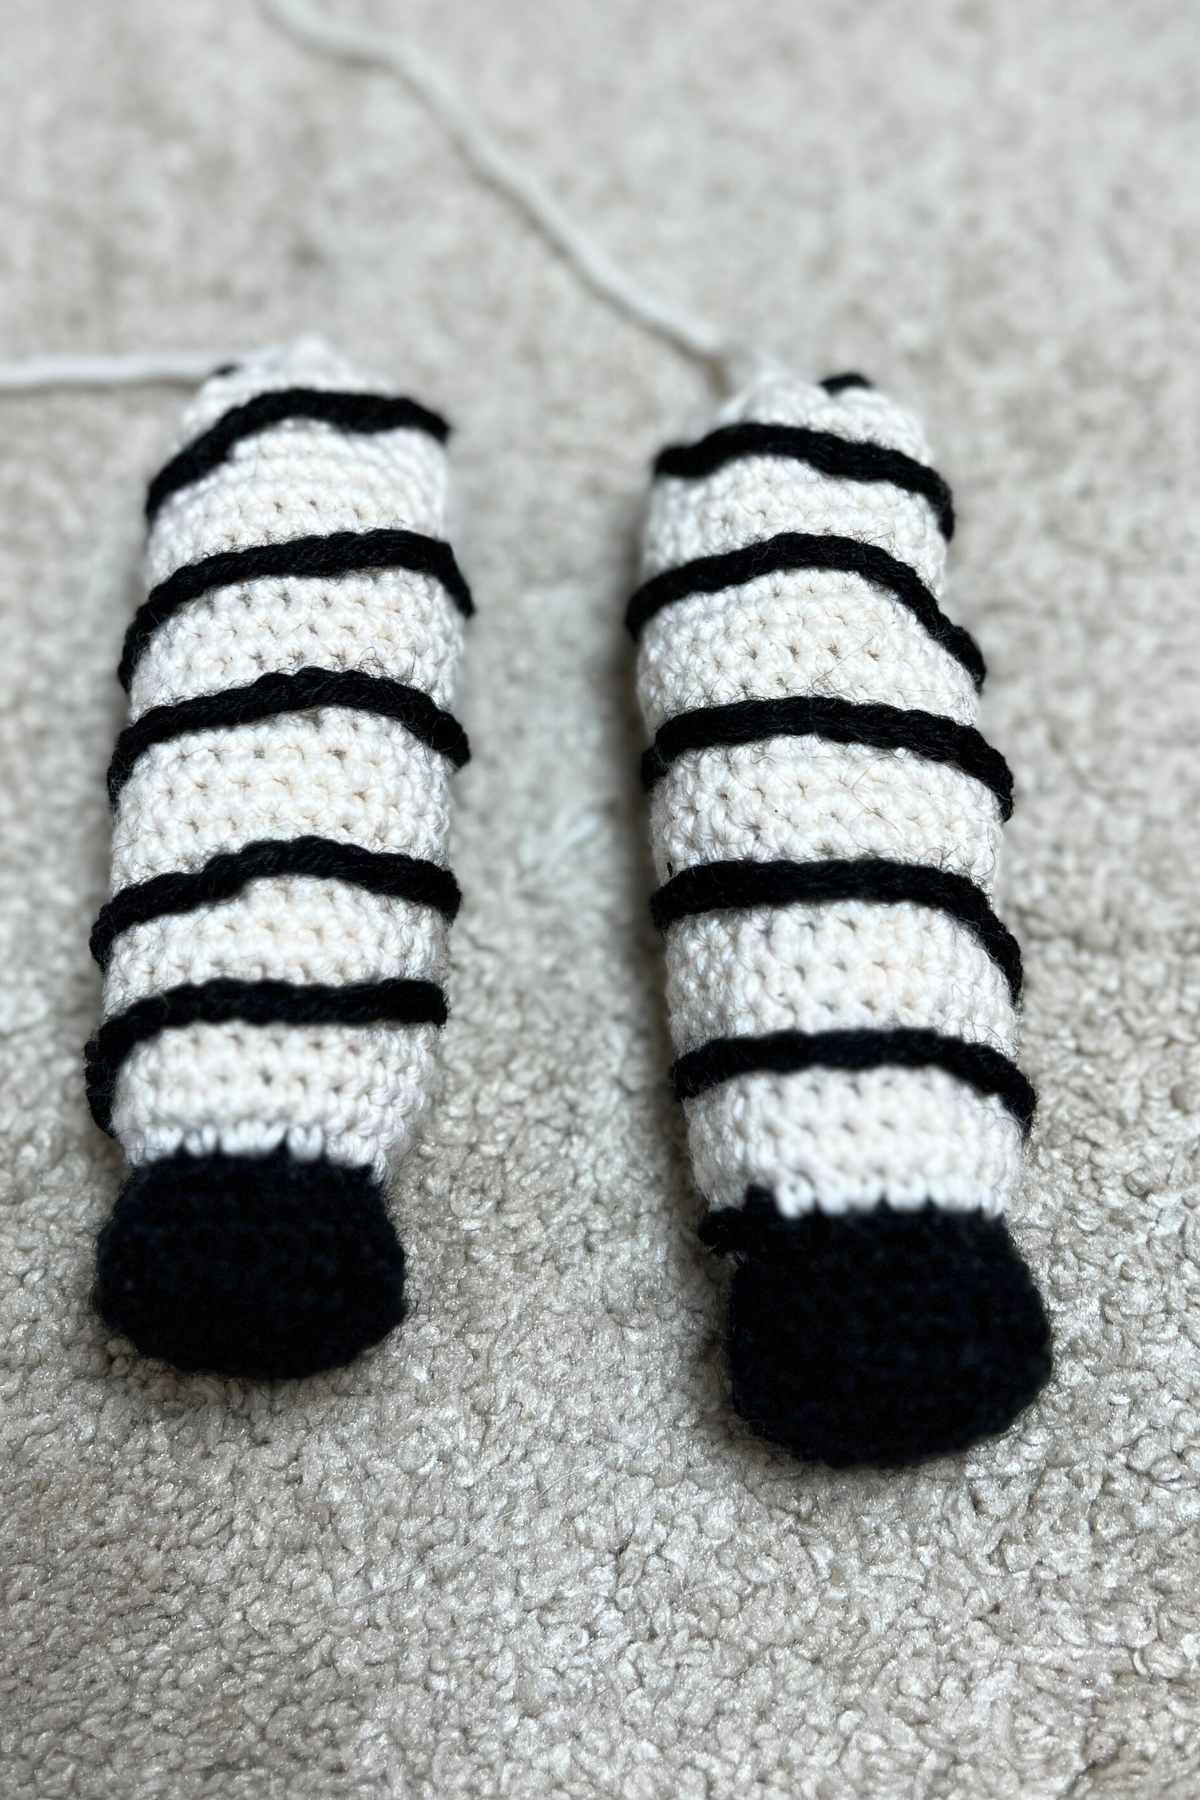
Crochet Zebra’s Legs
Follow the arm pattern to create your legs, but you’re going to do the stripes a little differently.
Stripes for the legs
Your leg stripes are going to be sewn as two long chains, one for each arm. Ch81, sk, 1sc x 80, then sew this thicker stripe on as symmetrical spirals, rotating in opposite directions to each other.
The Tail

Work in your almond yarn with your 3.5mm crochet hook.
Round 1
Make a magic circle of eight stitches (8)
Round 2
2sc x 8 (16)
Round 3 – 15
1sc x 16
Fill with toy stuffing, and sew onto the back end of your body section.
Tail fluff
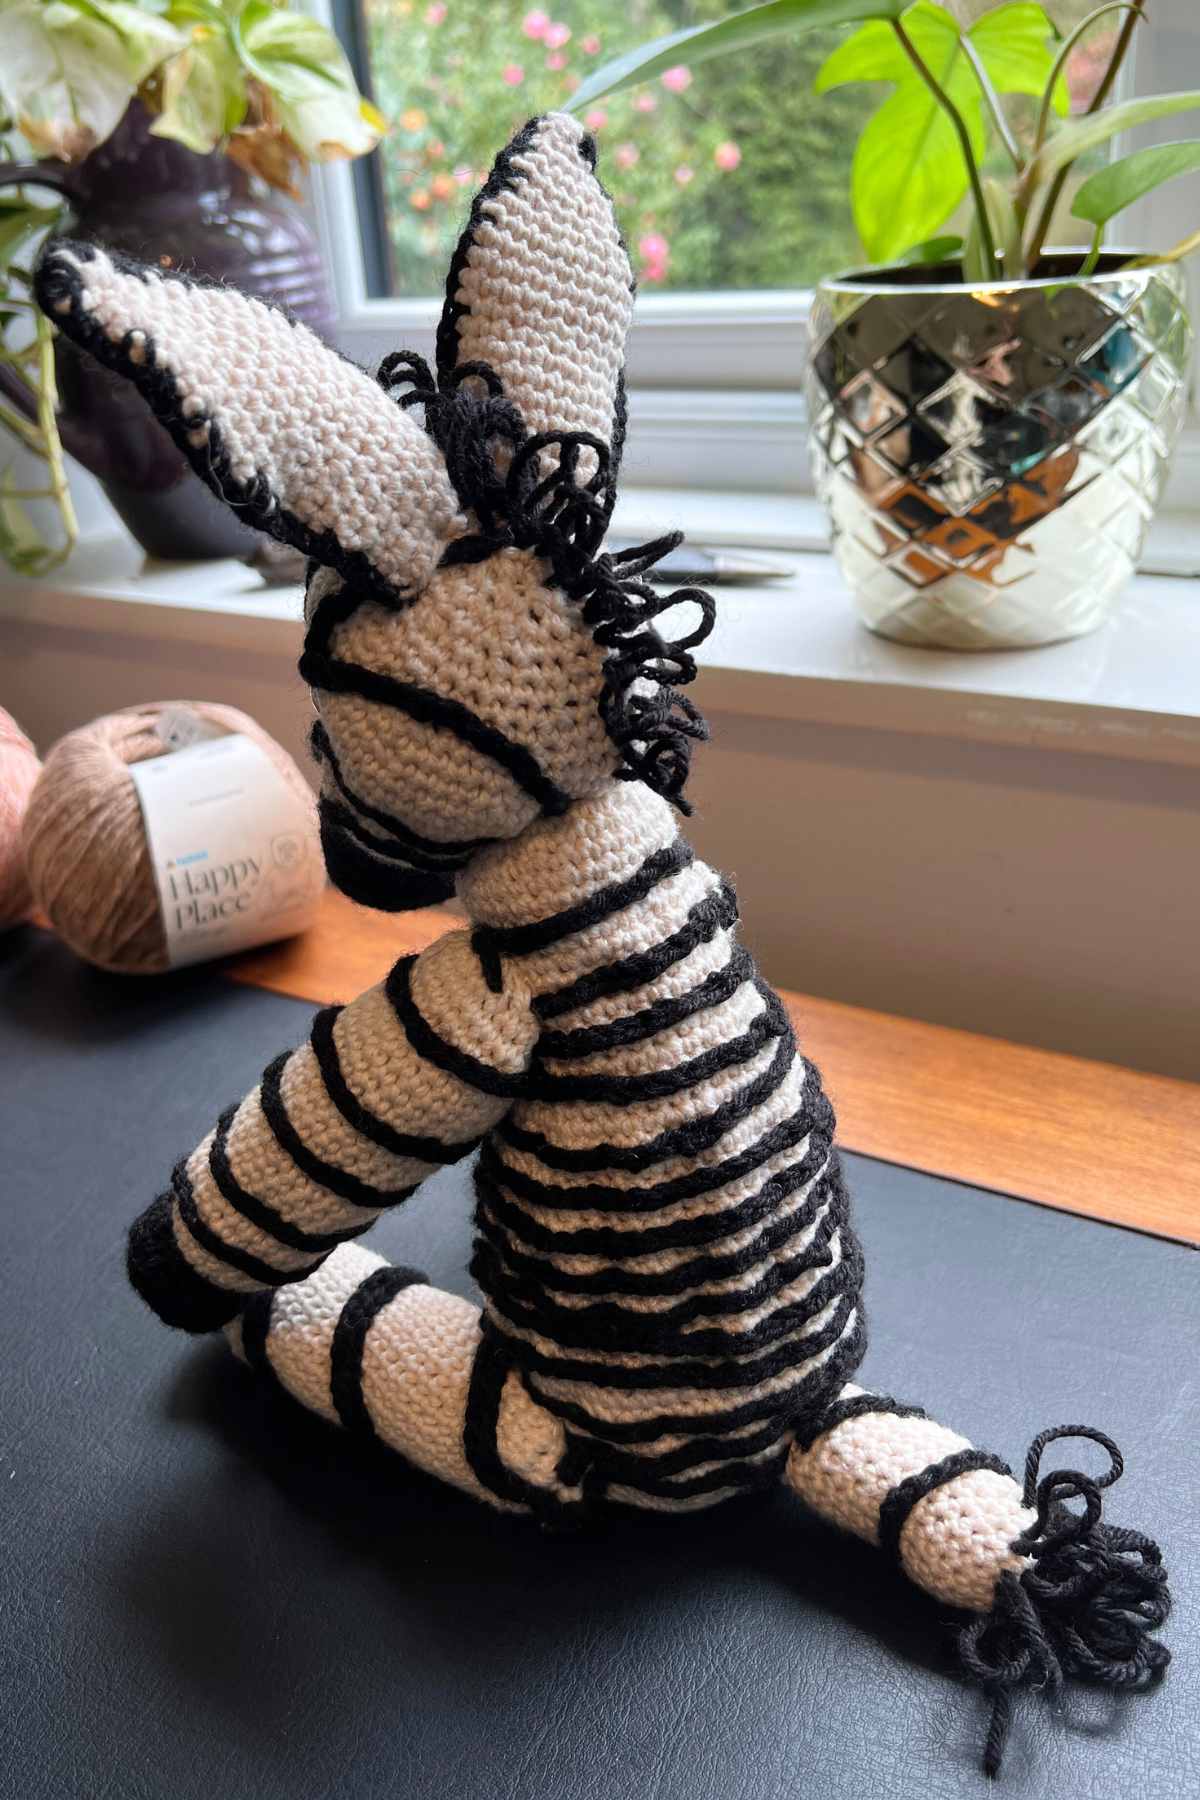
I created the furry end of the tail using a long strand of black yarn and a tapestry needle. I sewed in and out from the magic circle, working through each stitch for three rounds but leaving a long loop at each stitch.
Crocheting the Mane
You are going to sew the mane in the same way. Weaving in and out with your needle and black yarn, leaving large loops of yarn hanging from each stitch.
Zebra mane’s work directly down the back of the head, so don’t make a very wide line, just one or two loops at the level of each round will be fine.
Sewing the Amigurumi Zebra Together
Now you’ve got all your pieces, you can lay them together on the floor in front of you and have a good think about how you want your zebra to look. I have a clear idea in my head of posture, and you can just copy what I did with mine.

I like this style of toy to pose like a traditional teddy bear, with arms hanging down and legs level to allow it to sit. Try to align the shoulders with the expansion between the neck and body shapes.
For this toy, it’s important to make sure that your spirals of stripes on the arms and legs sit in a way that looks symmetrical too.
If you’re not very confident with sewing, pin around the edges of the limbs first before sewing so you don’t lose your place.
And if you have any questions about any of this, give me a shout in the comments section below.
Happy Crocheting!
Lucy Kate, x
*The products linked in this pattern were carefully selected by Lucy Kate Crochet. If you decide to purchase using the links provided, we may earn a small commission on that sale. This is at no extra cost to you.

