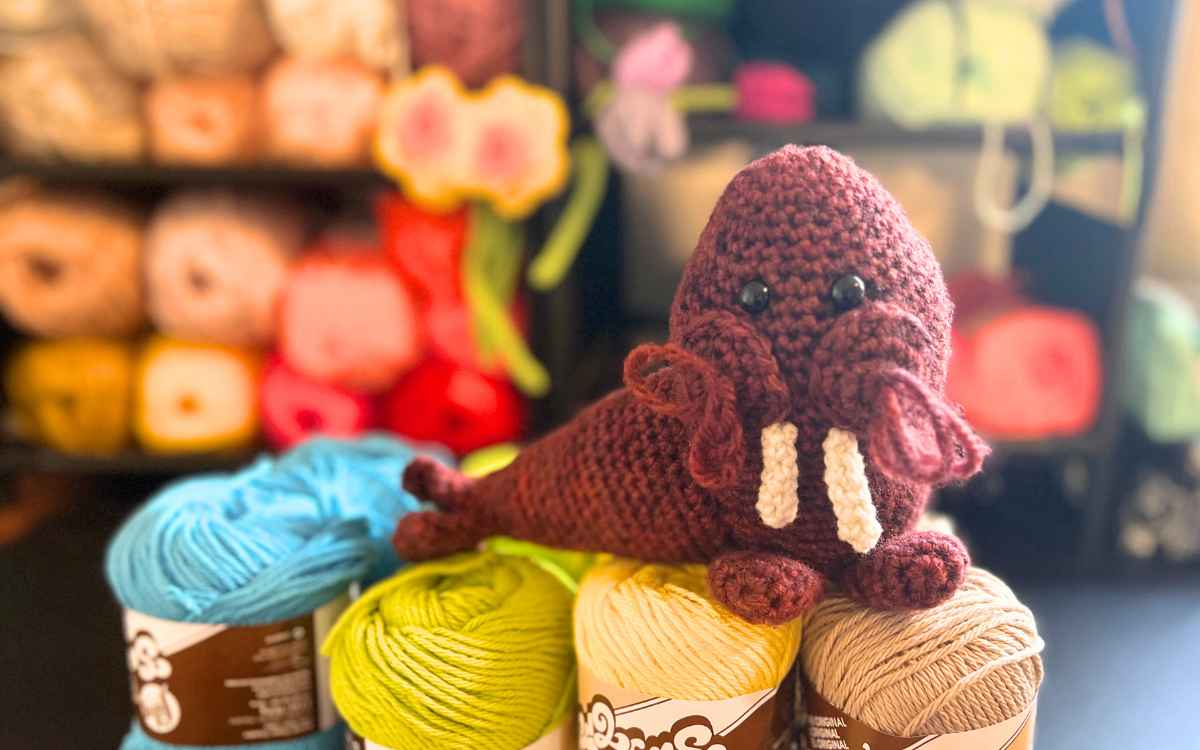
Free Crochet Walrus Pattern
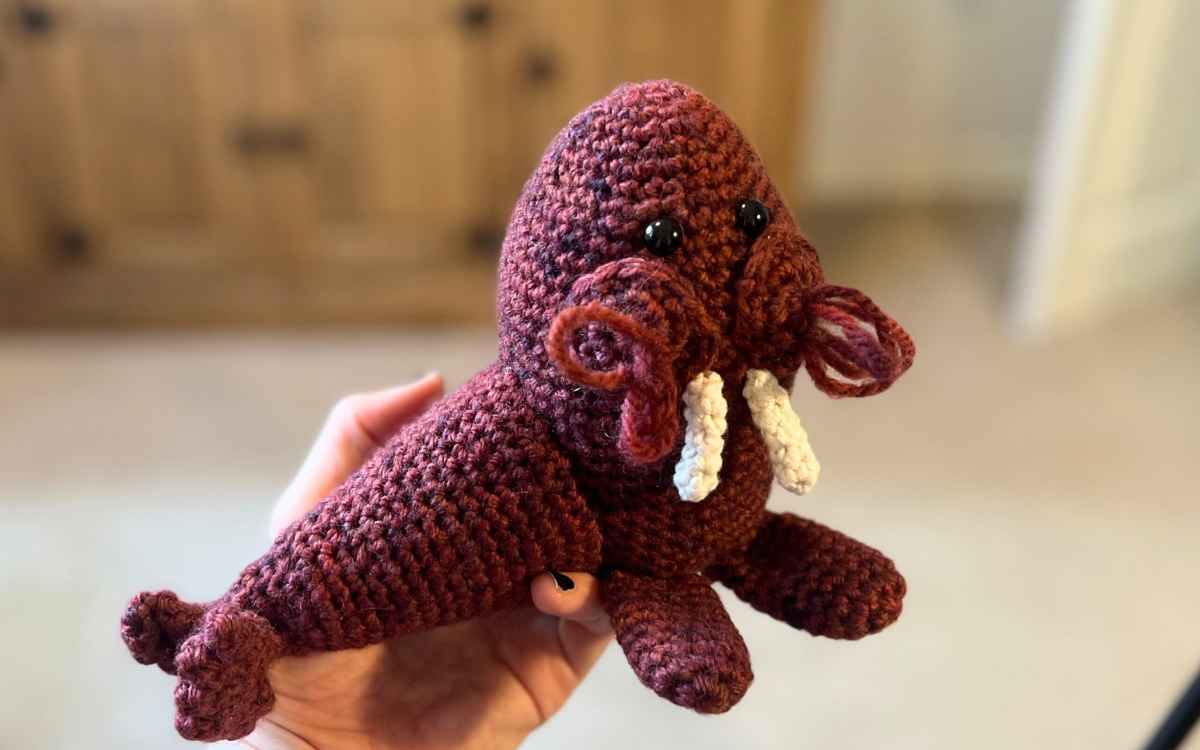
My free crochet walrus pattern is designed to look like the impressive lumbering walrus, but with a cute and cheeky twist. You’ll find all of the techniques and stitches are beginner friendly, and I’ll walk you through each step of the process to keep it simple and fun.
I’ve always been a bit obsessed with sea creatures, but this hasn’t really come into my crochet creations before! Since I hooked up this cute amigurumi walrus I’ve also produced a seal, sea otter, seahorse, puffer fish and squid. Quite the crochet sea creature collection!
Your Crochet Kit List
Here’s what you’ll need to complete this pattern:
- 100g Merino DK red brown yarn
- 20g cream acrylic DK yarn
- 5mm crochet hook
- 4mm crochet hook
- Yarn needle
- Safety eyes
- Toy safe stuffing

Crochet Walrus Pattern Notes and Tips
In this pattern you will need to use magic circles, single crochets, chains and slip stitches. You’ll also need to be fairly handy with a yarn needle, as there is a fair bit of sewing together to be done. If you’re new to crochet you might want to check out the following guides before you begin:
- The various ways of learning to crochet
- Basic stitches and techniques
- What to have in your crochet kit
- Single vs double crochets
I’ll give you the abbreviations with the full explanation for the first few rounds to help get you started.

Free Crochet Walrus Pattern
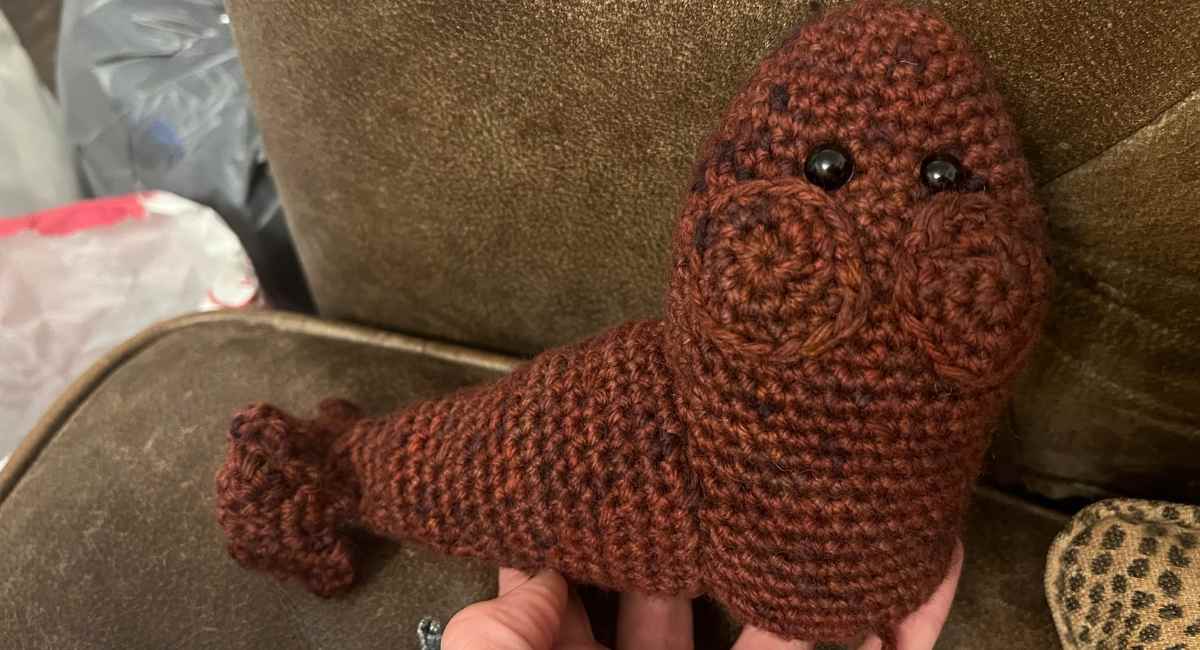
This pattern is made in two main sections, with smaller add-ons for the cheeks and front flippers. You’ll usually be working in the red/brown yarn with your 5mm crochet hook, but the tusks will require the acrylic cream yarn and 4mm hook.
Walrus Crochet Pattern for the Head and Main Body
This section will be worked in rounds from a central magic circle. You’ll need a size 5mm hook and your red/brown yarn.
Round 1
Magic circle of six stitches (6)
Round 2
Make two single crochets into each of the six stitches in the round, it will now total twelve.
2sc x 6 (12)
Round 3
Put one single crochet into the next stitch, then two into the following. Repeat until the end of the round.
(1sc, 2sc) x 6 (18)
Round 4
sc x 18
Round 5
(1sc x 2, 2sc) x 6 (24)
Round 6
sc x 24 (24)
Round 7
(1sc x 3, 2sc) x 6 (30)
Round 8
sc x 30 (30)
Round 9
(1sc x 4, 2sc) x 6 (36)
Round 10
sc x 36 (36)
Round 11
(1sc x 5, 2sc) x 6 (42)
Round 12 – 15
sc x 42 (42)
Round 16
(1sc x 5, sc2tog) x 6 (36)
Round 17 – 20
sc x 36 (36)
Round 21
(1sc x 4, sc2tog) x 6 (30)
Round 22 – 25
sc x 30 (30)
Round 26
(1sc x 3, sc2tog) x 6 (24)
Round 27 – 30
sc x 24 (24)
Round 31
(1sc x 2, sc2tog) x 6 (18)
Round 31
(1sc, sc2tog) x 6 (12)
Round 32
(sc2tog) x 6 (12)
Insert safety eyes and fill with toy safe stuffing.
Slip stitch to close
Walrus Crochet Cheeks
The cheeks are a short few rounds, still working with your 5mm hook and red/brown yarn
Round 1
Magic circle of 8 stitches
Round 2
2sc x 8
Round 3
sc x 16
Slip stitch to close ring, and sew with slight raise to cheek position.
Crochet Walrus Tail

Round 1
Magic circle of six stitches (6)
Round 2
2sc x 6 (12)
Round 3
(1sc, 2sc) x 6 (18)
Round 4
(1sc x 2, 2sc) x 6 (24)
Round 5
(1sc x 3, 2sc) x 6 (30)
Round 6
(1sc x 4, 2sc) x 6 (36)
Round 7
1sc x 36 into the back of each stitch for one round.
Round 8 – 10
1sc x 36
Round 11
(1sc x 4, sc2tog) x 6 (30)
Round 12 – 16
sc x 30
Round 17
(1sc x 3, sc2tog) x 6 (24)
Round 17 – 20
sc x 24
Round 21
(1sc x 2, sc2tog) x 6 (18)
Round 22 – 24
sc x 18
Round 25
(1sc, sc2tog) x 6 (12)
Round 25
(sc2tog) x 6 (6)
Round 26
2sc x 6 (12)
Round 27
1sc x 12 (12)
Fin Side One

You are now going to break up your continuous round, and turn it into two separate circles, from which you’ll build the walrus’ back fins.
Step 1
1sc x 6, then stitch across the circle into your first single crochet to complete a circle.
Step 2
2sc x 6 (12)
Now you are going to add definition to the walrus’ fins.
Step 3
- Chain 4, then missing the final chain space, single crochet back into the chain three times until your hook is at the base of the chain.
- Slip stitch through the next stitch and the one on the other side of the circle, beginning to bring it to a close.
- Repeat from the beginning of this step 5 further times, then slip stitch to close.
- Repeat the process now for the fin on the other side.
Joining the Walrus’ Tail and Body
Using your yarn needle and a length of red/brown yarn, sew into the stitches you put into the back during round 7 to attach the tail to the body.
Walrus Tusks and Whiskers
The Tusks
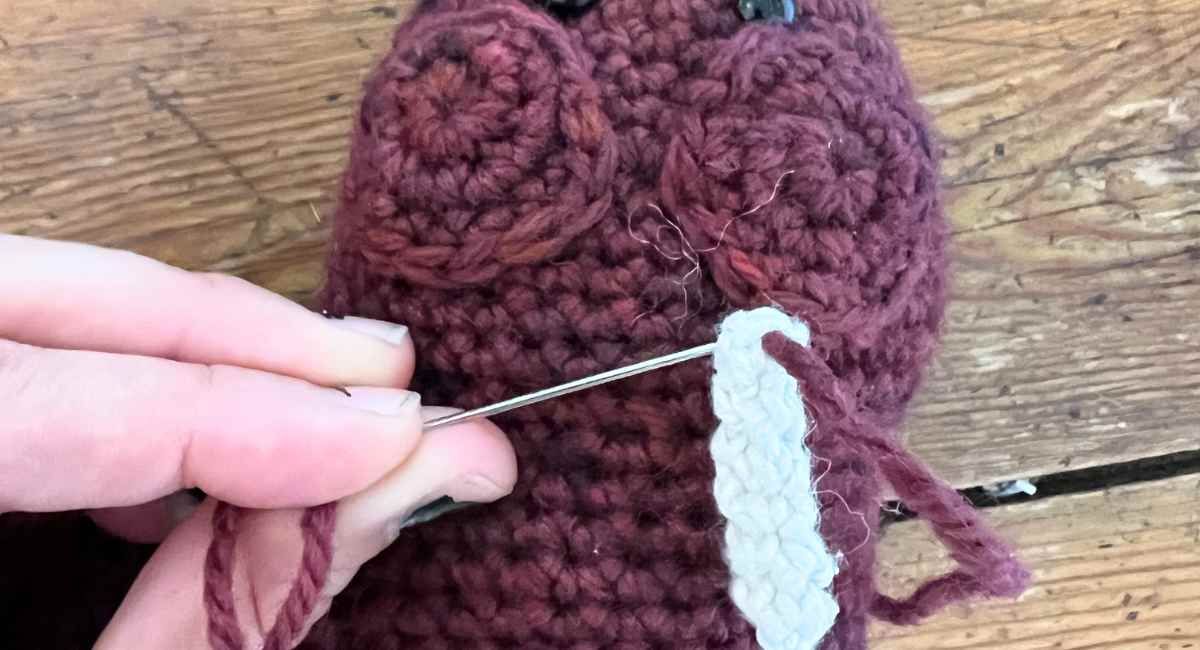
To produce the tusks I used a slightly more coarse white yarn, and you’ll need your smaller 4mm hook.
Round 1
Magic circle of 4 stitches
Round 2 – 6
1sc x 4
Tie off and pull the loose end through tusk
Attaching the tusks and creating whiskers
Take a length of your red/brown yarn and attach a yarn needle.
Use this yarn to sew the tusks onto the base of the cheeks.
You will then take the length of yarn and sew it through the middle of the cheeks to create whiskers.
Your Walrus’ Front Flippers
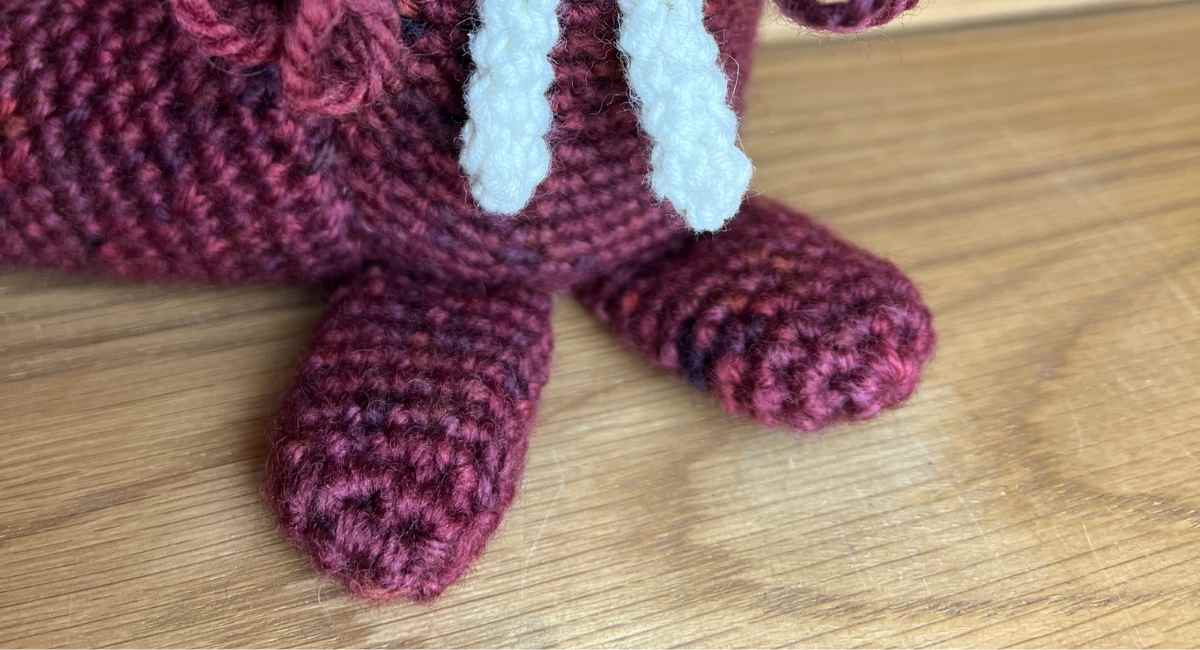
The characteristic walrus front flippers are unstuffed, and made in the red/brown yarn using a 5mm crochet hook.
Round 1
Magic circle of six stitches (6)
Round 2
2sc x 6 (12)
Round 3 – 10
sc x 12 (12)
When complete use your yarn needle to sew the flippers onto the front of your walrus’ body.
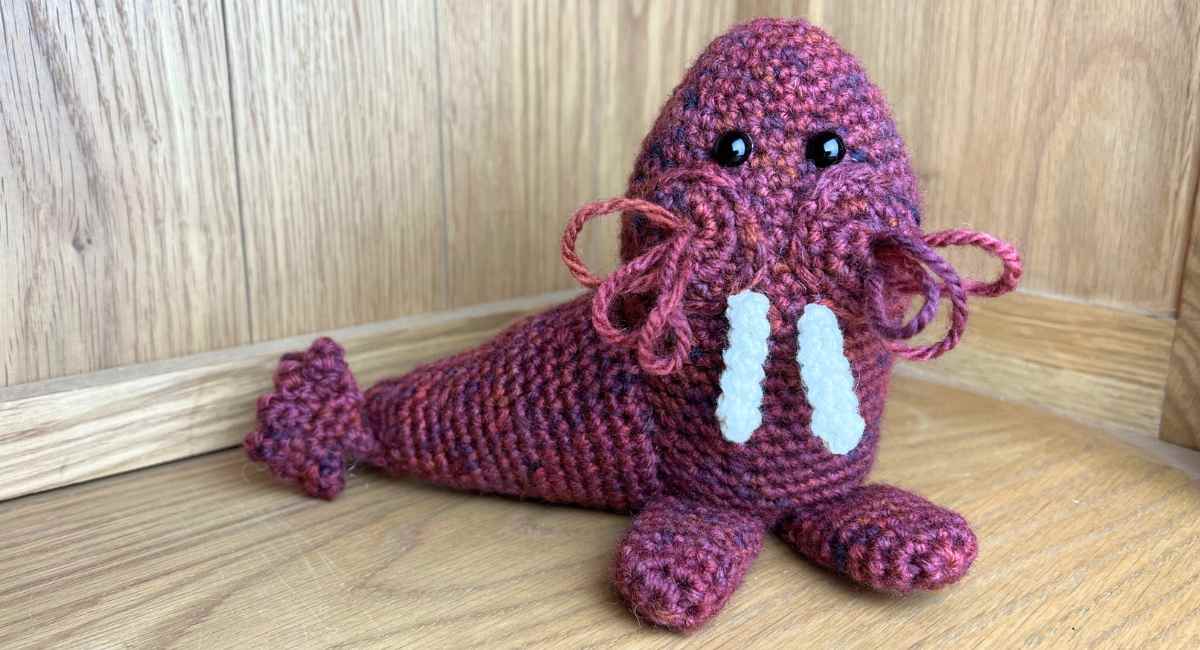
Your Crochet Walrus
I hope you’ve enjoyed this pattern, and if you have any questions just hit me up in the comments section below. And don’t forget to share pictures of your complete crochet walrus toy on my Facebook page or Instagram.
Happy Crocheting,
Lucy Kate, x