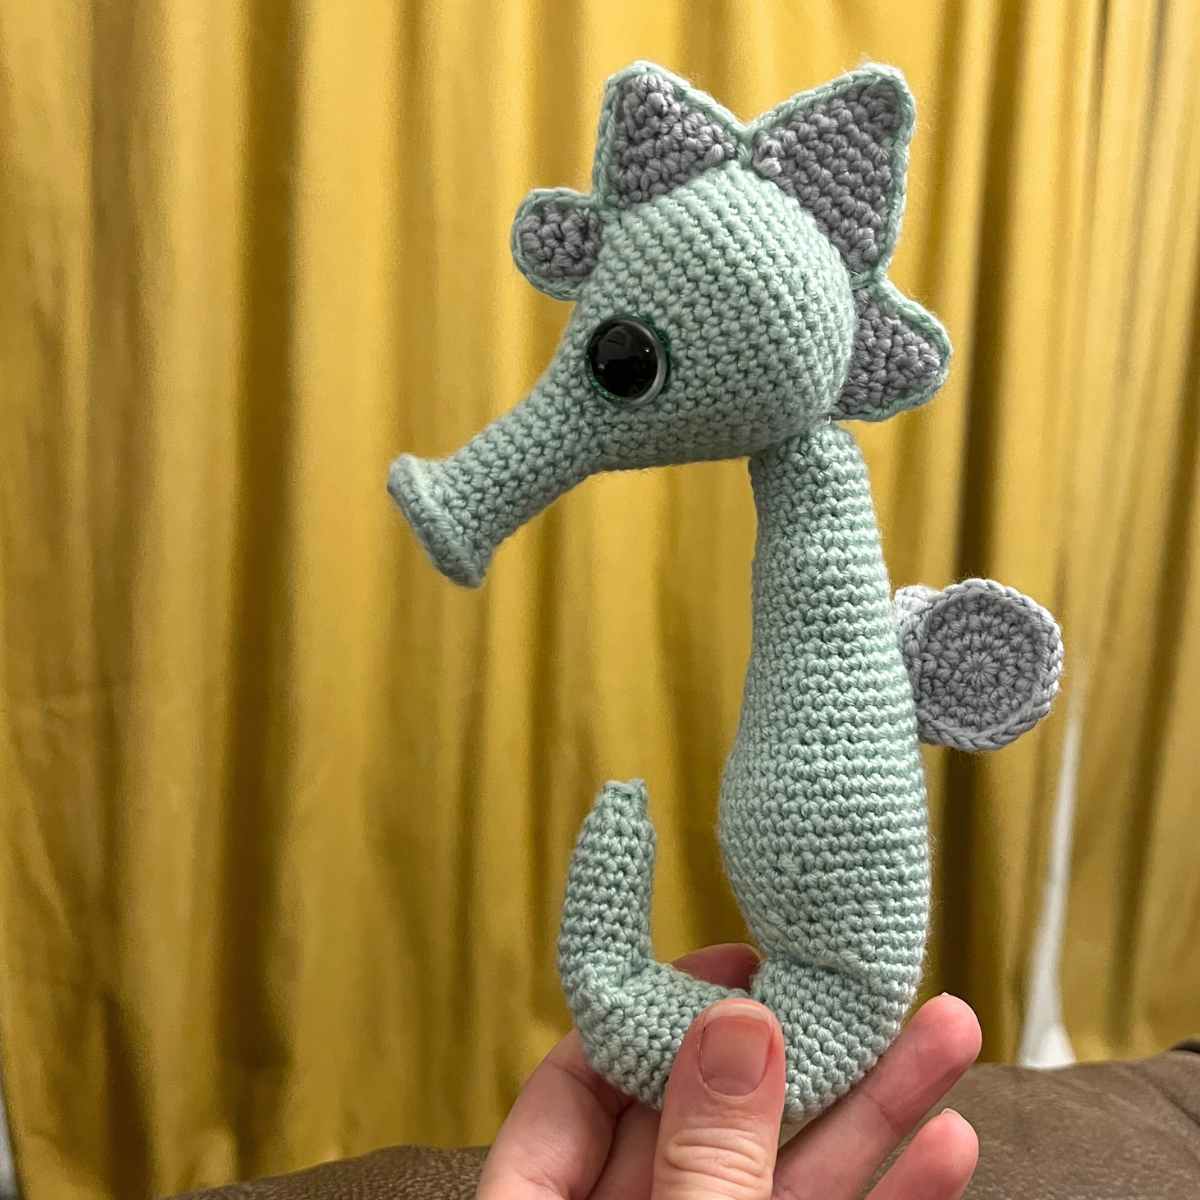
Fry the Crochet Seahorse – Free Pattern

My crochet seahorse pattern is designed to give off that distinctive seahorse character, but with a whole bunch of cuteness thrown in for good measure. This pattern is designed to be easy to follow, with full instructions within the tutorial for new terms and abbreviations.

Baby seahorses are called fry, hence the name. This pattern is a great match for my collection of ocean animals as well.
What You’ll Need To Crochet A Seahorse
- Deramores Studio Babylux mid gray DK yarn*
- Women’s Institute Soft and Cuddly mint DK yarn
- 3mm crochet hook
- 2.5mm crochet hook
- Toy safe stuffing
- 16mm safety eyes
- Yarn needle
The 3mm crochet hook is for the bulk of the pattern, you’ll just need the 2.5mm crochet hook for surface crocheting around the coronet. You can swap the yarn for any other DK yarn you like, but it might work up a little differently in scale and for some yarn fibers you might need to adjust your crochet hook size accordingly.

Amigurumi Seahorse Pattern Notes
You’ll work this crochet seahorse pattern in rounds from magic circles. There are some partial increases and decreases, a little bit of hand sewing and some surface crocheting for final detailing in the pattern.
You’ll find the following abbreviations in the tutorial:
- sc – single crochet.
- 2sc – two single crochets into the same stitch.
- sc2tog – one single crochet to join two stitches together.
- BLO – back loop only.
- FLO – front loop only.
I will give you each of these terms in full written English the first time they come up.
The Free Amigurumi Seahorse Pattern
This pattern will be crocheted in sections, and hand sewn together when each piece is completed.
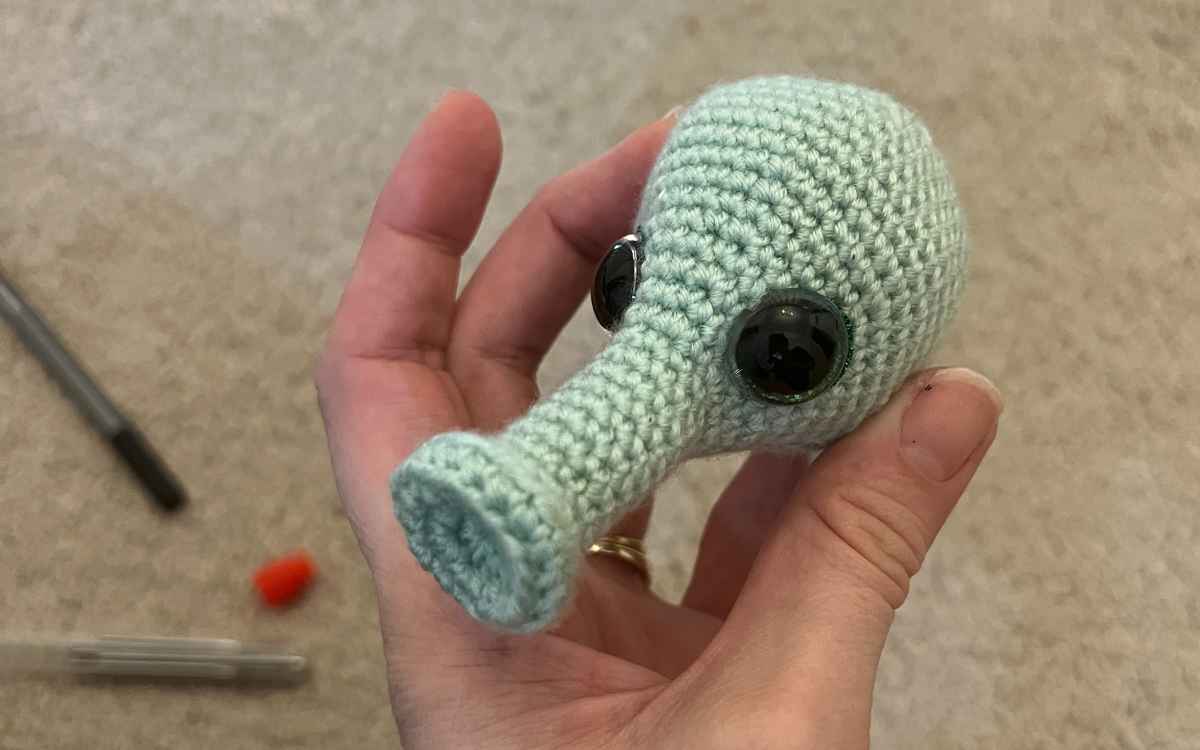
Amigurumi Seahorse’s Head
Work this round in your mint green yarn using a 3mm crochet hook. You’ll need safety eyes and some toy stuffing ready.
Round 1
Make a magic circle of six stitches (6)
Round 2
Put two single crochets into each stitch of the round.
2sc x 6 (12)
Round 3
(1sc, 2sc) x 6 (18)
Round 4
1sc x 18 into the back loop only (BLO)
Round 5
(1sc, sc2tog) x 6 BLO (12)

Round 6 – 14
1sc x 12 (12)
Round 15
(1sc, 2sc) x 6 (18)
Round 16
1sc x 18 (18)
Round 17
(1sc x 2, 2sc) x 6 (24)
Round 18
1sc x 24 (24)
Round 19
(1sc x 3, 2sc) x 6 (30)
Round 20
1sc x 30 (30)
Round 21
(1sc x 4, 2sc) x 6 (36)
Round 22
(1sc x 5, 2sc) x 6 (42)
Round 23 – 27
1sc x 42 (42)
Round 28
(1sc x 5, sc2tog) x 6 (36)
Round 29
1sc x 36 (36)
Round 30
(1sc x 4, sc2tog) x 6 (30)
Fill the seahorse’s snout with toy safe stuffing, then insert safety eyes into the front of your face.

Round 31
(1sc x 3, sc2tog) x 6 (24)
Round 32
(1sc x 2, sc2tog) x 6 (18)
Round 33
(1sc, sc2tog) x 6 (12)
Fill the rest of the sea horse’s head with toy safe stuffing.
Round 34
sc2tog x 6, then hand sew to close.
Crocheting your Seahorse’s Body and Tail
For this piece use your 3mm crochet hook and mint green yarn.

Round 1
Make a magic circle of eight stitches (8)
Round 2
2sc x 8 (16)
Round 3 – 8
1sc x 16 (16)
Round 9
(1sc, 2sc) x 4, 1sc x 8 (20)
Round 10 – 15
1sc x 20 (20)
Round 16
(1sc x 2, 2sc) x 4, 1sc x 8 (24)
Round 17 – 20
1sc x 24 (24)
Round 21
(1sc x 3, 2sc) x 4, 1sc x 8 (28)
Round 22
(1sc x 4, 2sc) x 4, 1sc x 8 (32)
Round 23 – 26
1sc x 32 (32)
Round 27
(1sc x 4, sc2tog) x 4, 1sc x 8 (28)
Round 28 – 29
1sc x 28 (28)
Round 30
(1sc x 3, sc2tog) x 4, 1sc x 8 (24)
Round 31 – 32
1sc x 24 (24)
Round 33
(1sc x 2, sc2tog) x 4, 1sc x 8 (20)
Fill with toy stuffing.
Round 34 – 40
1sc x 20 (20)
Fold and sew a stitch in round 36 to an adjacent stitch in round 30.

Round 41
(1sc, sc2tog) x 4, 1sc x 8 (16)
Round 42 – 44
1sc x 16 (16)
Round 45 – 46
1sc x 6, 1sc x 4 in the front loop only (FLO), 1sc x 6 (16)
Fill with toy stuffing.
Round 47 – 50
1sc x 16 (16)
Fold and sew a stitch in round 49 to an adjacent stitch in round 45.

Round 51 – 56
1sc x 16 (16)
Fill with toy stuffing.
Round 57
sc2tog x 5, 1sc x 6 (10)
Round 58 – 62
1sc x 10 (10)
Sew one stitch in round 56 to the adjacent stitch in round 60.
Round 63
sc2tog x 5, then hand sew to close.
Crochet Seahorse Fins
You will create two fins using your 3mm crochet hook and gray yarn.

Round 1
Make a magic circle of six stitches (6)
Round 2
2sc x 6 (12)
Round 3
(1sc, 2sc) x 6 (18)
Round 4
(1sc x 2, 2sc) x 6 (24)
Hold the fins back to back, and sew them together then along five stitches at the edge of the circle. You can then sew them directly onto the back of your seahorse.
Amigurumi Seahorse Coronet

1 Small Coronet
Round 1
Make a magic circle of six stitches (6)
Round 2 – 3
1sc x 6 (6)
2 Medium Coronets
Round 1
Make a magic circle of six stitches (6)
Round 2 – 3
1sc x 6 (6)
Round 4
2sc x 6 (12)
Round 5
1sc x 12 (12)
1 Large Coronet
Round 1
Make a magic circle of six stitches (6)
Round 2 – 3
1sc x 6 (6)
Round 4
2sc x 6 (12)
Round 5 – 6
1sc x 12 (12)
Round 7
(1sc, 2sc) x 6 (18)
Round 8 – 9
1sc x 18 (18)
Finishing Details

Take each section and gently press it flat with your fingers, then line them up from the forehead to the back of the head.
Using your yarn needle, weave in and out of the coronet sections and the head to firmly attach them.
Now using your 2.5mm crochet hook, make a line of single surface crochets along the top of the coronet.
Your Crochet Seahorse
This crochet seahorse has a few tricky places, like the fine surface crocheting work, but I hope you will find it works up nice and quickly.
I love to see photos of your work, if you’d care to share them on our Facebook group or tag me on Instagram!
Happy Crocheting,
Lucy Kate, x

*The products linked in this pattern were carefully selected by Lucy Kate Crochet. If you decide to purchase using the links provided, we may earn a small commission on that sale. This is at no extra cost to you.