Free Crochet Elf Pattern
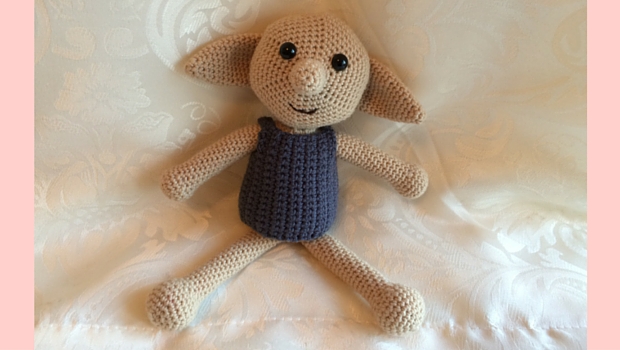
I created this crochet elf amigurumi toy pattern a decade ago now, and it remains one of my most popular patterns even today. It comes with detailed instructions, and with advice for sewing him together and making his cute little sack. Just make sure you don’t crochet him any socks to go along with it!
Your Equipment List
I used the following equipment to create my elf doll:
- a steel yarn needlePaid Link
- a size E / 3.5mm crochet hookPaid Link
- sharp scissors
- 100g DMC wooly merino wool in tanPaid Link
- a small amount of brown DK yarnPaid Link (for the mouth)
- 2 x safety eyesPaid Link
- 50g Patons smoothie DK yarn in slate greyPaid Link
- toy stuffingPaid Link
- stitch markers
I don’t normally specify yarn needle type, but the tightness of the stitches for this pattern mean that you will need to have a finer yarn needle to attach the body sections together without compromising their structure. I used a curved tapestry needle with a sharper point.
If you will be working on this pattern over the course of several sessions then you will find it helpful to keep a note of the row you are on at the end of each session. I find this also helps when crocheting whilst looking after kids, who have rather a tendancy to make you lose count.
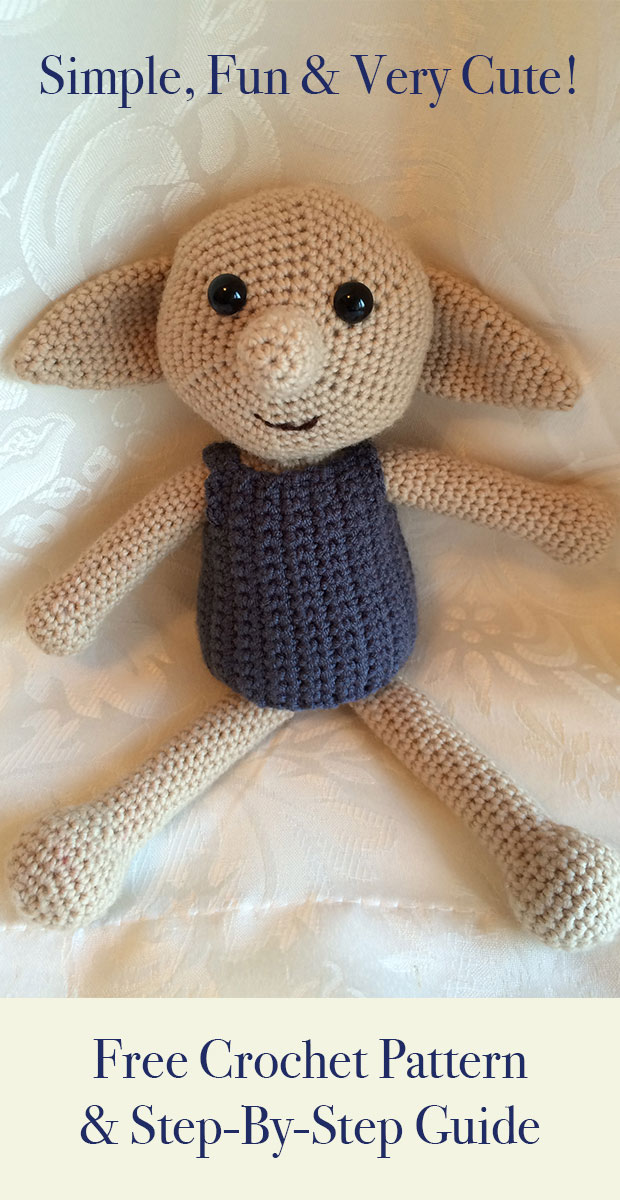
Free Crochet Toy Pattern
The pattern below is given in sections, as the crochet elf toy is created as individual body parts.
I crocheted the clothes separately, although the final sewing for them is carried out on the body to ensure a snug fit you should be able to remove them once the toy is complete.
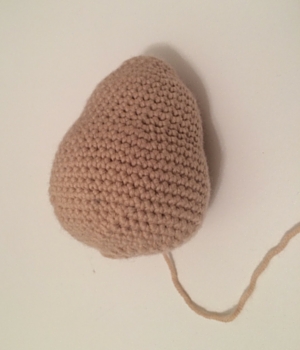
Crochet Elf’s Head
Begin using the pale merino wool, using a 3.5mm hook. The stitch count for each round is given at the end of the row in brackets.
This pattern is worked in a continuous spiral round, expanding from the initial magic circle.
Use a stitch marker to mark the first stitch of each row, to help you keep count as they expand.

Row 1 – Make a magic circle of 6 stitches (6)
Row 2 – Make 2 single crochets (2sc) in each stitch (12)
Row 3 to 6 – Make 1sc in each stitch (12)
Row 7 – Make 1sc in the first stitch, and 2sc in the next. Repeat for the round – (1sc, 2sc). (18)
Row 8 – Make 1sc in the first two stitches, then 2sc in the next. Repeat for the round (1sc x 2, 2sc). (24)
Row 9 – (1sc x 3, 2sc) repeat for the round (30)
Row 10 – (1sc x 4, 2sc) repeat for the round (36)
Row 11 – (1sc x 5, 2sc) repeat for the round (42)
Row 12 – (1sc x 6, 2sc) repeat for the round (48)
Row 13 – (1sc x 7, 2sc) repeat for the round (54)
Row 14 – (1sc x 8, 2sc) repeat for the round (60)
Row 15 – (1sc x 9, 2sc) repeat for the round (66)
Row 16 to 18 – 1sc in each stitch (66)
Row 19 – Make 1sc in the first nine stitches, then single crochet two stitches together (sc2tog). Repeat for the round (1sc x 9, sc2tog). (60)
Row 20 – (1sc x 8, sc2tog) repeat for the round (54)
Row 21 – (1sc x 7, sc2tog) repeat for the round (48)
Row 22 – (1sc x 6, sc2tog) repeat for the round (42)
Pull the last stitch out to form a large loop to help keep your place.
You will now need to attach your safety eyes.
The outer eye pushes through the crochet head in a screw fashion.
The back which holds it in place is pushed in at the rear of the pattern in the same manner.
If you are unsure of your eye placement try pulling a thread of yarn through each of your desired places first.
This will give you an idea whether they are evenly placed before you comit to stretching the stitch gap out with the actual eye piece.
Row 23 – (1sc x 5, sc2tog) repeat for the round (36)
Row 24 – (1sc x 4, sc2tog) repeat for the round (30)
Row 25 – (1sc x 3, sc2tog) repeat for the round (24)
Row 26 – (1sc x 2, sc2tog) repeat for the round (18)
Pull the last stitch out to form a large loop to help keep your place.
You will now need to stuff the head
Start with the long nose, using the butt of your crochet hook to make sure the stuffing is pushed right down to the end. Pad it well, leaving just a little space for you to work your last couple of rows.
Row 27 – (1sc x 1, sc2tog) repeat for the round (12)
Add the final stuffing if you feel it is required to give the toy the right shaped head.
Row 28 – sc2tog until closed (6)
Slip stitch to join and leave a long tail for sewing the sections together later.
Now set your crochet elf’s head to one side somewhere safe, and begin work on his body.
Crocheting the Body
To make your crochet toy’s body you will need to use the same equipment as for his head, starting with the pale merino wool and 3.5mm hook.
As with the head, his body pattern is worked in a continuous spiral round, expanding from the initial magic circle. Stitch markers will help you to keep count of your rows as they expand.
Row 1 – Make a magic circle of 6 stitches (6)
Row 2 – Make 2 single crochets (2sc) in each stitch (12)
Row 3 – Make 1sc in the first stitch, and 2sc in the next. Repeat for the round – (1sc, 2sc). (18)
Row 4 to 5 – Make 1sc in each stitch (18)
Row 6 – Make 1sc in the first two stitches, then 2sc in the next. Repeat for the round (1sc x 2, 2sc). (24)
Row 7 – (1sc x 3, 2sc) repeat for the round (30)
Row 8 – (1sc x 4, 2sc) repeat for the round (36)
Row 9 to 14 – Make 1sc in each stitch (36)
Row 15 – (1sc x 5, 2sc) repeat for the round (42)
Row 16 – (1sc x 6, 2sc) repeat for the round (48)
Row 17 – (1sc x 7, 2sc) repeat for the round (54)
Row 18 to 23 – Make 1sc in each stitch (54)
Row 24 – Make 1sc in the first seven stitches, then single crochet two stitches together (sc2tog). Repeat for the round (1sc x 7, sc2tog). (48)
Row 25 – (1sc x 6, sc2tog) repeat for the round (42)
Row 26 – (1sc x 5, sc2tog) repeat for the round (36)
Row 27 – (1sc x 4, sc2tog) repeat for the round (30)
Row 28 – (1sc x 3, sc2tog) repeat for the round (24)
Row 29 – (1sc x 2, sc2tog) repeat for the round (18)
You will now need to stuff your toy’s body. Fill it with toy stuffing, but make sure not to overfill the body. It should have a certain amount of ‘squidge’ to it when you hold it, rather than being completely rigid.
Row 30 – (1sc x 1, sc2tog) repeat for the round (12)
Row 31 – sc2tog until closed (6)
Slip stitch to join and leave a long tail for sewing the sections together later.
Now set your body to one side with his head, as we won’t be joining any parts together until we have them all ready.
Crocheting the Arms (make 2)
The crochet arms and legs are slightly different patterns, so make just two of these. Use the same body wool colour and your 3.5mm hook.
Again we will be working in an increasing spiral.
Row 1 – Make a magic circle of 6 single crochet stitches (6)
Row 2 – Put 2sc in each stitch until the end of the row (12)
Row 3 – Make 1sc in the first stitch, and 2sc in the next. Repeat for the round – (1sc, 2sc). (18)
Row 4 to 5 – Put 1sc in each stitch (18)
Row 6 – (1sc x 1, sc2tog) repeat for the round (12)
Row 7 to 29 – Put 1sc in each stitch. Remember to mark the first stitch of row 7 to keep count of the rows.
Slip stitch to join and leave a long tail for sewing it on later. Fill the leg with toy stuffing, using the end of your hook to push it down to the hand pad. Leave top of the arm empty for later attaching it to the body, approximately the width of your thumb.
You can now make your similar legs using the pattern below.
Crochet Legs (make 2)
We will be making two legs for your elf, and as with the arms it’s important that they are the same length as each other. These will have bigger feet sections than the arms hand sections, and will be slightly longer too.
Row 1 – Make a magic circle of 6 single crochet stitches (6)
Row 2 – Put 2sc in each stitch until the end of the row (12)
Row 3 – Make 1sc in the first stitch, and 2sc in the next. Repeat for the round – (1sc, 2sc). (18)
Row 4 – Make 1sc in the first two stitches, then 2sc in the next. Repeat for the round (1sc x 2, 2sc). (24)
Row 5 to 7 – Put 1sc in each stitch (24)
Row 8 – (1sc x 2, sc2tog) repeat for the round (18)
Row 9 – (1sc x 1, sc2tog) repeat for the round (12)
Row 10 to 31 – Put 1sc in each stitch. Remember to mark the first stitch of row 7 to keep count of the rows.
Slip stitch to join and leave a long tail of yarn.
As you did with his arms, fill your crochet toy’s legs with stuffing, leaving just a small space at the top for later sewing in.
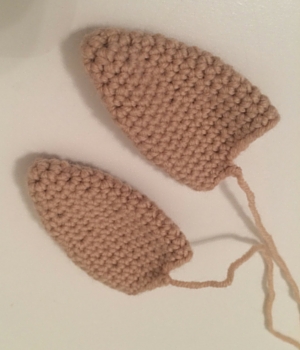
Crocheting the Ears (make 2)
To make your elf toy some ears you will need to crochet two cones. These will then be pushed flat to form the right shapes for his characteristic elven ears.
Row 1 – Make a magic circle of 4 stitches (4)
Row 2 – Make 2sc in each stitch (8)
Row 3 – Make 1sc in each stitch (8)
Row 4 – (1sc, 2sc) repeat for the round (12)
Row 5 – Make 1sc in each stitch (12)
Row 6 – (1sc x 2, 2sc) repeat for the round (16)
Row 7 to 9 – Make 1sc in each stitch (16)
Row 10 – (1sc x 3, 2sc) repeat for the round (20)
Row 11 to 19 – Make 1sc in each stitch (20)
Fold the ear in half along the length of the cone, and without stuffing sew the open bottom edge together using your yarn needle. Leave a long tail for attaching it to the head later.
Joining Crochet Elf Together
Before you begin sewing the elf together lay out all of his individual parts in the manner that you want him to be the joined in. This will enable you to make sure that it is all in proportion before you begin committing them together.
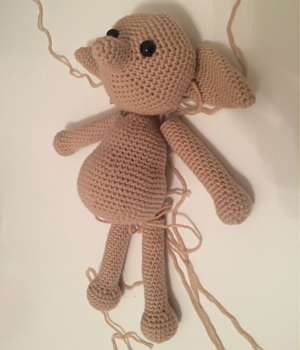
Your long tails left at the end of each section will be used to neatly sew each part together.
The most important thing to do is ensure that the stitches are small, neat and discreet.
When you have sewn each piece together, pass the threaded needle a few times through the body and then cut off the length of yarn.
Pull the yarn tight before snipping so the loose end should ping back into the body and be hidden from view.
Once he is complete you can if you wish sew a mouth on for him using your dark brown yarn and needle. Be careful here, as pulling too tightly can disfigure the face or cause stuffing to stick out. I still recommend this instead of sewing a mouth before stuffing during the crocheting phase, because your finished head shape can alter unexpectedly when stuffed, leaving the features looking somewhat odd or uneven.
So now you should have a complete but rather naked Elf.
We are going to dress him in his original garb of a sack.
Crochet Clothes
The design I made for crochet elf’s clothes is very simple, to match the outfit he wears in the first book he appears in.
It will look before it is complete like a rectangle with two small rectangles cut out, which will form arm holes for the toy.
Main clothing body
Row 1 – Make a chain of 14 stitches, plus 2 to form the first sc.
Put 1sc in each chain from the 3rd loop.
Row 2 – *Chain 2 to form the first sc.
Put 1sc into each remaining stitch of the row.
Row 3 to 5 – Repeat from *.
Row 6 – Chain 2 to form the first sc.
Sc once in the next 10 stitches. Chain 2.
Row 7 to 9 – Ch2 to form the first sc. Then sc once into each of the next 10 stitches.
Row 10 – Ch2 to form the first sc. Sc once into each subsequent stitch. Chain 6 at the end of the row.
Row 11 – *Sc into the 3rd stitch from the hook, then sc once into each stitch to the end of the row. Ch2 at row’s end.
Row 11 to 17 – Repeat from *.
Row 18 – From the 3rd stitch from the hook, sc once in the first 10 stitches. Chain 2.
Row 19 to 21 – From 3rd stitch from the hook, sc once into each of the 10 stitches. Ch 2 at the row’s end.
Row 22 – From 3rd stitch from the hook, sc once into each stitch. Chain 6 at the end of the row.
Row 23 – *Sc into the 3rd stitch from the hook, then sc once into each stitch to the end of the row. Ch2 at row’s end.
Row 24 to 27 – Repeat from *.
Decide which face of the garment you want to be displayed, and threading your yarn needle with a long tail of single crochet the opposite sides of the rectangle together.
Pull the sleeve over the body of your toy and now make the shoulder straps.
This will ensure they are the correct size for the toy regardless of the stitch size you ended up with,
Clothing straps
Make a chain of 8 stitches, put a single crochet into the 3rd stitch from the hook. Single crochet in each remaining stitch to the row’s end. Leave a long tail at each end.
Sew the straps on to each shoulder corner of the main body clothing piece, fixing them at a point which is snuggly fitted but allows the clothes to be removed if you want.
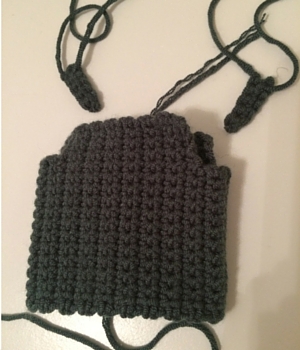
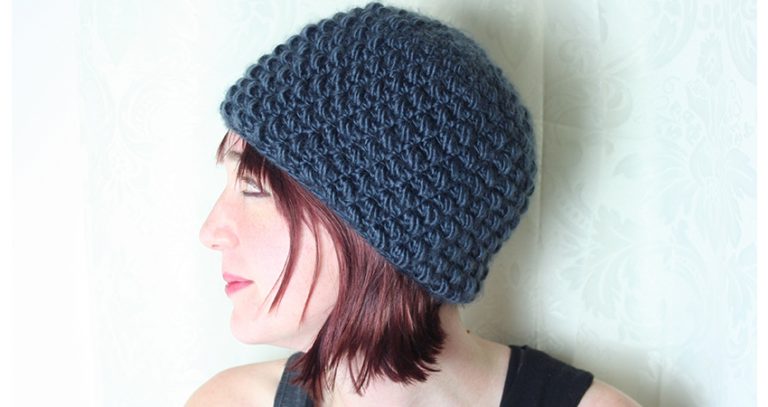
Alternative Crochet Clothes
The clothing used in this pattern is the original get-up. Once he is freed he gets to choose whatever he desires. Namely socks and hats if my recollection is correct.
The elf shown in these photos was made on commission for a lovely lady and her daughter, but I am so pleased with him I will be making another for my own little girl. I think to keep him unique I will dress him instead in a wooly hat and oversized socks for her.
Part of the fun of this toy is you can pretty much go crazy with his outfits. After all, this adorable chap would be happy with whatever you chose.
Crochet Toy Safety
Please note that handmade crochet toys are not safety tested.
Although I have used safety eyes in this pattern, which have a reduced chance of coming away from the toy and presenting a choking hazard, this risk is not entirely removed in their use.
The safest way to do eyes for babies is to stitch them in place, which if done carefully can absolutely retain the charm of the toy’s facial features.
Using official safety tested toy stuffing is another good way to help your crochet toy to be a little safer for kids.
Caution
I do not recommend letting a child under the age of three play with a crochet toy unsupervised.
They may also not stand up to the level of rough play some kids are fond of as well as a machined toy, so you will need to teach them to take care of their new friend.
This said, what they do get out of a crochet toy is something unique. Special not just in terms of the time and love that has gone into it’s creation, but because it has been made with them in mind.
As you might expect my 2 and a half year old daughter has a number of crochet toys which I have made over the past couple of years. I hope you are encouraged to hear that she has as yet not managed to damage any of them in normal play time activity, and they remain much cherished members of her collection.
Happy Crocheting! x
If you fancy setting him up like in the movies, why not crochet a spider to keep him company!
I thank you for this pattern. I am making this and it’s adorable. However I didn’t see a finished size. Could you tell me an approximate size?
Hi Denise, I am glad that you like the pattern. My finished Dobby is around 27cm tall. Best wishes, Lucy
Yours is SOOOOOOO cute!!!. But I think I DEFINITELY did something wrong in my attempt, I’m only on row 15 of his head and it’s the size of my face and I’m almost out of yarn!!! 0_0 .
Hi Kelly, Oops! That doesn’t sound quite right does it 🙂 If you’d like to pop a photo of your attempt on the Lucy Kate Crochet Facebook page, I can see if I can work out where you might have strayed from the pattern? Best wishes, Lucy
I’ve done his head and it came out great! Except his nose is not very big but I don’t mind. Now I’m working on the body. On row 4-5 should it be 18 total stitches? I sure hope so because I can’t figure out how it would be 12 without decreasing so I’m just going to go with 18 for now. Oh! And thx for answering my previous question
When making the sack, do we turn after each row? I am having no end of trouble with this simple task today. 🙂 I have finished his other parts and he is sooo cute. Thank you so much for the pattern.
Hi Becky, Make it as a continuous cylinder, until you reach the arm holes, then turn with each row 🙂 Hope that helps! Best wishes, Lucy.
I’m sorry, but I’m having trouble with the sack, too, Lucy. Do you mean this to be worked in the round when you say “continuous cylinder?” That’s not working out for me, either. The Dobby doll is wonderful and easy to make, so I’m not sure why his simple garment is giving me fits. Thank you for your assistance. Amy
Oh dear, I have just looked back over the pattern and I was mis-remembering, I’m so sorry! I made it as a flat piece then sewed it, not as a cylinder (in hindsight, that might have been simpler!)
Work as you would a blanket, back and forth, turning it around at the end of each row.
I hope this helps! If not, I will make another one following my own instructions and check where I can make the pattern more clear 🙂
I was wondering if you mind if anyone sells a Dobby made from your pattern?
Hi Crystal, You are very welcome to make as many Dobbys from this pattern to sell as you would like 🙂 As long as you don’t copy the pattern and sell that, it’s no problem. I’d love to see a picture of the toys you have made, if you’d like to share on my Facebook page? Best wishes, Lucy.
I have made about 10 of these cuties so far! I so appreciate the pattern – but have not sold the pattern. I made a few adjustments on size and nose length – but he is just adorable! Everyone loves Dobby!
I’m having a problem attaching the head to the body. It’s too floppy.
Hi Donna, There are a few possible reasons this is happening. It could be that the head is not stuffed quite as full as it should be, or that the stitching is too loose. However, I suspect it’s because the neck needs to be sewn wider to give fuller support to the head. If you pop a photo into the posts section of my Facebook page I’ll be happy to take a look and see if I can help further 🙂 Best wishes, Lucy
Hi! I’m having a ridiculous amount of trouble trying to figure out how to make his sack. It doesn’t look right while I’m doing it and the instructions aren’t very clear. Would you mind making another pattern to follow for the sack? I’m sorry I’m fairly new but I can’t seem to figure it out.
Hi Adrienne, I am sorry to hear you are finding it hard to follow. I have been back over the sack section, and added some explanation / changed a few of the instructions. I hope this helps!
Thank you so much! Like I said I’m fairly new to crochet so things everybody else understands I’m like huh? Haha but this is much much easier. Thank you again and I love this pattern!
Hi Adrienne, I am happy to help 🙂 I hope you enjoy making your crochet Dobby!
Please help I have been ripping my hair out for days on the sack!!!! Row 18 is where it all goes undone: Row 18 – From the 3rd stitch from the hook, sc once in the first 10 stitches. Chain 2.
It just does look right and doesn’t look like the picture im not sure where im going wrong 🙁 I more than fine with patterns and for the life of my I can not figure this out!
Hi Callie,
Sorry to hear that you are having trouble with crochet Dobby’s sack. Would you like to take a photograph of where you have got to, and either email it to me or message it across on Facebook? I can then see if I can work out where it’s going wrong.
In the longer term however, I think I will redesign the sack, as you are not alone in finding it unclear!
Best wishes, Lucy
Thanks SO much!!!! Lucy. I pulled it apart but I will start again and send through the photo 🙂 Thanks so much for your help xo
Can you tell me what size eyes you used? I think your size is perfect.
Hi Joy, They are 10mm eyes. If you are in the UK you can buy them from Hobbycraft here. Best wishes, Lucy
Thank you!
Hey what weight yarn did you use? And as a beginner is this going to look awful? Lol. I’m pregnant and want to make a lot of the hp characters and creatures in crochet
Hi Abbey, Congratulations on your pregnancy!
DMC Woolly Merino Wool is a DK (Double Knit) yarn.
You should be able to follow this pattern as a beginner.
If you need a bit of additional help interpreting it then check out these articles:
Basic Stitches and Techniques
Understanding Crochet Abbreviations
Remember to keep the stitches as tight as you can (so that the stuffing isn’t exposed), and if you have questions then message me on here or my Facebook page – I will be happy to help. Good luck!
thank you ever so much for this free pattern. i will be making dobby today, and may use him as a tree topper for my harry potter themed christmas tree 🙂
Hi Sammie, I’m glad you like the pattern 🙂 What a fabulous idea! The themed tree sounds amazing. I’m now tempted to make a small My Little Pony themed tree for my daughter’s room this year… 🙂
Hi I’m Tiffany and I made this Dobby for my sister in law she is having a boy and she is doing Harry Potter theme and she asked me to make this for her. However I got everything done then I get to the clothing and for the life of me I can not figure it out I keep messing it up and I follow it to the T so I don’t know what I’m doing wrong. Any way I was wondering if you have a video of making the clothing if not that’s ok thank you for the pattern.
Hello, I was wondering if you could show how to make another Harry potter figure, a hippogriff! Thank you so much for this one, it helped a lot! 😉
Hi Vanessa, Interesting concept! I will definitely add it to my planned projects. If you subscribe to my email list you will then be notified when it’s ready.
Realistically looking at my workload I expect this would be next spring now, but it’s a lovely idea and something I will absolutely try.
Thanks for your comment 🙂 Lucy x
Where can I buy the wool, I’ve looked everywhere!
Thanks!!! I am so excited for the next one!
– Vanessa
Where can I buy this wool!!
Hi Rickie, The DMC Merino Wool came from a Hobby Craft Store. I can’t find it online right now, but I will add a link if/when I do!
I use “I Love this Cotton” yarn sold at Hobby Lobby
Hi there, The light orange wool you say to use is more like a pumpkin orange and looks nothing like the colour of your Dobby! Even brought it from Hobby Craft! Has anyone else had this problem?
I’m going to take it back and see if I can get an alternative colour which is more appropriate.
Hi Samantha,
I’m sorry to hear that you found this shade more orange than you were hoping for. Here is the light orange shade as shown on the Hobby Craft website: http://www.hobbycraft.co.uk/dmc-woolly-merino-wool-in-light-orange/606516-1017 This is where I got mine, however following your comment I have had a look at DMC’s website and they show the same photo labelled as ‘tan’ instead when you follow the products through: http://commonthread.us/woolly-merino-wool-yarn-48-colors.html#family-products It looks like Hobby Craft may have been mislabelling the product previously, or that there has been a change in design or color, so it might be worth looking for the tan shade instead? Thanks for bringing this to my attention, I will change the instruction in the pattern to reflect what’s shown on the DMC website. Hope this helps and that Hobby Craft exchange for you – they are normally very good! Best wishes, Lucy.
I’ve just finished sewing Dobby together. This is the very first time I have crocheted to a pattern. I even had to look on line to see what sc meant and how to do it.
So, I’m very pleased with my efforts. It’s for a friend. I didn’t even know what a Dobby was either.
So, very pleased with my efforts, but I am so dissapointed that I cannot work out how to make his clothes. As your story says ‘ he has to remain a slave if he has no clothes’, so I really would like to give him his freedom also if I give him to my friend.
I thinkimjust go
Ping to make a rectangle then do some chain stitching for the arms to go through.
A BIG thank you for allowing me to use the pattern for free.
I’ve just finished him and we love him. He was so easy to make and he is one of the cutest toys I have made. I just have to make a sock for him now.
Hi! I was wondering if its possible to crochet this using cotton yarn instead of wool? Wool makes me itchy so I try to stay away from it but I want to attempt make this for a friend for her birthday. This will be my first time making anything other than wash clothes lol
Hi Brittany, You can absolutely follow the pattern using a different yarn type. The finish may be slightly different, but he will still look like Dobby 🙂 Just remember you might need to increase or decrease your hook size depending upon the yarn weight. This will be noted somewhere on the packaging. I’d love to see a photo when you have finished, if you wouldn’t mind sharing it to my Facebook page? All the best, Lucy x
I made a rendition of this using your pattern. I have to day that it was sooooo easy to follow and it turned out fantastic!!! I’d love to show you a picture of the final results of mine. Thank you so much for sharing this awesome pattern!
Hi Rina, I am so pleased to hear you liked it. You can upload a picture to the Lucy Kate Crochet Facebook page if you would like? I’d love to see it! Best wishes, Lucy
Hi Lucy
thanks for the pattern. I cannot see where the instructions for the nose are though. I’m completing the head- I have got to the bit for the eyes then it appears as though it just closes. i caanot see the nose seperate or am i simply missing it ?
Hi Mandy, Rows 3 – 6 of the initial head instructions form the length of the nose. The first magic circle is the end of the nose. I hope this helps! Best wishes, Lucy Kate.
i must have gone wrong then ! mine is flat !! x
The first time I did the head I missed the continuous sc stitching step which creates the nose length too! I got too excited and didn’t read it. Haha
Hi Lucy!!
I love this dobby! He is super cute. I’m done with the the body, I’m just trying to make the clothes, which I’m having some trouble. It didn’t make two rectangles, it made something like a zig zag. Also it was really short.
Hi! Thanks for the pattern! Do I need to be turning the work inside out before I stuff it? I am guessing not but (mine personally) I found dobby’s body ended up slightly lumpy. Any suggestions?
I just finished Dobby for my first grandchild’s shower (this Saturday) and he is adorable. The shower has a Harry Potter theme. I think that the problem with the sack directions is simply that you have half the number of rows that you should have. Because it is worked back and forth, this is actually two rows. If you look at the front, you can see 12 vertical rows (or 6 ridges), instead of the 6 rows that you have indicated in the pattern. That should solve the problem!
I just made one for my friend. I was wondering if I could link this pattern in my blog? I want to feature your pattern in my Harry Potter craft series.
Hi Heather, You are very welcome to link to my pattern. Just please don’t copy and paste it 🙂 Thanks for including my Dobby in your Harry Potter craft series! Lucy x
Mine also turned out very cute. I also figured out the way to make the clothing it is way too small. So I made it again with bigger needles , still too small to fit around the body. Any ideas?
Have just finished dobby and he’s great thank you are you going to do a harry potter
How big are his eyes?
Hi Crissy, They are 10mm safety eyes.
I recognized Dobby immediately…. he is sooo cute! Thank you
I used 15 mm eyes . Too big? I want familiar with Dobby until a friend of mine asked me to crochet him for her baby’s room, also do you have a crochet pattern for the hat and socks? Thank you for sharing!