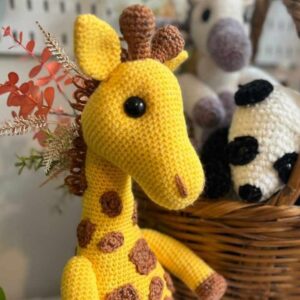
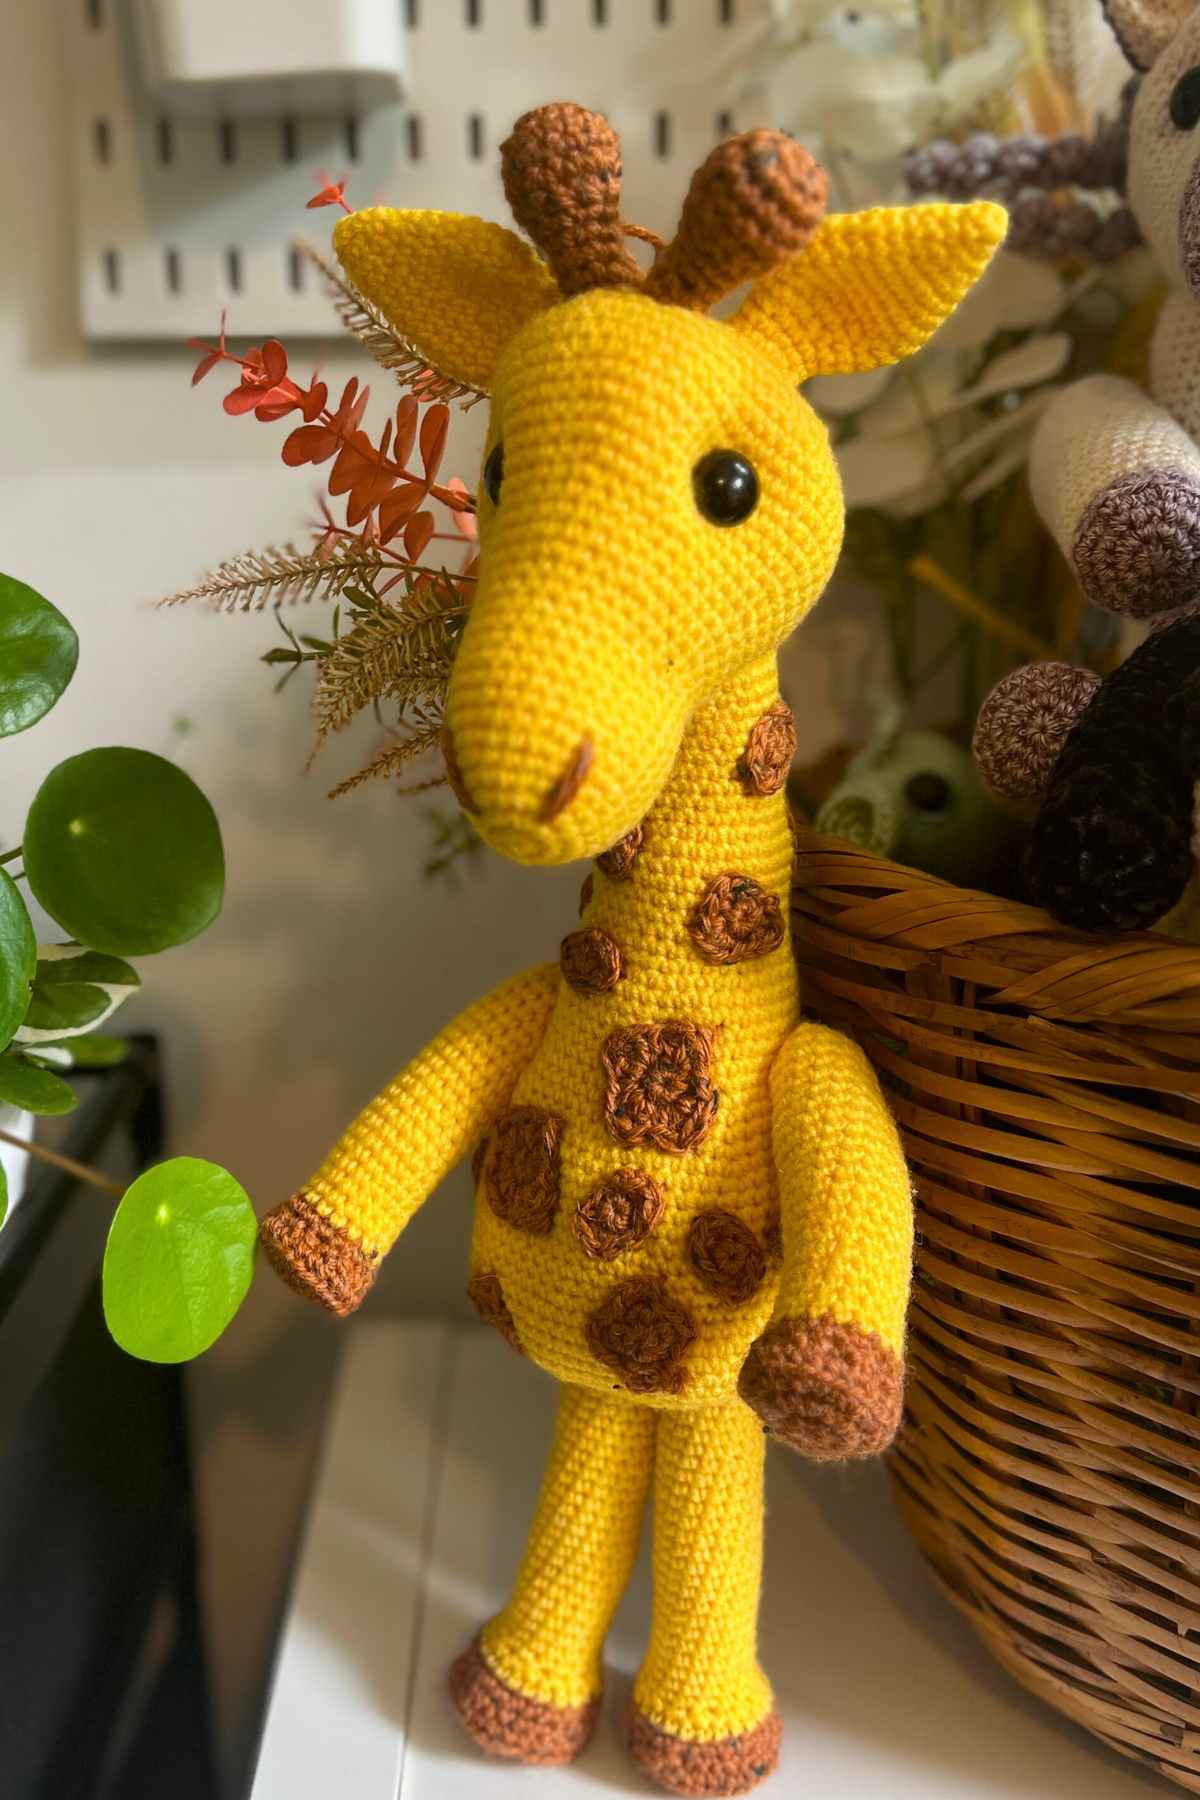
How To Crochet A Giraffe – Free Pattern
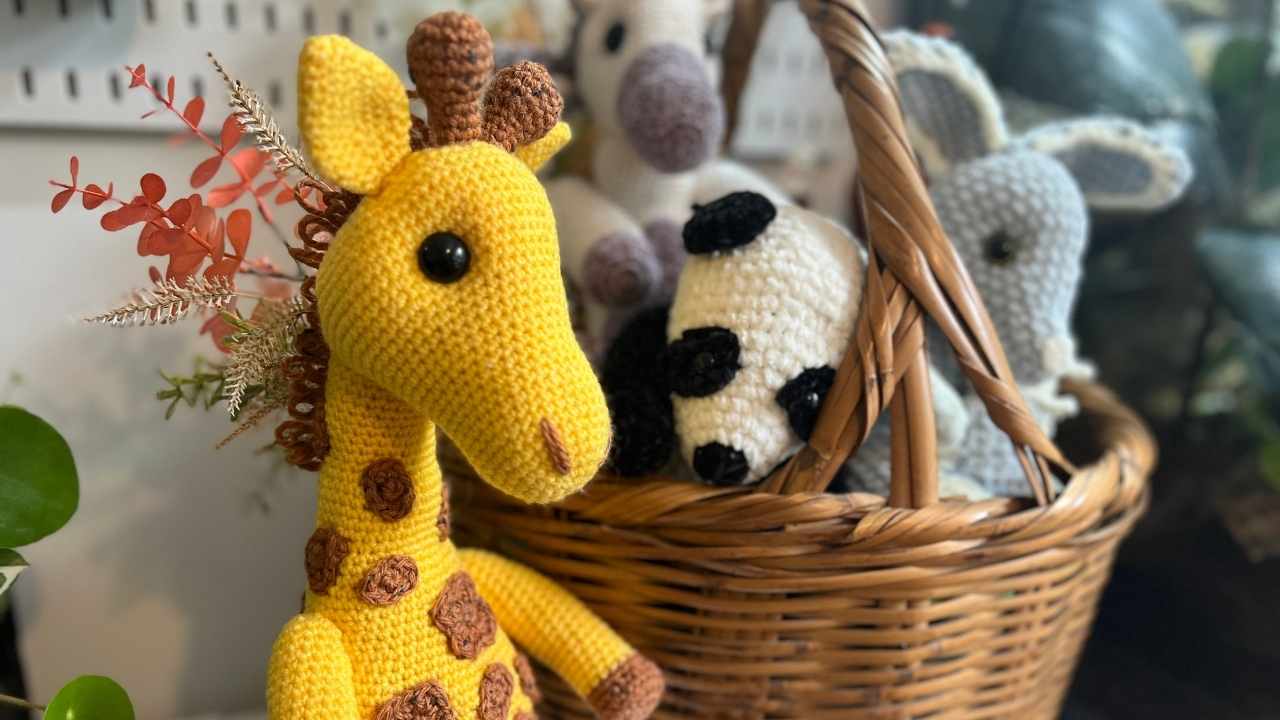
This giraffe is a pretty special pattern for me, because it marks my return to crochet design after a couple of months’ break. Which might not sound like much, but I usually design constantly, so it’s been a thing!
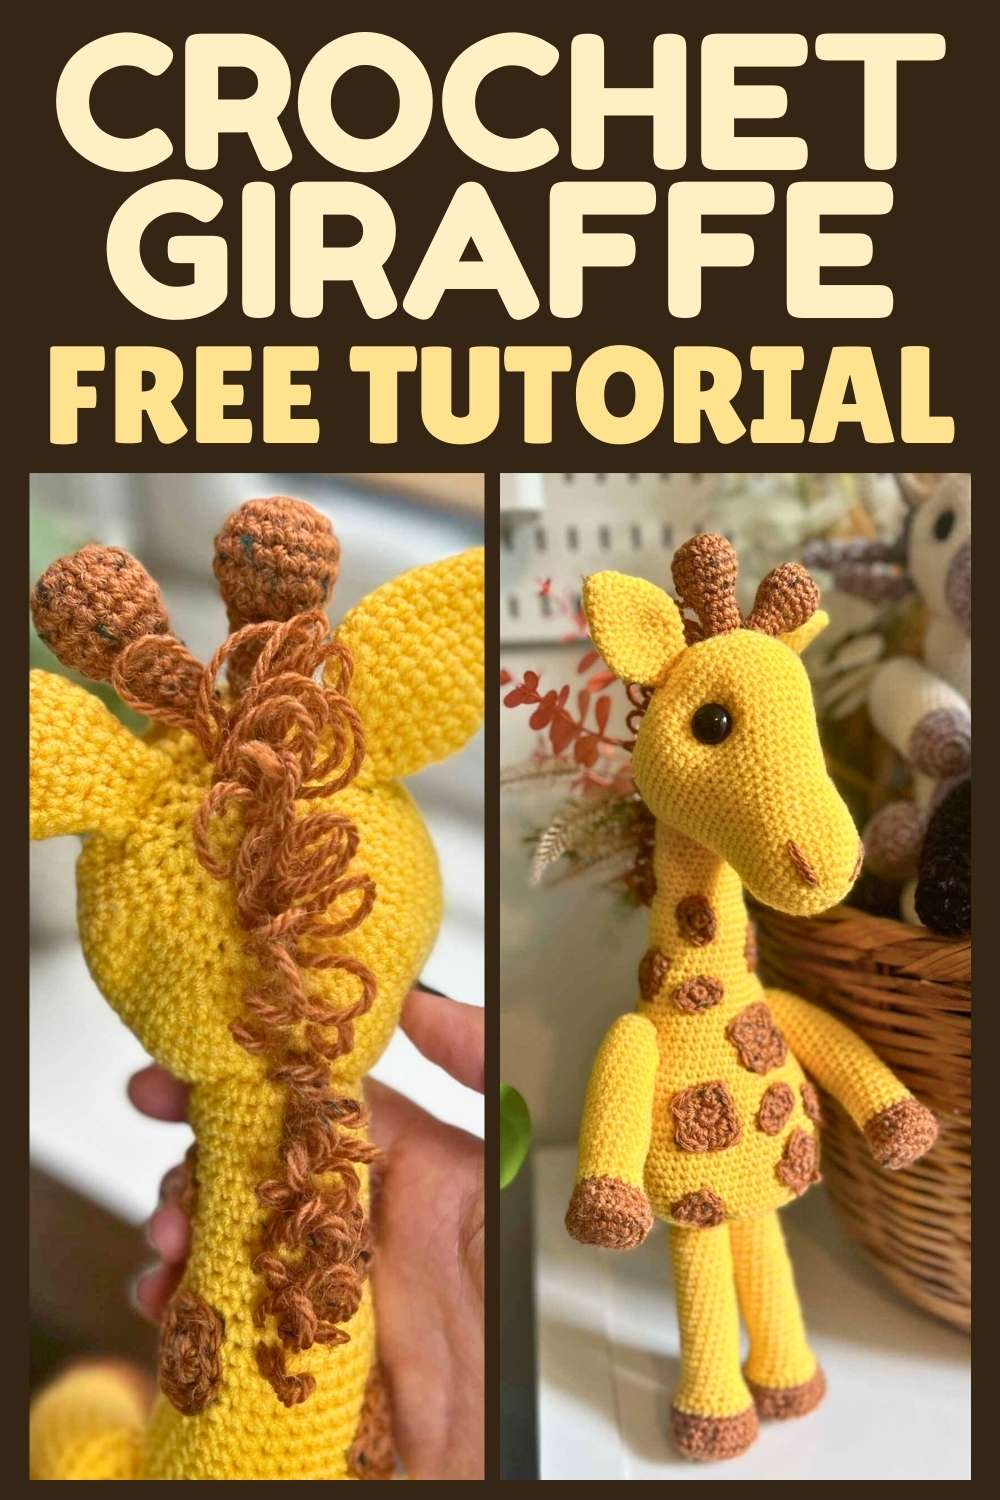
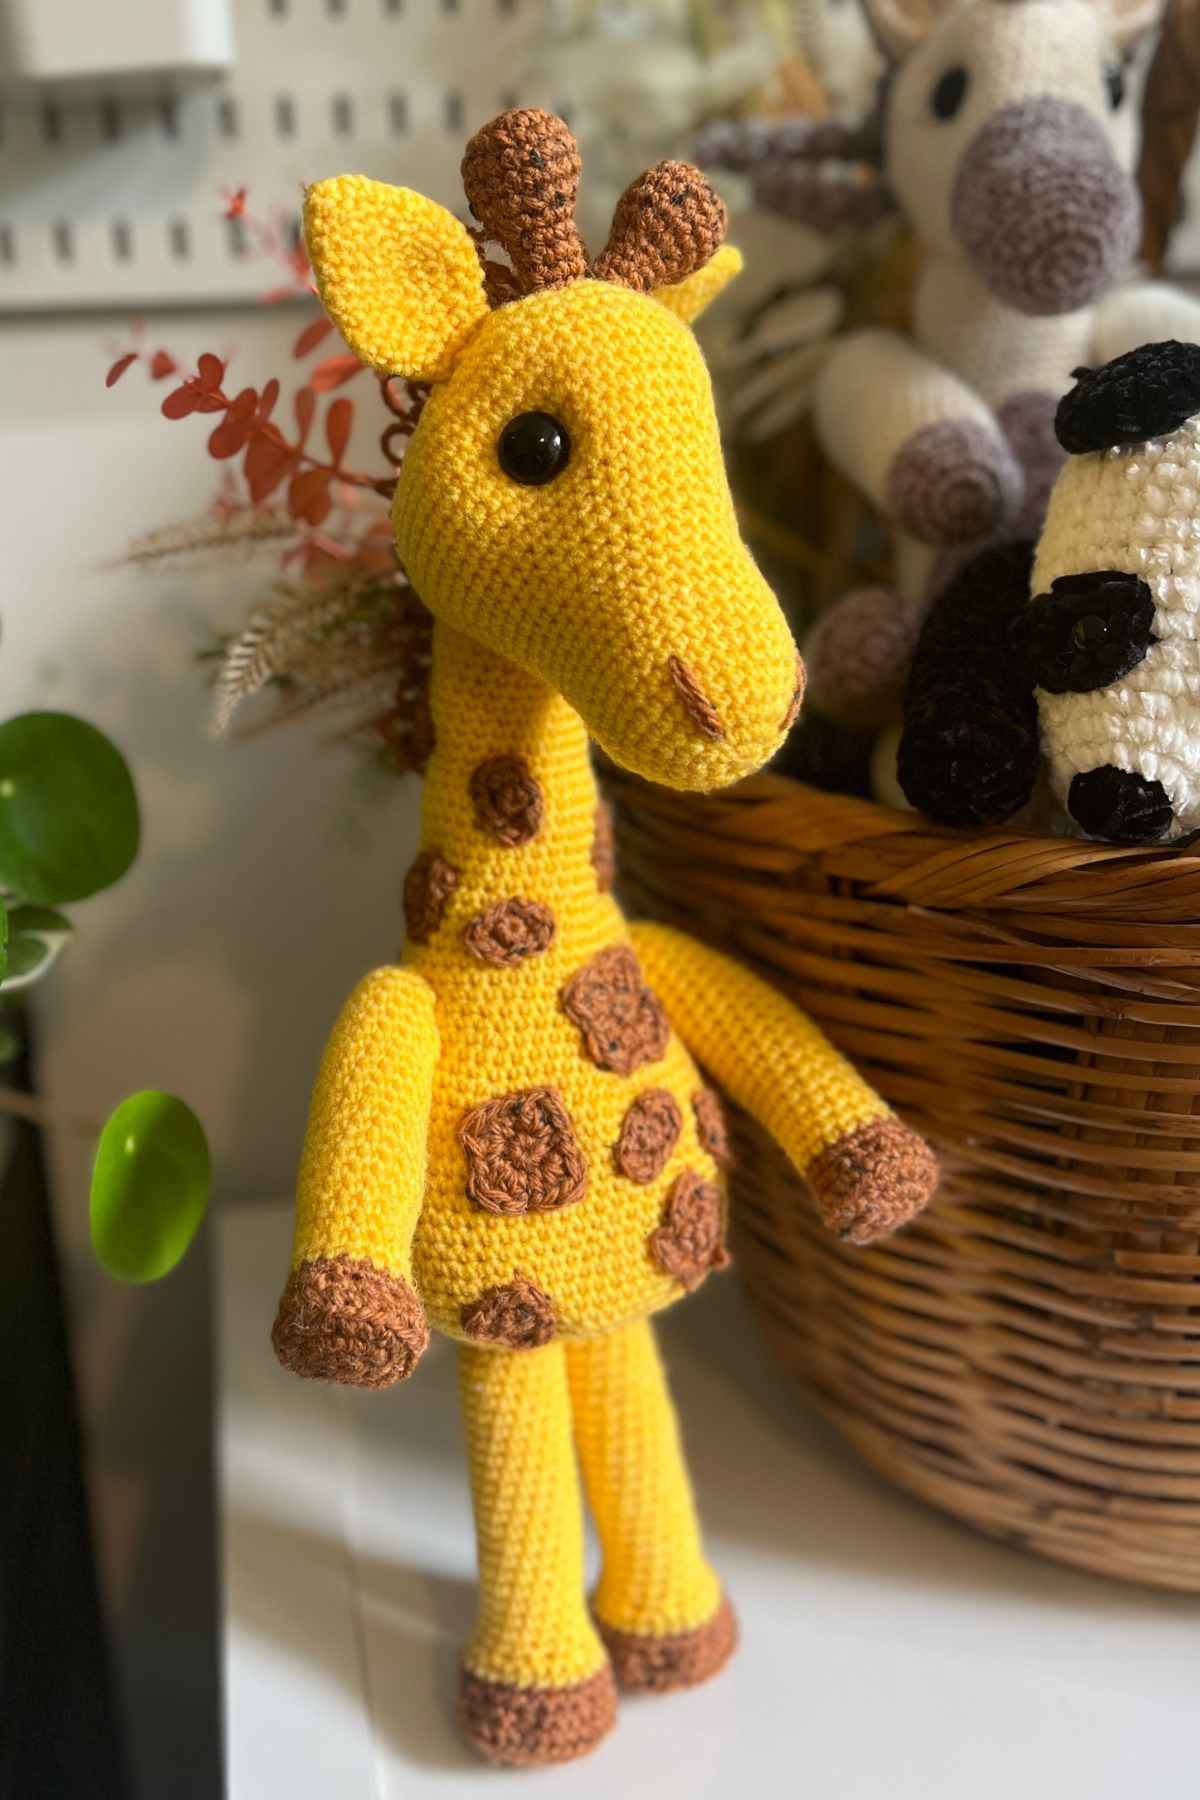
My crochet giraffe pattern is one of my larger creations at over 15 inches tall, but it didn’t take too long to create. If you can read a simple amigurumi pattern and have crocheted a few times before, this could be the perfect next project for you.

Want a printable version of this pattern? It is available as a PDF download here, or scroll down for the free pattern:
This toy giraffe is also a great zoological companion for my zebra, monkey, okapi, koala, otter and elephant patterns if you’ve made them previously!
*The products linked in this pattern were carefully selected by me based on what I used to produce the design. If you decide to purchase using the links provided, I may earn a small commission on that sale at no extra cost to you.
Your Kit List
Here’s what I used to create my giraffe pattern.
- 50g brown/orange West Yorkshire Spinners aranPaid Link* tweed yarn
- 100g yellow DK yarn*
- 3.5mm crochet hookPaid Link*
- Toy safe stuffing*
- Tapestry needlePaid Link*
- 12mm safety eyes*
You’ll have noticed that I used two different yarn weights in this pattern. It’s a little unconventional, but I wanted to give a lift to the hoof areas and patches, which I think this heavier weighted yarn achieves.
Stitches and Techniques
This pattern uses the standard amigurumi stitches, along with some hand sewing to attach the patches and join the toy together. Here are the abbreviations you’ll see and some links to tutorials for particular techniques.
- magic circle
- sc – single crochet
- 2sc – put two single crochets into one stitch
- sc2tog – use a single crochet to join two stitches together
- BLO – stitch into the back loop only
- slst – slip stitch
- dc – double crochet
- tr – treble crochet
- cc – change color

My Crochet Giraffe Pattern
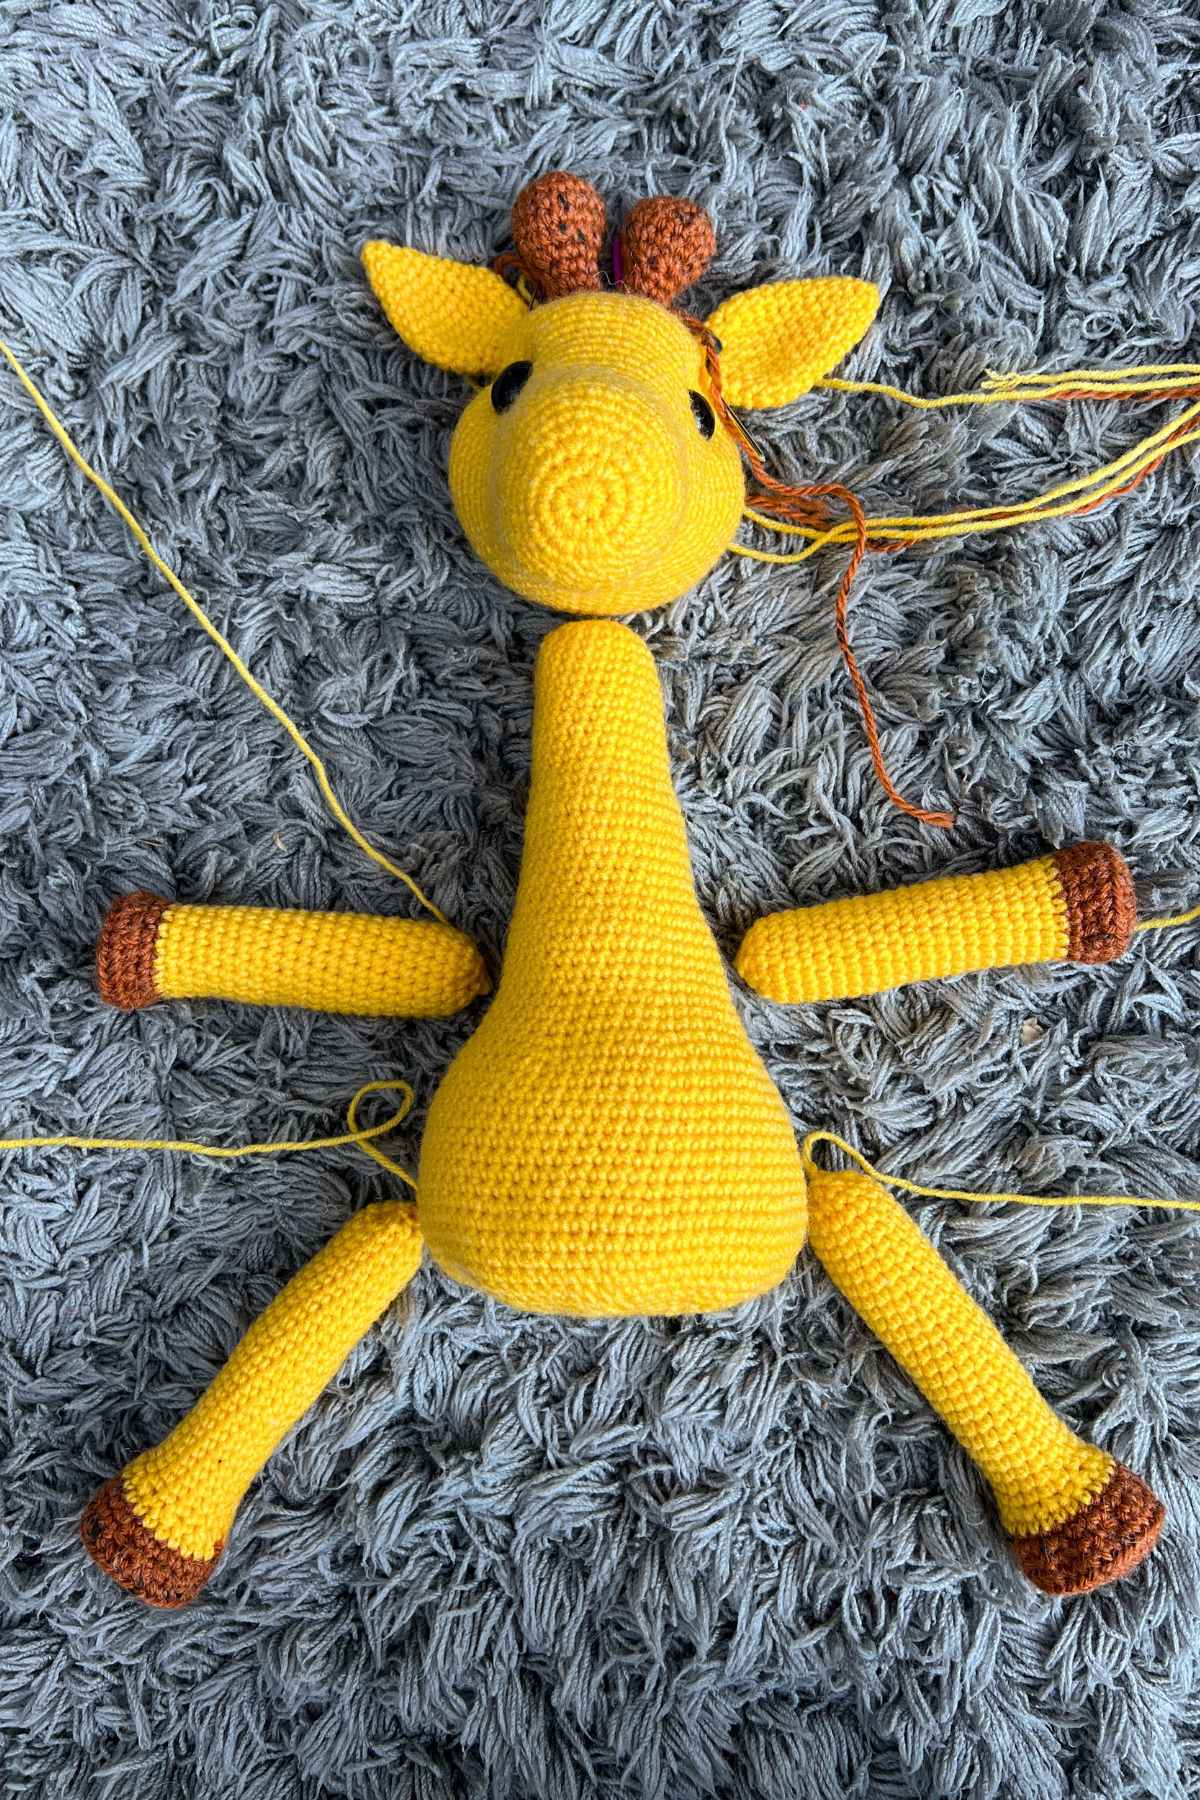
I crocheted my giraffe in separate sections, and hand sewed the composite pieces together at the end.
The head
Work with your yellow yarn and 3.5mm crochet hook.
Round 1
Make a magic circle of eight stitches (8)
Round 2
2sc x 8 (16)
Round 3
(1sc, 2sc) x 8 (24)
Round 4 – 5
1sc x 24 (24)
Round 6
(1sc x 2, 2sc) x 8 (32)
Round 7 – 15
1sc x 32 (32)
Round 16
(1sc x 3, 2sc) x 8 (40)
Round 17 – 19
1sc x 40 (40)
Round 20
(1sc x 4, 2sc) x 8 (48)
Round 21
1sc x 48 (48)
Round 22
(1sc x 5, 2sc) x 8 (56)
Round 23
1sc x 56 (56)
Round 24
(1sc x 6, 2sc) x 8 (64)
Round 25 – 30
1sc x 64 (64)
Round 31
(1sc x 6, sc2tog) x 8 (56)
Round 32
(1sc x 5, sc2tog) x 8 (48)
Round 33
(1sc x 4, sc2tog) x 8 (40)
Round 34
(1sc x 3, sc2tog) x 8 (32)
Stuff the muzzle of the giraffe, then insert safety eyes at around level 22, and approximately 20 stitches apart. To inset the eyes, take a strand of yarn and tie to behind each safety eye backing and pull it taut.
Round 35
(1sc x 2, sc2tog) x 8 (24)
Round 36
(1sc, sc2tog) x 8 (16)
Stuff the remainder of the giraffe’s head.
Round 37
sc2tog to close. Hide the yarn tail inside the head.
Giraffe ears
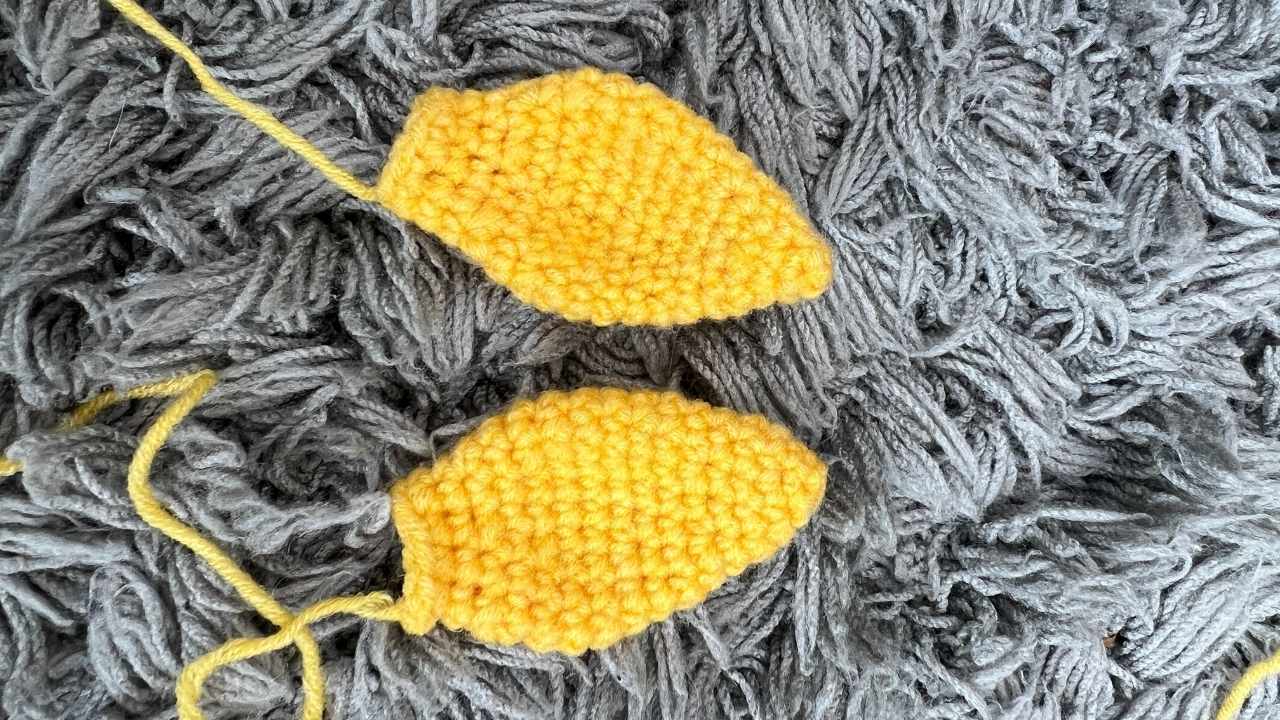
Use your 3.5mm crochet hook and yellow yarn again.
Round 1
Make a magic circle of five stitches (5)
Round 2
1sc x 5 (5)
Round 3
2sc x 5 (10)
Round 4 – 5
1sc x 10 (10)
Round 6
(1sc, 2sc) x 5 (15)
Round 7 – 8
1sc x 15 (15)
Round 9
(1sc x 2, 2sc) x 5 (20)
Round 10 – 11
1sc x 20 (20)
Round 12
(1sc x 2, sc2tog) x 5 (15)
Round 13
(1sc, sc2tog) x 5 (10
Round 14 – 15
1sc x 10
Flatten the piece, and gently push your finger into the wide section to give it shape. Slip stitch to close and leave a long tail of yarn for sewing later.
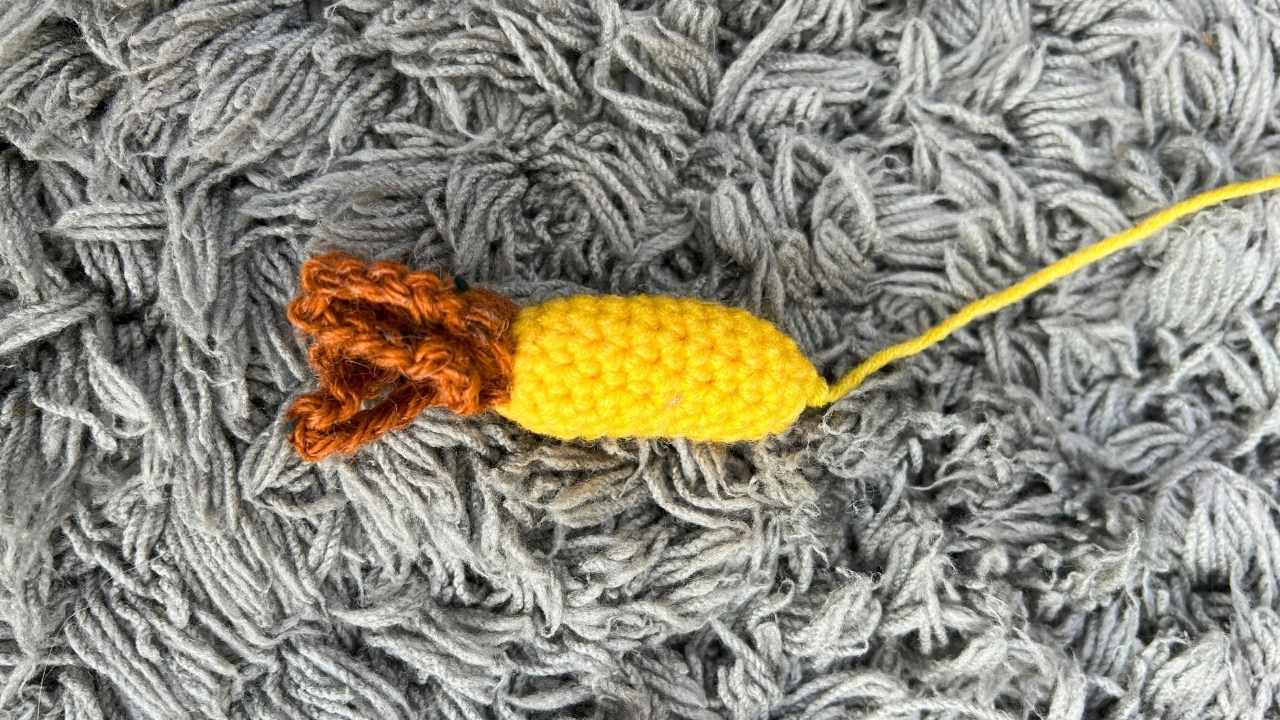
Making the ossicones
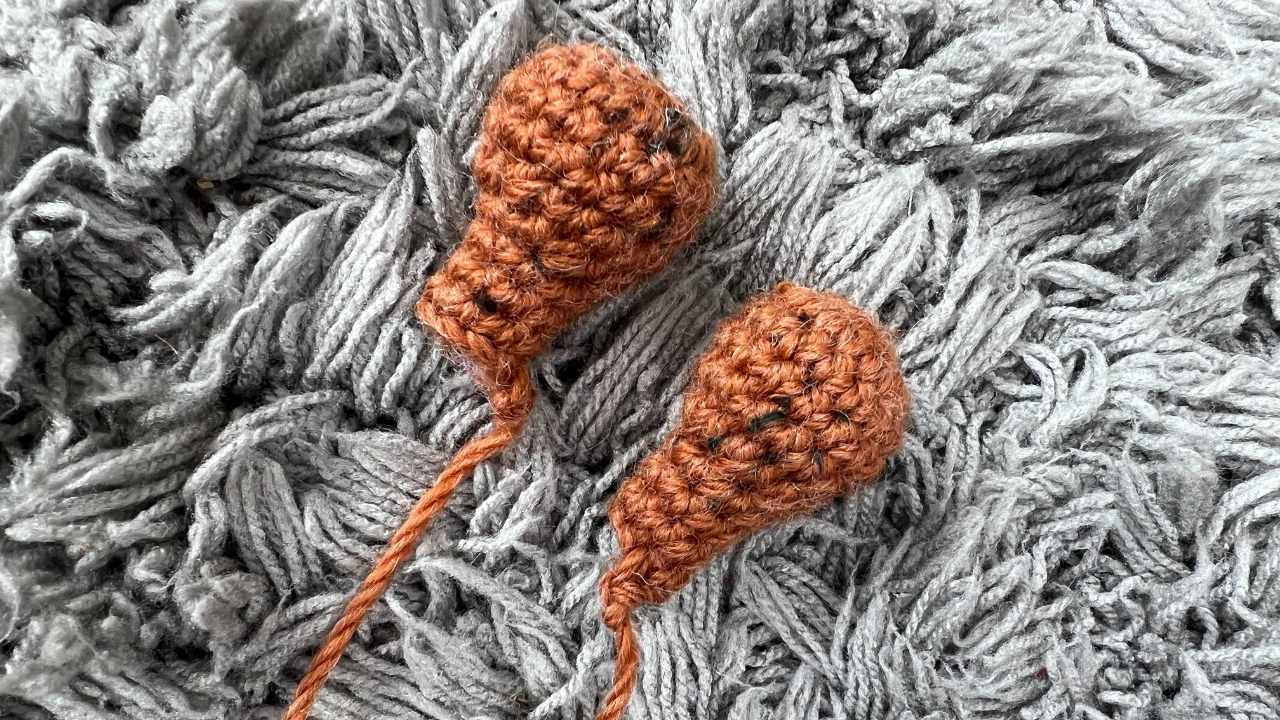
Your giraffe’s little horns are called ossicones, and you’re going to make two in the brown/orange yarn using your 3.5mm hook.
Round 1
Make a magic circle of eight stitches (8)
Round 2
2sc x 8 (16)
Round 3 – 5
1sc x 16 (16)
Round 6
sc2tog x 8 (8)
Round 7 – 10
1sc x 8 (8)
Slip stitch to finish. You can now stuff the ossicone, but leave the bottom end open for sewing later.
The body
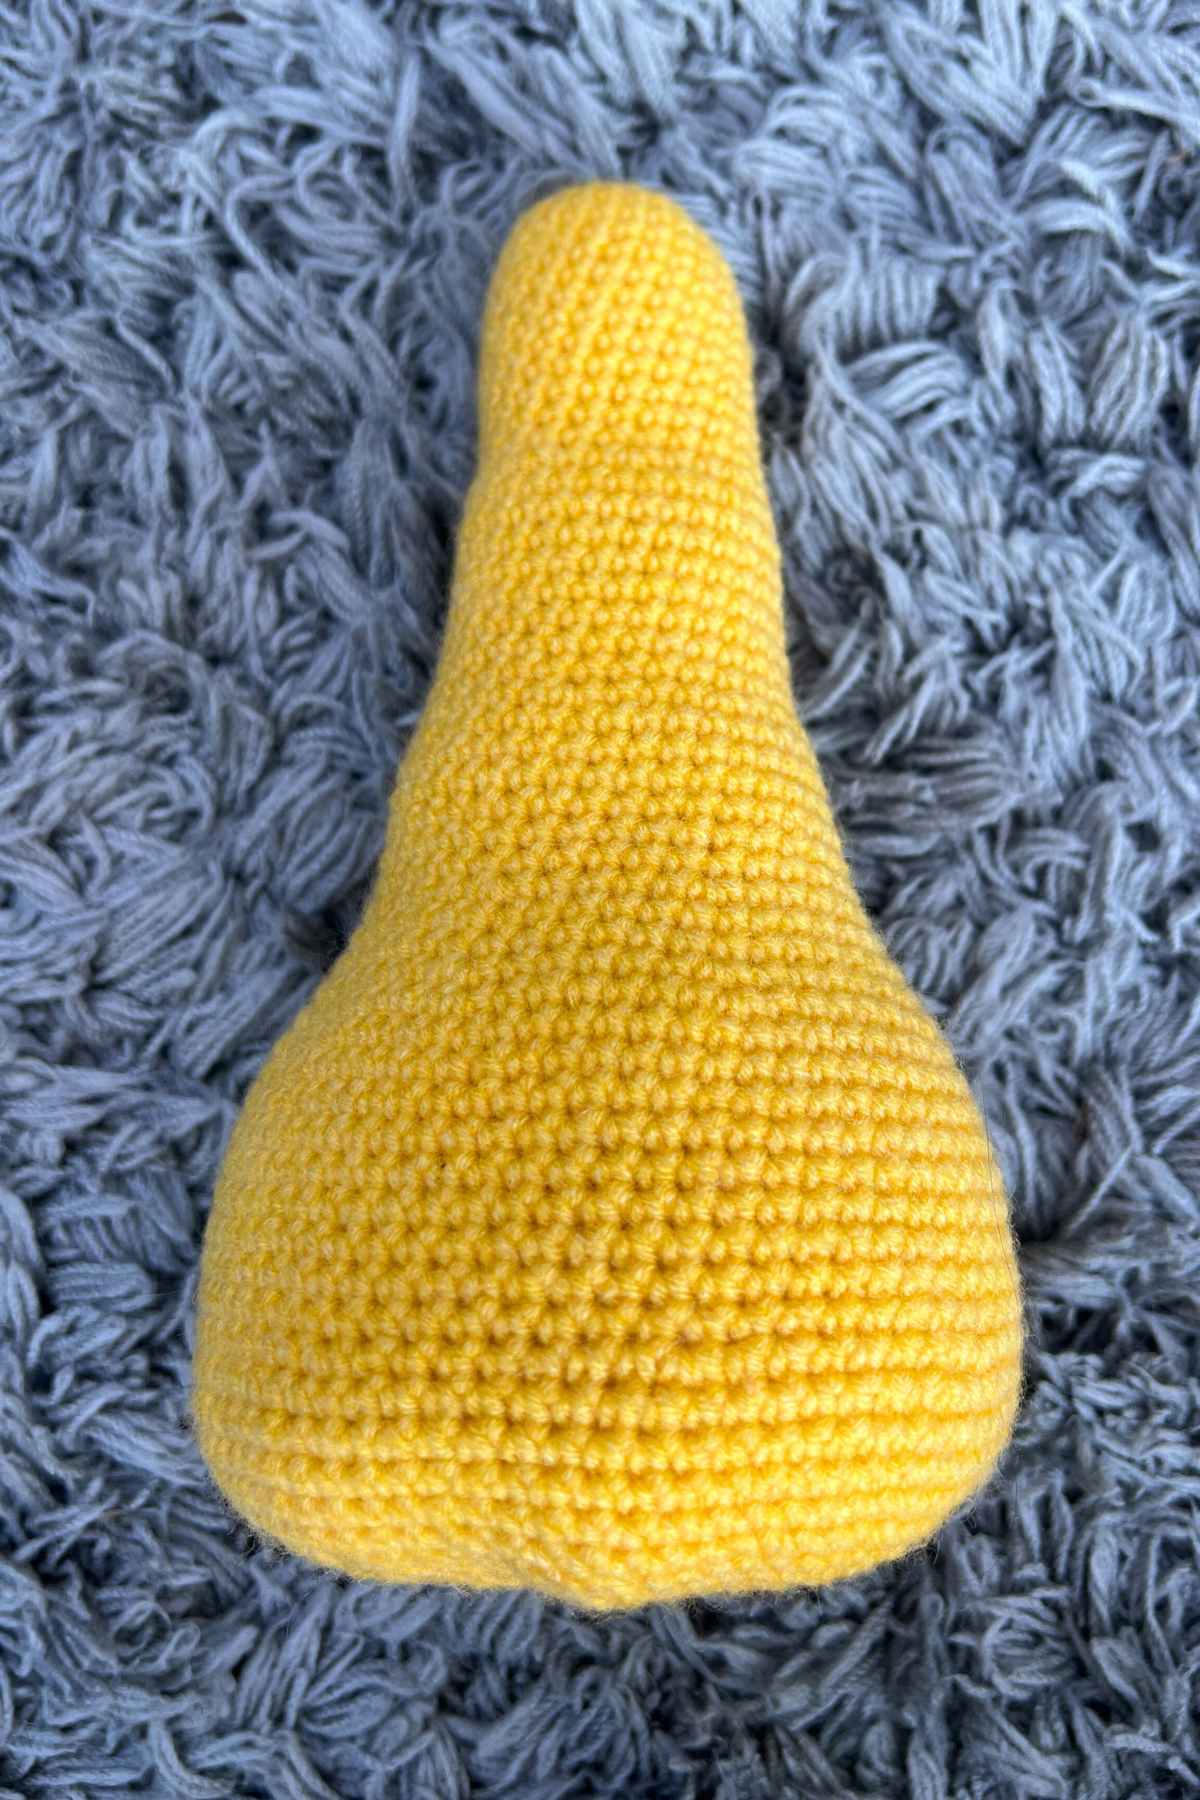
Your giraffe’s basic body will be made all in yellow yarn. The patches will get sewn on later, so for now just grab your yellow yarn and 3.5mm hook.
Round 1
Make a magic circle of eight stitches (8)
Round 2
2sc x 8 (16)
Round 3
(1sc, 2sc) x 8 (24)
Round 4 – 15
1sc x 24 (24)
Round 16
(1sc x 2, 2sc) x 8 (32)
Round 17 – 25
1sc x 32 (32)
Round 26
(1sc x 3, 2sc) x 8 (40)
Round 27 – 32
1sc x 40 (40)
Round 33
(1sc x 4, 2sc) x 8 (48)
Round 34 – 35
1sc x 48 (48)
Round 36
(1sc x 5, 2sc) x 8 (56)
Round 37
(1sc x 6, 2sc) x 8 (64)
Round 38 – 46
1sc x 64 (64)
Round 47
(1sc x 7, 2sc) x 8 (72)
Round 48 – 52
1sc x 72 (72)
Round 53
(1sc x 7, sc2tog) x 8 (64)
Round 54
(1sc x 6, sc2tog) x 8 (56)
Round 55
(1sc x 5, sc2tog) x 8 (48)
Round 56
(1sc x 4, sc2tog) x 8 (40)
Round 57
(1sc x 3, sc2tog) x 8 (32)
Round 58
(1sc x 2, sc2tog) x 8 (24)
Round 59
(1sc, sc2tog) x 8 (16)
Fill with toy stuffing.
Round 60
sc2tog to close, and hide the yarn tail end inside the body section.
Front legs
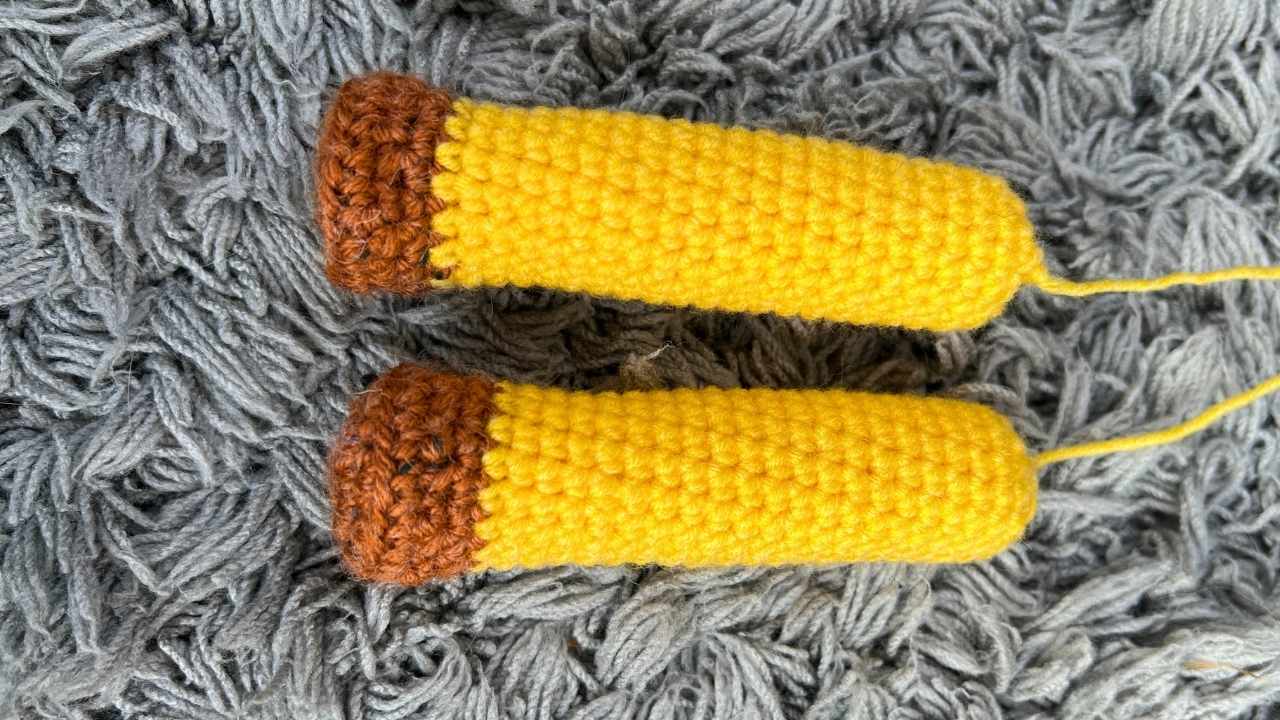
Your legs will begin at the hooves in the darker shade, then change to yellow later so have both yarns to hand. Use your 3.5mm crochet hook.
Round 1
Make a magic circle of eight stitches (8)
Round 2
2sc x 8 (16)
Round 3
(1sc, 2sc) x 8 (24)
Round 4
BLO 1sc x 24 (24)
Round 5
(1sc, sc2tog) x 8 (16)
Round 6
1sc x 16 (16)
cc to yellow
Round 7 – 27
1sc x 16 (16)
Fill with toy stuffing
Round 28
sc2tog to close, then sew closed, leaving a long tail of yarn for sewing later.
Back legs
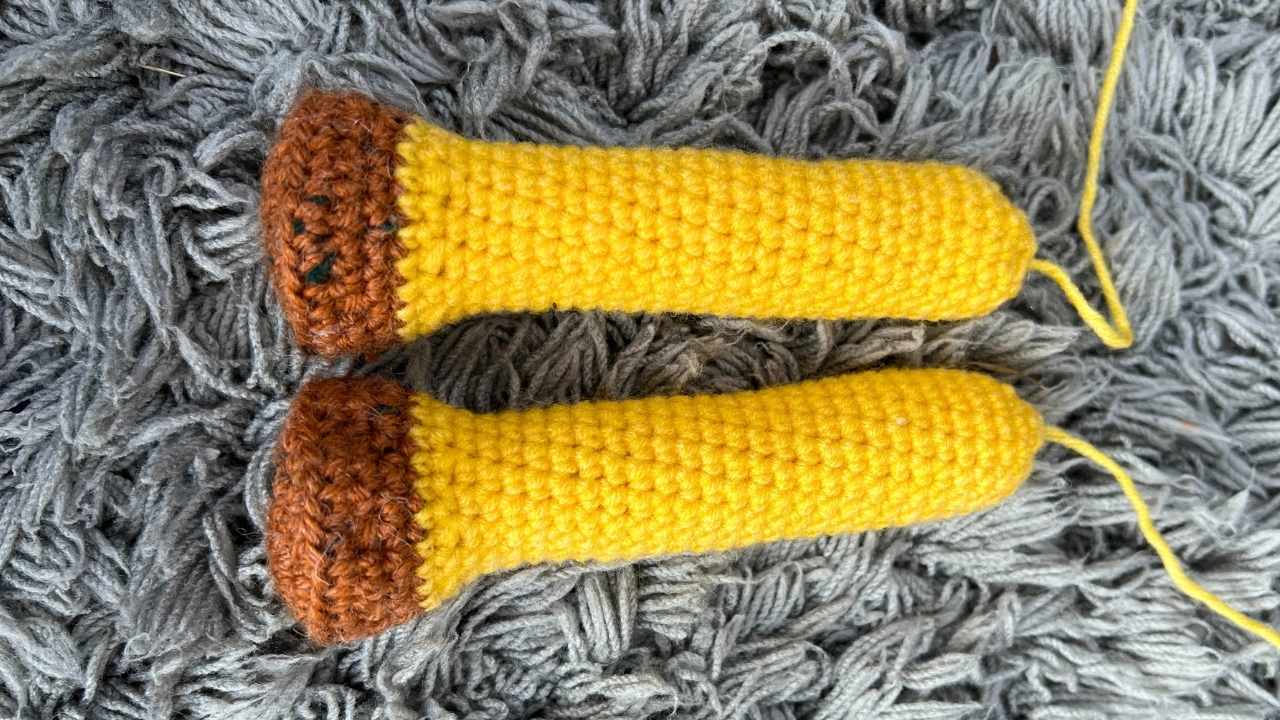
Begin in the orange shade of yarn again.
Round 1
Make a magic circle of eight stitches (8)
Round 2
2sc x 8 (16)
Round 3
(1sc, 2sc) x 8 (24)
Round 4
(1sc x 2, 2sc) x 8 (32)
Round 5
BLO 1sc x 32 (32)
Round 6
(1sc x 2, sc2tog) x 8 (24)
Round 7
1sc x 24 (24)
cc yellow
Round 8
(1sc, sc2tog) x 8 (16)
Round 9 – 33
1sc x 16 (16)
Round 34
sc2tog to close, then sew closed, leaving a long tail of yarn for sewing later.
Giraffe patches
All of your giraffe’s patches will be made in the darker yarn using your 3.5mm crochet hook.
Big
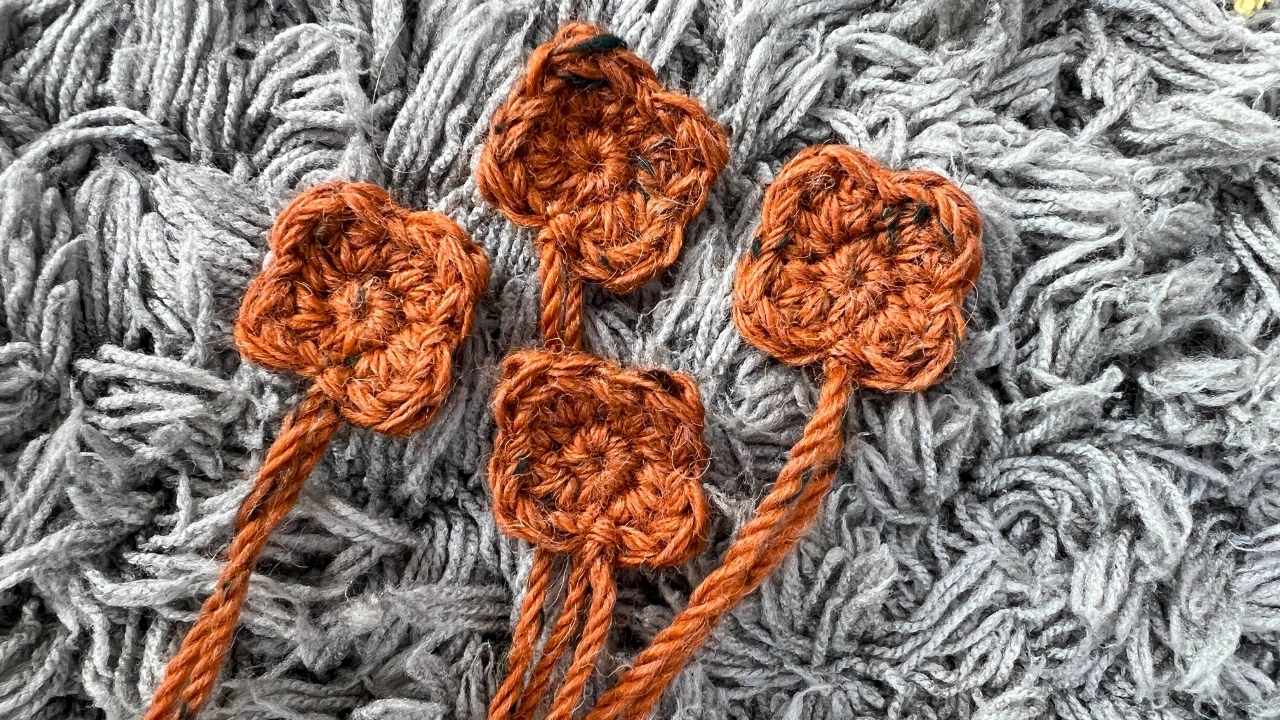
Round 1
Make a magic circle of eight stitches (8)
Round 2
((dc, tr, dc), sc) x 3, (dc, tr, dc), slst
Small
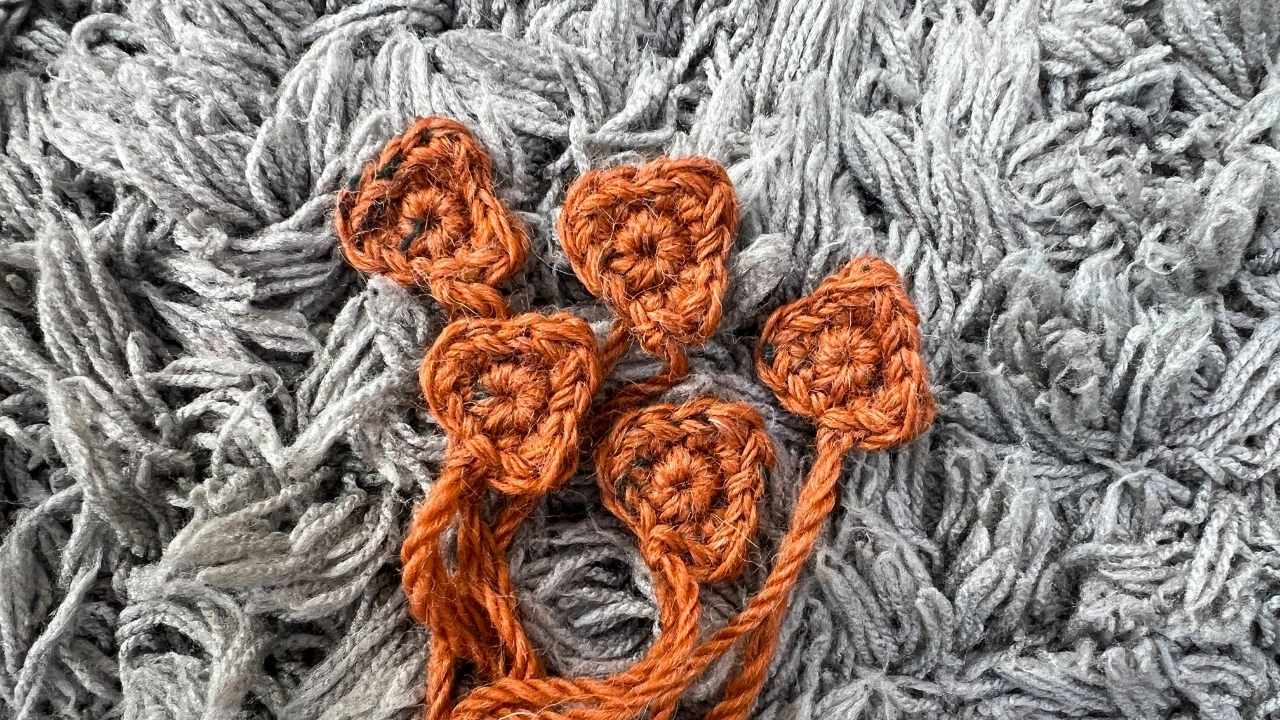
Round 1
Make a magic circle of six stitches (6)
Round 2
3sc, slst, ((sc, dc, sc), slst) x 2
Micro
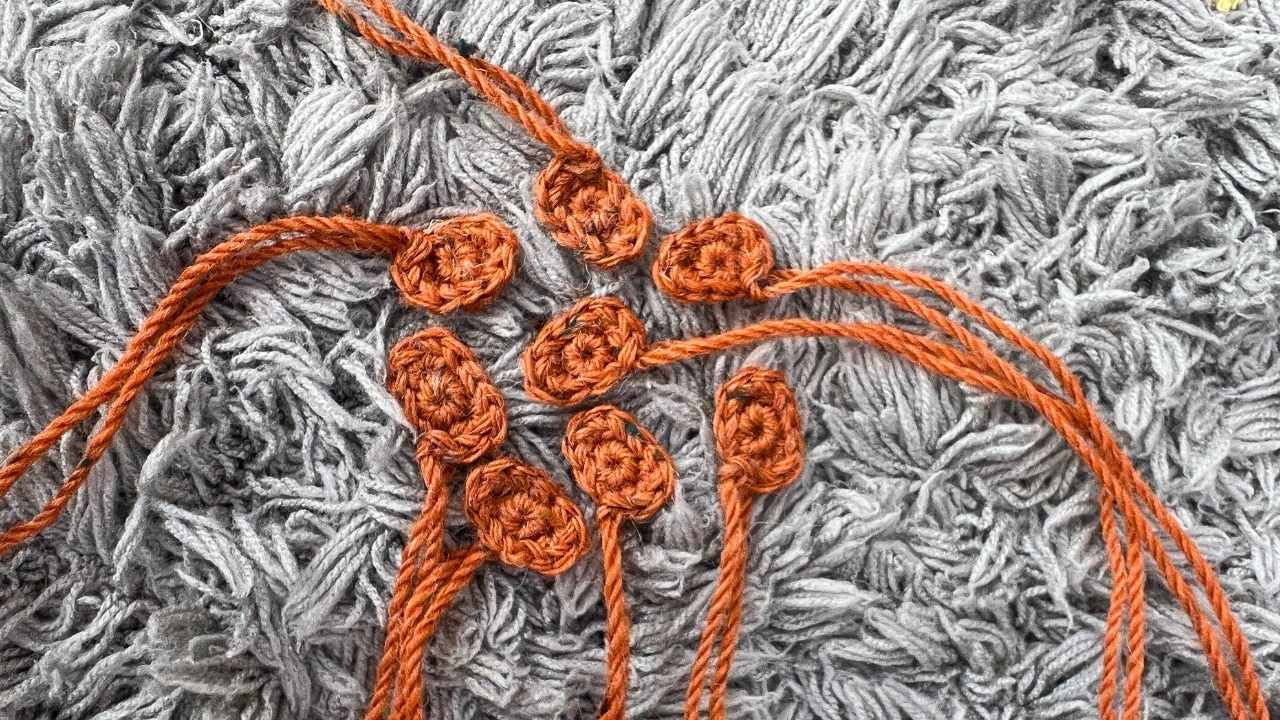
Round 1
Make a magic circle of six stitches (6)
Round 2
(slst, 3sc, slst) x 2
Giraffe’s tail
Round 1
Make a magic circle of six stitches (6)
Round 2
2sc x 6 (12)
Round 3 – 11
1sc x 12 (12)
Stuff the tail so far.
Round 12
Sc2tog to close.
Sewing your Giraffe Together
You’re now ready to sew your giraffe together. You’ll want to use the yarns you worked each section with, so mostly the yellow and the orange for the ossicones. Some pieces will have tail sections you can use for sewing, others you can use yarn from the skein.
Lay the sections out on the floor in front of you.
Begin by sewing the ears and ossicones onto the head. You want your ears to sit nine rows back directly from the eyes. Attach the base of the ears so they sit upright, with the section flattened.
The ossicones sit between and slightly forward of the ear positions. Weave in and out of the ends around the circumference of the circular base.
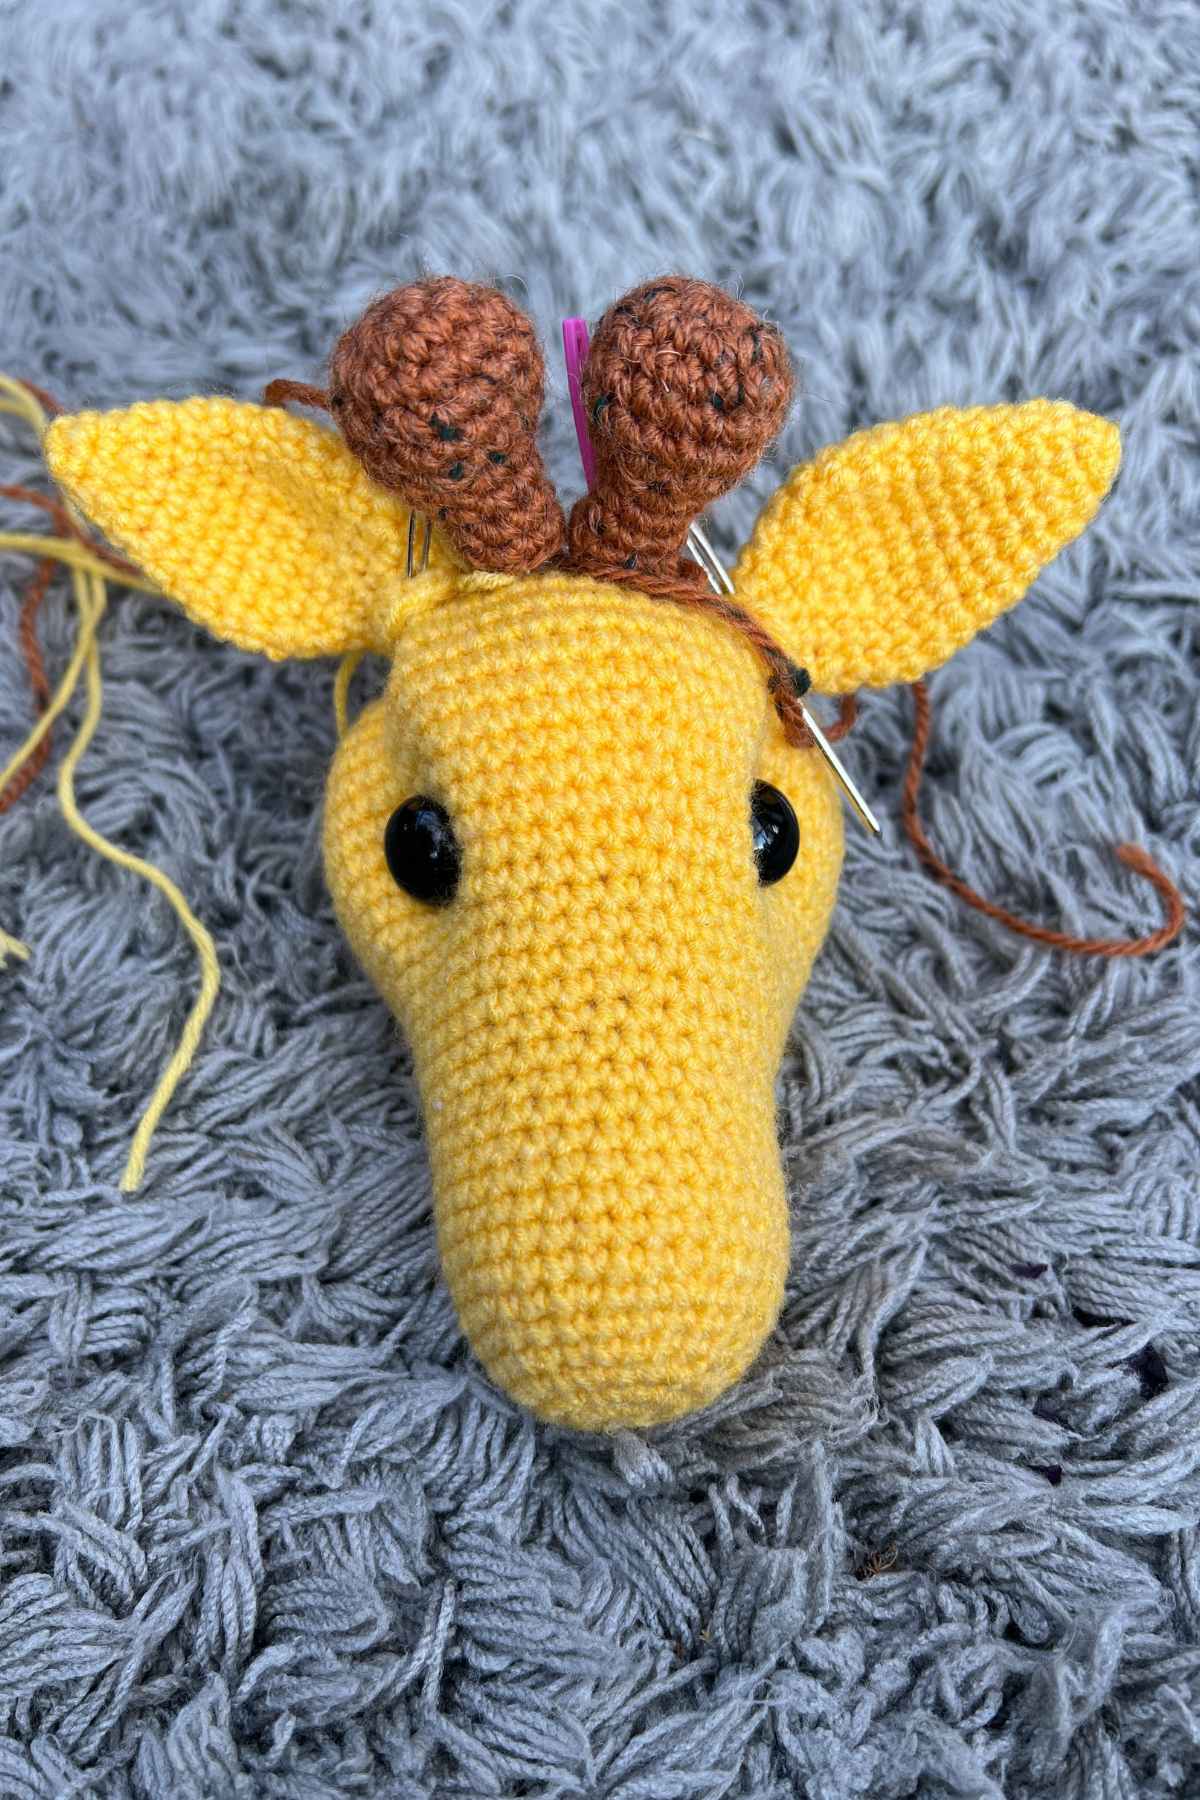
Now you can sew the head onto the neck. I like to sit it so that the flat back of the head lines up with the neck, and sew in and out of the stitches around towards the chin side and back up.

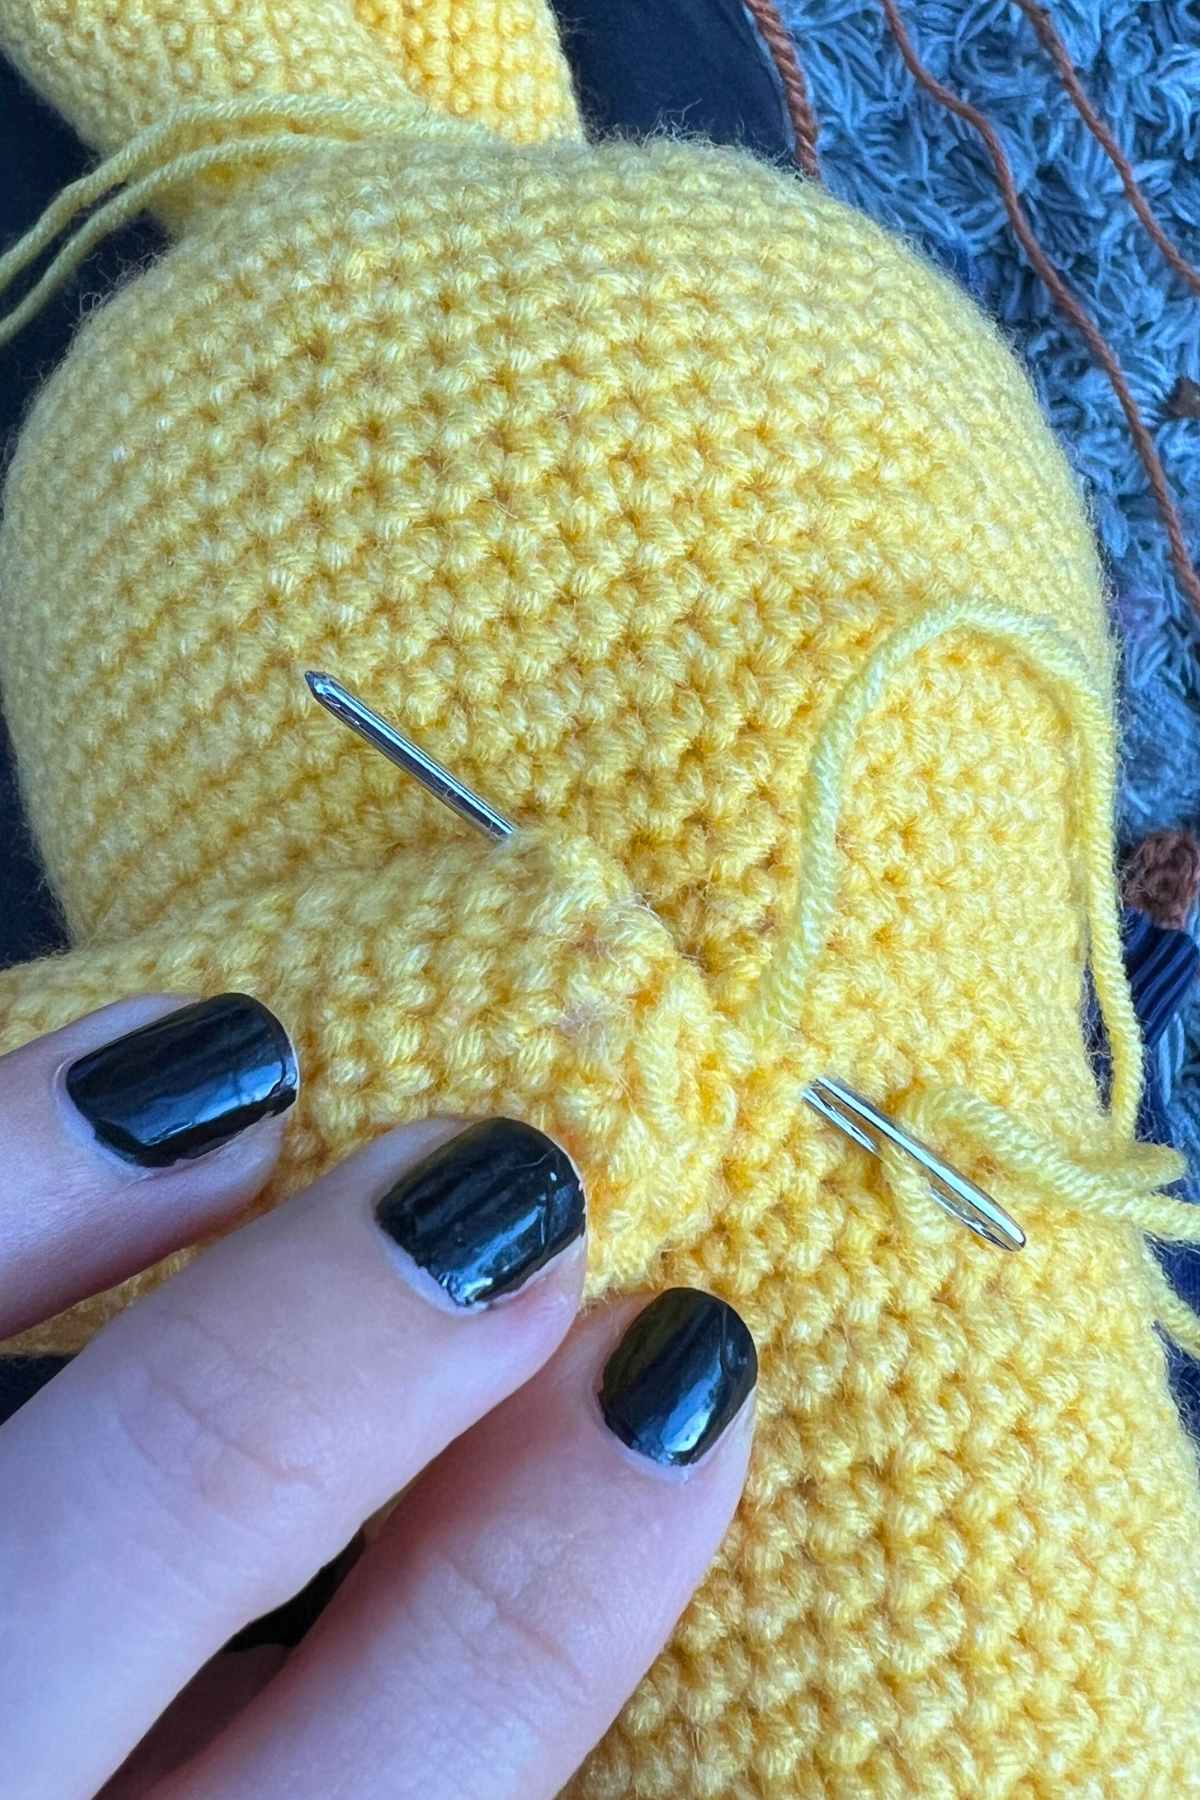
You will be sewing the limbs onto the body using the long yarn tails you left earlier. Place the legs so that your giraffe is in a standing position, directly at the center of the body where you closed your circle.
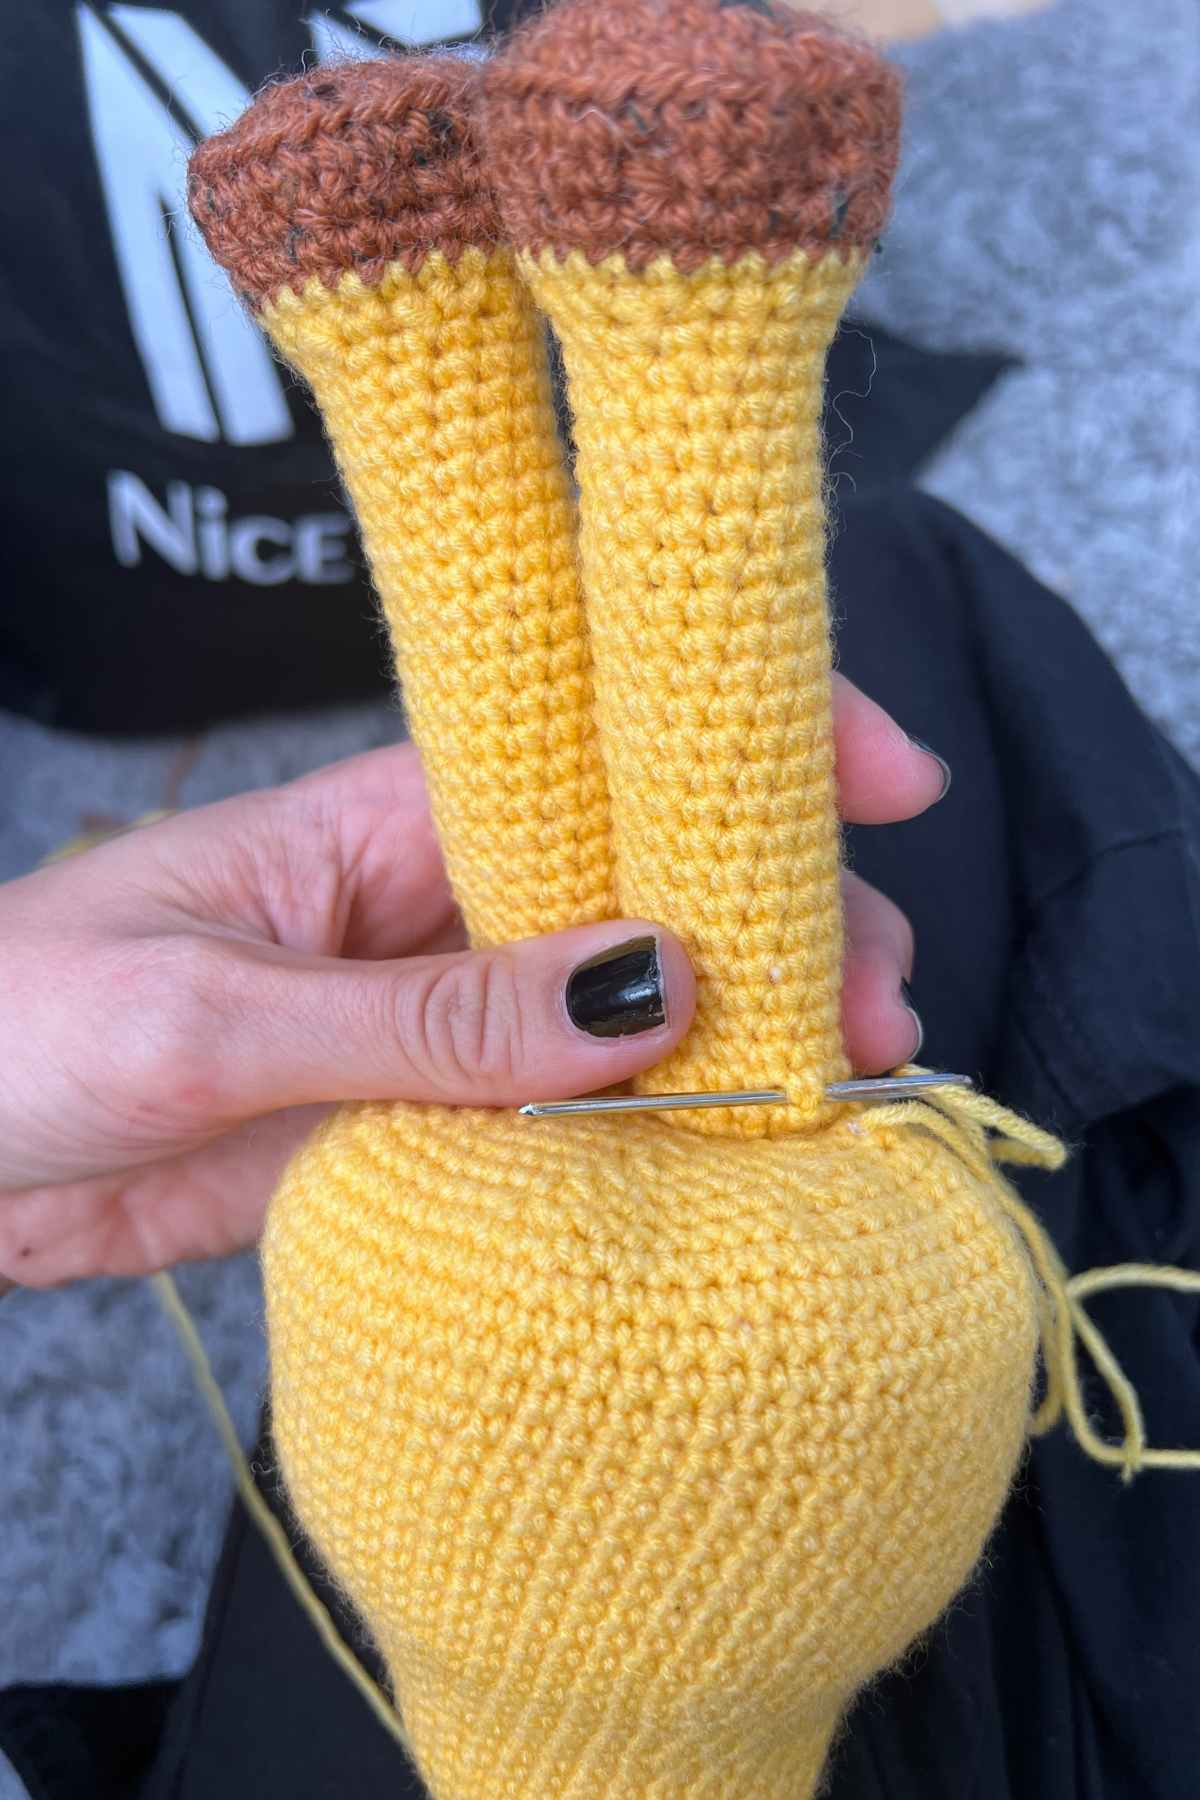
The arms need to sit where the neck widens into the body, at either side of the toy.
Finally weave the tail onto the back underside of the body, hanging down behind the legs.
Finishing Touches
Your giraffe is nearly complete now, we just need to add a few more details to really bring her to life.
Attaching the patches
I think the giraffe’s patches look best when sewn onto the body at random. I recommend placing them with a slight lean towards having larger patches lower down, but otherwise without a concerted plan.
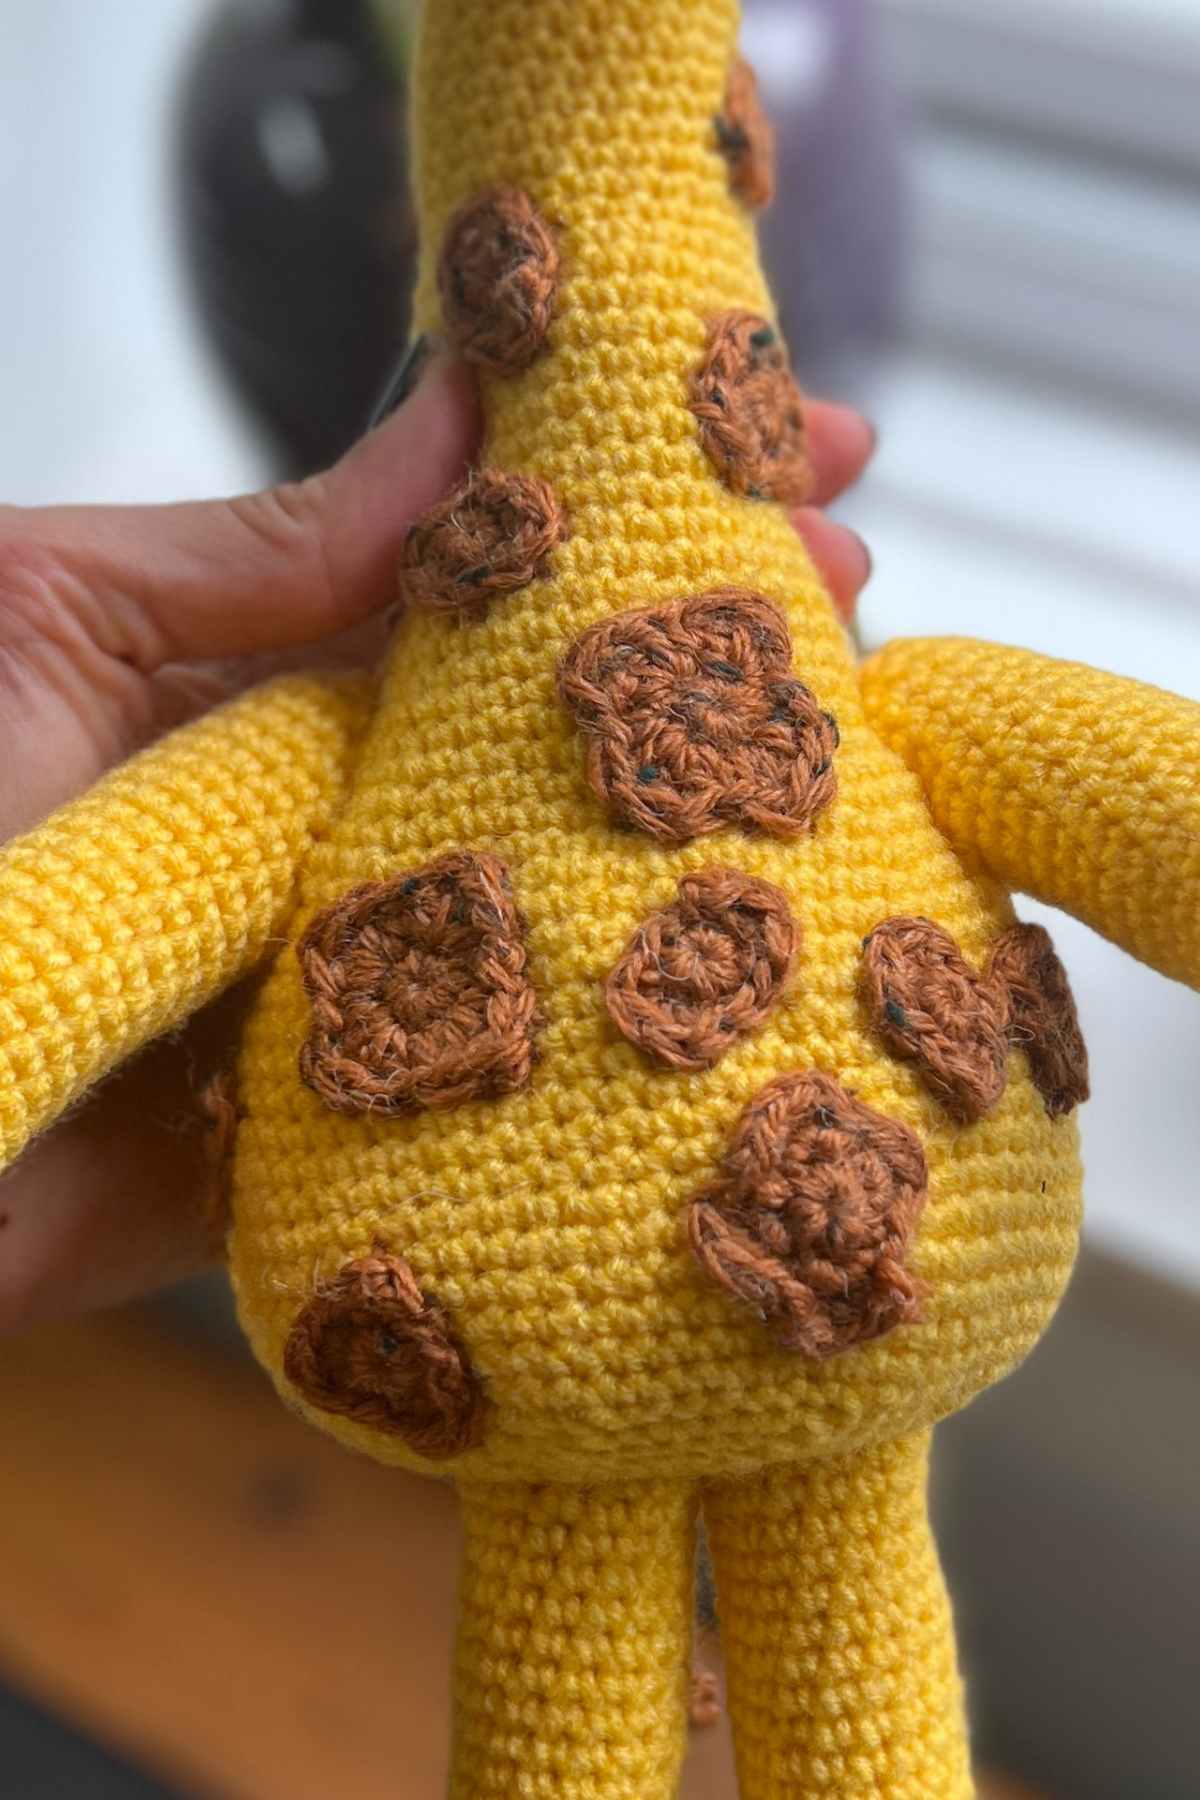
Pin the patches in place whilst you decide what you think looks best, then sew around the edge of each one with your tapestry needle and the brown yarn.
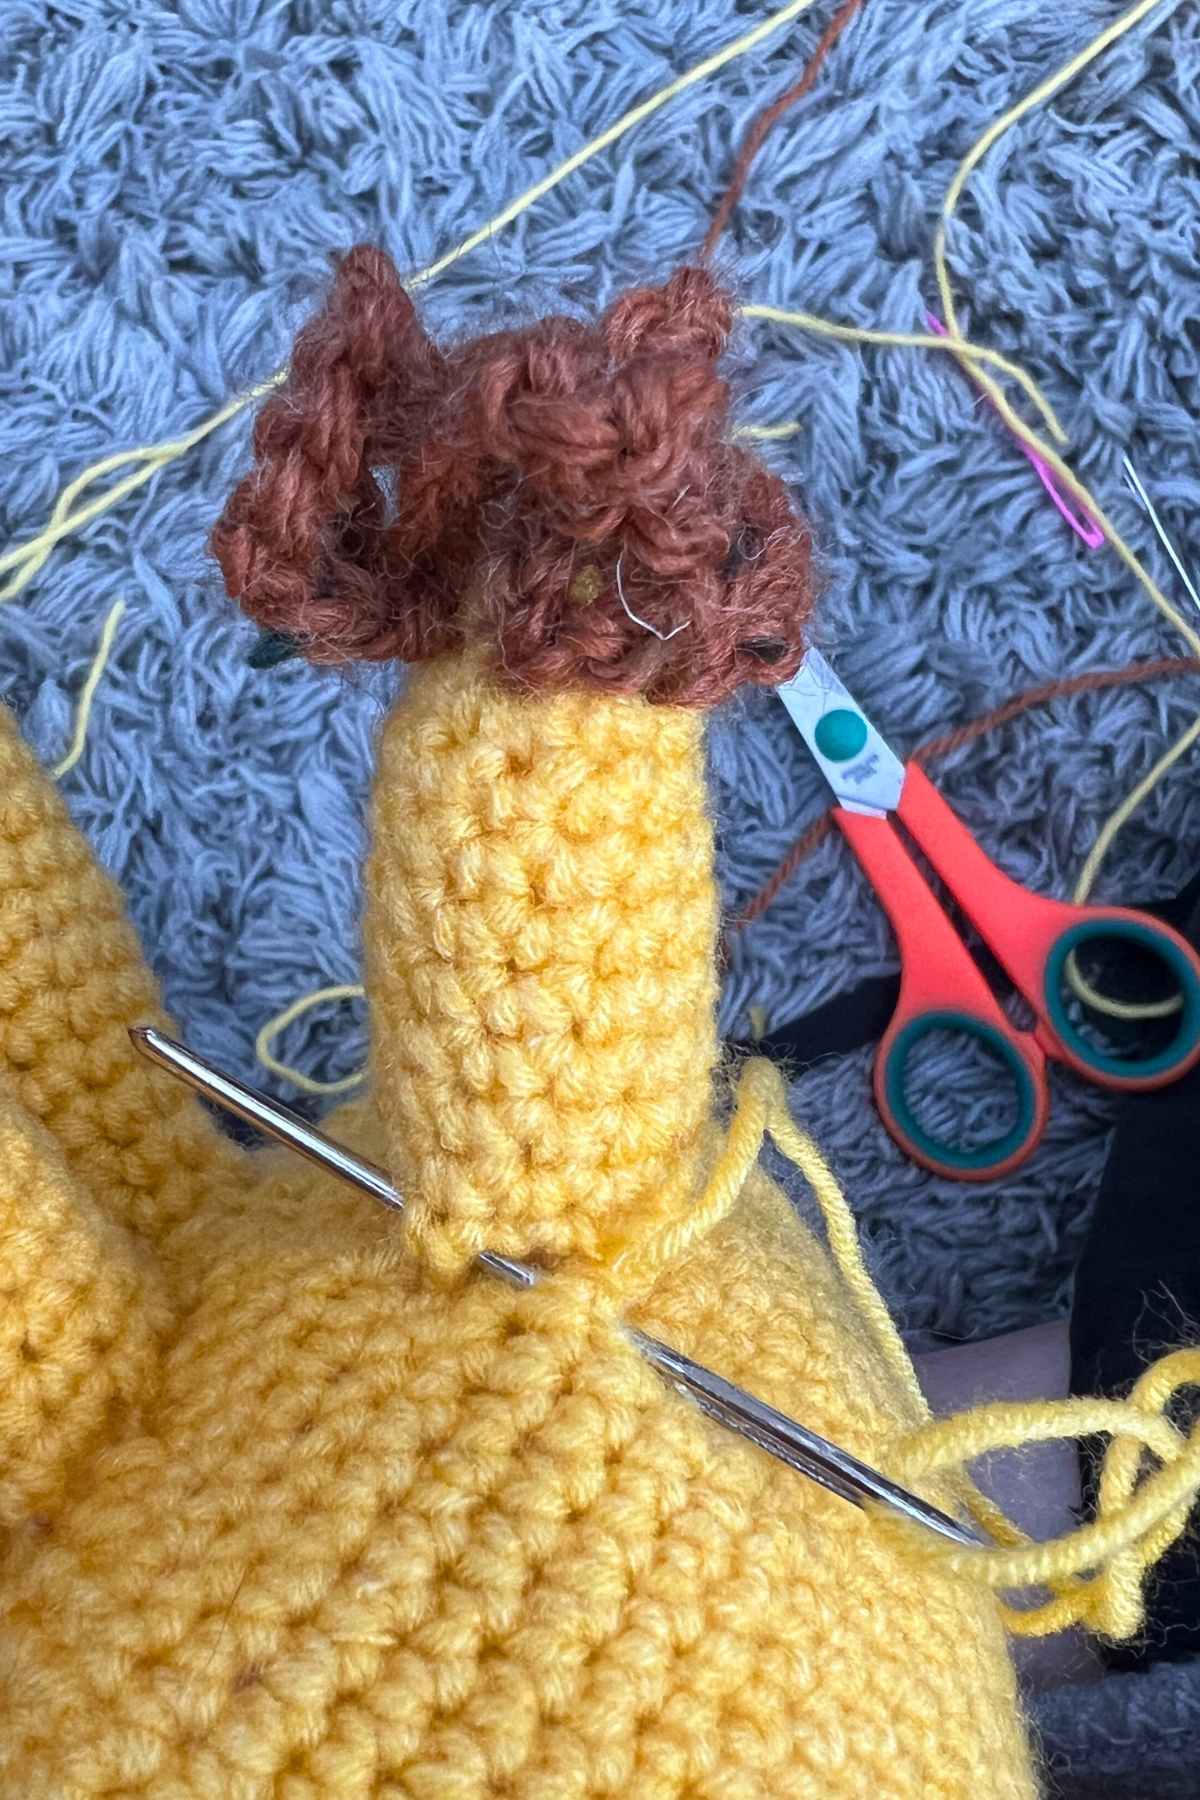
The giraffe’s mane and tail
I used a needle and the orange yarn to create the mane and tail. Attach the orange yarn, and starting at the top of the giraffe’s head, weave in and out of the stitches down the back of the neck. With each stitch, leave a loop of yarn exposed to form strands of hair. Once you’ve reached the nape of the neck, proceed back up sewing into the next set of stitches along.
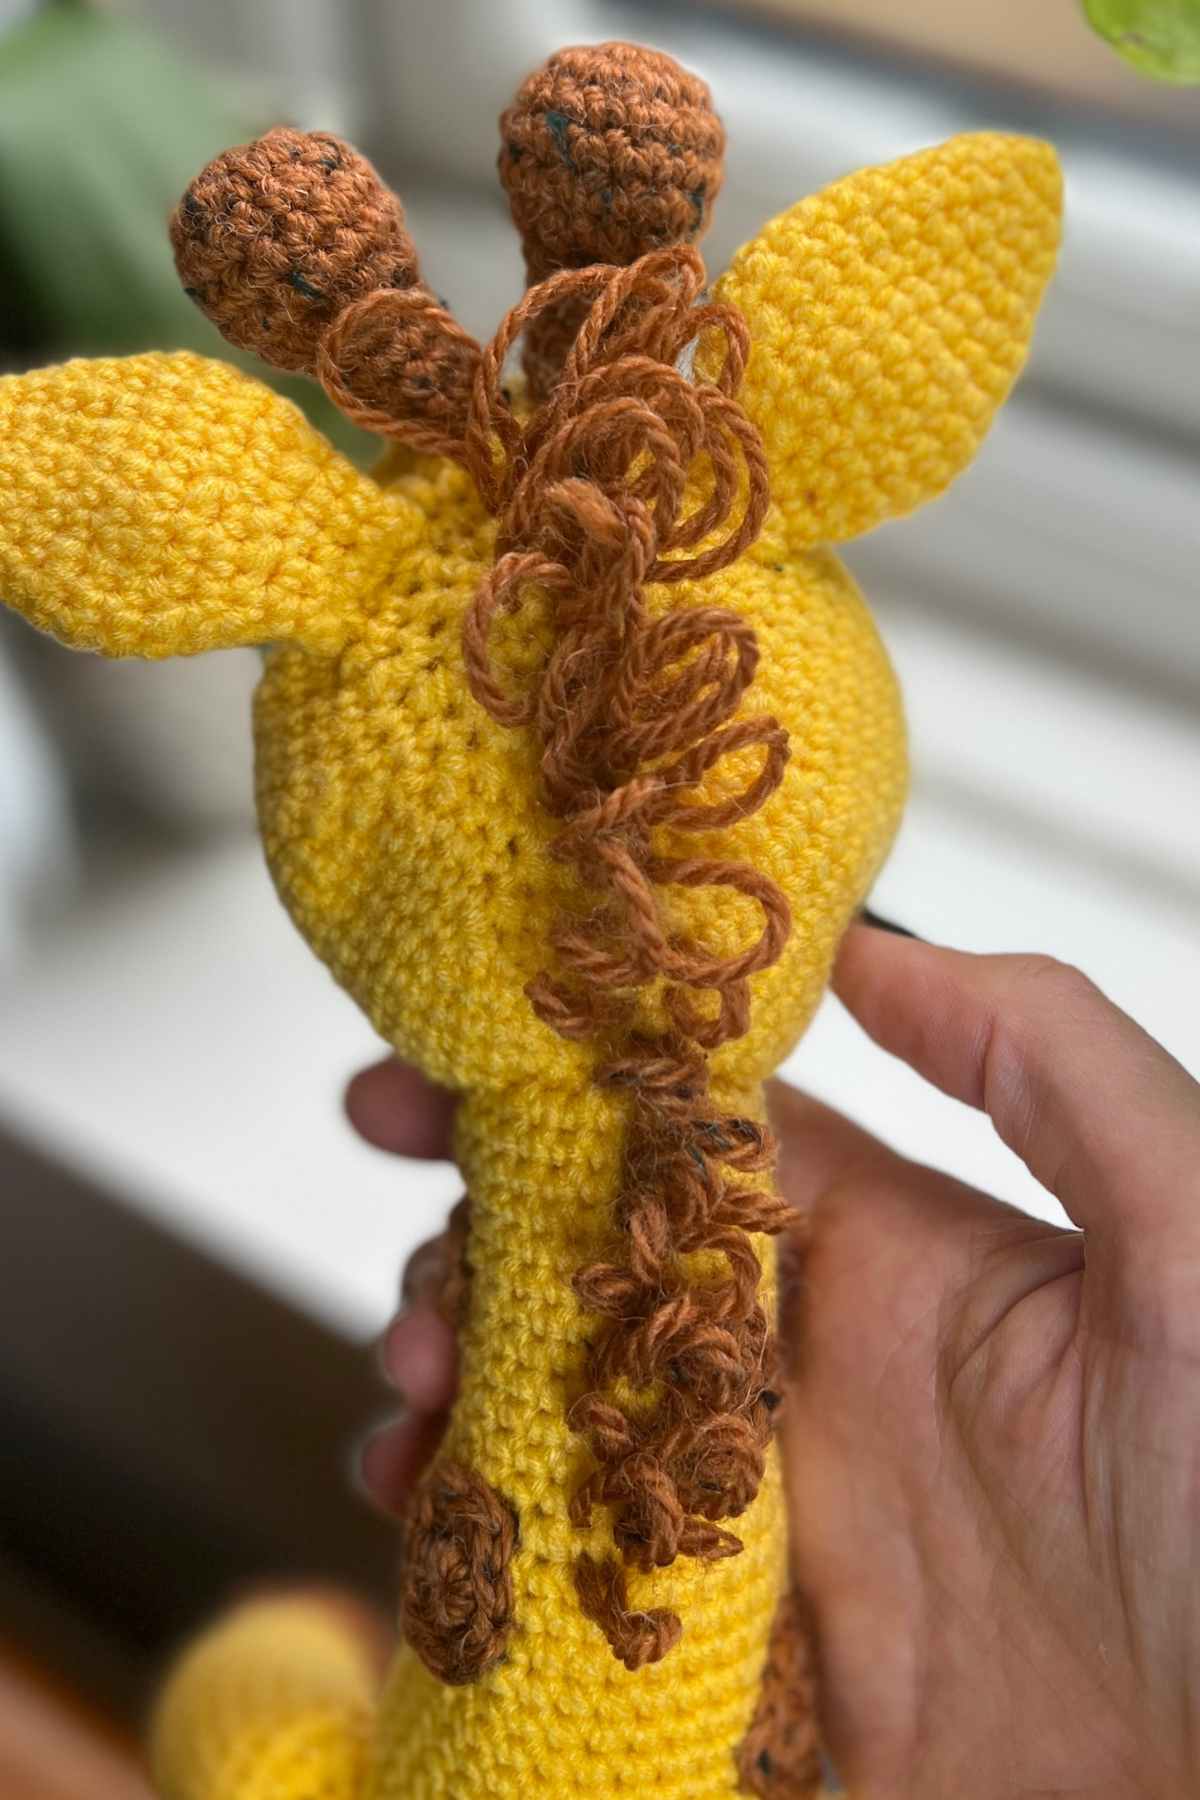
In a similar manner, work the tail from the center of the magic circle around the first couple of rounds, looping into each stitch.
Nostrils
Finally, let’s make sure your amigurumi giraffe can breathe with a pair or nostrils. Keep your orange yarn on the tapestry needle, and sew back and forth across a three stitch gap around six rounds back from the starting magic circle of your giraffe’s muzzle.
I can’t wait to hear what you think of your finished giraffe, so do let me know in the comments section below.
Lucy Kate, x