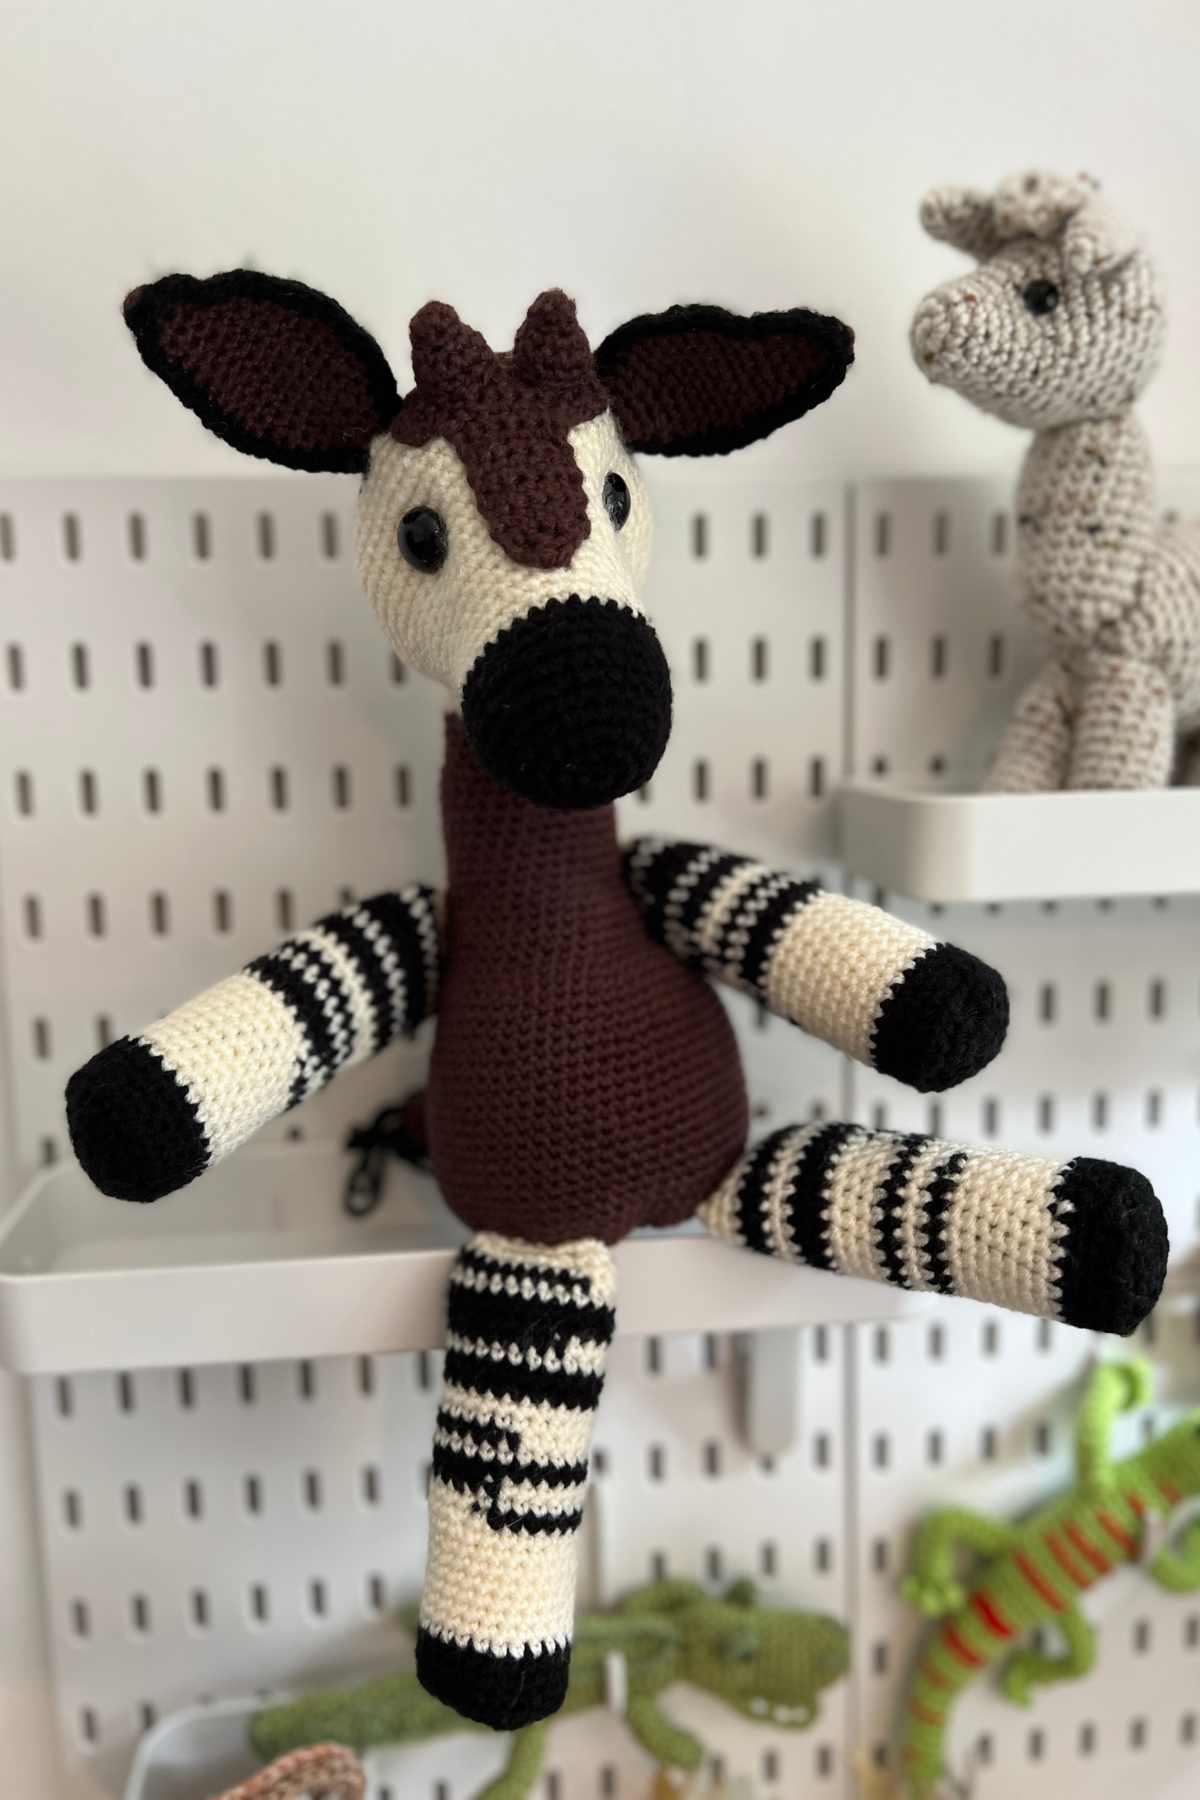
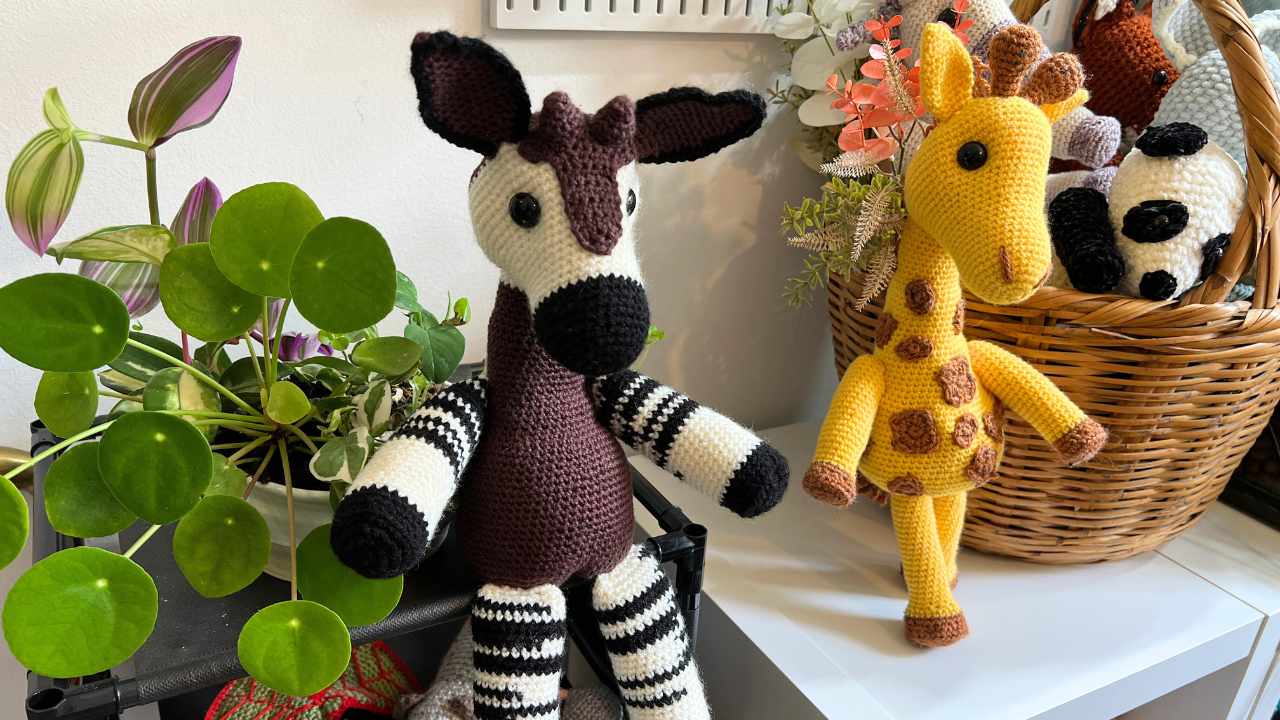
Free Crochet Okapi Pattern
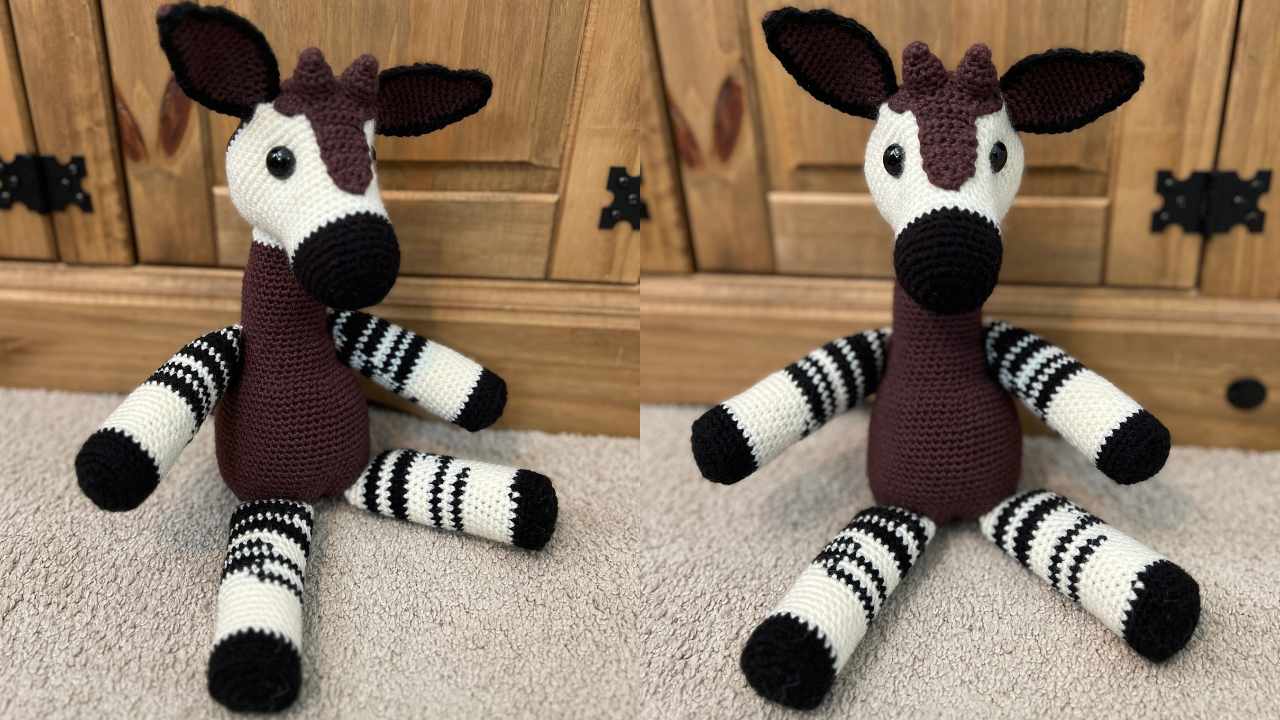
I have designed a lot of crochet toys over the past decade, but this one mattered more to me. Because the okapi isn’t just any other animal. It’s one that literally stopped me in my tracks the first time I saw one, as a child at Marwell Zoo in Hampshire, UK. There was a big sign saying how shy they were, and to be quiet. I pushed the door tentatively, then stood and stared. I stared as my brothers cooed, I stared as my Mum hushed them, I stared as they moved on to see the rest. My feet were rooted, my eyes in disbelief.

This must sound crazy now they are so much better known, but to me I’d seen the chimaera. Part horse, part zebra, part giraffe. All beauty.
I hope this pattern does even an iota of justice to an animal that still astounds me years later and well into adulthood, as it did as a little girl.
You might also like to make a giraffe, koala or elephant pal for him when you’re done!
Here’s what you’ll need to have
I used the following yarns, but the pattern should still look great if you swap in the same weight of another brand or even color.
- Womens’ Institute Premium DK black yarn
- Hobbi Cotton Silk brown yarn (color 20)
- Emu Classic Baby DK in white (color 201)
- 16mm safety eyes
- 3.5mm crochet hook
- Toy safe stuffing
- Yarn needle
- Stitch markers

And here’s what you need to know
This pattern uses standard amigurumi techniques including:
- Magic circle
- sc – single crochet
- 2sc – put two single crochets into one stitch
- sc2tog – join two stitches together with one single crochet
- slst – slip stitch
- cc – color change
- ch – chain
Free Crochet Okapi Pattern
You’re going to make your toy okapi in sections, which will be hand sewn together at the end.
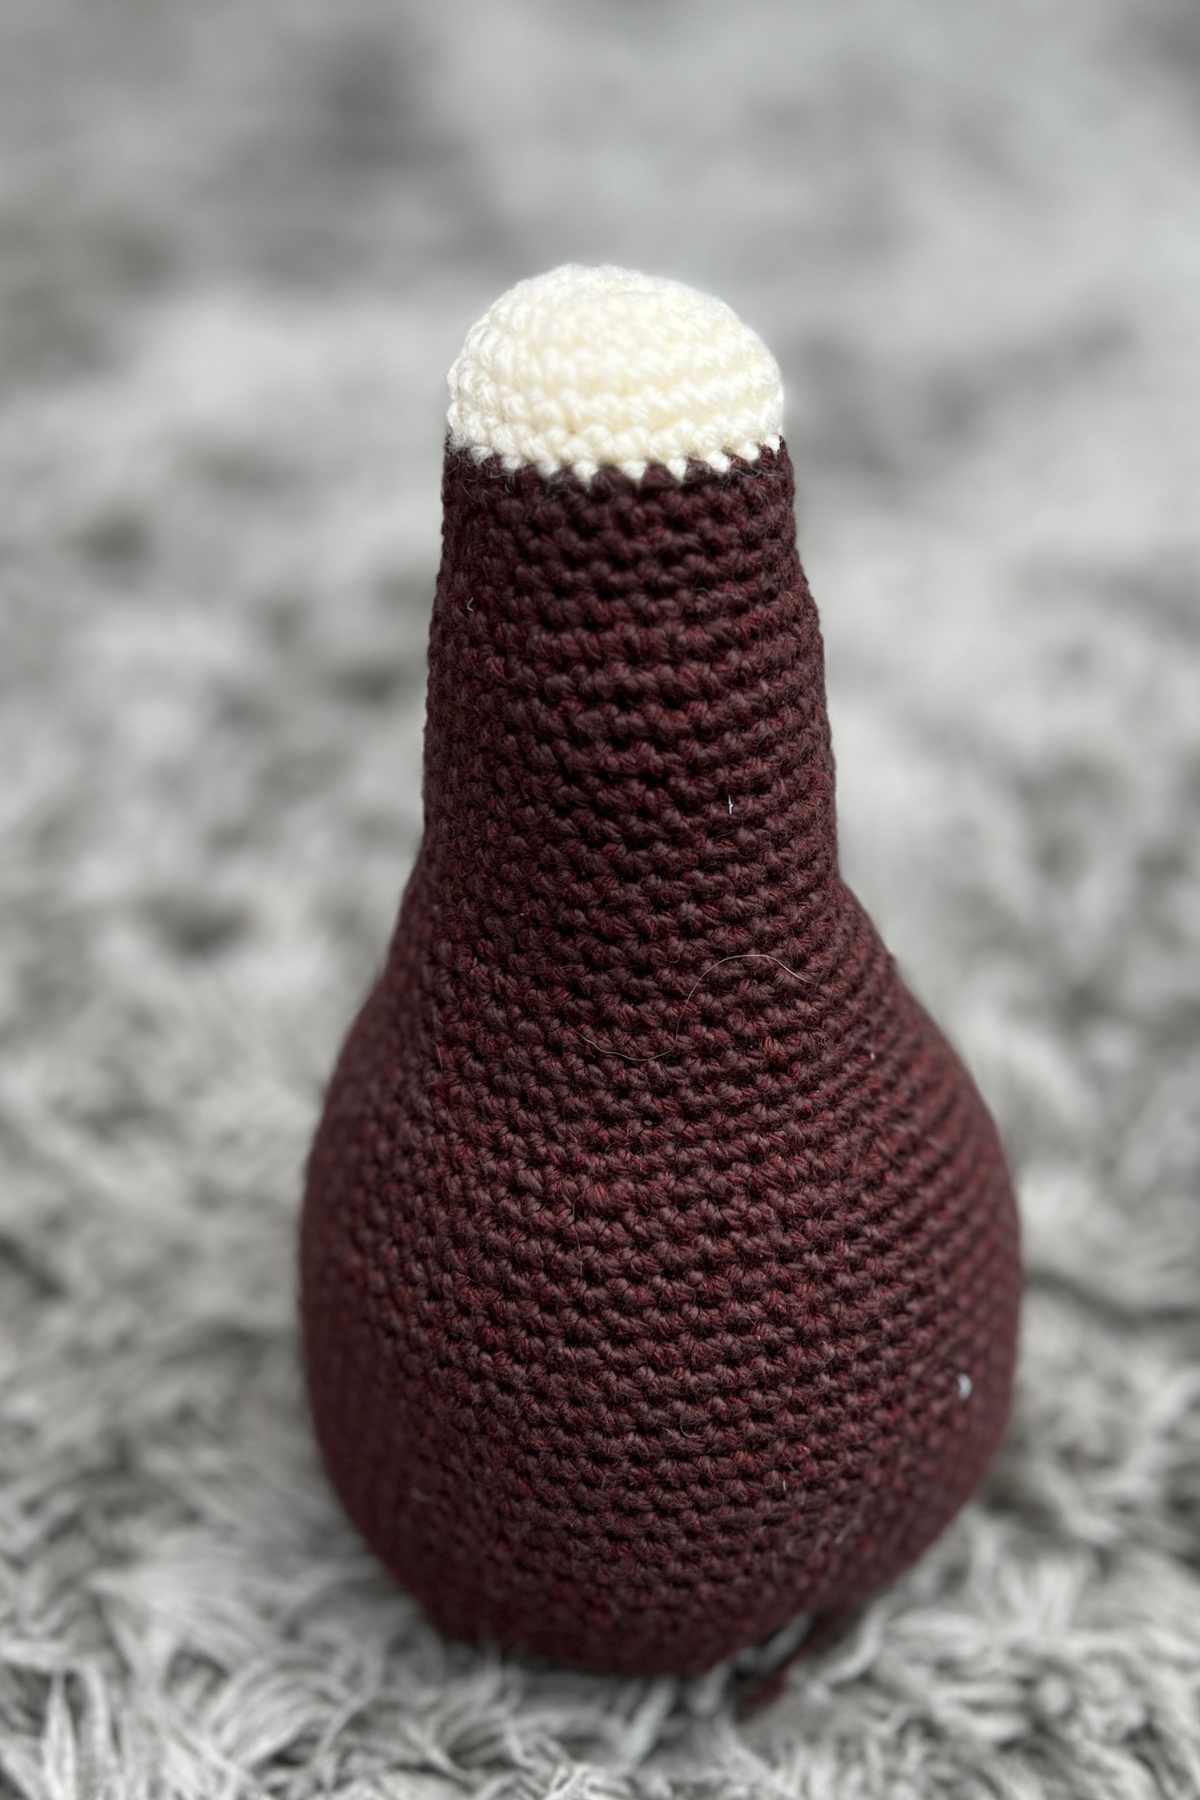
Head
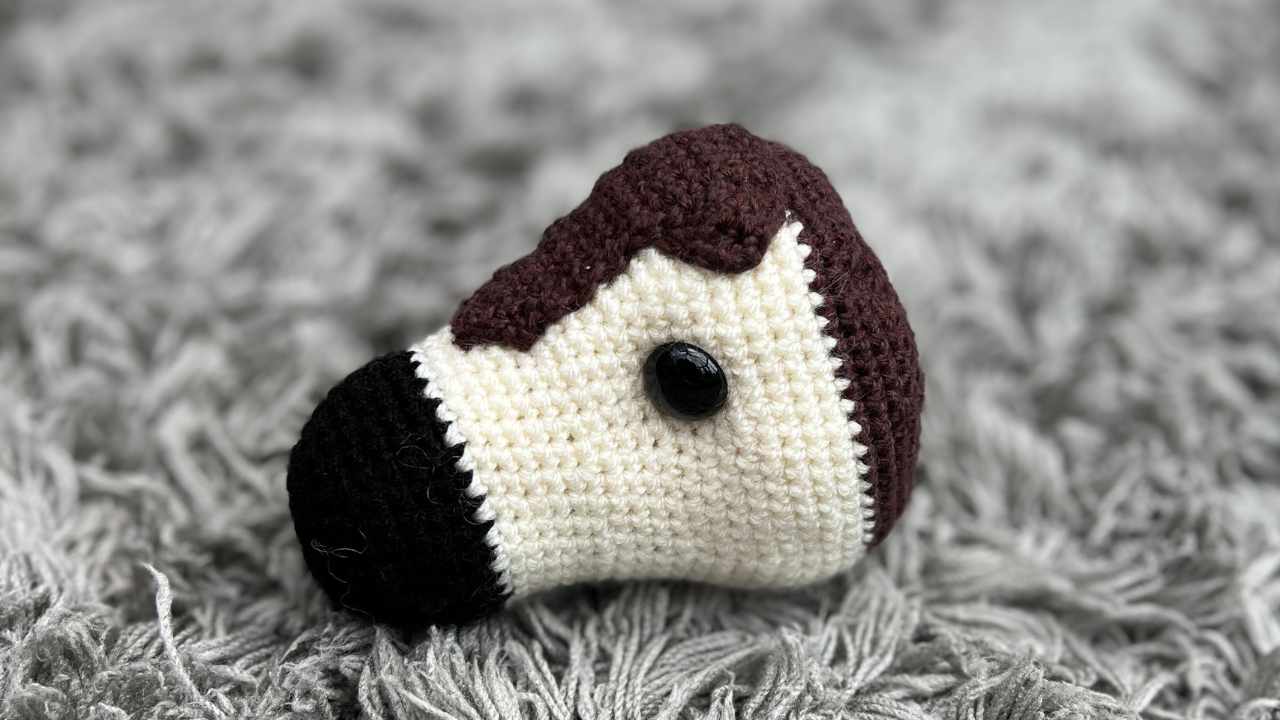
Start with your black yarn.
Round 1
Make a magic circle of eight stitches (8)
Round 2
2sc x 8 (16)
Round 3
(1sc, 2sc) x 8 (24)
Round 4 – 5
1sc x 24
Round 6
(1sc x 2, 2sc) x 8 (32)
Round 7 – 10
1sc x 32
cc white yarn
Round 11 – 16
1sc x 32
Round 17
(1sc x 3, 2sc) x 8 (40)
Round 18 – 20
1sc x 40
Round 21
(1sc x 4, 2sc) x 8 (48)
Round 22
1sc x 48
Round 23
(1sc x 5, 2sc) x 8 (56)
Round 24
1sc x 56
Round 25
(1sc x 6, 2sc) x 8 (64)
Round 26 – 29
1sc x 64
cc brown
Round 30 – 31
1sc x 64
Round 32
(1sc x 6, sc2tog) x 8 (56)
Round 33
1sc x 56
Round 34
(1sc x 5, sc2tog) x 8 (48)
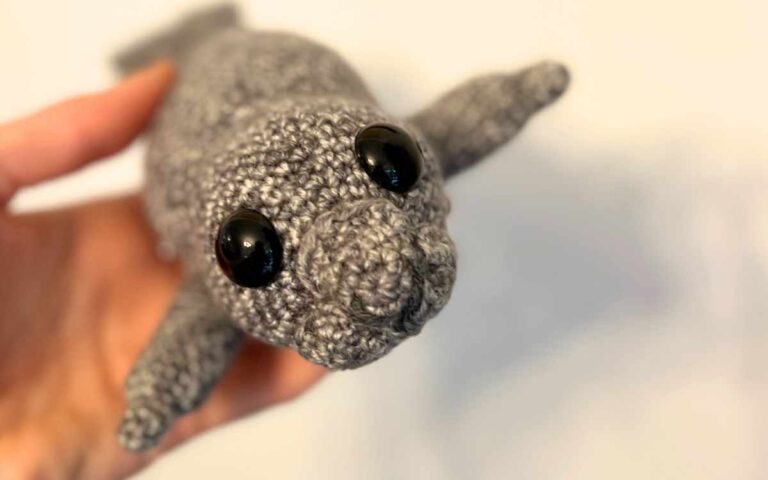
Fill the okapi’s muzzle with toy stuffing, then insert the safety eyes at round 23, approximately 18 stitches apart. Use a scrap piece of yarn to tie the backs of the eyes together to give them an inset look.
Round 35
(1sc x 4, sc2tog) x 8 (40)
Round 36
(1sc x 3, sc2tog) x 8 (32)
Round 37
(1sc x 2, sc2tog) x 8 (24)
Round 38
(1sc, sc2tog) x 8 (16)
Round 39
sc2tog to close, then tie off. Hide the yarn tail inside the head.
Forehead patch
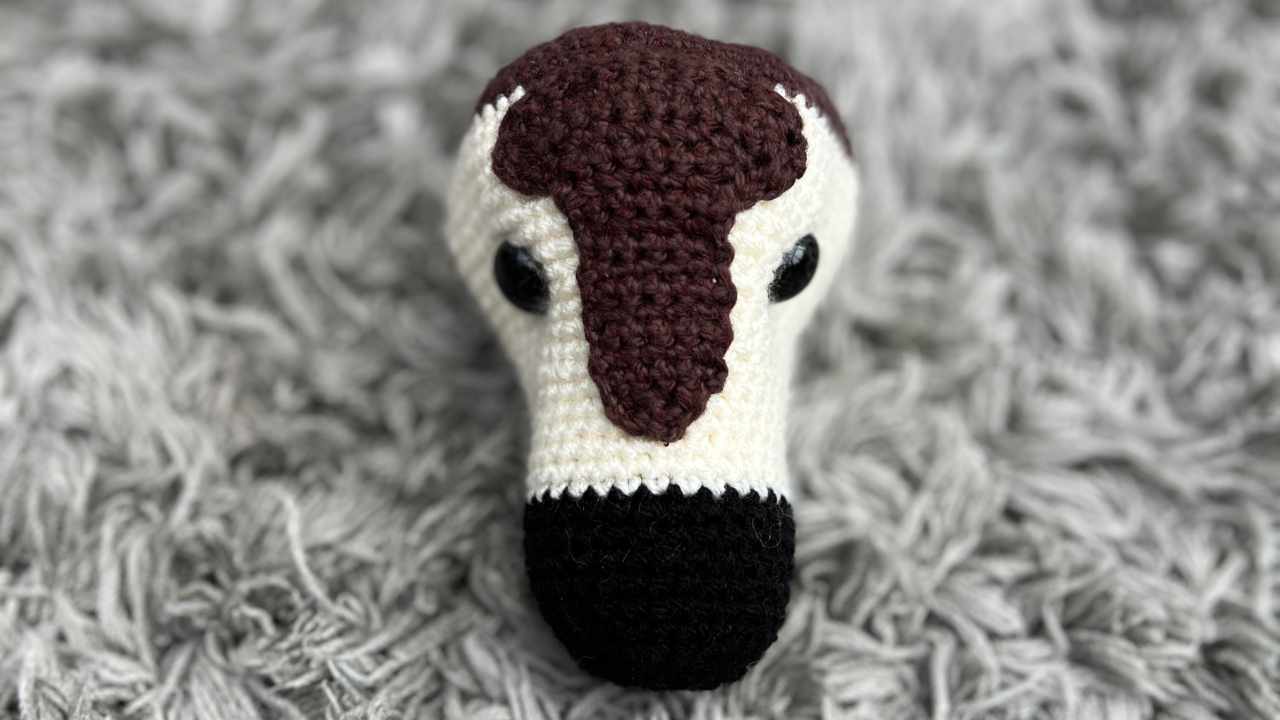
Use your brown yarn.
Round 1
Ch15 (15)
Round 2
Sk2, sc2tog, 1sc x 11, sc2tog (13)
Round 3
Ch2, turn, sk, sc2tog, 1sc x 9, sc2tog (11)
Round 4
Ch2, turn, sk, sc2tog, 1sc x 7, sc2tog (9)
Round 5
Ch2, turn, sk, sc2tog, 1sc x 5, sc2tog (7)
Round 6
Ch2, turn, sk, sc2tog, 1sc x 5, sc2tog (5)
Round 7 – 14
1sc x 5
Round 15
Ch1, turn, sc2tog x 2 (3)
Round 16
Ch1, turn, sc2tog (2)
Cut a long tail of yarn, and set to one side for sewing later.
Your Okapi’s Ossicones
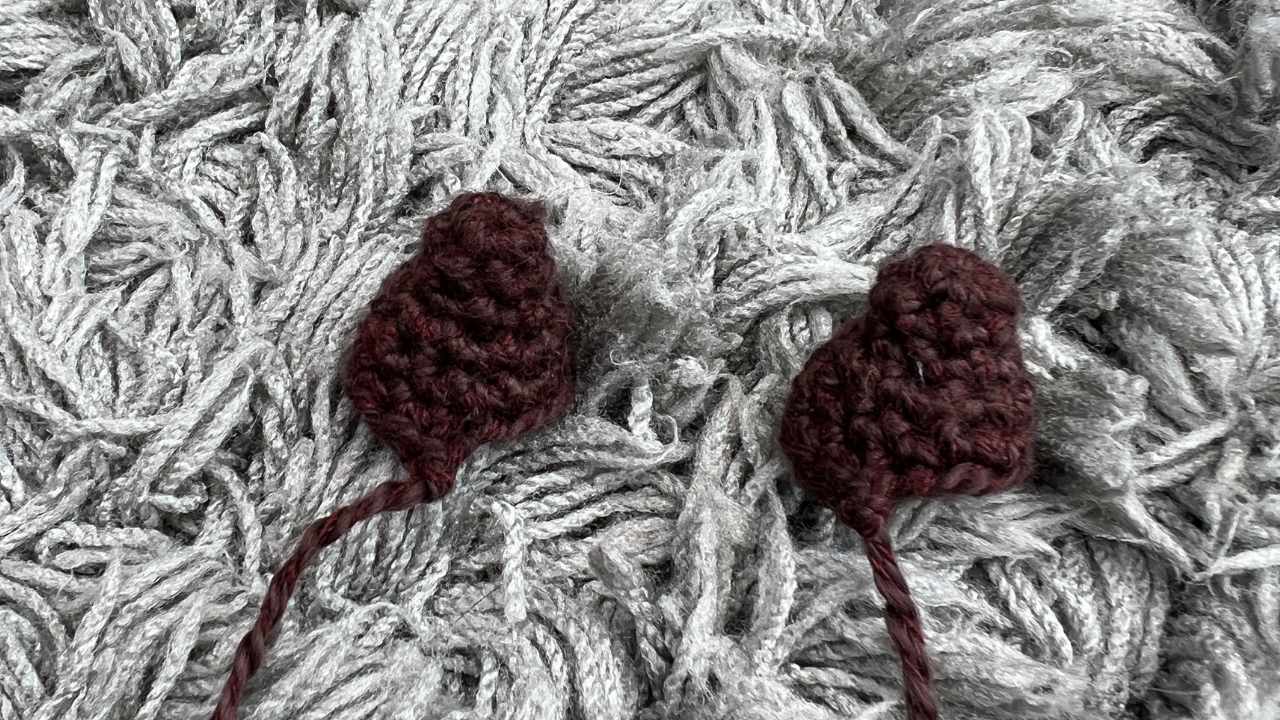
Make your ossicones in the same brown colored yarn.
Round 1
Make a magic circle of five stitches (5)
Round 2 – 3
1sc x 5
Round 4
2sc x 5 (10)
Round 5
(1sc, 2sc) x 5 (15)
Fill with toy stuffing, leaving the shape open like a little cone, and set to one side for sewing later.
Body
Begin in the white yarn.
Round 1
Make a magic circle of eight stitches (8)
Round 2
2sc x 8 (16)
Round 3
(1sc, 2sc) x 8 (24)
Round 4 – 6
1sc x 24
cc brown
Round 7 – 11
1sc x 24
Round 12
(1sc x 2, 2sc) x 8 (32)
Round 13 – 22
1sc x 32
Round 23
(1sc x 3, 2sc) x 8 (40)
Round 24 – 27
1sc x 40
Round 28
(1sc x 4, 2sc) x 8 (48)
Round 29
(1sc x 5, 2sc) x 8 (56)
Round 30 – 33
1sc x 56
Round 34
(1sc x 6, 2sc) x 8 (64)
Round 35 – 47
1sc x 64
Round 48
(1sc x 6, sc2tog) x 8 (56)
Round 49
(1sc x 5, sc2tog) x 8 (48)
Round 50
(1sc x 4, sc2tog) x 8 (40)
Round 51
(1sc x 3, sc2tog) x 8 (32)
Round 52
(1sc x 2, sc2tog) x 8 (24)
Fill with toy stuffing, ensuring the neck section is fairly full so that the head doesn’t sag down.
Round 53
(1sc, sc2tog) x 8 (16)
Round 54
sc2tog to close, tie off and hide the loose end inside the body of the toy.
Four Legs
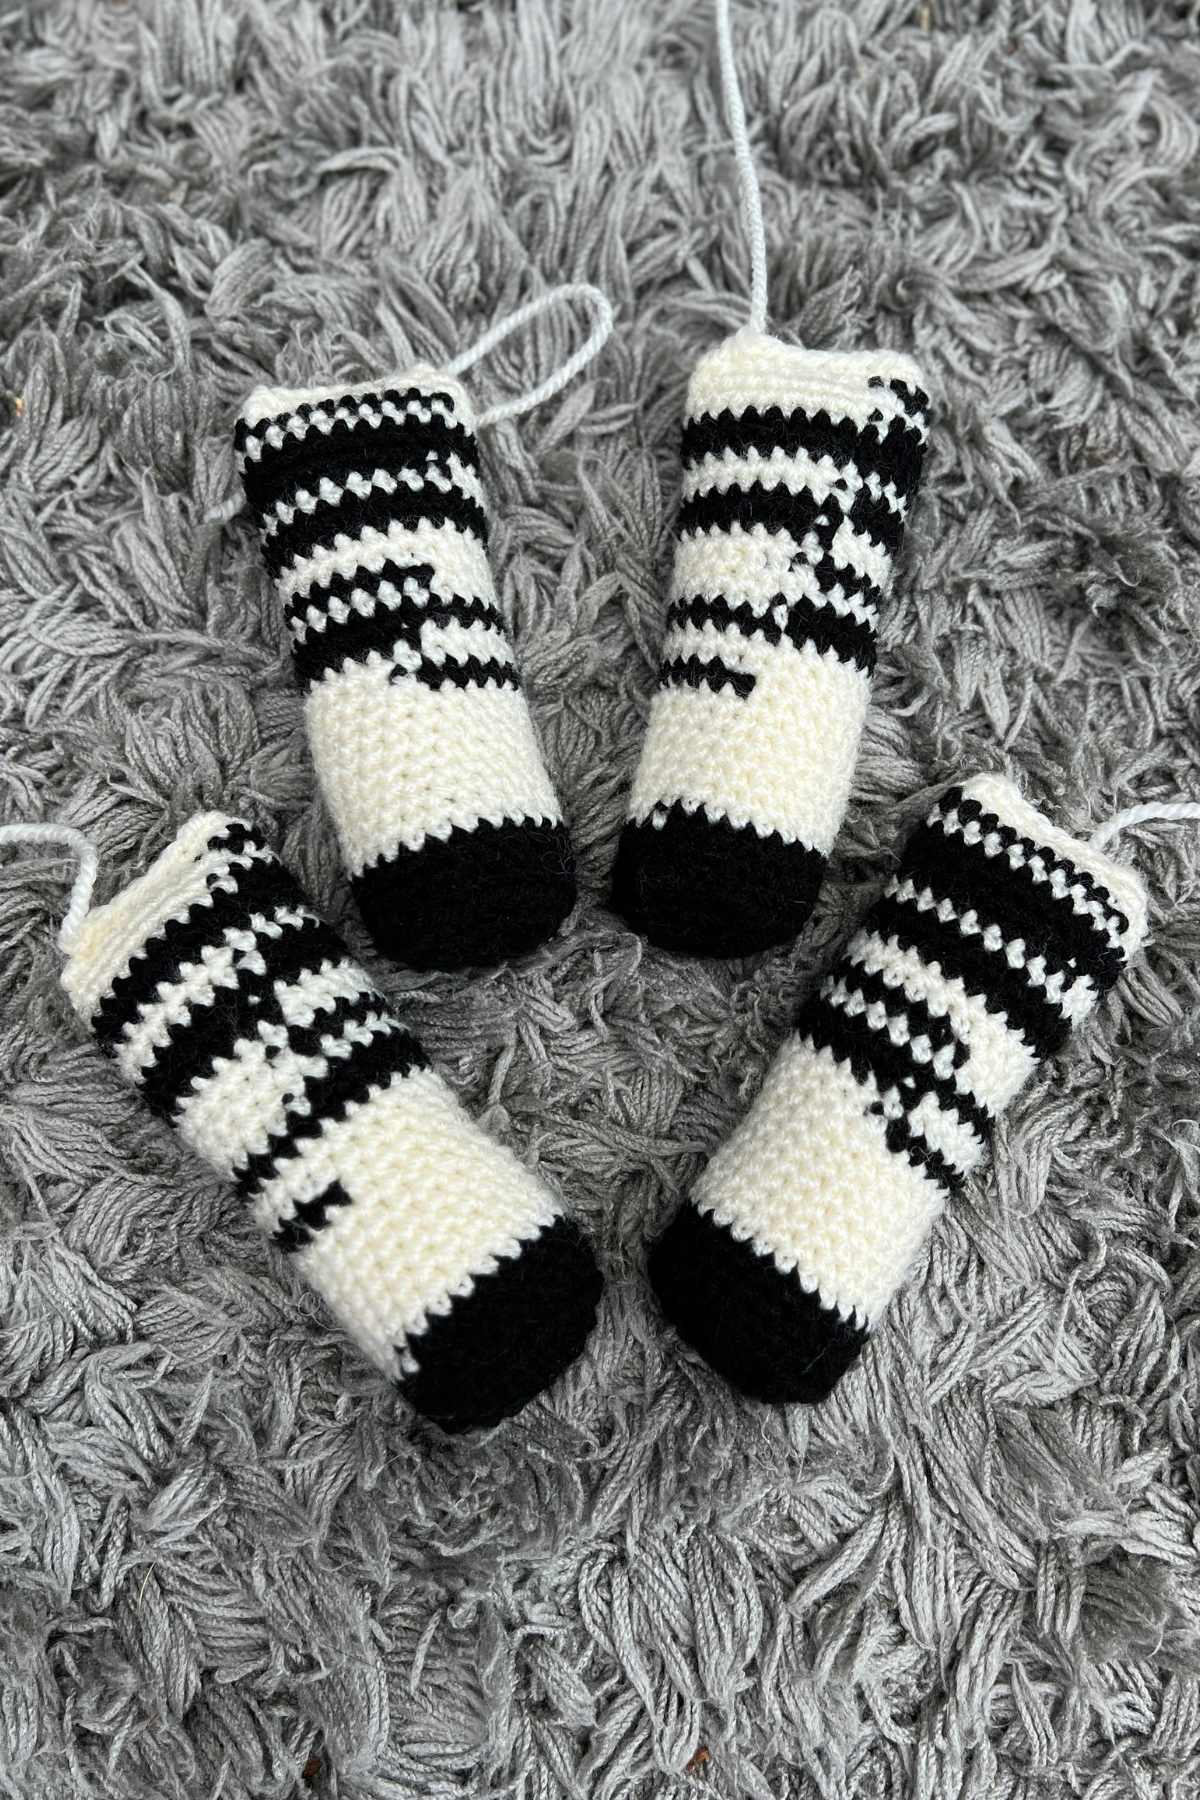
Start with the black yarn.
Round 1
Make a magic circle of eight stitches (8)
Round 2
2sc x 8 (16)
Round 3
(1sc, 2sc) x 8 (24)
Round 4
(1sc x 2, 2sc) x 8 (32)
Round 5
BLO (1sc x 2, sc2tog) x 8 (24)
Round 6 – 7
1sc x 24
cc white
Round 8 – 15
1sc x 24
cc black
Round 16
1sc x 12
cc white
1sc x 12 (24)
Round 17
1sc x 24
Round 18
1sc x 12
cc black
1sc x 12 (24)
Round 19
1sc x 24
cc white
Round 20
1sc x 24
Round 21
1sc x 12
cc black
1sc x 12 (24)
cc white
Round 22 – 23
1sc x 24
cc black
Round 24 – 25
1sc x 24
cc white
Round 26
1sc x 24
Round 27
1sc x 12
cc black
1sc x 12
Round 28 – 29
1sc x 24
cc white
Round 30
1sc x 24
Round 31
1sc x 12
cc black
1sc x 12 (24)
cc white
Round 32
1sc x 24
Round 33
(1sc, sc2tog) x 8 (16)
Stuff the leg up to round 31, then flatten the top section.
You are now going sc the two sides of the top of the leg together, so eight stitches each joining a stitch on one side to the other.
The Okapi’s Tail
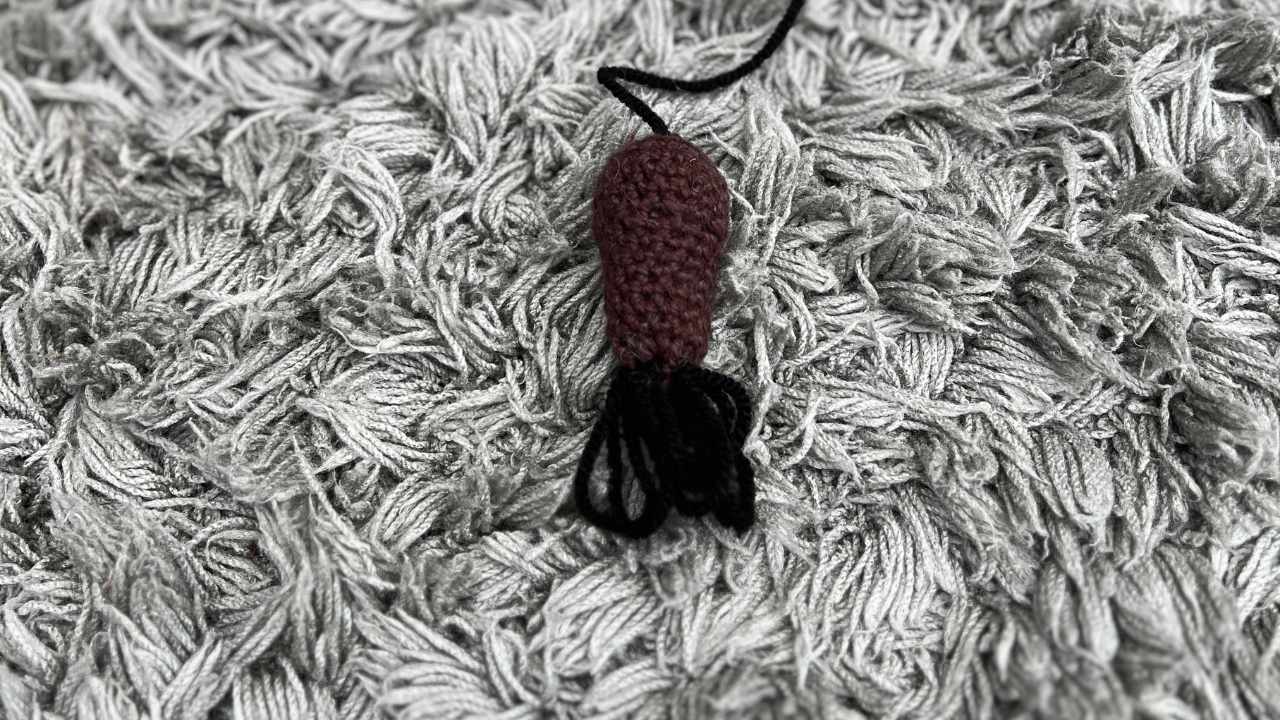
Use your brown yarn.
Round 1
Make a magic circle of six stitches (6)
Round 2
2sc x 6 (12)
Round 3
(1sc, 2sc) x 6 (18)
Round 4 – 6
1sc x 18
Round 7
(1sc, sc2tog) x 6 (12)
Round 8 – 14
1sc x 12
Fill with toy stuffing.
Round 15
sc2tog x 6, then hand sew to close.
Swap to the black yarn, attach a yarn needle and sew loose loops of yarn into the top two rounds of stitches.
Ears
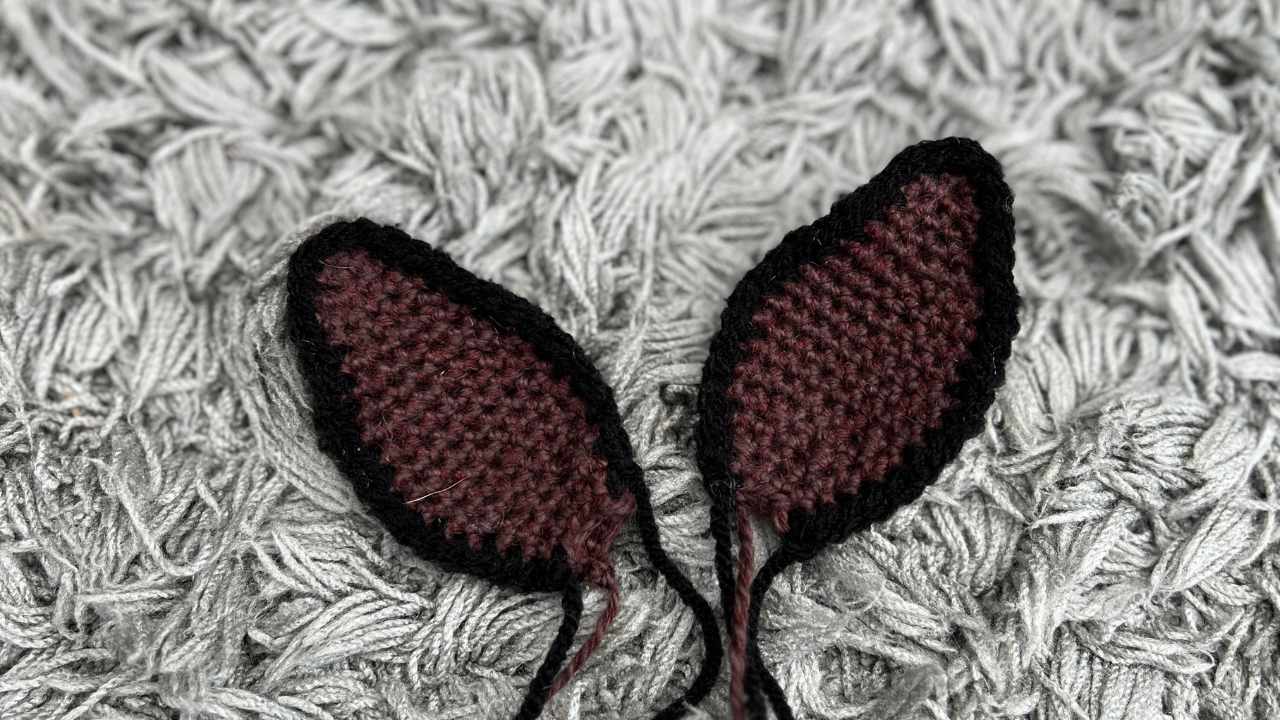
Use your brown yarn for the ears.
Round 1
Make a magic circle of five stitches (5)
Round 2
1sc x 5
Round 3
2sc x 5 (10)
Round 4 – 5
1sc x 10
Round 6
(1sc, 2sc) x 5 (15)
Round 7 – 8
1sc x 15
Round 9
(1sc x 2, 2sc) x 5 (20)
Round 10 – 14
1sc x 20
Round 15
(1sc x 2, sc2tog) x 5 (15)
Round 16
1sc x 15
Round 17
(1sc, sc2tog) x 5 (10)
Round 18 – 19
1sc x 10
You are now going to edge your ears using surface crochet, in your black yarn. Flatten each ear section, and work around the circumference, crocheting single crochets through every stitch along the edge.
Joining Your Crochet Okapi Together
Lay out the sections of your okapi on the floor in front of you.
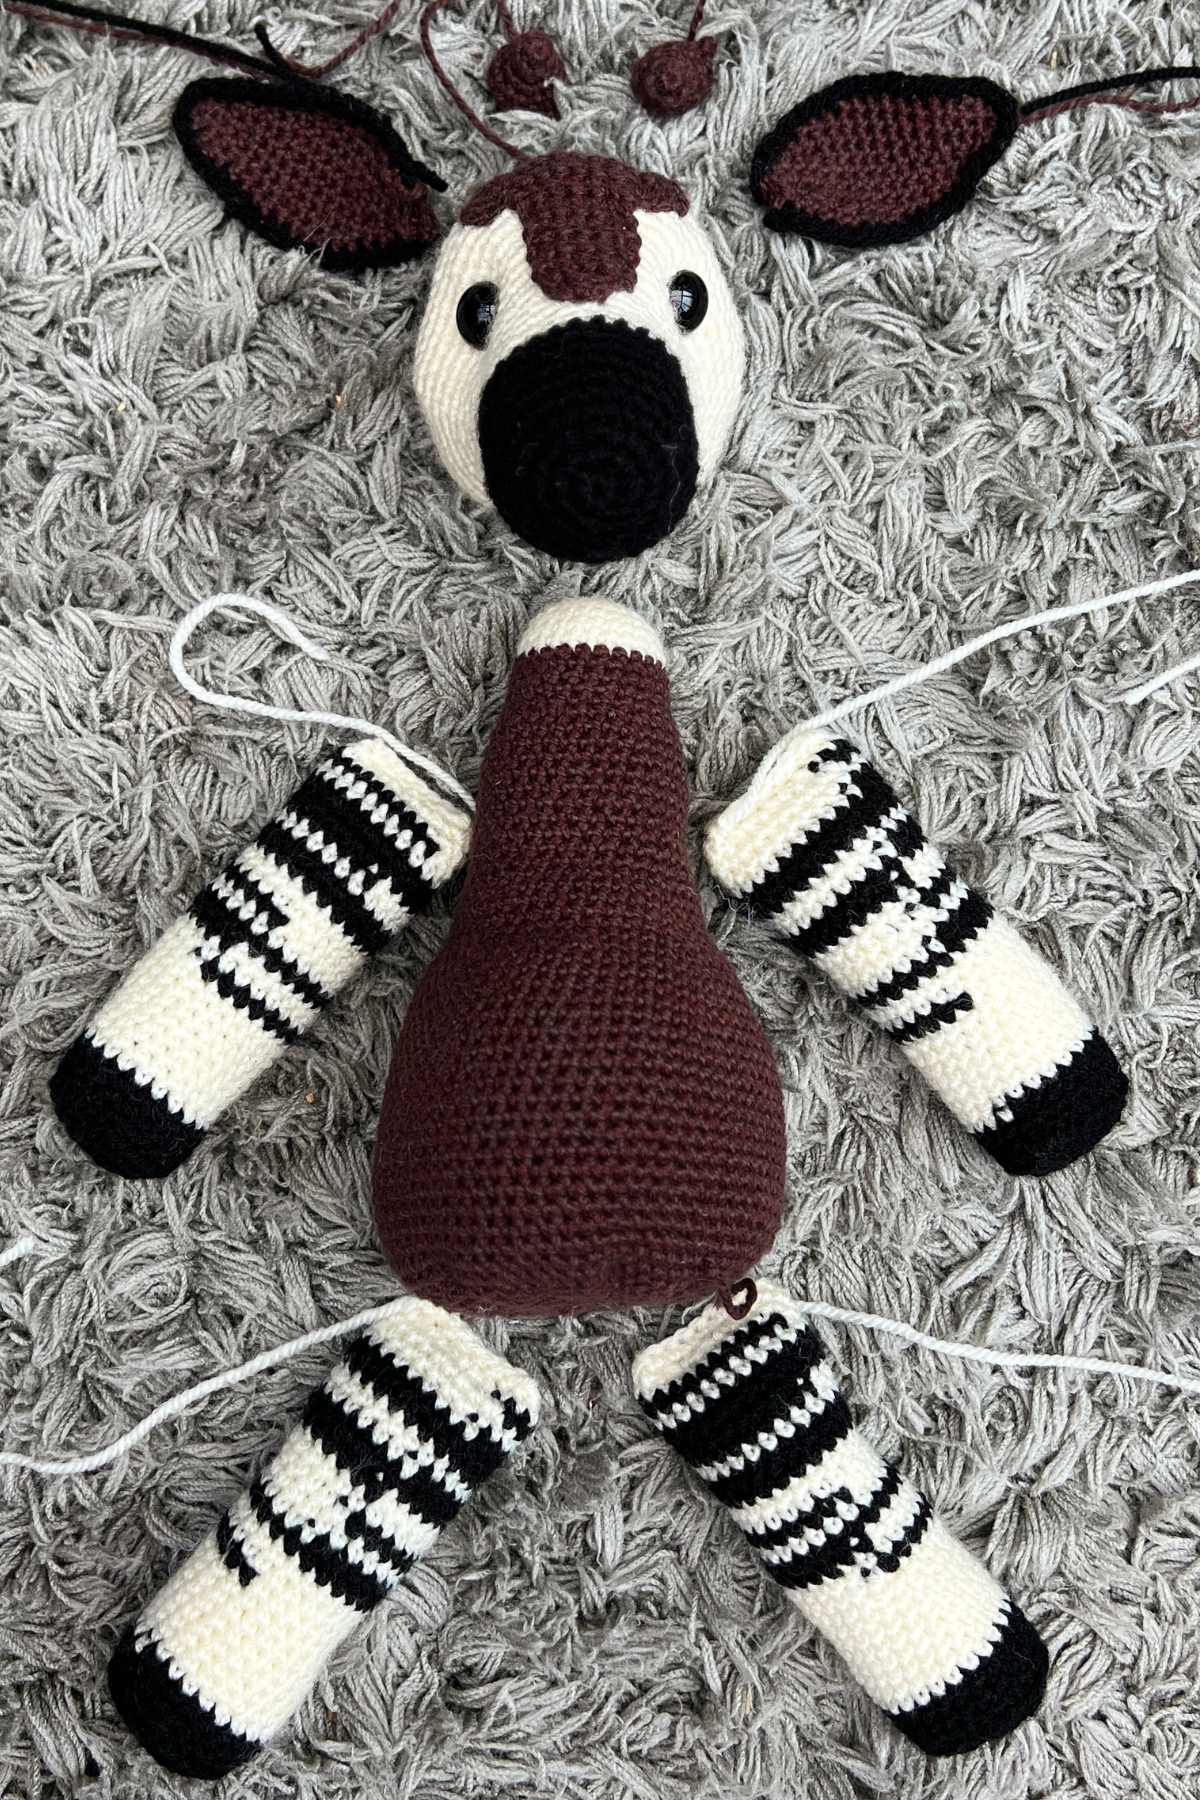
Each piece should be sewn together with the appropriate colored yarn, and ideally using a sharp steel needle. It should be wide enough to fit the yarn through the eye, but not so wide that the yarn slips straight out, or that the needle distorts the stitch shape.
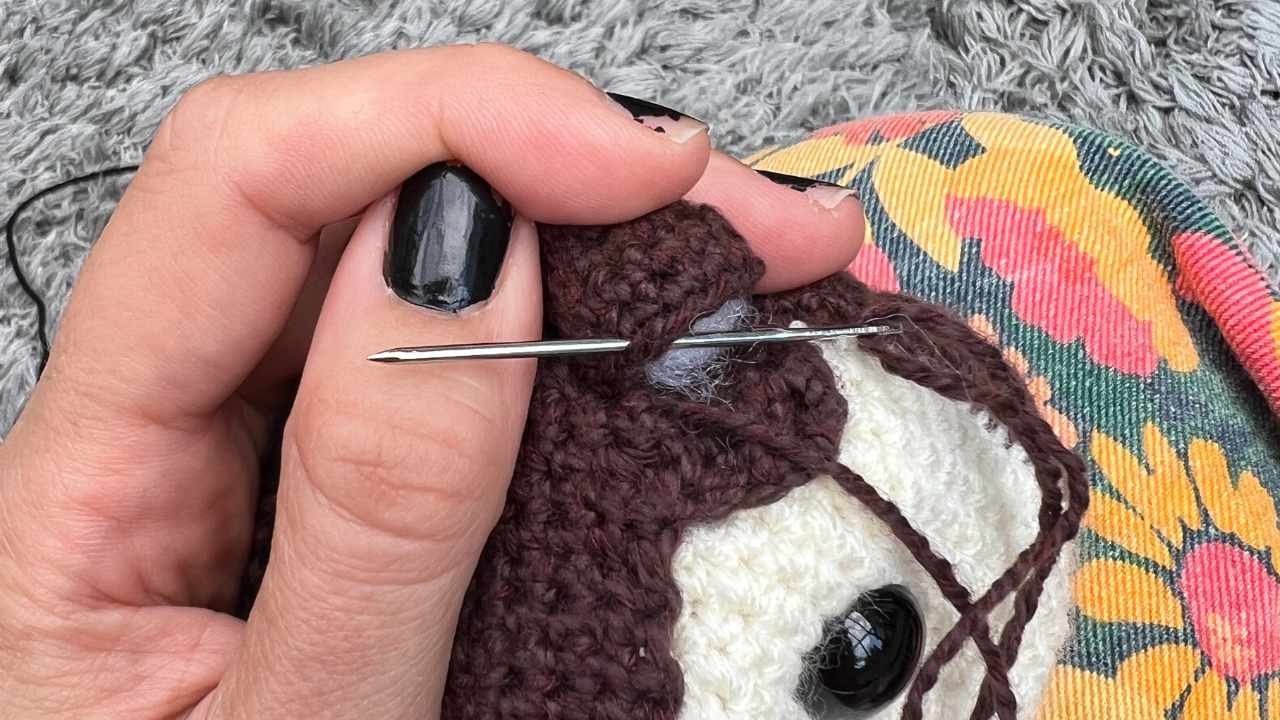
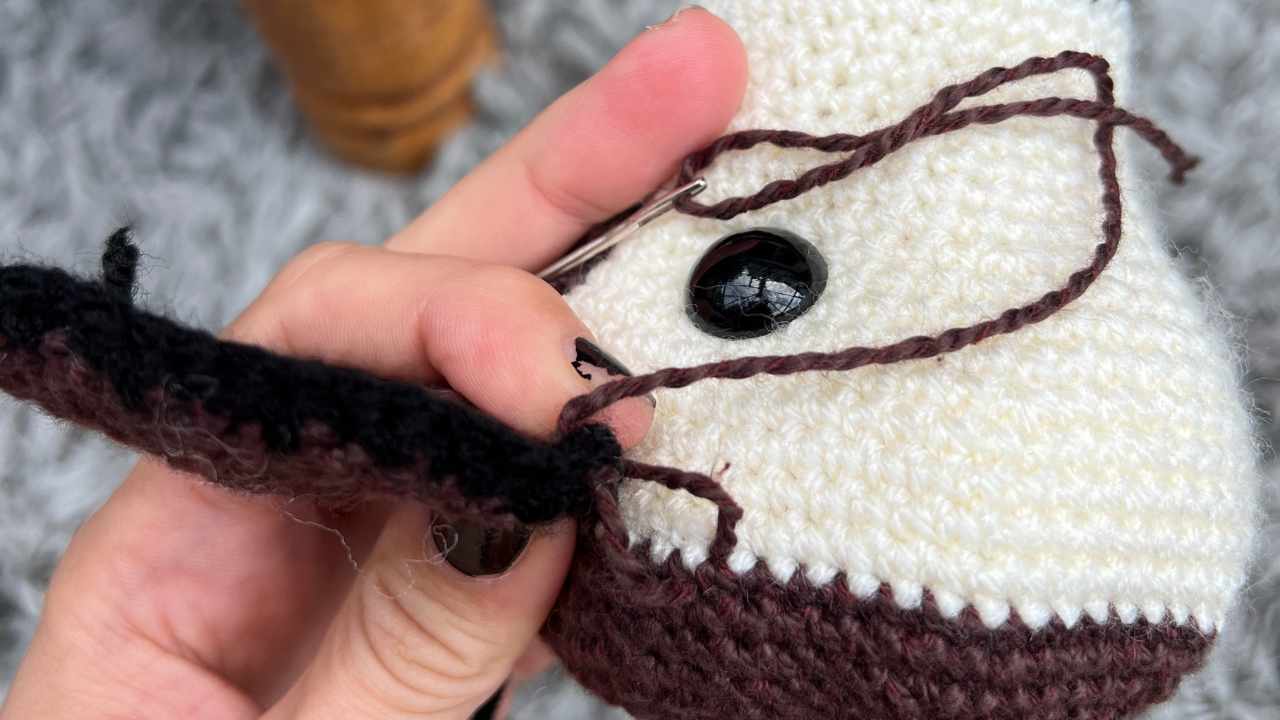
We’ll begin by adding the facial features. Attach the forehead patch so that the long end lines up with the color change at the top of the head. It should taper to a point in line with the mid point between the eyes.
The ossicones sit at either side of the bulged areas on the patches.
The ears sit along the color change on the head, around three stitches up from each eye.
The head can now be sewn on to the white neck section. Keep the muzzle pointing straight forward, and stitch tightly so that it doesn’t wobble in place.
Your arms are sewn at the point the neck turns into the body, and the legs sit pointing forward and slightly outward.

The tail should be attached so that it is resting against the floor when the okapi is sitting down.
If you have any questions, do let me know! And don’t forget to tell me how you get along making your own okapi toy.
Happy Crocheting,
Lucy Kate, x

OMG, I LOVE THIS!! The Okapi is probably my most favourite animal, for exactly the same reasons as you. I live near Marwell Zoo, and so have visited their Okapi several times.
Will definitely be making this chap!
That’s wonderful, I’m so happy to hear that!
Hey.
I’m having a few problems with the forehead patch. Few questions:
Are they rows or rnds?
Looking at the picture, it seems to increase at the top before it decreases down the nose. But I can’t see any increases on the pattern.
The stitch count doesn’t seem to add up eg Round 2 uses 15 stitches, but also has a Sk2 at the start, implying it needs 17 chains from round 1. This maths issue seems to be repeated throughout that part. The maths isn’t “mathing” 🙂
Please can you clarify?
Many thanks.
for the forehead patch, there aren’t enough stitches in the chain to make up for row 2. 2+2+11+2=17 not fifteen.
Hi Lily,
It looks like you’re right – I think it’s a typo and Lucy intended to write Ch 17 (17) for Round 1. I’m always reluctant to edit someone else’s pattern for them, but I’ll flag this up with her!
Sarah
Lucy Kate Crochet HQ
Wondering how much of each yarn color will be needed? What is the finished size? This is adorable and I am looking forward to trying to make it.
Hello, this looks like a lovely pattern and I would like to try to make it. Can any brand of DK weight acrylic yarn be used in substitution for the recommended yarns? Do you have any recommendations. Thank you
It should work up just fine in any acrylic DK, but as I’m sure you know some are nicer to work with than others! https://lucykatecrochet.com/crocheting-with-acrylic-yarn