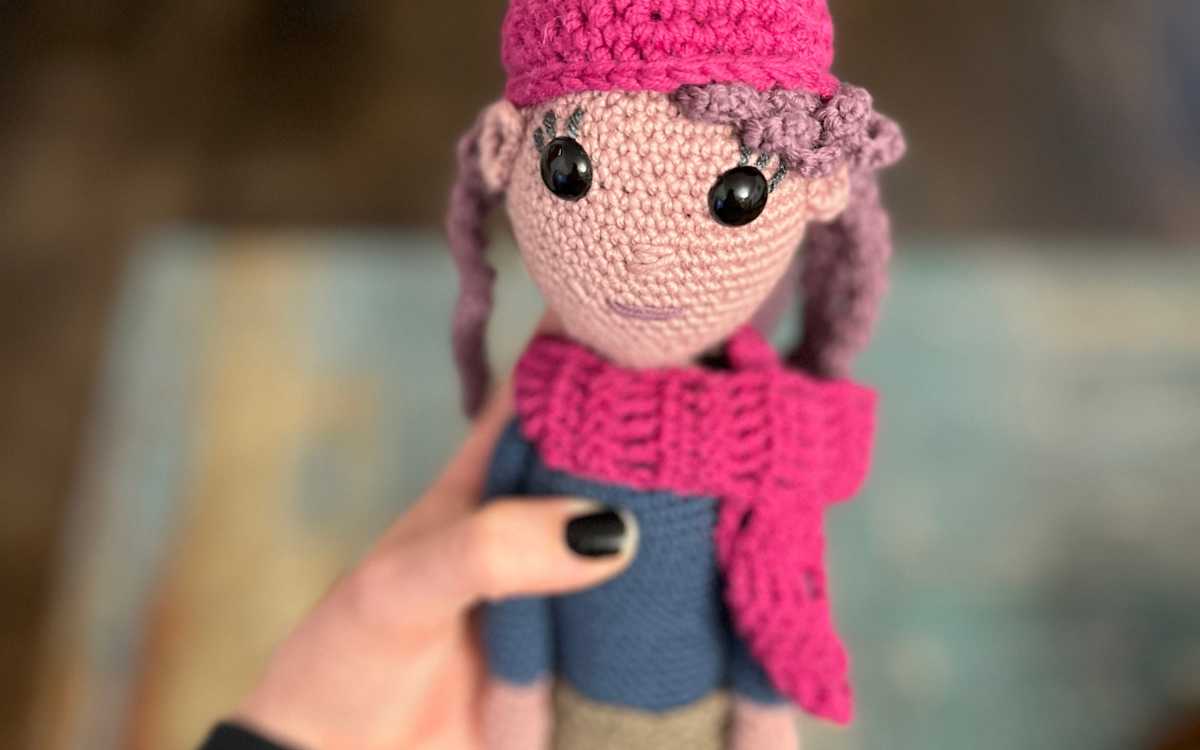
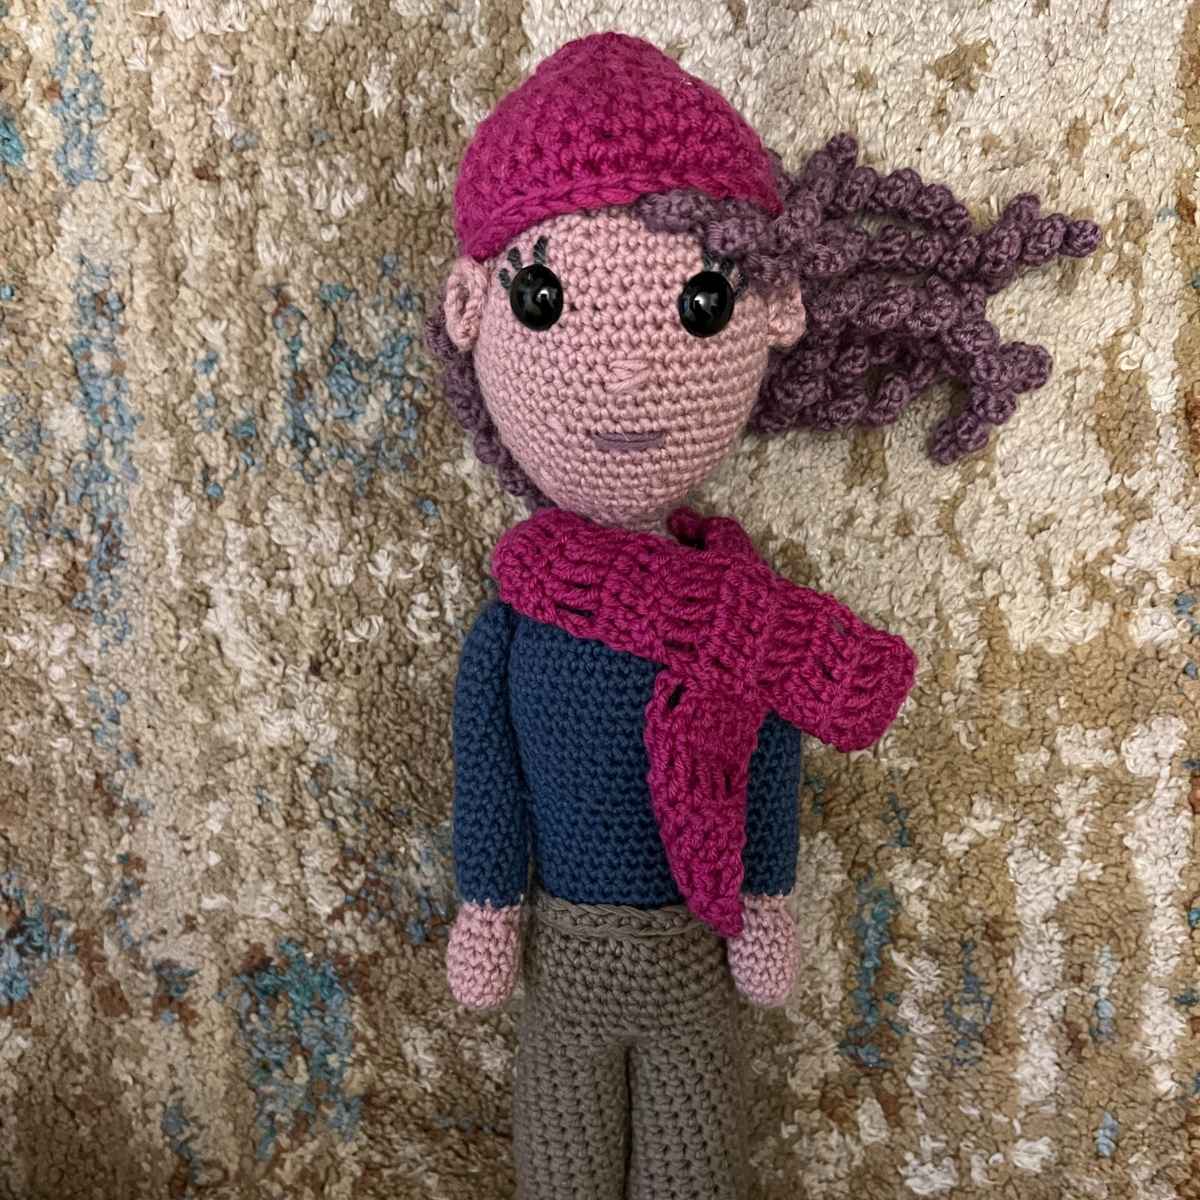
Tilly the Winter Crochet Doll – Free Pattern
My winter crochet doll is wrapped up warm and ready for the snow flurries of the season. This amigurumi doll is an intermediate level pattern, but I have provided enough instructions to help an amigurumi novice crochet a perfect doll too!
You will be crocheting her in sections, and hand sewing her pieces together with a chunky yarn needle when you’re finished.
Your Crochet Tool Bag
- 3.5mm crochet hook
- 6mm crochet hook
- 2oz/50g Knitcraft Mocha Grand Merino DK Yarn (alternative – Rico Essentials Merino DK)
- 2oz/50g Knitcraft Blush Grand Merino DK Yarn (alternative – Sirdar Cashmere Merino Silk DK)
- 2oz/50g pink Woolly merino wool yarn
- 2oz/50g blue Wool and Company merino wool yarn
- 2oz/50g khaki DK yarn
- 2 safety eyes
- Toy safe stuffing
- Yarn needle
- Stitch markers
I made the doll’s pant legs out of a partial skein I had left. Whilst I am confident it was Sirdar Snuggly yarn, I’m not 100% certain. Please do let me know if you think it works up a little differently!
Pattern Notes
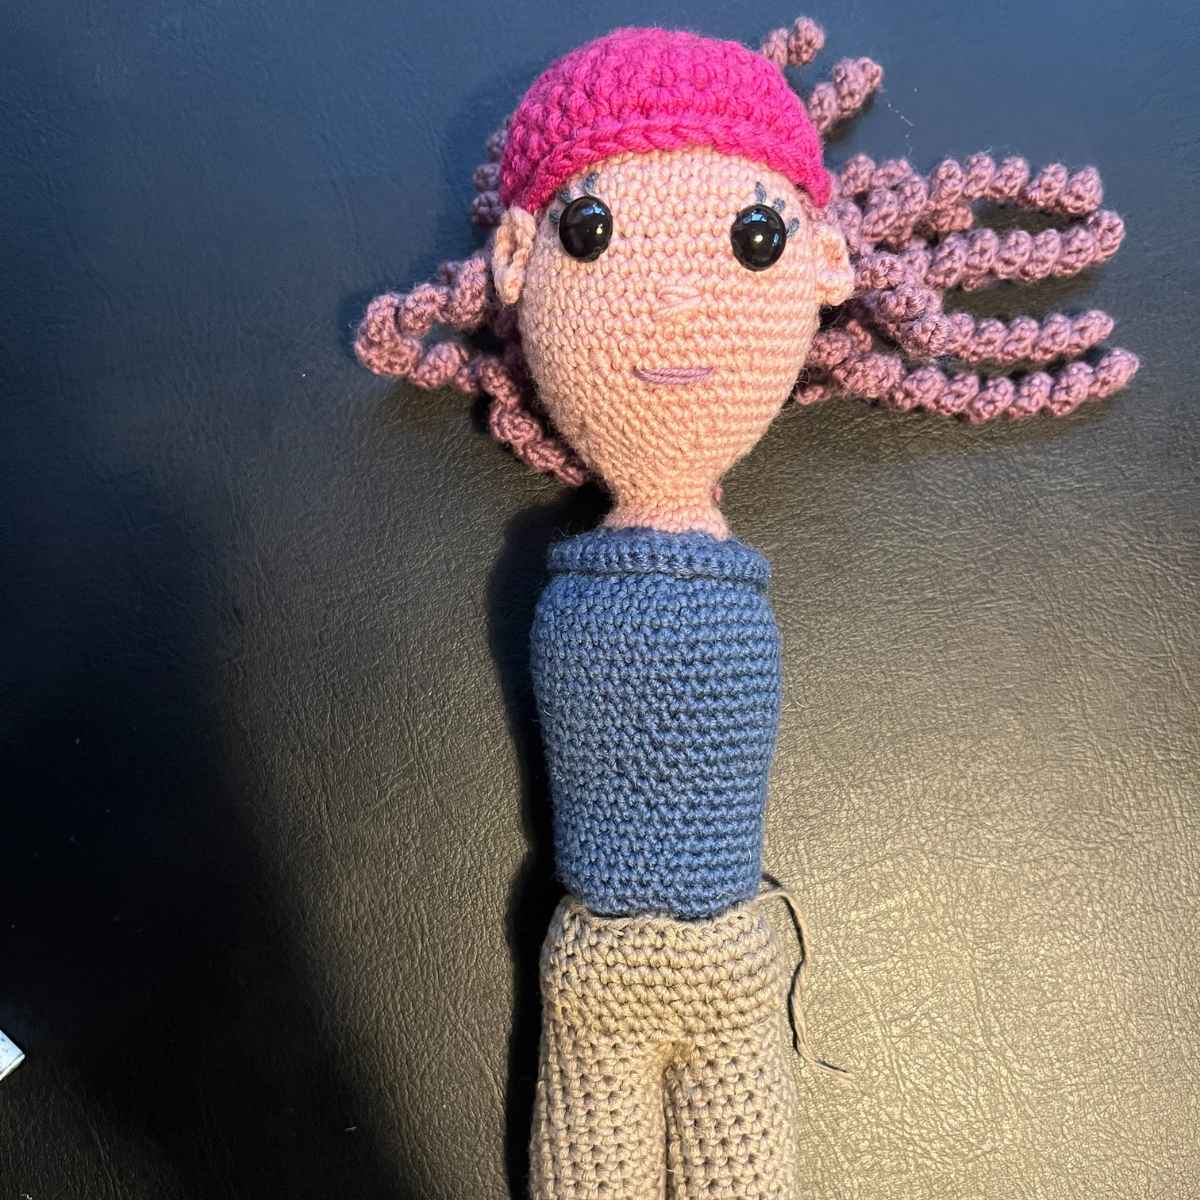
My crochet elf doll pattern was an unexpected success in the family. She’s been adopted away from the holiday display and lives in my daughter’s bedroom. And now my sister has asked that I make my youngest niece a doll of her own based on the Christmas elf. It’s chilly weather, so I’ve made an amigurumi doll that has the essence of the crochet elf doll’s cute character, but with a toasty plushie twist. And of course, I’ve named it after my niece – meet Tilly, the winter warm crochet doll!
The beginning of this pattern is the same as the elf doll, so if you’ve made that before you’ll find the instructions rather familiar. However, beyond the head, neck and hair it deviates completely.
You will be using your 3.5mm crochet hook for the majority of the pattern. You will only need your 6mm crochet hook for the shoes.
Most of the pattern is created from magic loops, and you’ll need to be happy with single crocheting too. The abbreviations are all explained the first time I use them, and there will be a bit of hand sewing for the facial features and joining your doll together.
Free Crochet Doll Pattern
This amigurumi doll has different colors for each section, so keep an eye out for yarn changes between pieces.
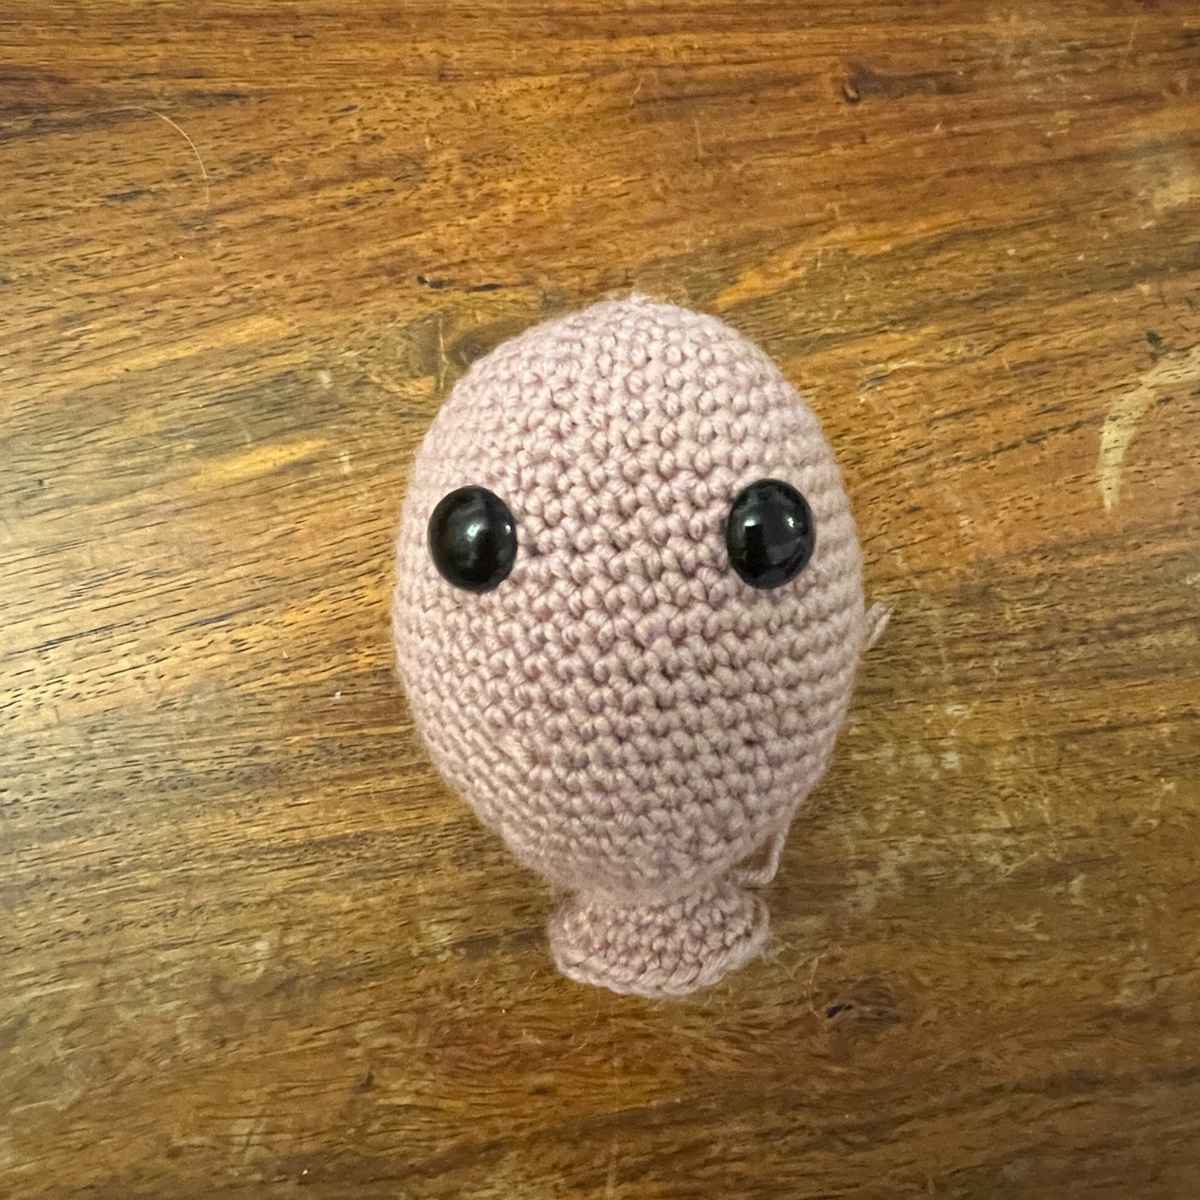
Crocheting Your Doll’s Head and Neck
The doll’s head is made with the 3.5mm crochet hook and blush yarn. You’ll need your safety eyes and toy stuffing ready too, along with some of the darker mocha yarn for the mouth.
Round 1
Make a magic circle of six stitches (6)
Round 2
Put two single crochet stitches into each stitch of the round, doubling the total.
2sc x 6 (12)
Round 3
Make one single crochet into the next stitch, and two into the following stitch. Repeat for the round, increasing the total by six stitches.
(1sc, 2sc) x 6 (18)
Round 4
(1sc x 2, 2sc) x 6 (24)
Round 5
(1sc x 3, 2sc) x 6 (30)
Round 6
1sc x 30 (30)
Round 7
(1sc x 4, 2sc) x 6 (36)
Round 8
(1sc x 5, 2sc) x 6 (42)
Round 9 – 11
1sc x 42 (42)
Round 12
(1sc x 6, 2sc) x 6 (48)
Round 13 – 17
1sc x 48 (48)
Round 18
Make one single crochet into the first six stitches, then use a single crochet to join the next pair of stitches together. Repeat for the rest of the round, reducing the total stitch count by six.
(1sc x 6, sc2tog) x 6 (42)
Round 19 – 21
1sc x 42 (42)
Round 22
(1sc x 5, sc2tog) x 6 (36)
Round 23
(1sc x 4, sc2tog) x 6 (30)
Round 24
1sc x 30 (30)
Insert the safety eyes into the front of the head, around row 11. Set them around eight stitches apart from the central post.
Round 25
(1sc x 3, sc2tog) x 6 (24)
Round 26
(1sc x 2, sc2tog) x 6 (18)
Round 27
(1sc, sc2tog) x 6 (12)
Round 28 – 31
1sc x 12 (12)
Round 32
(1sc, 2sc) x 6 (18)
Round 33
(1sc x 2, 2sc) x 6 (24)
Round 34
(1sc x 3, 2sc) x 6 (30)
Crocheting her collar
The collar of your doll’s dress will be made from the neck’s end point. Use the same sized crochet hook but changing to your blue yarn.
Round 35
(1sc x 4, 2sc) x 6 (36)
Round 36
(1sc x 5, 2sc) x 6 (42)
Round 37
(1sc x 6, 2sc) x 6 (48)
Slip stitch into the next stitch, and tie off. Weave the loose end back into the head.
Fill your doll’s head with toy safe stuffing. Ensure the neck is well padded but not overstuffed.
The Facial Details
You are going to need your tapestry needle for this section, and to hand sew on the details of the nose, mouth and eyelashes.
Sewing the eyelashes

To create your eyelashes, thread your black yarn (or use the hair color if you don’t have a scrap spare).
Push the threaded needle from the top of the doll’s head, where the entry point will be obscured later, into the far corner of the eye.
Sew into the material diagonally two stitches up and away from the eye.
Push the needle one stitch in towards the eye itself, then at the same angle two stitches diagonally up again.
Repeat a third time for the final more central eyelash.
Creating the crochet doll’s nose
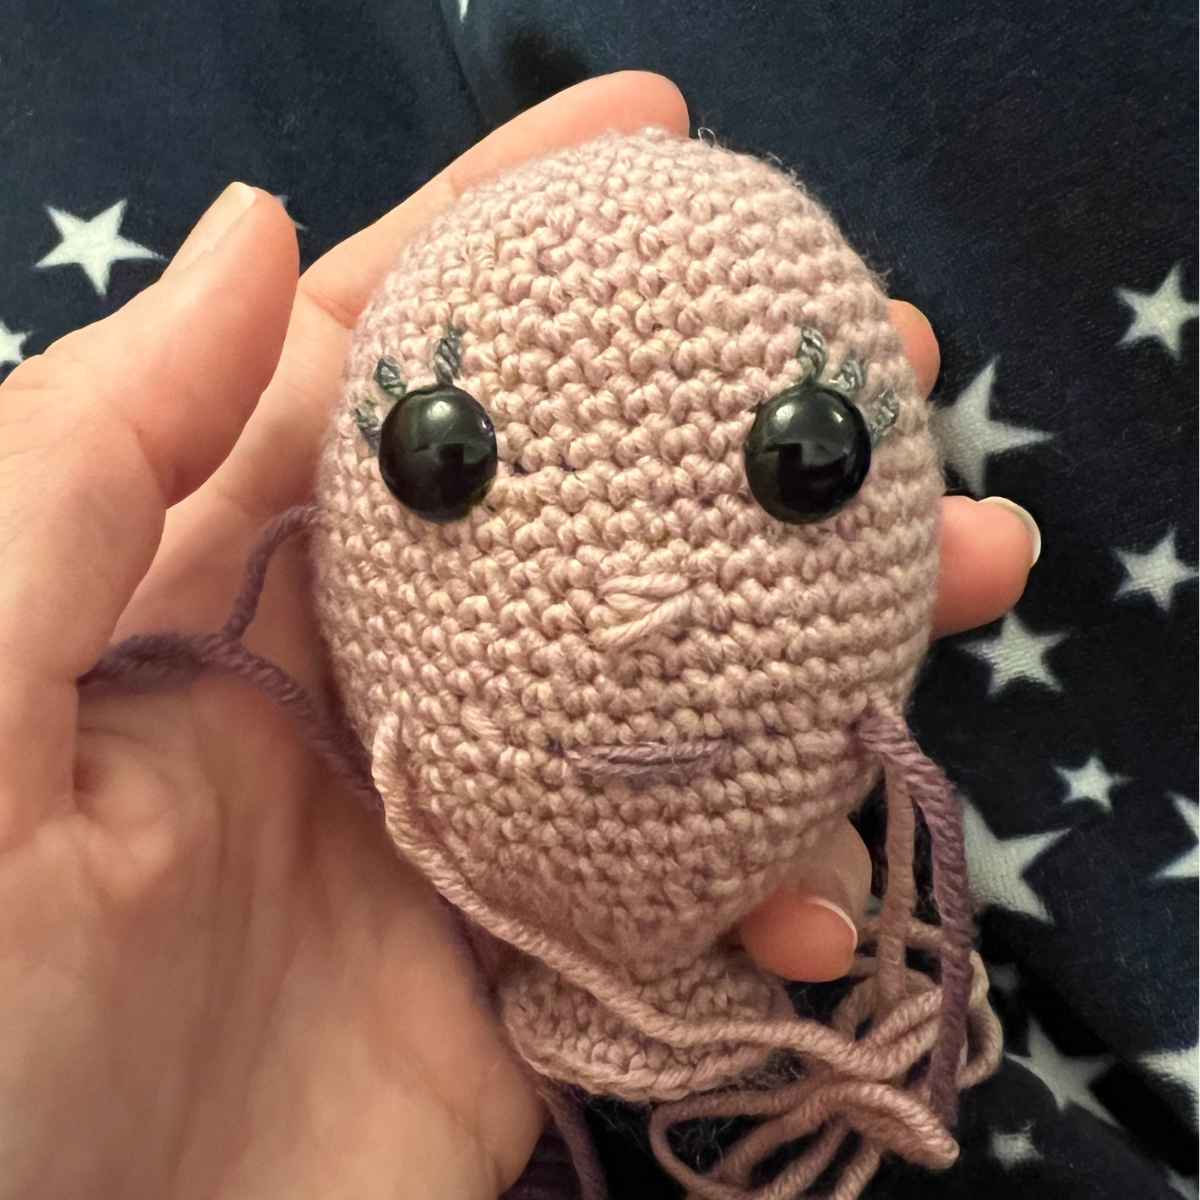
Thread your skin color onto the yarn needle now, and weave back and forth around three down in the center of the face. Your nose should be approximately three stitches wide.
Sewing your crochet doll’s mouth
You’ll create your doll’s mouth using the same mocha colored yarn as you’ll use for their hair. Thread your tapestry needle and insert it from the top of the head, coming out in line with the inner side of the eyes, around three rounds down from the nose.
Make your mouth with just two lines of yarn, sewn around five stitches wide. Be careful to make sure it lines up with the rest of the facial features, and is symmetrical.
Crocheting Your Doll’s Ears
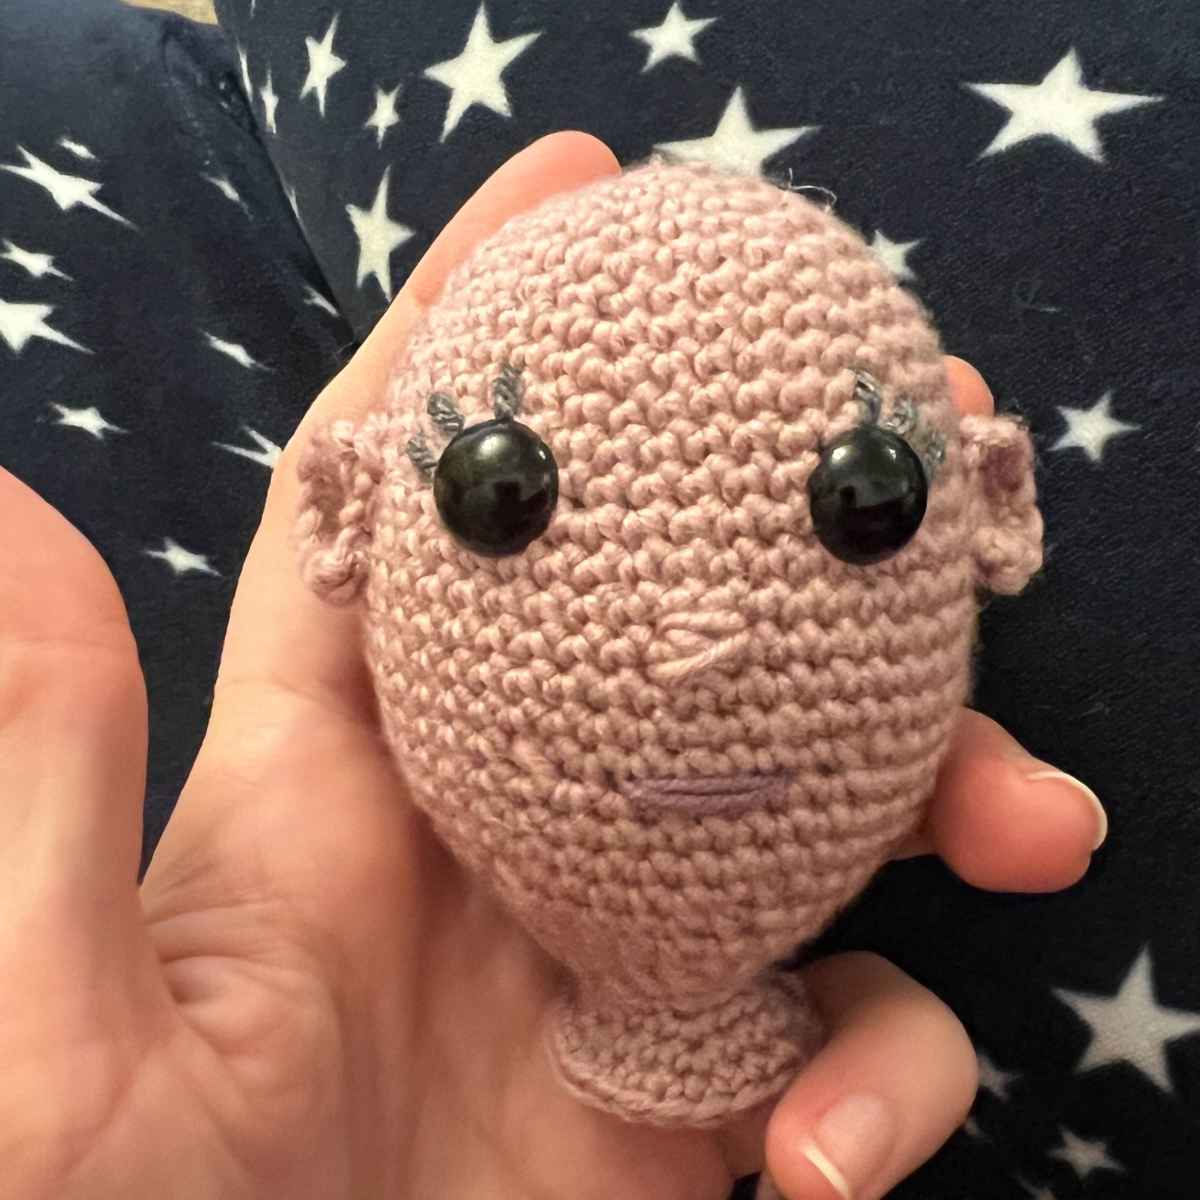
Your doll’s ears are going to be created from open magic circles.
- Make a magic circle of six stitches, but don’t close the circle. Flip the circle over.
- Chain one and make one single crochet into each stitch including the first. Flip the ear over again.
- Chain one and make one single crochet along the edge, then slip stitch into the final stitch.
Repeat this twice, then you’ll want to hand sew the ears onto the side of the head. Try to line them up with the ears for a more natural look.
Crocheting Curly Doll Hair
Your crochet dolls’ hair will be made from a series of chains with single crochets into them.
Use the mocha yarn for her hair, and work it with your 3.5mm crochet hook.
The simplest way to do these gorgeous curls is in sets of a few chains, that you’ll work back into. Your starting chains should range between 30 and 45 loops long for the sides and back of the hair, and the three sections of bangs should be about twenty stitches long in the chain.

For example:
Chain 31. Skipping the first chain, make one single crochet back into each stitch.
Chain 35. Skipping the first chain, make one single crochet back into each stitch.
You now have two separate curl strands.
Repeat until you have five or six curly hair segments, and then hand sew the string of curls onto the hairline at around round eight of the head.
Repeat this process until you are happy with the number of strands of hair your doll has. I ended up with twenty five longer curls and around five shorter ones as the bangs.
Your crochet doll should look like she has the ultimate low hairline, which will be disguised when her hat is added on.
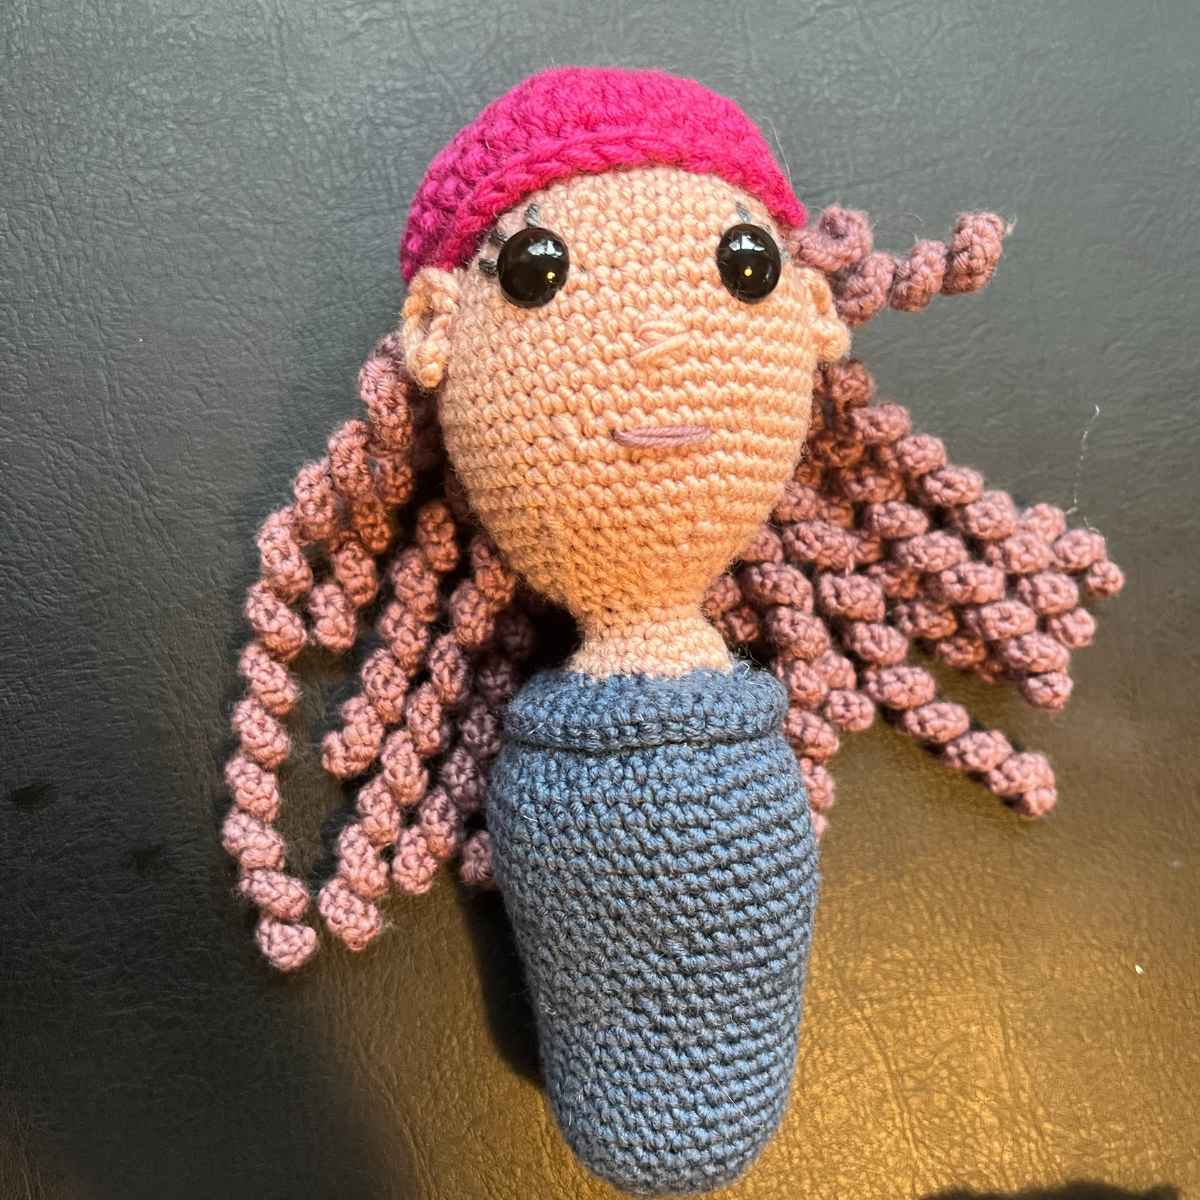
Crocheting The Hat
You are now going to crochet your doll a beanie hat which will cover the hairline. Use pink DK merino wool, and watch the rounds carefully as we’re going to work them slightly differently.
Round 1
Make a magic circle of eight stitches (8)
Round 2
2sc x 8 (16)
Round 3
(1sc, 2sc) x 8 (24)
Round 4
(1sc x 2, 2sc) x 8 (32)
Round 5
(1sc x 3, 2sc) x 8 (40)
Round 6
1sc x 40
Round 7
(1sc x 4, 2sc) x 8 (48)
Round 8
1sc x 48
Round 9
(1sc x 5, 2sc) x 8 (56)
Round 10
1sc x 56 into the front loop only (FLO)
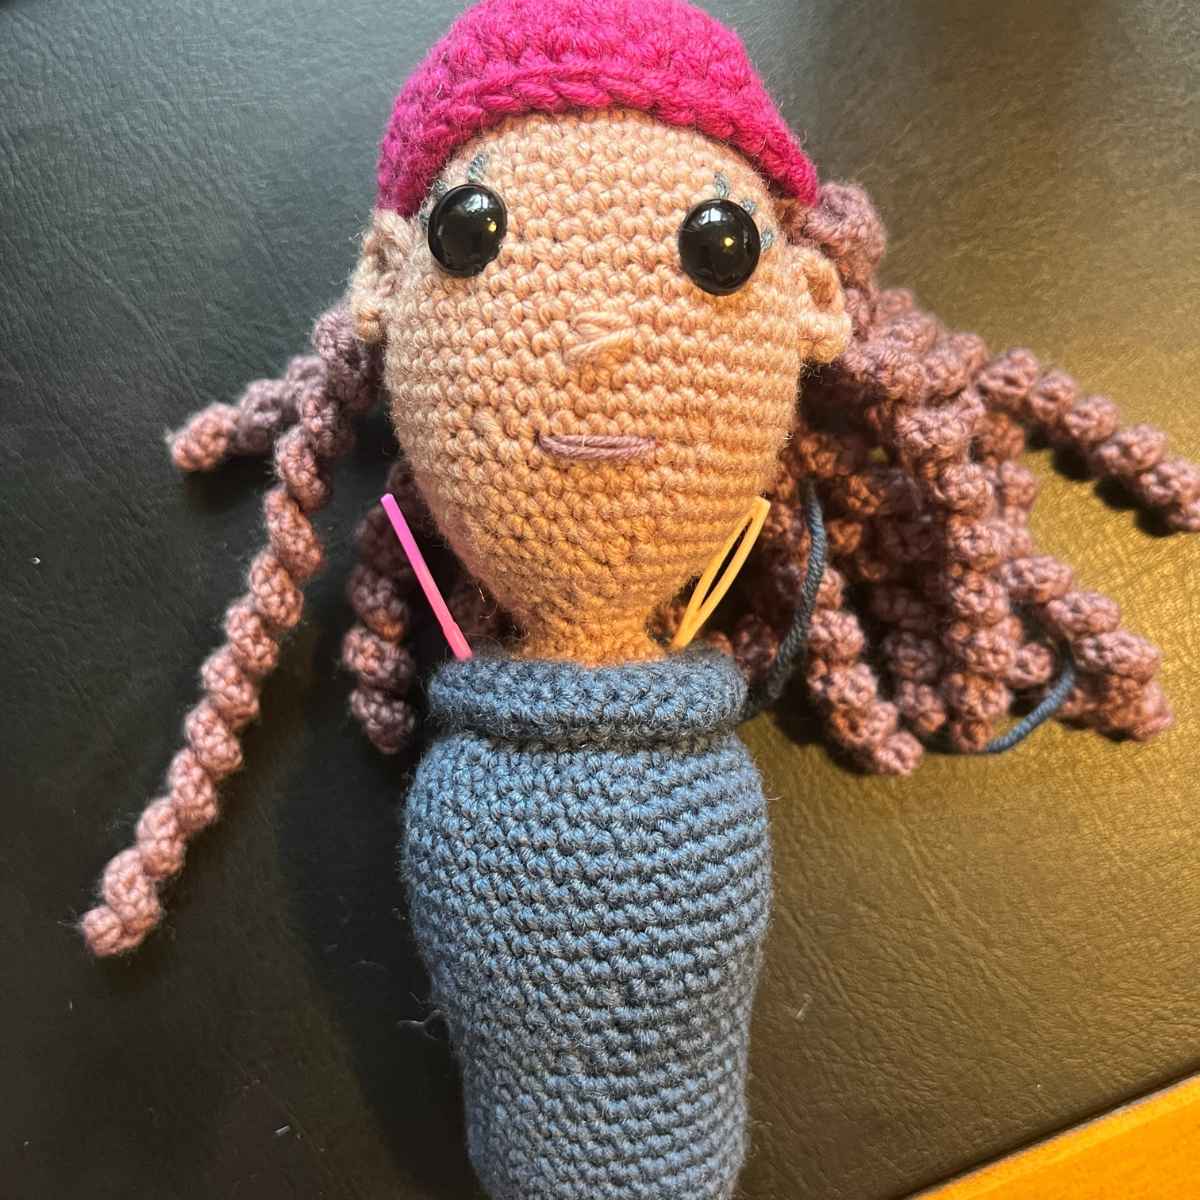
Sweater
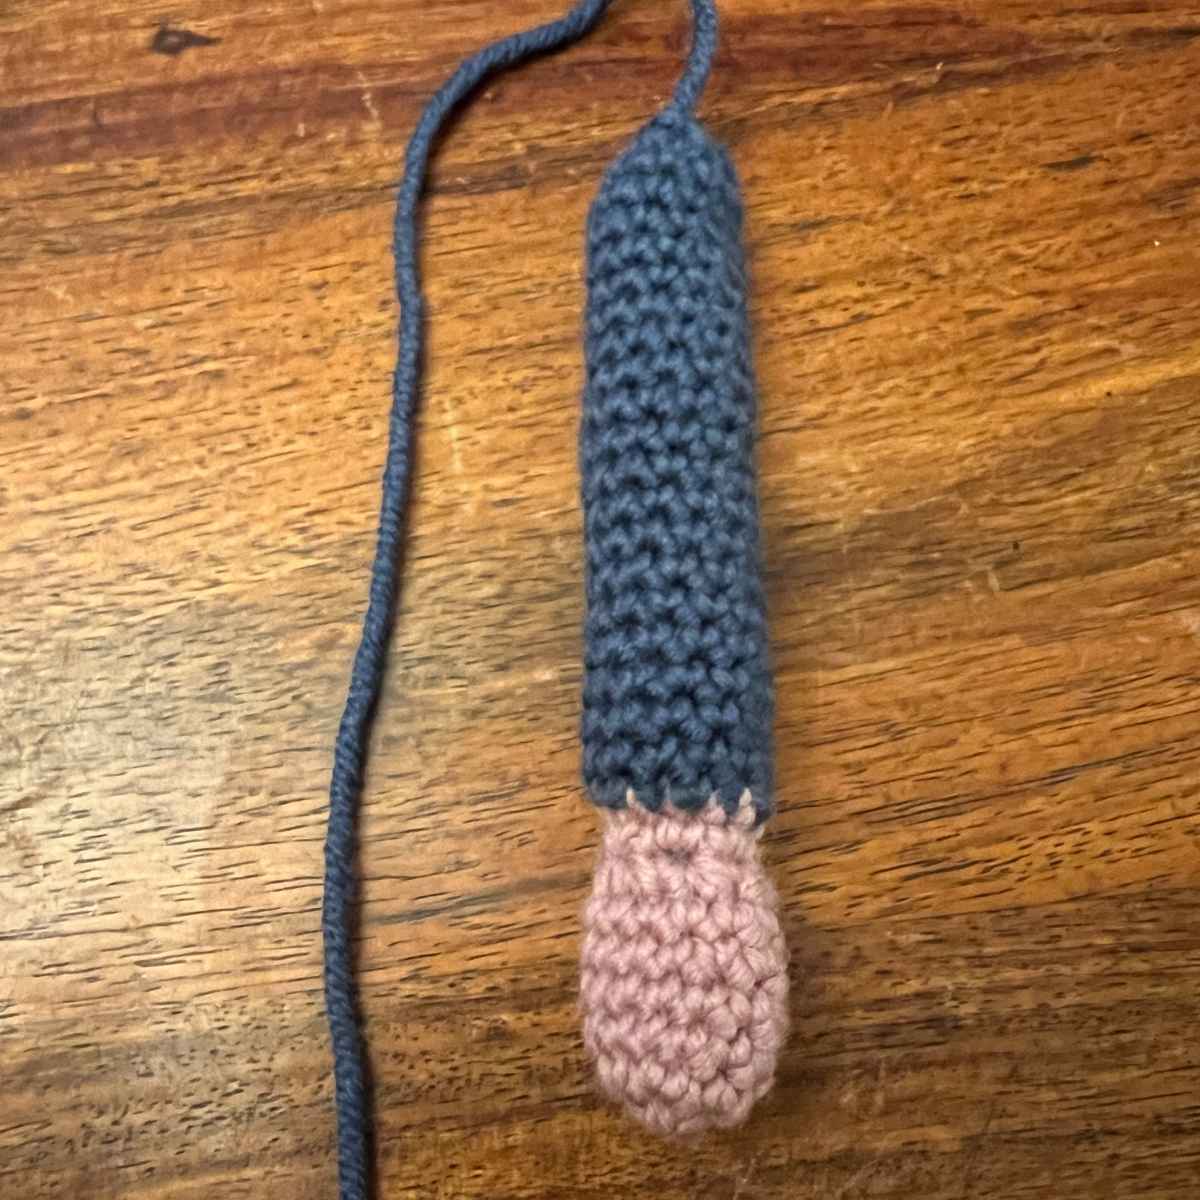
You are going to work your amigurumi doll’s sweater as a separate piece, that you’ll then hand sew under the collar. Use your 3.5mm crochet hook and blue merino wool yarn.
Round 1
Make a magic circle of six stitches (6)
Round 2
2sc x 6 (12)
Round 3
(1sc, 2sc) x 6 (18)
Round 4
(1sc x 2, 2sc) x 6 (24)
Round 5
(1sc x 3, 2sc) x 6 (30)
Round 6
(1sc x 4, 2sc) x 6 (36)
Round 7
1sc x 36 (36)
Round 8
(1sc x 5, 2sc) x 6 (42)
Round 9 – 13
1sc x 42 (42)
Round 14
(1sc x 5, sc2tog) x 6 (36)
Round 15
1sc x 36 (36)
Round 16
(1sc x 4, sc2tog) x 6 (30)
Round 17 – 25
1sc x 30 (30)
Round 26
(1sc x 3, sc2tog) x 6 (24)
Round 27
(1sc x 2, sc2tog) x 6 (18)
Fill with toy safe stuffing.
Round 28
(1sc, sc2tog) x 6 (12)
Round 29
sc2tog to close.
You can now sew the sweater underneath the collar. I recommend using your blush yarn on the needle, and working through the wider section of the neck. You can use yarn needles to hold it in place as you work.
Crochet Doll Arms
Your doll’s arms begin at the hands, using the blush yarn. You’ll then need to switch over to your sweater color, working the entire thing in your 3.5mm crochet hook.
Round 1
Make a magic circle of six stitches (6)
Round 2
2sc x 6 (12)
Round 3 – 7
1sc x 12 (12)
Round 8
sc2tog x 6 (6)
Round 9
1sc x 6 (6) cc to blue yarn
Round 10
2sc x 6 (12)
Round 11 – 25
1sc x 12 (12)
Fill with toy safe stuffing.
Round 26
sc2tog to close.
Hand sew each arm to the sides of the dolly, attaching them at the shoulder point as a minimum, or weaving in lower down as well for a more secure position.
Crocheting the Doll’s Legs
Give your doll’s some trousers with the khaki DK yarn and 3.5mm crochet hook.

Round 1
Make a magic circle of six stitches (6)
Round 2
2sc x 6 (12)
Round 3
(1sc, 2sc) x 6 (18)
Round 4
(1sc x 2, 2sc) x 6 (24)
Round 5
(1sc x 3, 2sc) x 6 (30)
Round 6
1sc x 30 BLO (30)
Round 7 – 10
1sc x 30 (30)
Round 11
(1sc x 3, sc2tog) x 6 (24)
Round 12
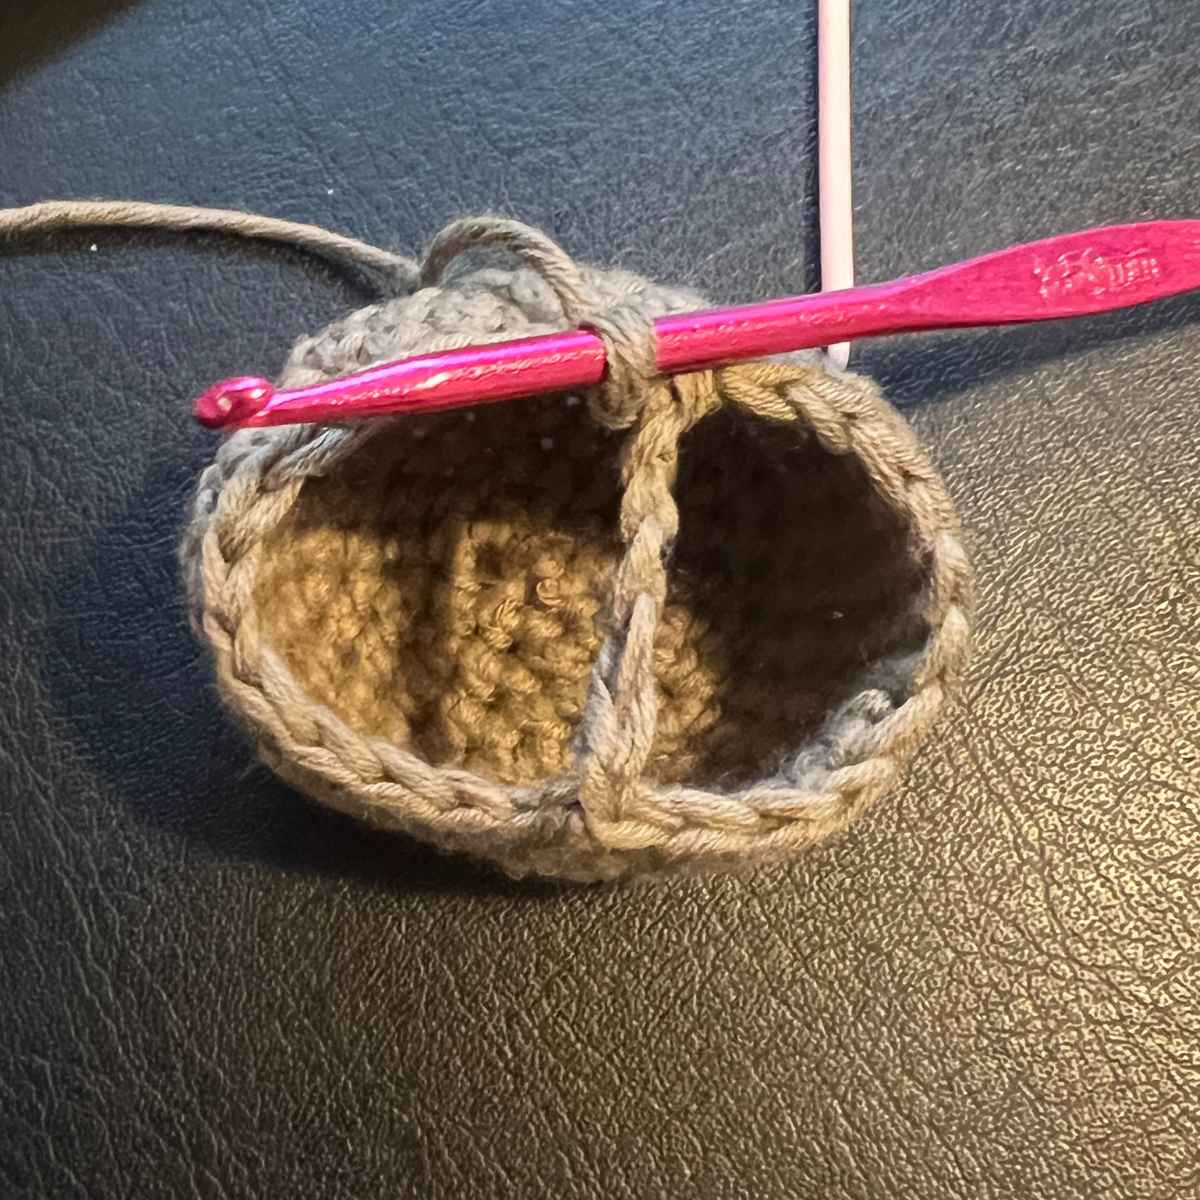
Watch out for this round, it’s a little bit different. You are going to separate the shape to make two pant legs.
Chain 6, then slip stitch into the 12th stitch of the round.
Your chain should split the circle in two.
You are now going to work into one side only.
Round 13
1sc x 18 (18)
Work into the edge of the circle, and then across the central chain.
Round 14 – 31
1sc x 18 (18)
Round 32
(1sc, sc2tog) x 6 (12)
Fill with toy safe stuffing.
Round 33
sc2tog to close.
You can now create the other leg in exactly the same manner, from round 13. If you find you’ve lost a stitch in the join (it’s easily done) then add a stitch by single crocheting twice into one of the stitches at round 13.
The belt
I gave my winter doll a crocheted belt by make a chain of 25 stitches and single crocheting once into each stitch. When you’ve made your foundation chain, wrap it around your doll’s middle to check the length. If you’re tensioning is a little looser or tighter than mine you’ll still be able to make it fit.
Cut off your khaki yarn and attach a sturdy needle. Hand sew the trousers underneath the sweater, and the belt around the join point of them both.
Crochet Doll’s Shoes
You will need to use two strands of yarn and your 6mm crochet hook.
Round 1
Make a magic circle of six stitches (6)
Round 2
2sc x 6 (12)
Round 3 – 4
1sc x 12 (12)
Round
sc2tog to close.
Using your yarn needle sew one shoe onto the underside of each leg.
Crocheting Your Doll’s Scarf
Work the scarf separately in pink yarn with your 3.5mm crochet hook.
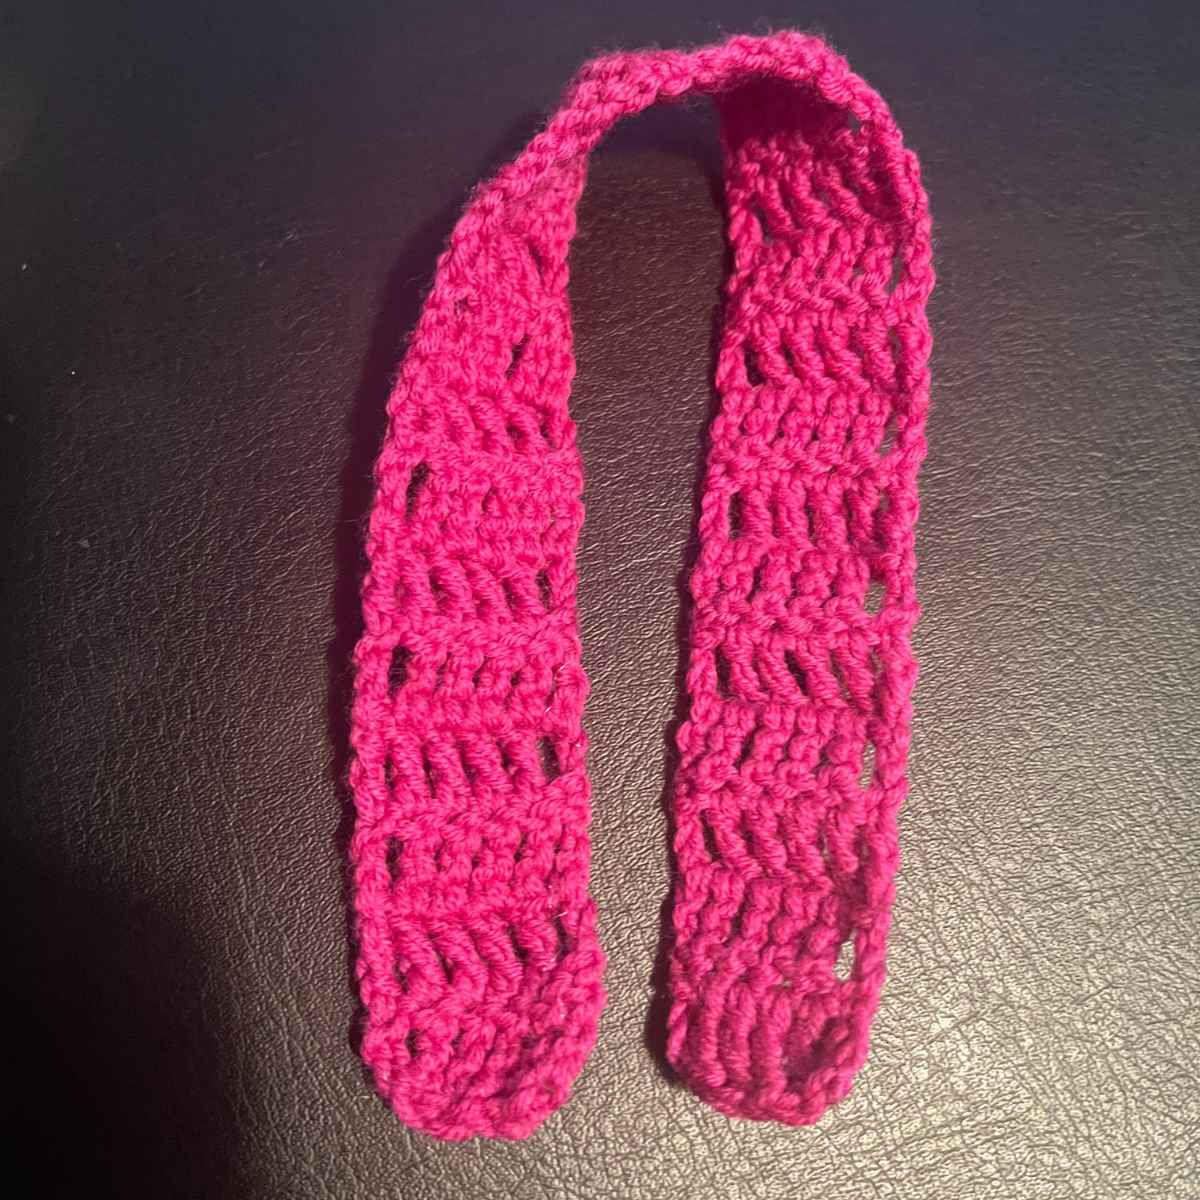
Row 1
Make a chain of seven stitches.
Row 2
Skipping the nearest loop to the hook, make a treble crochet into each space on the chain.
Row 3
*Chain three, then treble crochet into each stitch.
Row 4 – 30
Repeat from *.
I used a yarn needle to join the scarf in place when I was done, attaching it to itself rather than the doll.
Crocheting Your Own Doll

This was a high stakes project for me, because I’m going to give this dolly to my smallest niece. I’ll let you know what she thought of it after the holiday season – as you know, four year old’s don’t hold back on opinion sharing!
I hope you enjoy the pattern too, and happy crocheting!
Lucy Kate, x