Crochet Pekingese Pattern
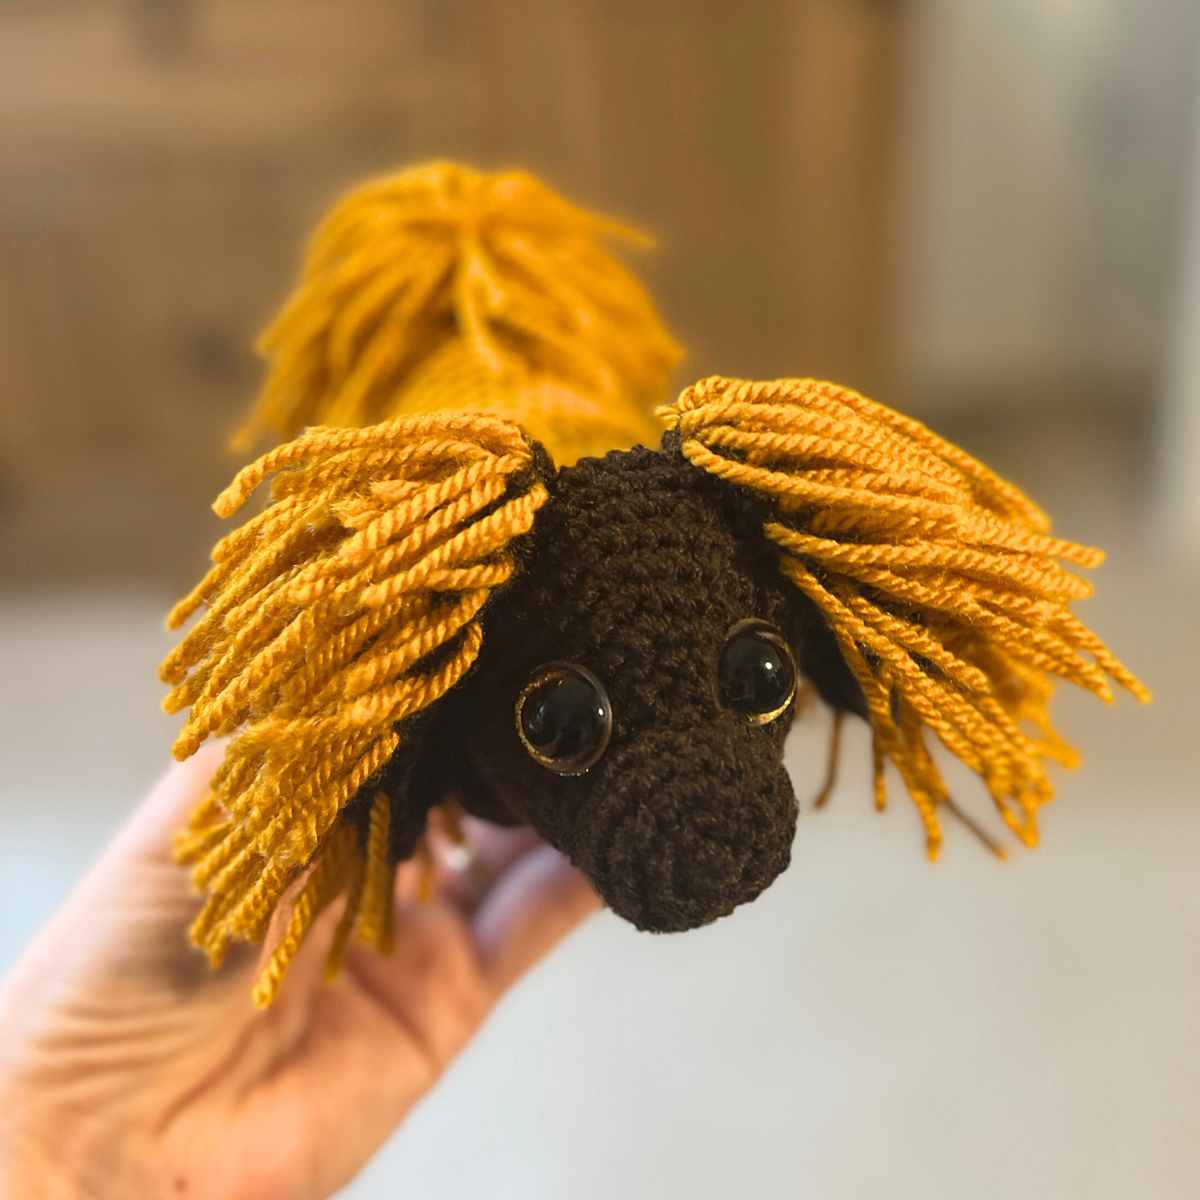
My crochet Pekingese pattern is designed to show off the fluffy charm of this historically regal dog breed. It took a while for me to settle on a way to simulate their long coat whilst keeping the amigurumi Pekingese practical to crochet, but I’m pretty happy with the result. Big eyes and a snubbed muzzle complete the look.
Your Crochet Kit List
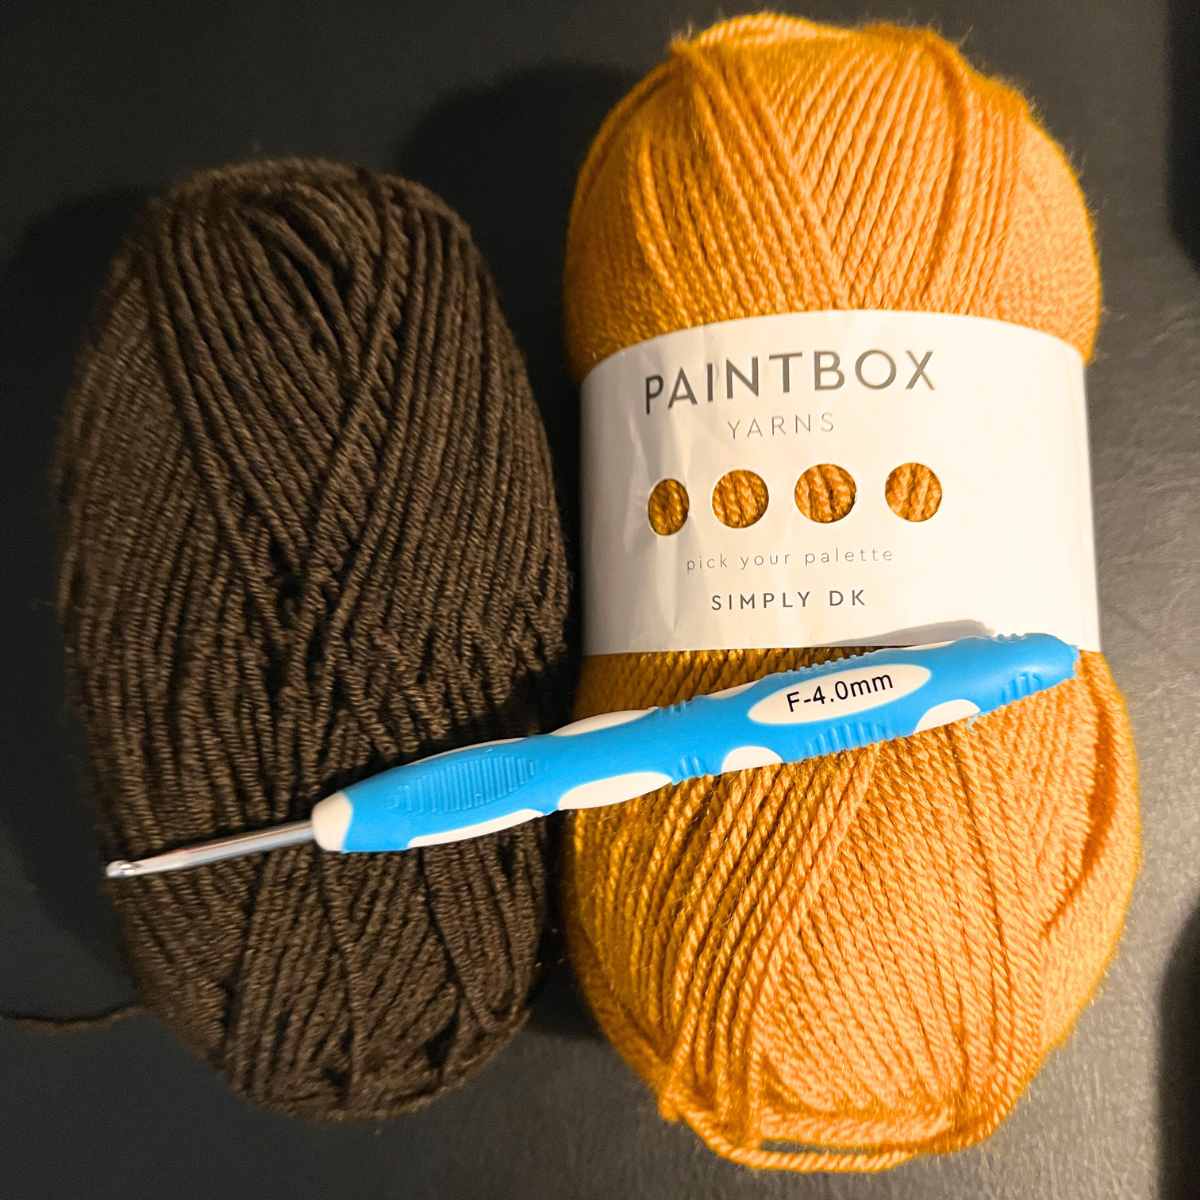
To create your own amigurumi Pekingese dog you’ll need:
- 4mm crochet hook
- 16mm safety eyes*
- 2oz/50g Yellow DK yarn
- 1oz/25g Brown DK yarn
- Toy safe stuffing*
- Yarn/tapestry needle
- Scissors/yarn cutter
The yarns I used were Paintbox Simply DK*, but any acrylic based DK weight yarn should give a very similar effect. Remember if you choose to swap out for a different yarn thickness, you will also need to change hook size.
Pattern Notes and Help
This crochet pattern is worked from magic circles. You’ll find the following abbreviations in the pattern:
- sc – single crochet
- 2sc – make two single crochets in the stitch
- sc2tog – join two stitches together with one single crochet
- FLO – make your stitches into the front loop only
- cc – color change
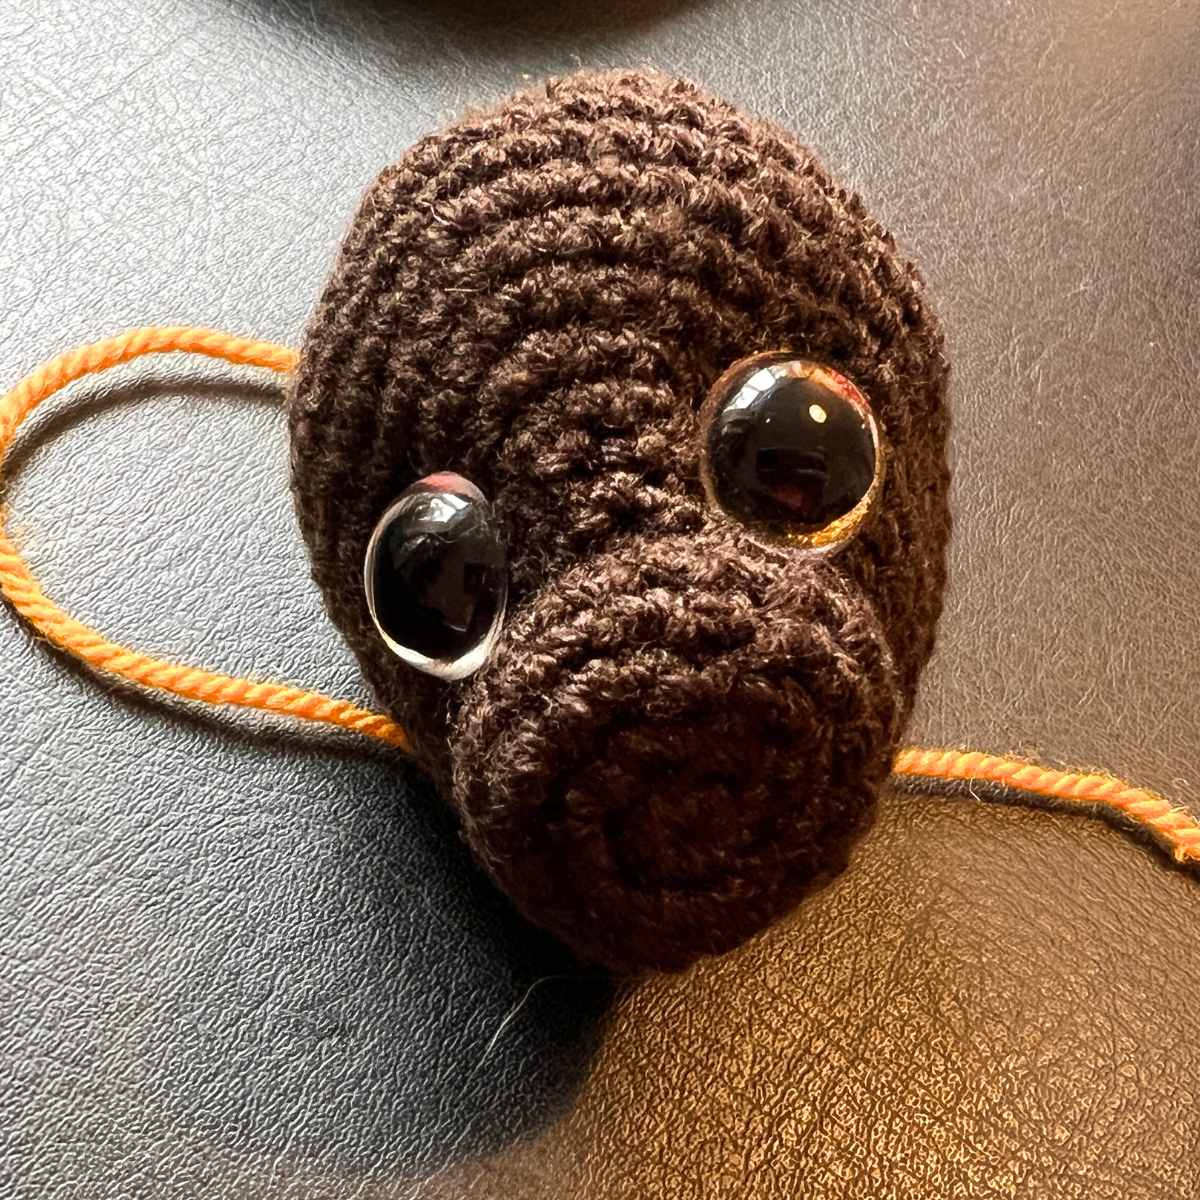
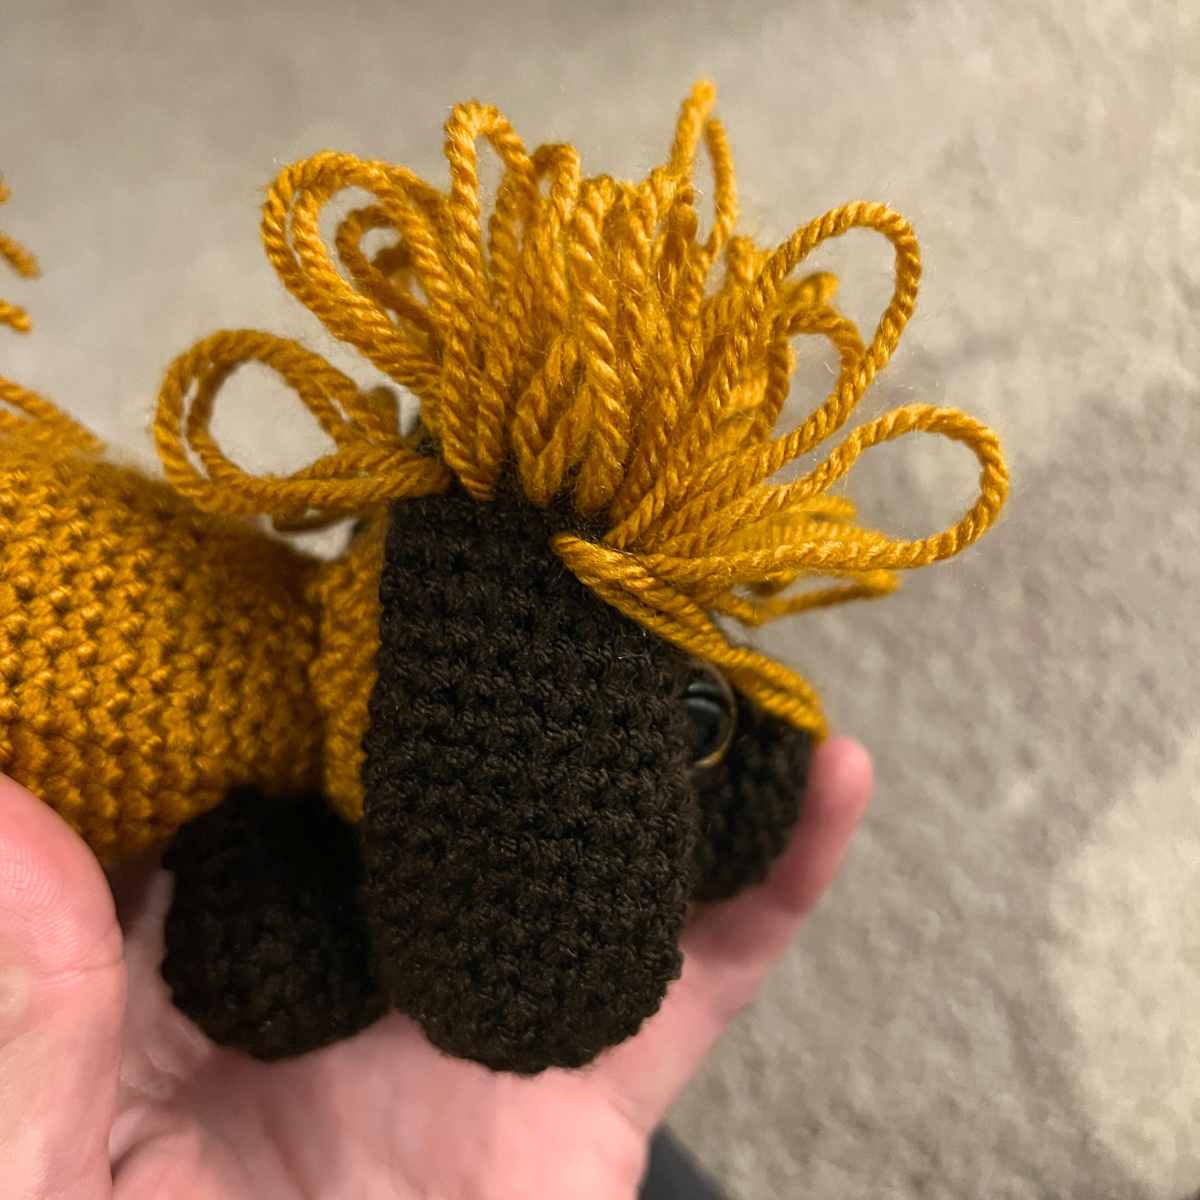
The face is worked in irregular rounds beyond the muzzle, so watch out for the change in repetitions at this point. You’ll also find a couple of front loop only stitches to give definition to the nose.
The most time consuming part of this pattern is the fur on the tail and ears, I find this is easier to work with a steel yarn needle.
Free Crochet Pekingese Pattern
This pattern will be worked in separate sections. You’ll make all of the composite parts first, then add the fur detail to the ears and tail when you’re done with the main construction.

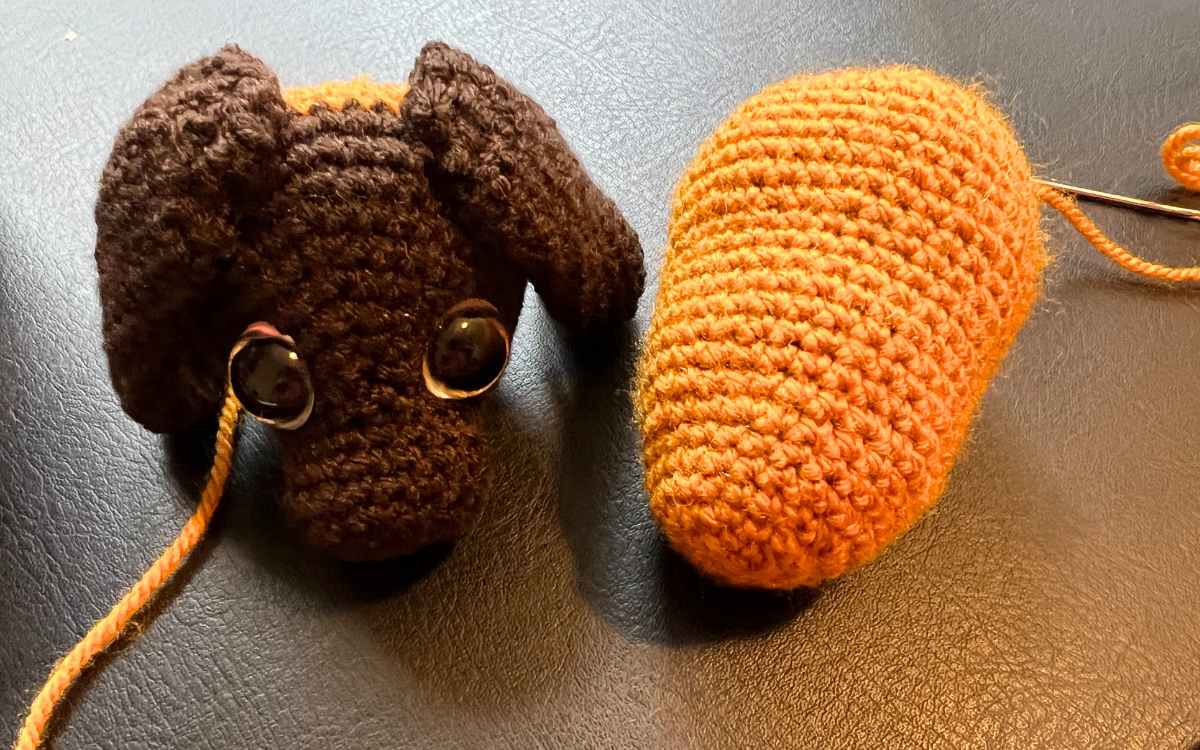
Crochet Pekingese’s Face
You’re going to begin crocheting your Pekingese dog’s face with the brown yarn, but have the yellow ready for a color change.
Round 1
Make a magic circle of six stitches (6)
Round 2
2sc x 6 (12)
Round 3
(1sc, 2sc) x 6 (18)
Round 4 – 7
1sc x 18 (18)
Round 8
FLO (1sc x 2, 2sc) x 6 (24)
Round 9
FLO (1sc x 3, 2sc) x 6 (30)
Round 10
1sc x 30 (30)
Round 11
(1sc x 4, 2sc) x 3, 1sc x 15 (33)
Round 12
(1sc x 5, 2sc) x 3, 1sc x 15 (36)
Round 13
(1sc x 6, 2sc) x 3, 1sc x 15 (39)
Round 14
(1sc x 7, 2sc) x 3, 1sc x 15 (42)
Round 15 – 17
1sc x 42
cc yellow
Round 18
(1sc x 5, sc2tog) x 6 (36)
Round 19
(1sc x 4, sc2tog) x 6 (30)
Round 20
(1sc x 3, sc2tog) x 6 (24)
Insert safety eyes so that they sit with the base of the eye just above the muzzle.
Round 21
(1sc x 2, sc2tog) x 6 (18)
Round 22
(1sc, sc2tog) x 6 (12)
Fill the head with toy stuffing, ensuring that it stuffs the muzzle too.
Round 23
sc2tog x 6, then hand sew to close.
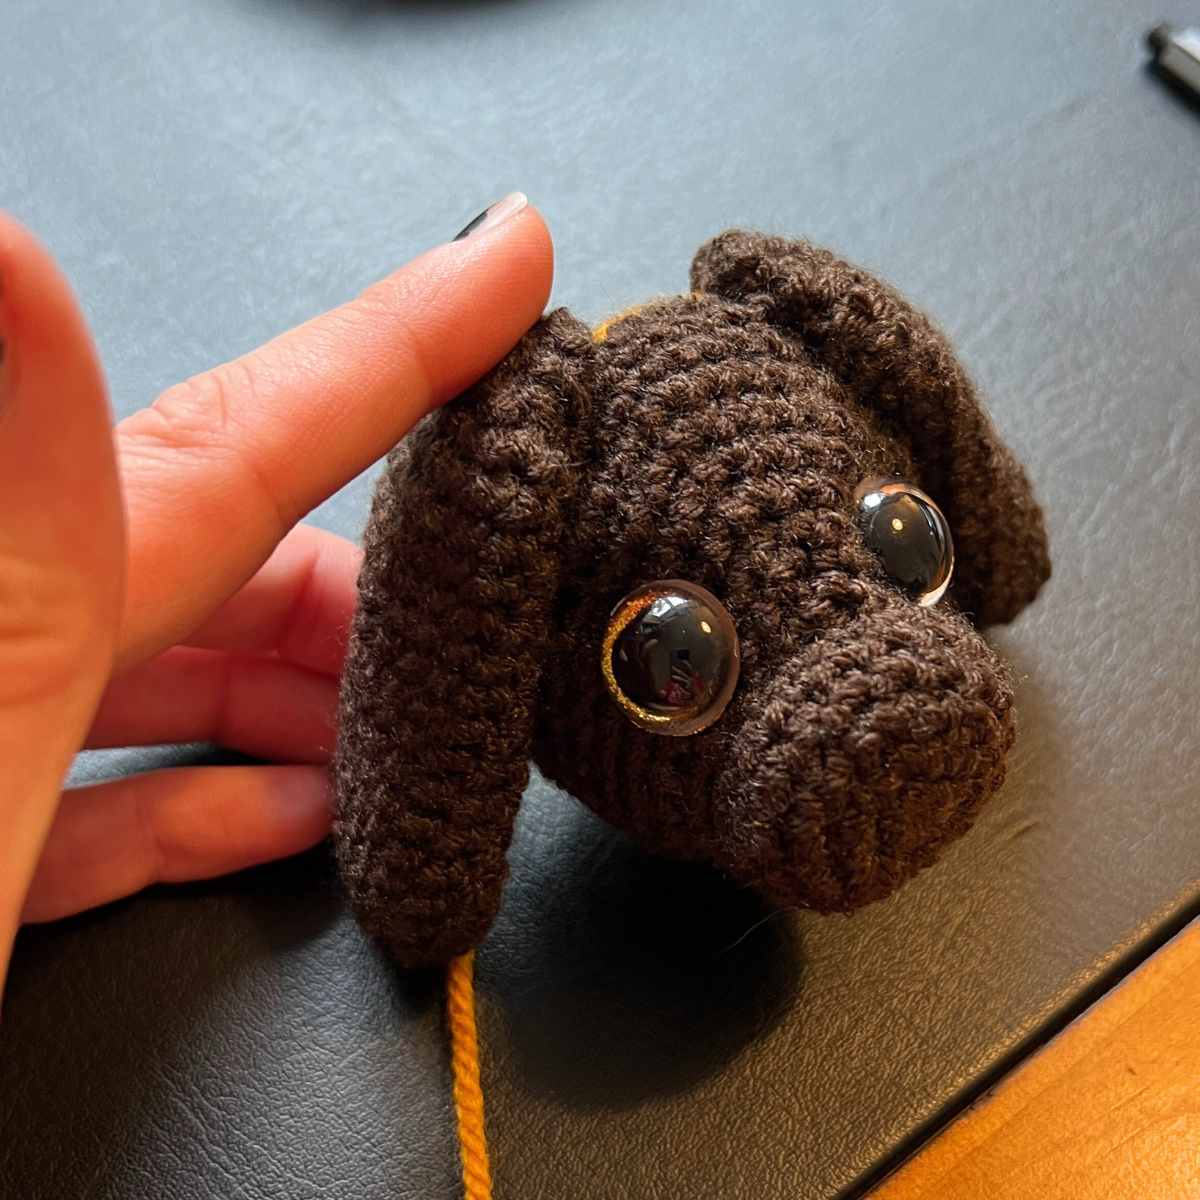
Amigurumi Pekingese Ears
You are just going to make the bulk of the ears here, we’ll add the long hair to them later. Use your brown yarn and your 4mm crochet hook.
Round 1
Make a magic circle of eight stitches (8)
Round 2
2sc x 8 (16)
Round 3 – 16
1sc x 16
At the end of the round, tie off and leave a long tail of yarn.
Flatten the ear and sew directly to either side of the head, approximately in line with the center of each eye. Remember not to sew them too close into the middle, as you’ll be working the fur into the ears later on.
Crocheting the Body
Your Pekingese amigurumi’s body is made entirely in yellow yarn, using your 4mm crochet hook.
Round 1
Make a magic circle of eight stitches (8)
Round 2
2sc x 8 (16)
Round 3
(1sc, 2sc) x 8 (24)
Round 4 – 6
1sc x 24 (24)
Round 7
(1sc x 2, 2sc) x 8 (32)
Round 8 – 15
1sc x 32 (32)
Round 16
(1sc x 3, 2sc) x 8 (40)
Round 17 – 22
1sc x 40 (40)
Round 23
(1sc x 3, sc2tog) x 8 (32)
Round 24
(1sc x 2, sc2tog) x 8 (24)
Round 25
(1sc, sc2tog) x 8 (16)
Fill the body with toy safe stuffing. It should feel full but not solid and the stitches should remain tight, with no filler exposed through gaps.
Round 26
sc2tog x 8, then hand sew to close.
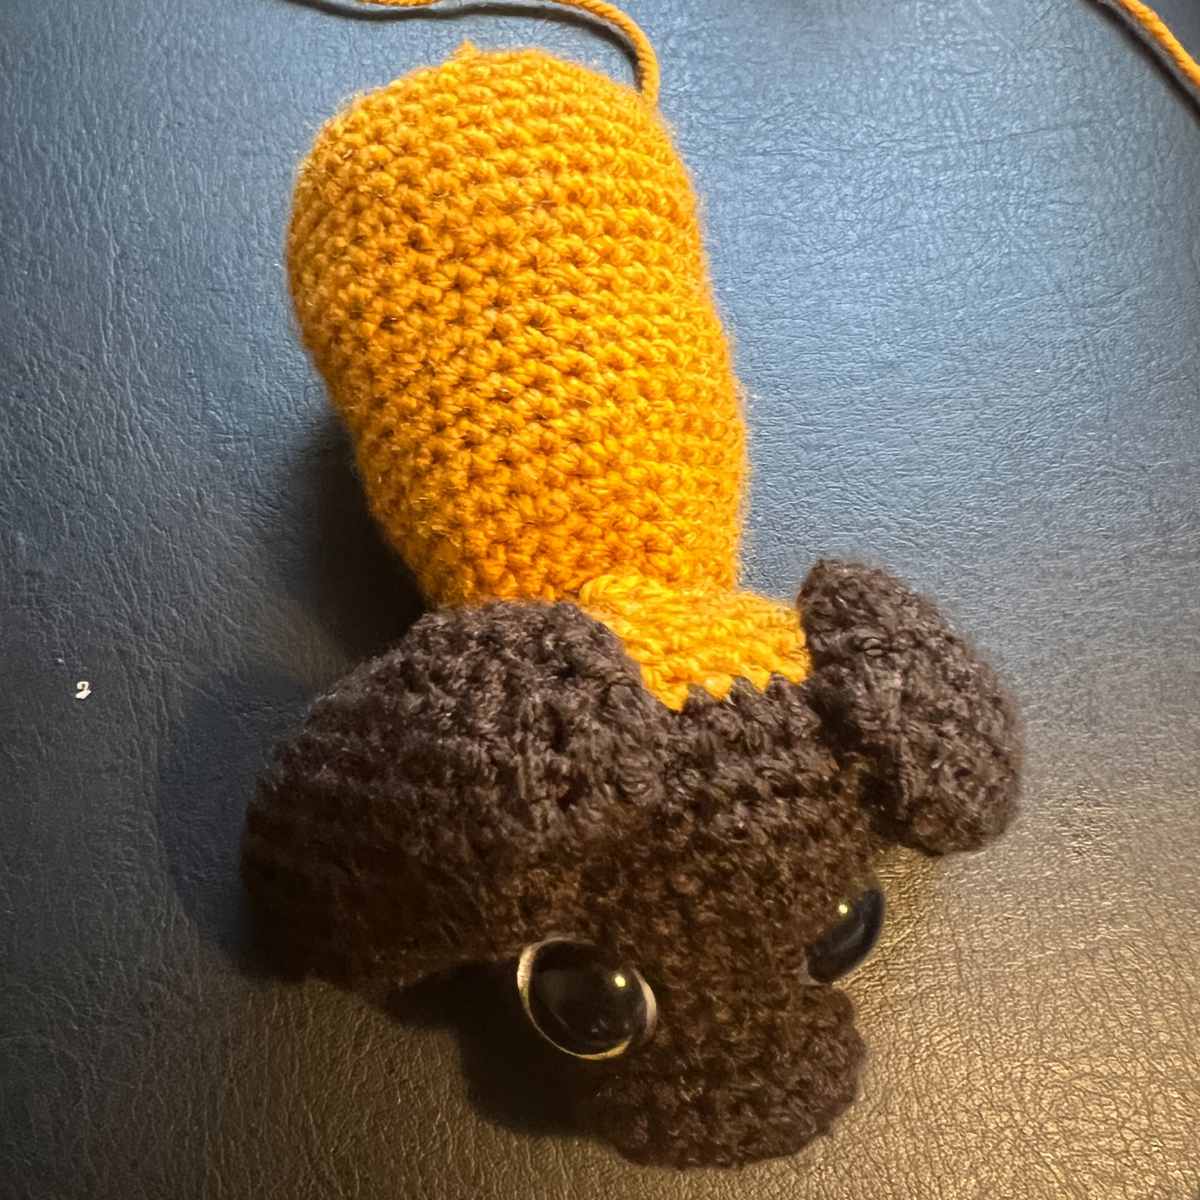
You can now sew the head onto the body. Line up the body using the magic circle end as the neck, with the bottom of the yellow section of the head.
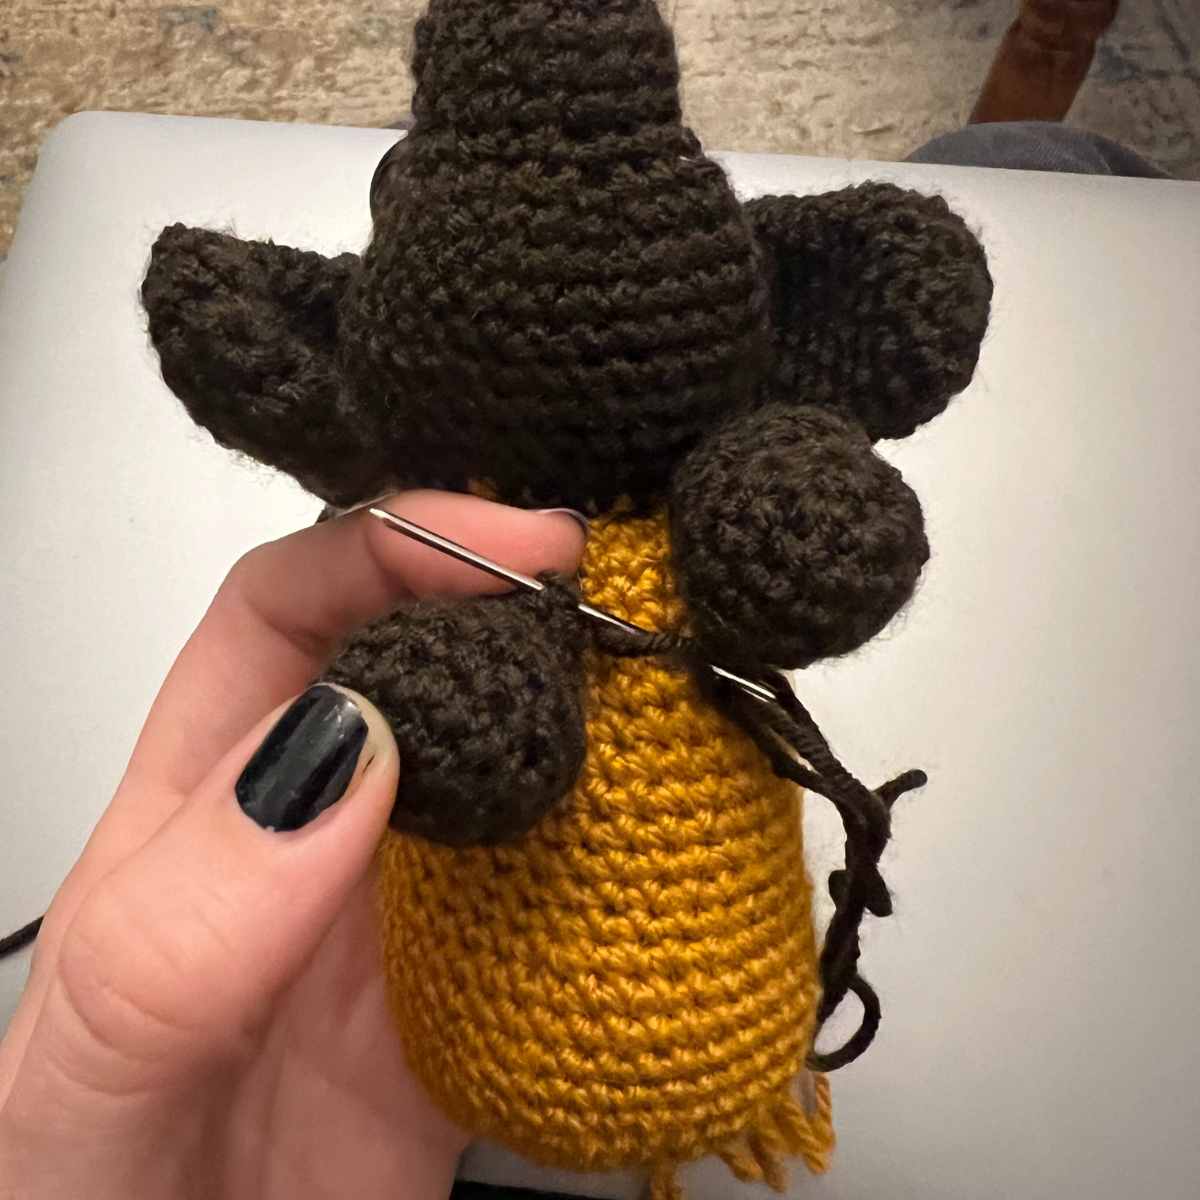
Crochet Pekingese Legs
Your Pekingese’s legs are going to be crocheted in brown yarn.
Round 1
Make a magic circle of eight stitches (8)
Round 2
2sc x 8 (16)
Round 3 – 5
1sc x 16 (16)
Round 6
Sc2tog x 8 (8)
Round 7 – 8
1sc x 8 (8)
Fill the legs carefully with tiny pieces of toy stuffing, then sew the open end directly to the underside of the body.
Crocheting the Tail
The Pekingese has a splendid, puffed tail. But it’s all fur and very little tailbone. So you’re going to just make a little stub tail for your crocheted Pekingese at this point. Use your yellow yarn and your 4mm crochet hook.
Round 1
Make a magic circle of six stitches (6)
Round 2
2sc x 6 (12)
Round 3 – 7
1sc x 12
Fill with toy stuffing.
Round 8
Sc2tog x 6, then hand sew closed leaving a long tail of yarn. Use your yarn tail to thread the needle and sew onto the top of your Pekingese’s back end.
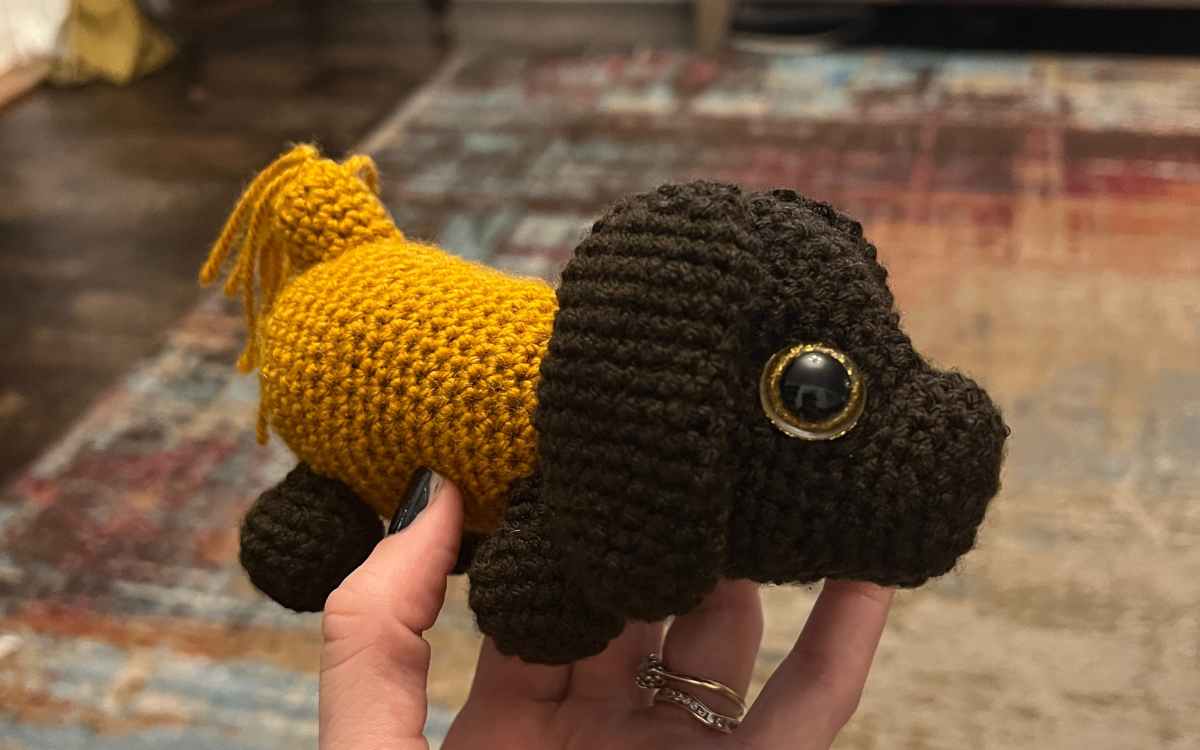
Sewing the Lovely Long Coat
It’s time to add that classic coat!
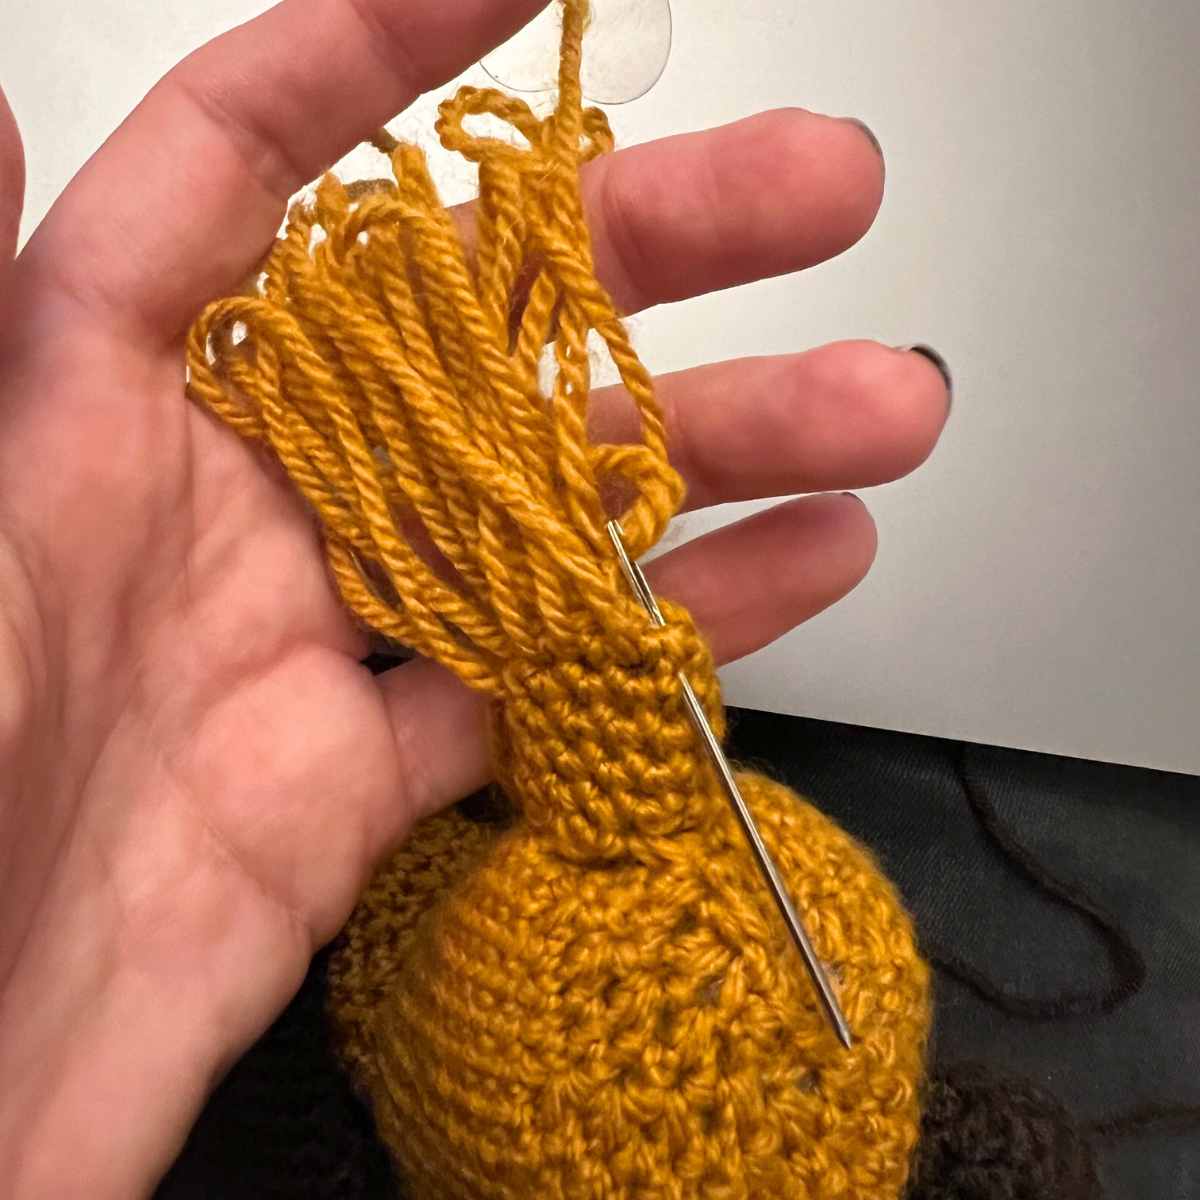
I created this furred effect using a yarn needle and long lengths of the yellow yarn. Thread your needle and weave in and out of the stitches on the tail and ears, leaving trailing loops of yarn. Once you have worked a few through, tie off and snip the tops of the loops leaving little trailing furry tails.
You have two choices for attachment here. Either you can knot pairs of the yarn tails used for the fur together to secure them in place, or you can view the toy as decorative only as the strands will pull out if tugged.
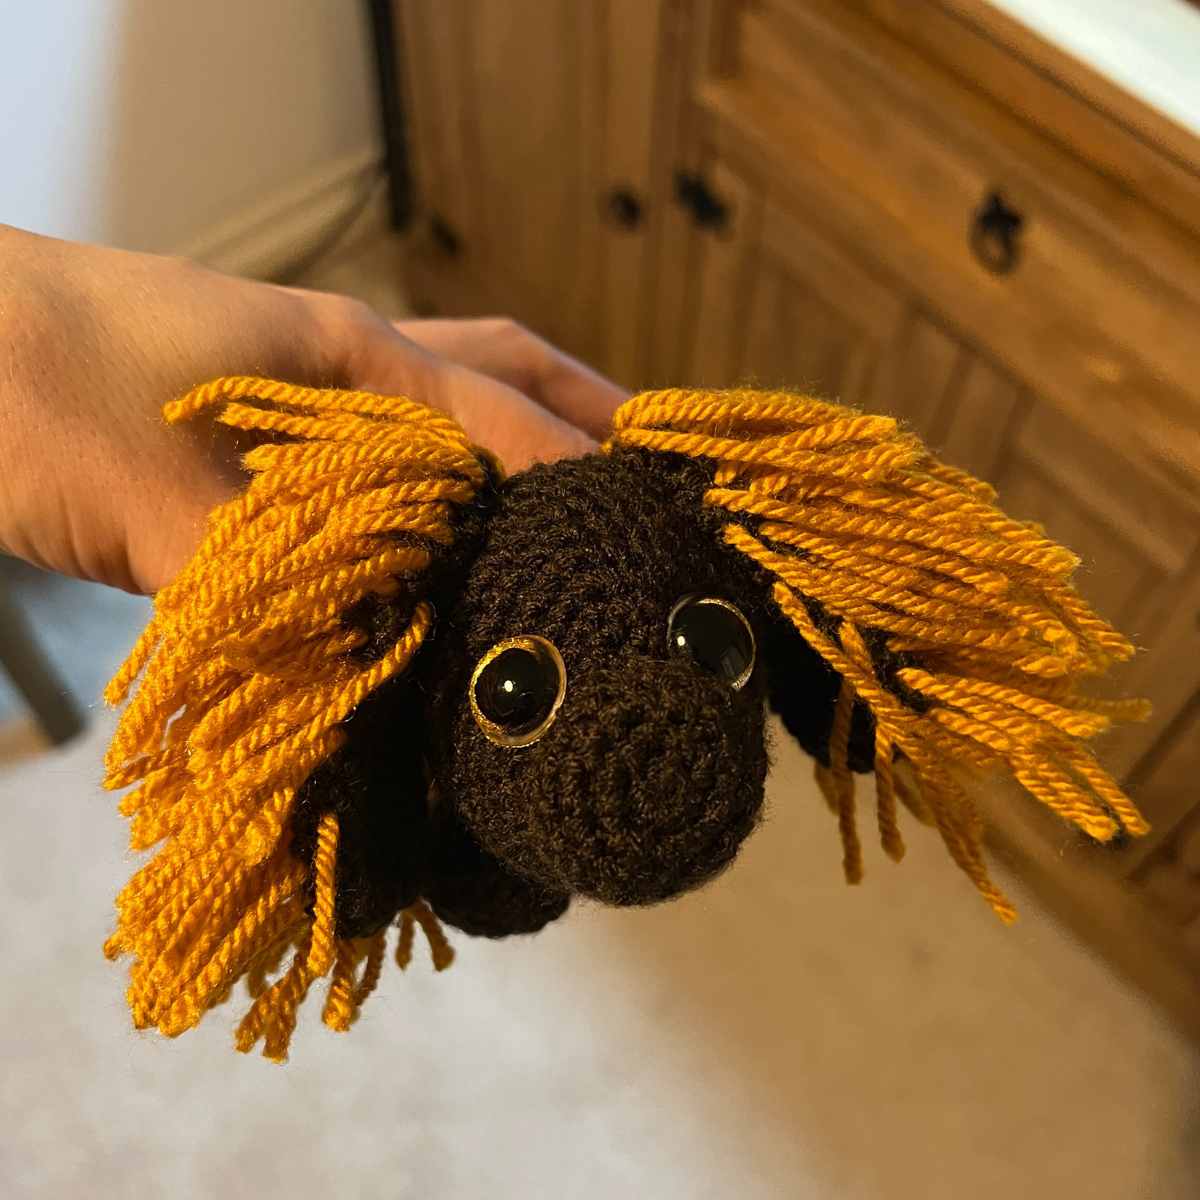
Your Crochet Pekingese Puppy
When crocheting your own amigurumi Pekingese, you can add more fur to the body as well if you like. It might complete the look, but I felt that leaving that area bare accentuated the characteristics a little more. But give it a go, I’d love to see how it looks if you’d like to tag me on Insta or share it on our Facebook group.
Happy Crocheting!
Lucy Kate, x
*The products linked in this pattern were carefully selected by Lucy Kate Crochet. If you decide to purchase using the links provided, we may earn a small commission on that sale. This is at no extra cost to you.
