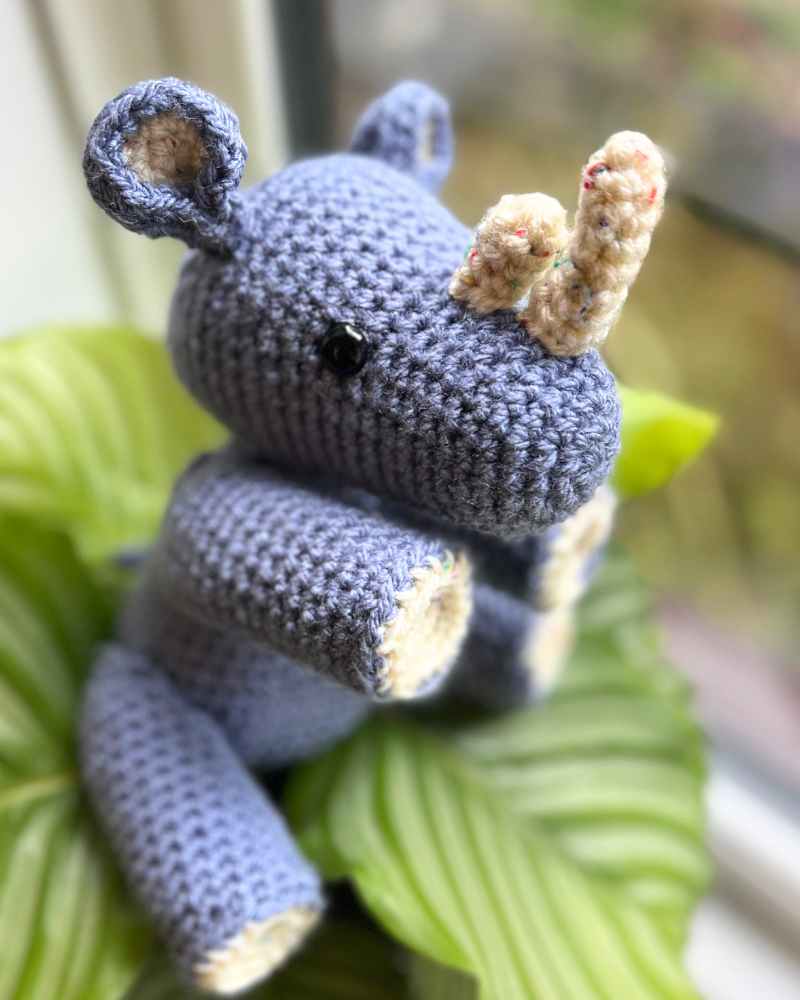
Free Crochet Rhino Pattern
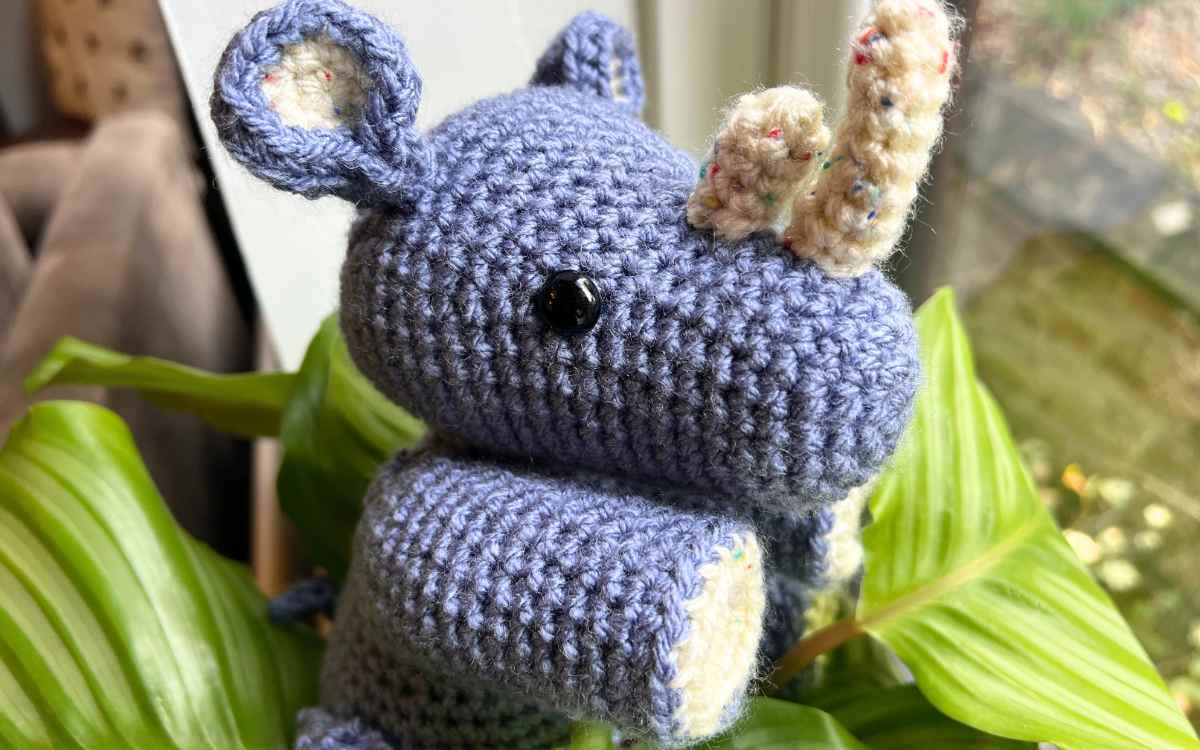
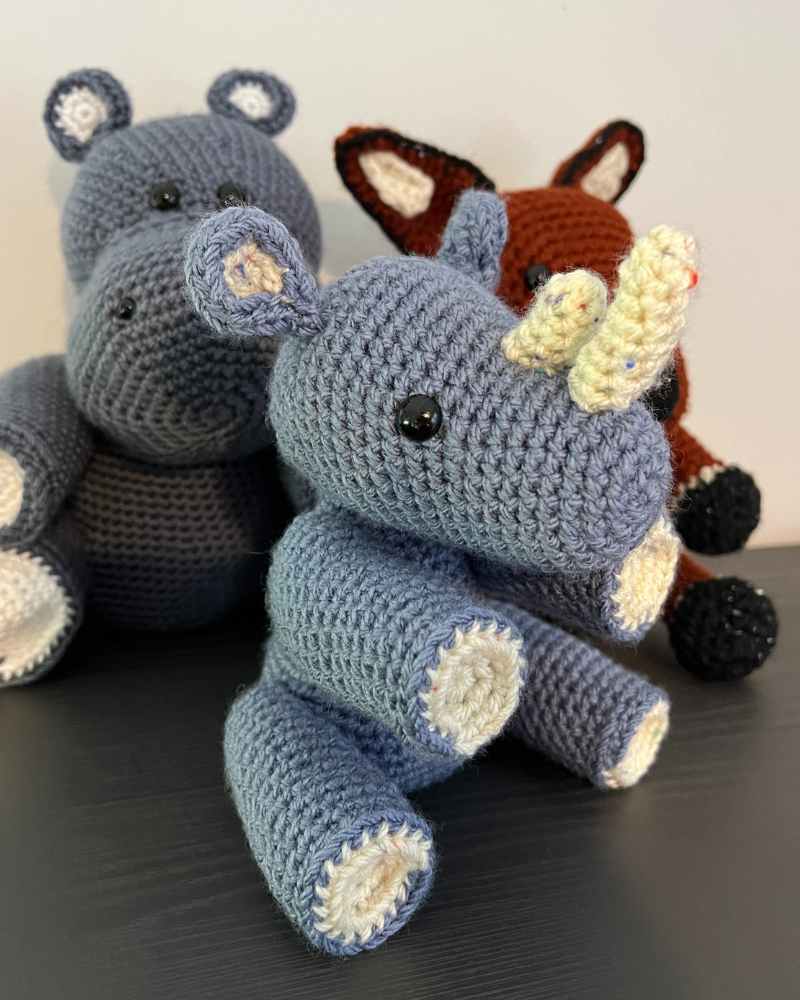
My crochet rhino pattern is a firm favorite in this house. In fact, it started a small war between my kids, both of whom wanted to keep him. I think I’m going to have to crochet a few more rhinos this month!
To follow this crochet rhinoceros pattern you’ll need a skein of gray aran yarn, and a skein of cream aran yarn, along with a 5mm crochet hook. I used flecked yarn for the pale areas as I love the tone it gives the stuffie, but it’s fine to use plain if you prefer.
You’ll build the crocheted rhino in sections from magic circles, and I’ll give you instructions for putting together each part.
I was delighted with the more dainty design of the crocheted sugar glider I put together last week, so decided to see how it would look if I scaled down my standard designs a little to reflect this. I’m pretty pleased with the result!
What You’ll Need
To complete my crochet rhino free pattern you’ll need the following:
- 100g gray aran yarn
- 50g cream aran yarn
- 5mm crochet hook
- Yarn needle
- Safety eyes
- Toy stuffing
- Stitch markers
For this pattern I used Knitcraft Everyday Aran in Steel Blue and Cream Tweed. It’s totally fine to use other shades or brands of aran yarn with the 5mm crochet hook. If you use a differently weighted yarn, make sure you adjust your hook according to the instructions on the yarn’s packaging.

Pattern Instructions
This crochet pattern is suitable for beginners as well as more advanced hookers! The main techniques you’ll be using are magic circles, single crochets, simple increases and decreases, and hand sewing with a yarn needle.
For the tail you’ll also need to make a chain, which you’ll single crochet back into and then hand sew together.
I write my crochet patterns using US terms, if you are UK based you can find an easy term translator here.
All the abbreviations I’ll use today are explained the first time they crop up, and you can find a complete crochet abbreviation terminology guide here if you feel a little lost. You’re also very welcome to ask me any questions in the comments section, and I’ll do my best to help you succeed.
Free Crochet Rhino Pattern
This rhino crochet pattern is built in sections. For each one you’ll need a 5mm crochet hook, and aran weighted yarn.
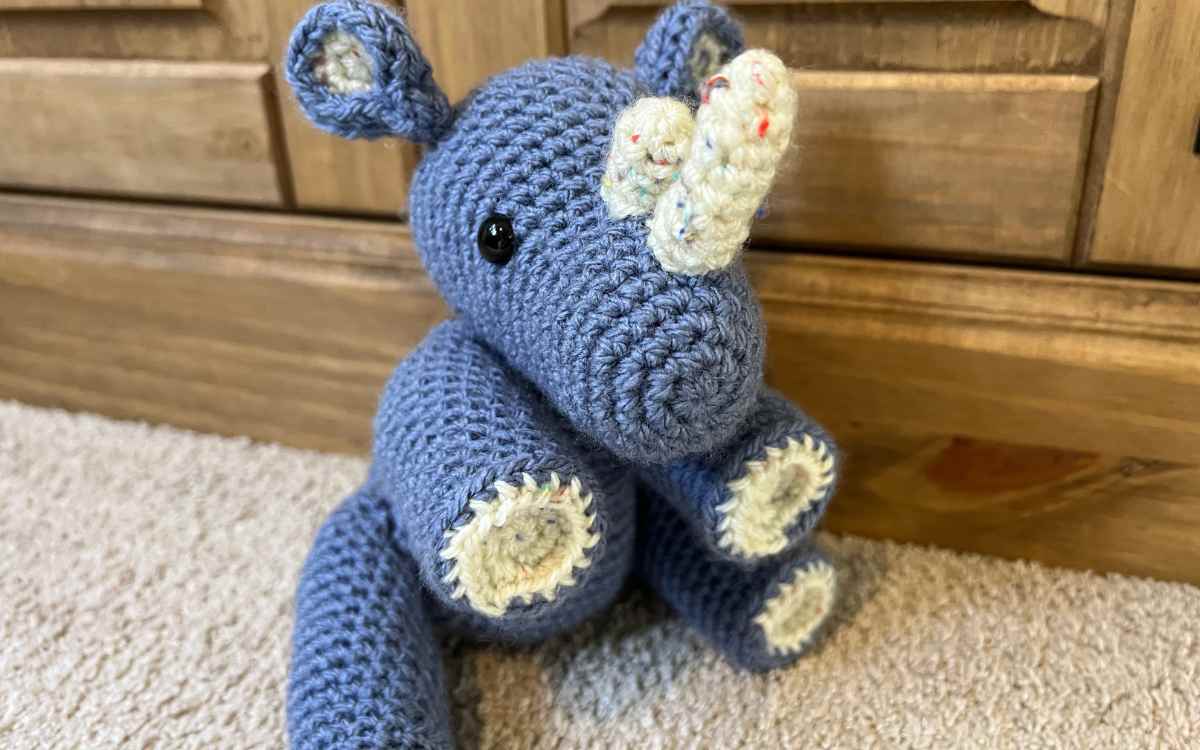
Your Crochet Rhino’s Head
Begin working with your gray aran yarn and the 5mm crochet hook.
Round 1
Make a magic circle of six stitches (6)
Round 2
Put two single crochets into each stitch of the round.
2sc x 6 (12)
Round 3
Make one single crochet in the first stitch and two in the next. Repeat this pattern for the round.
(1sc, 2sc) x 6 (18)
Round 4
(1sc x 2, 2sc) x 6 (24)
Round 5 – 10
1sc x 24 (24)
Round 11
(1sc x 3, 2sc) x 3, 1sc x 12 (27)
Round 12
(1sc x 4, 2sc) x 3, 1sc x 12 (30)
Round 13
(1sc x 5, 2sc) x 3, 1sc x 12 (33)
Round 14
1sc x 33 (33)
Round 15
(1sc x 6, 2sc) x 3, 1sc x 12 (36)

Round 16
(1sc x 7, 2sc) x 3, 1sc x 12 (39)
Round 17 -21
1sc x 39 (39)
Round 22
(1sc x 7, sc2tog) x 3, 1sc x 12 (36)
Round 23
(1sc x 6, sc2tog) x 3, 1sc x 12 (33)
Round 24
(1sc x 5, sc2tog) x 3, 1sc x 12 (30)
Round 25
(1sc x 4, sc2tog) x 3, 1sc x 12 (27)
Round 26
(1sc x 3, sc2tog) x 3, 1sc x 12 (24)
Round 27
(1sc x 2, sc2tog) x 6 (18)
Now insert the safety eyes around the level of round 11. Fill the head with toy safe stuffing, being careful not to push it in too tightly.
Round 28
(1sc, sc2tog) x 6 (12)
Round 29
sc2tog to close
Crochet Rhino Body
Your crochet rhino body will be made using your gray yarn and the 5mm crochet hook.

Round 1
Make a magic circle of eight stitches (8)
Round 2
2sc x 8 (16)
Round 3 – 4
1sc x 16 (16)
Round 5
(1sc, 2sc) x 8 (24)
Round 6
1sc x 24 (24)
Round 7
(1sc x 2, 2sc) x 8 (32)
Round 8 – 15
1sc x 32 (32)
Round 16
(1sc x 3, 2sc) x 8 (40)
Round 17
1sc x 40 (40)
Round 18
(1sc x 4, 2sc) x 8 (48)
Round 19 – 23
1sc x 48 (48)
Round 24
(1sc x 4, sc2tog) x 8 (40)
Round 25
1sc x 40 (40)
Round 26
(1sc x 3, sc2tog) x 8 (32)
Round 27
(1sc x 2, sc2tog) x 8 (24)
Round 28
(1sc, sc2tog) x 8 (16)
Fill with toy safe stuffing.
Round 29
sc2tog to close.
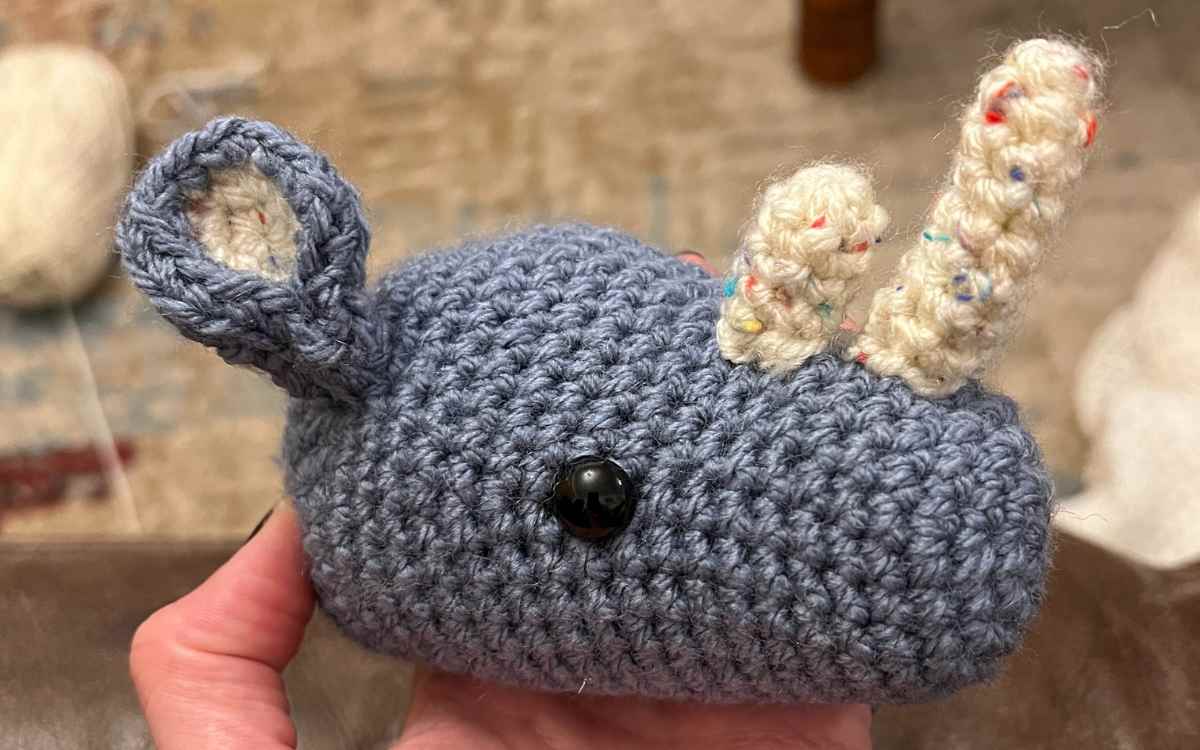
Crochet Rhino Horns
You will need to crochet two horns for your rhinoceros. They’ll both be made in your cream yarn, using the 5mm crochet hook.

Small Rhino Horn
Round 1
Magic circle of six stitches (6)
Round 2 – 5
1sc x 6 (6)
Slip stitch, tie off leaving a long tail of thread. Stuff the horn and set it to one side.
Big Rhino Horn
Round 1
Magic circle of three stitches (3)
Round 2
1sc x 3 (6)
Round 3 – 10
1sc x 6 (6)
Slip stitch, tie off leaving a long tail of thread. Stuff the horn and set it to one side with the other for sewing later.
Crocheted Rhino Ears
You’ll need the cream and gray yarns for the ears of the crochet rhino pattern. Begin in the cream color.

Round 1
Make a magic circle of six stitches (6)
Round 2
2sc x 6 cc (color change) to gray (12)
Round 3
(1sc, 2sc) x 6 into the front loop only (FLO) (18)
Round 4 – 5
1sc x 18 into the back loop only (BLO) (18)
Round 6
(1sc, sc2tog) x 6 (12)
Round 7
sc2tog to close, leaving a long yarn thread.
Flatten the ear so that the white circle is in the center, then pinch the bottom third together. Attach the yarn needle and sew the two sides together at this base section, to give that distinctive rhino ear shape.
How To Crochet Your Rhino Legs
Your rhino’s legs will also be made in the cream and gray yarns. You’ll start off with the cream color and your 5mm crochet hook again.
Round 1
Make a magic circle of six stitches (6)
Round 2
2sc x 6 (12)
Round 3
(1sc, 2sc) x 6 cc gray (12)
Round 4 – 5
1sc x 18 BLO
Round 6 – 21
1sc x 18
Fill the leg with toy stuffing, making sure you don’t stop the foot pad from being inverted slightly. Set the legs to one side, ready for sewing later.
How To Crochet A Rhino Tail
This section is a little different to the others. You’ll create your crochet rhino tail by using rows, not rounds. Work in your gray yarn, using the 5mm crochet hook.
Row 1
Make a chain of ten stitches
Row 2 – 3
Skip the first stitch, then put a single crochet in every stitch of the row
Now cut off a long train of yarn, and sew the final row to the original chain.
Sewing Your Crochet Rhino Together

When I join my crochet toys together the most important thing is symmetry. Begin by tacking the pieces together with a few loose stitches to make sure that the leg positions and ears are even.
Once you are happy with the positioning, tightly sew the limbs, ears and tail onto the body by weaving in and out of each piece and the area on the body where you want it to sit. For open ended pieces like the legs, ensure you get the needle through every stitch at the base round to get a tight seal for the stuffing.
My Crochet Rhino Pattern
I am really enjoying adding extra details to my more recent amigurumi patterns. This rhino is designed to be cute, of course, but also to have a realistic tone. I’d love to know what you think, and please do share your thoughts in the comments section or get in touch to share your photos on my Facebook page or Ravelry!
And if you’re already thinking about your next project, the elephant, chenille panda bear and hippo patterns go very well with this one!
Happy Crocheting!
Lucy Kate, x