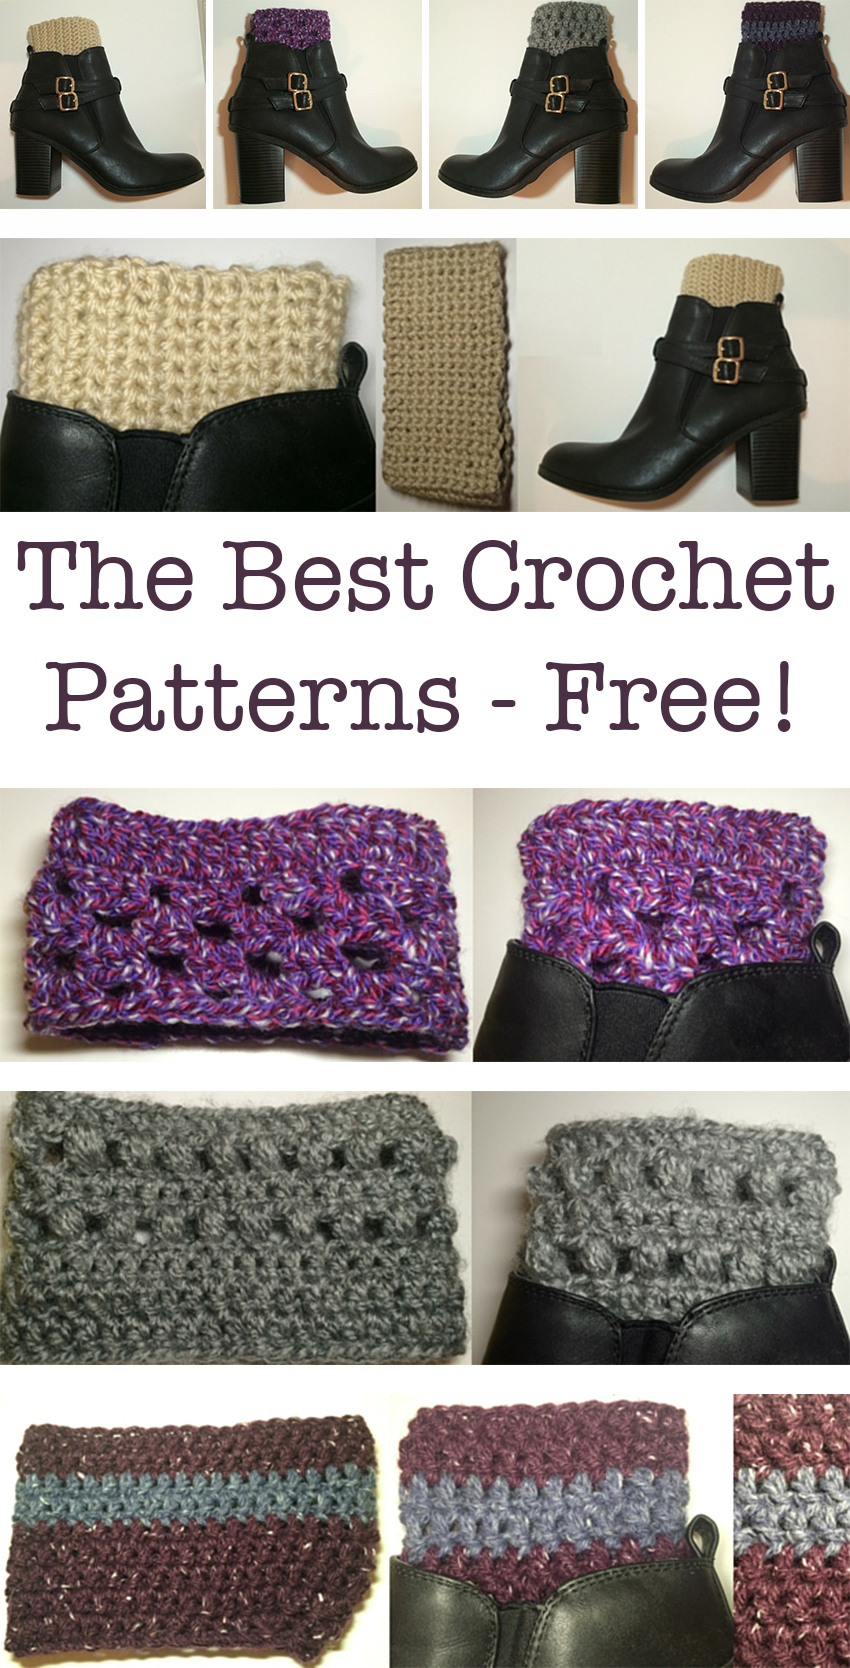
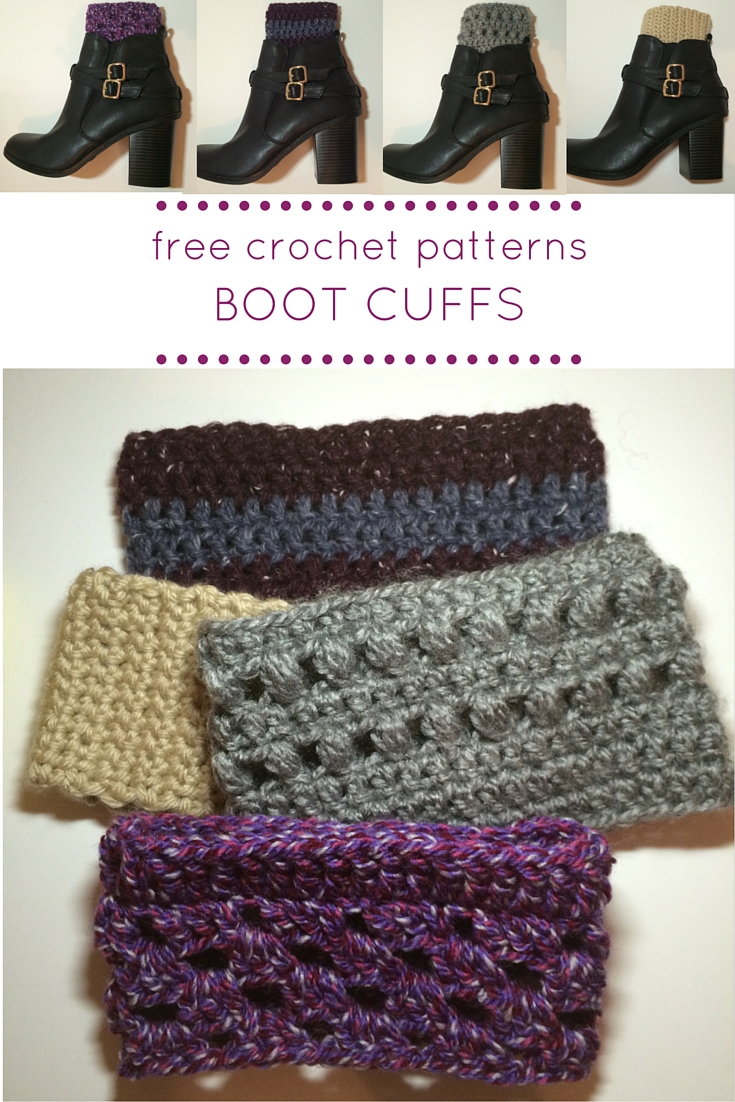
How To Crochet Boot Cuffs – 4 Free Patterns

These crochet boot cuff patterns are quick, simple to follow, don’t use a lot of yarn and are very beginner friendly. I’ll walk you through the entire process, showing you how to easily crochet your own stylish, fun boot cuffs.
Boot cuffs give the impression of a thick sock, raised lining or leg warmer under your shoe. Wear them raised a couple of inches above the rim of your boot for a funky crochet accessory to your wardrobe.
Crochet Boot Cuff Techniques
For the patterns below you will need to be comfortable with a few simple stitches and techniques.
They all require chains and slip stitches. Some make use of my current fad – the puff stitch. And for a few you will need to be happy with making a double crochet or a treble crochet.
Remember, in my patterns I always refer to US terms as that’s what I learned to crochet using and am most comfortable with. If you have trouble translating US to UK crochet terms, then check out this UK vs US double crochet article for clarification.
Sizing your Crochet Boot Cuffs
Before we begin, we need to have a little look at sizing your crochet boot cuffs. We all come in a fantastic range of shapes and sizes, and although boot cuffs have a certain amount of ‘give’ or stretch to them, these patterns were written for my calf sizes.
So you may have to adjust them to fit your own legs, and just as importantly your own boots!
Crochet boot cuffs and boot length
When I wrote these patterns I designed them to be worn with high leg boots, so I made the initial chain around the thickest part of my calf.
The boots I chose to picture the cuffs in (because they were a lot less scruffy!) are ankle boots, and to fit snugly into them the initial chain would obviously need to be considerably shorter than for my thigh.
How to size your crochet boot cuffs
Before you begin your crochet boot cuff, decide which pair of boots you want to wear them with. Pop the boots on and with a biro draw a mark on your leg where the top of the boot finishes. (That’s right – I am giving you, an adult, permission to draw on yourself.)
When you have a mark at the appropriate point on your leg, make the chain length instructed in the pattern. Take this chain and wrap it around your leg a couple of cm’s (an inch) above the biro mark.
- If the last chain reaches the first to form a fairly snug circle then carry on with the pattern.
- If the chain feels tight around your leg add links until it feels snug but not tight.
- If the chain feels like undo links until it sits snugly against your skin.
Remember, for different patterns using varying yarn types or hooks, you will need a different length of chain.
So repeat this process with each pattern you begin to make sure, and for the fitted crochet boot cuff pattern you will need a slightly different method. The fitted crochet boot cuff does not build from an initial looping chain, it increases row by row. In this case simply add rows until your cuff fits neatly around the appropriate part of your leg.
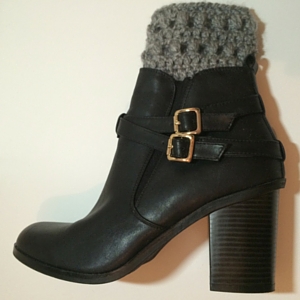
Granny Stitch Crochet Boot Cuffs
If you are a fan of the granny square, then this is the crochet boot cuff for you. This pattern reflects that traditional, still popular crochet pattern that we are all so fond of.
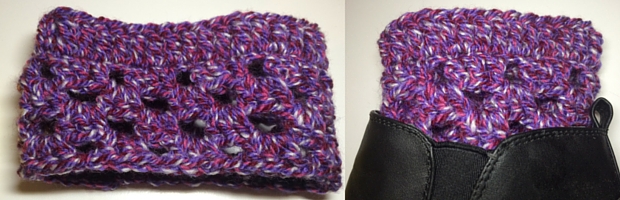
I have finished the pattern off with a simple border, which enhances the granny stitching with it’s simplicity.
Granny Stitch crochet boot cuffs equipment
For this pattern you will need a 7mm hook, 50g of yarn and some scissors.
The yarn I chose was the Sirdar Click Chunky. A wool blend in the Winter Violet colours. I am a real fan of this member of the Sirdar range and have used it for a lot of things lately.
It’s very cosy and the colours look even better in real life.

Granny stitch crochet boot cuffs pattern
Row 1 – Chain (ch) 40, slip stitch (sl st) into the first ch to make a circle.
Row 2 – Ch2, double crochet (dc) into the next 2 st. *Chain 1, then dc into the next 3 stitches. Repeat from * to rows end, then sl st to join and cut off leaving a long tail.
Row 3 to 5 – Ch2, double crochet (dc) into the next 2 st. *Chain 1, then dc into the next 3 stitches. Repeat from * to rows end, then sl st to join and cut off leaving a long tail.
Row 6 – Ch 3, Treble crochet (tr) into the next 39. Sl st to join at the end of the row.
Finally sew in all of your loose ends to finish.
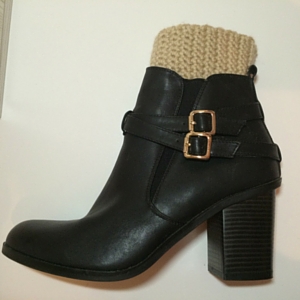
Fitted Crochet Boot Cuffs
The fitted crochet boot cuff has a repetitive pattern, forming a tight and tidy addition to your outfit.
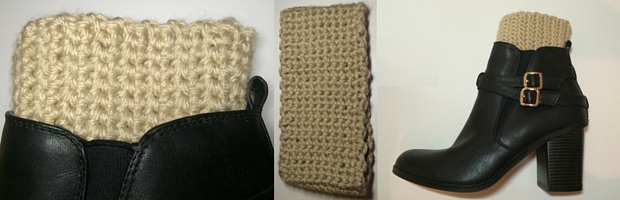
With this pattern the most important thing is to work on getting the stitches consistent, keeping the tension even in your yarn as you work so that it flows smoothly.
Fitted crochet boot cuffs equipment
For this crochet boot cuffs pattern you will require a 7mm hook, 50g of yarn and some scissors.
The yarn I chose was a double knit cream one, soft in texture, light but strong. You will find similar types in the Sirdar bonus range.
Fitted crochet boot cuffs pattern
Row 1 – Make a chain (ch) of 4 stitches (12 + 2 stitches)
Row 2 – Double crochet (dc) into the 3rd ch from the hook. Dc once into each subsequent chain in the row.
Row 3 – *Ch 3. Dc into the next 11 st.
Don’t forget to dc into the top of the chain at the row’s end, or you will find the pattern decreases in size as you continue.
Row 4 to 28 – Repeat from *
Row 29 – Decide which side of the crochet you want to be the outside, and face that side away from you. From the first stitch of the row, slip stitch into the comparative stitch on the original row. Slip stitch every stitch together in this manner. To finish leave a long train to sew in, and then turn the crochet boot cuff the correct way out.
Puff Stitch Crochet Boot Cuffs
The puff stitch crochet boot cuffs are some of my favourite. The variation in crochet techniques gives them a lovely texture.
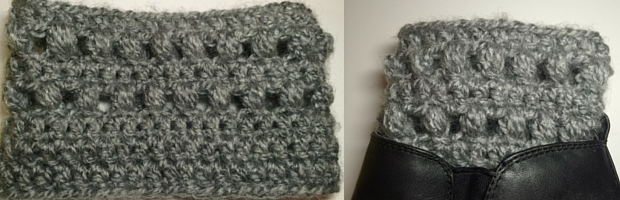
The yarn I chose is reminiscent of the 80’s leg warmers that boot cuffs can reflect.
Puff stitch crochet boot cuffs equipment
For this crochet boot cuffs pattern you will need a 7mm hook, 50g of yarn and some scissors.
The yarn I used was a standard grey double knit from my yarn scraps draw. I am afraid that I don’t know the brand- it was one I picked up several months ago and a garden centre and I am afraid to say I have lost the label. If I come across it again I will update this!
Puff stitch crochet boot cuffs pattern
Row 1 – Chain (ch) 38, slip stitch (sl st) to join as a circle
Row 2 – Ch2, then double crochet (dc) into each subsequent stitch. Sl st to join.
Row 3 – Ch2, *puff stitch into the next stitch, ch1, repeat from *. Sl st to join
Row 4 – Ch2, dc into each subsequent stitch. Sl st to join.
Row 5 – Ch2, *puff stitch into the next stitch, ch1, repeat from *. Sl st to join
Row 6 to 8 – Ch2, dc into each subsequent stitch. Sl st to join.
At the end of the row cut off and sew in the loose ends.
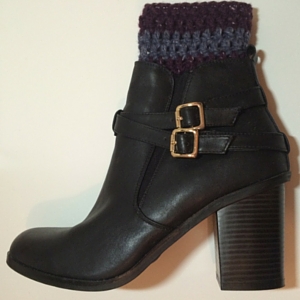
Striped Crochet Boot Cuffs
These crochet boot cuffs are more fitted than the others due to their increased length. I use mine to give an almost stocking-like effect. They can be worn a bit higher up the leg than the crochet patterns above.
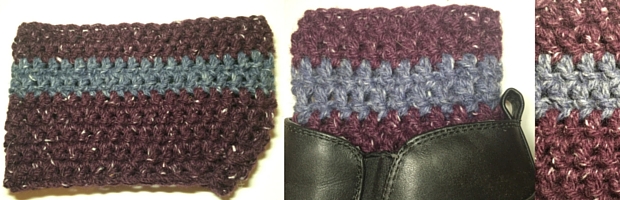
Or you can wear them lower with just the pattern peeking out, to give your leg a bit of extra warmth or padding in a less comfortable boot!
Striped crochet boot cuffs equipment
For this crochet boot cuffs pattern I used a 7mm hook, 50g of yarn in purple, 20g of yarn in grey and some scissors.
The yarn I used was Patons wool blend aran, in ‘burgundy tweed’ and ‘airforce colours’. This yarn has a slightly rougher texture, but isn’t abrasive. It’s also fairly close in texture so it’s nice and warm.
Striped crochet boot cuffs pattern
Row 1 – Chain (ch) 40, slip stitch (sl st) to join
Row 2 – Ch2, dc into each subsequent stitch. Sl st to join.
Row 3 – Ch2, dc into each subsequent stitch. Colour change. Sl st to join.
Row 4 – Ch2, dc into each subsequent stitch. Sl st to join.
Row 5 – Ch2, dc into each subsequent stitch. Colour change. Sl st to join.
Row 6 – Ch2, dc into each subsequent stitch. Sl st to join.
Row 7 to 8– Ch2, dc2tog x 3, dc into each remaining stitch in the row. Sl st to join.
Row 9 – Ch 2, dc2tog x 2, dc into each remaining stitch in the row. Sl st to join.
Crochet Boot Cuff Designs
Crochet boot cuffs are a fantastic crochet clothing accessory. Not just because they look great and provide that practical warmth, but because they are so versatile.
The patterns above are just four of my favourite simple crochet boot cuff patterns, but there are a host more possibilities.
If there is a stitch that you like, just make a loop with a chain and start building up the stitches.
Try mixing and matching various stitches, and see what you come up with. The crochet boot cuffs are small so even if it doesn’t work out, you haven’t wasted a lot of time or yarn. Remember, even when things go wrong when crocheting you learn something.
Another great way to build boot cuffs if you aren’t so keen on making up your own pattern, is to use the pattern given for another product. For example a blanket. All you need to do is take the pattern and apply it to that circular chain, or simply continue the rows until they are the right length to fit around your leg and slip stitch to join.
Have fun and as always,
Happy Crocheting! x