Free Crochet Unicorn Pattern
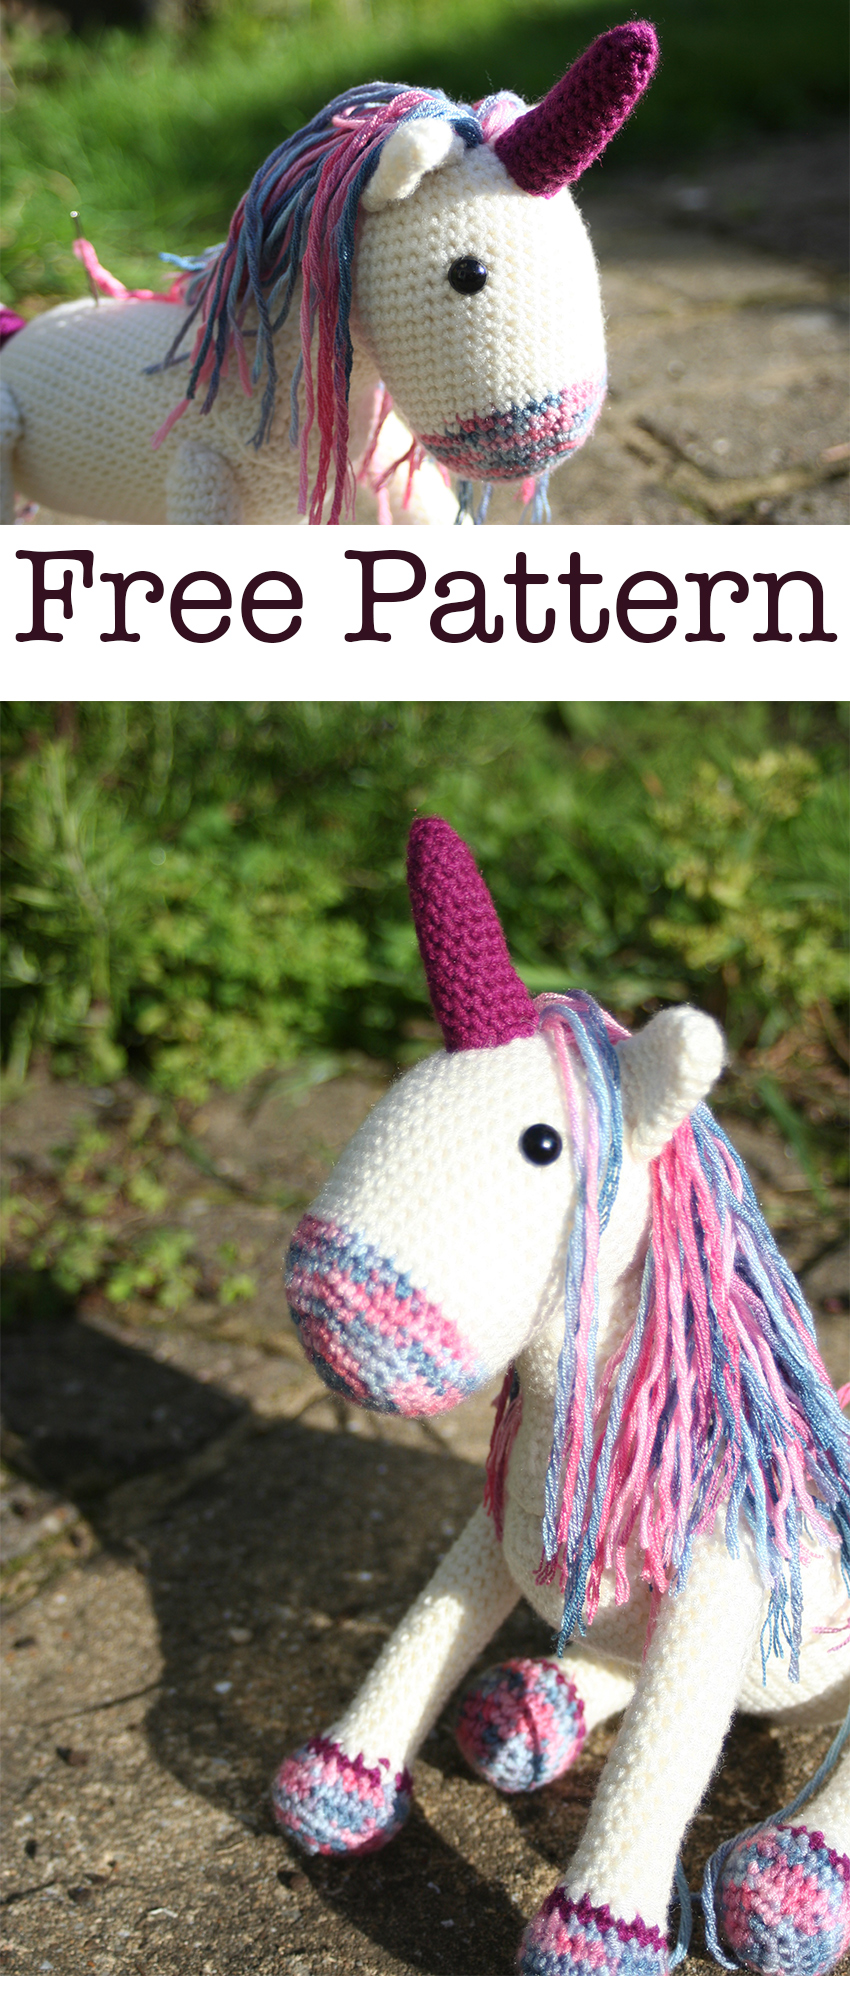
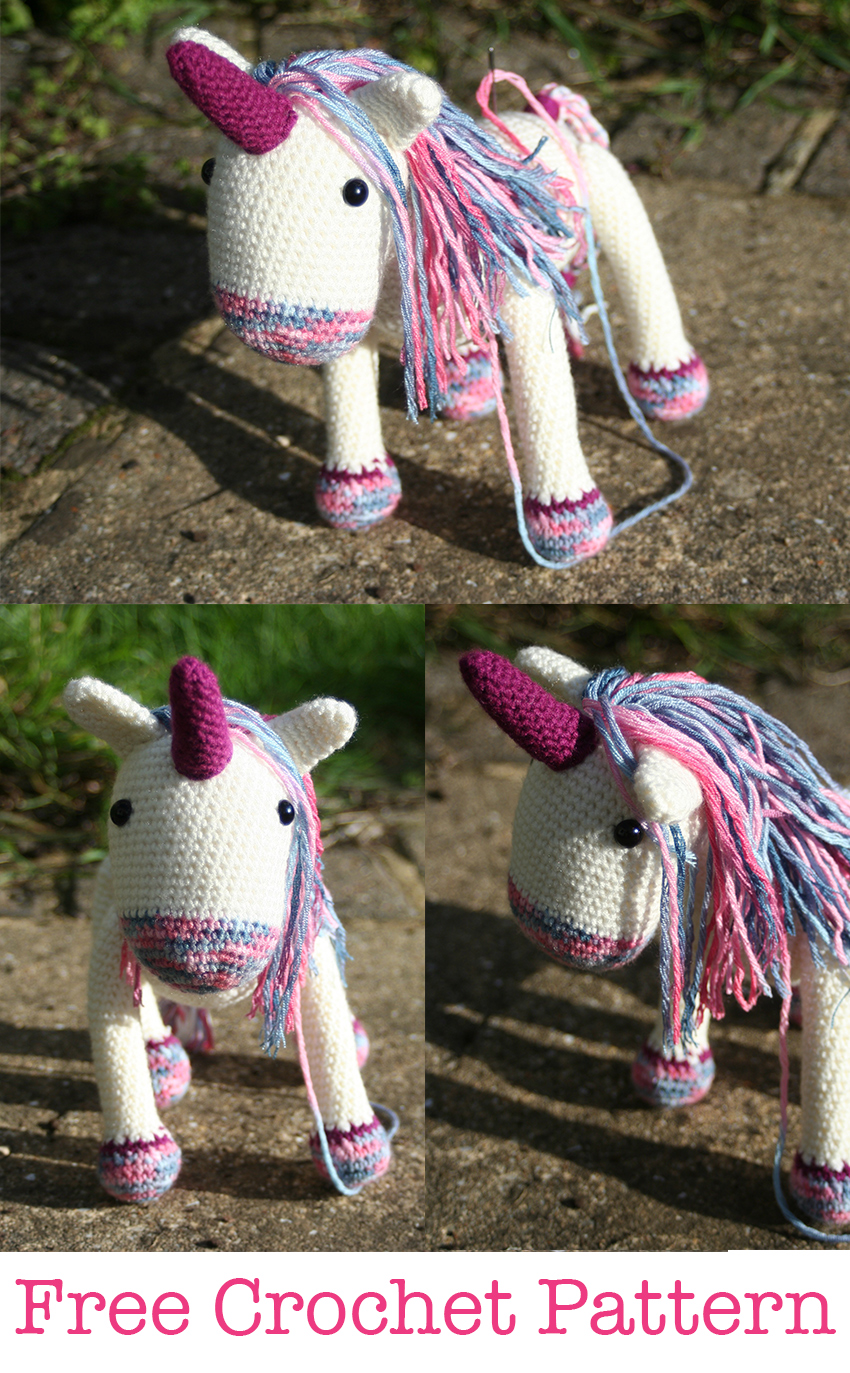
This free crochet unicorn pattern comes complete with step by step instructions, to make your crocheting as simple as possible. Crochet beginners should be able to use this pattern easily with the aid of my tutorials, and it’s a lovely first animal to create for your collection.
Love unicorns? You might also love my classic crochet unicorn and the easy squishy unicorn patterns.
Crochet Unicorn Equipment
You will need the following equipment to make your own crochet unicorn toy:
- Size G / 4mm Crochet HookPaid Link
- 100g DK Lilac Mix Yarn (Patons DK Smoothie Lilac MixPaid Link)
- 100g DK Purple Yarn (Patons DK Smoothie MagentaPaid Link)
- 100g DK Cream Yarn (Patons DK Smoothie CreamPaid Link)
- Toy StuffingPaid Link
- Steel Yarn NeedlePaid Link
Patons Smoothie DK yarn can be a little hard to get hold of in the USA. Here are some suggested alternatives if you can’t find any in your area:
- Lilac Mix YarnPaid Link (Worsted, for the mane/tail)
- Dark Purple DK YarnPaid Link
- Cream DK YarnPaid Link
Crochet Unicorn Pattern Notes
The crochet unicorn pattern below is going to produce the individual pieces you will need to construct your very own crochet unicorn toy. The body, head and legs are all built from magic circles, and involve some color changes along the way.
If you are unfamiliar with crochet abbreviations or need an extra hand getting to grips with some of the techniques then check out my beginners’ tutorials using these links.
Free Crochet Unicorn Pattern
Begin using your 4mm crochet hook, and start in the Lilac Mix yarn.
Round 1
Make a magic circle of 6 stitches. (6)
Round 2
Put two single crochets (2sc) into each stitch of the round. (12)
Round 3
Put 1sc into the first stitch, then 2sc into the next. Repeat six times.
(1sc, 2sc) x 6. (18)
Round 4
(1sc x 2, 2sc) x 6. (24)
Round 5
(1sc x 3, 2sc) x 6. (30)
Round 6
(1sc x 4, 2sc) x 6. (36)
Round 7 – 9
Put 1sc into each stitch. At the final stitch of round 9, color change to Cream. (36)
Round 10 – 15
Make 1sc in each stitch for the round. (36)
Round 16
(1sc x 5, 2sc) x 2, 1sc in each stitch to the end of the round. (38)
Round 17
(1sc x 6, 2sc) x 2, 1sc in each stitch to the end of the round. (40)
Round 18
(1sc x 7, 2sc) x 2, 1sc in each stitch to the end of the round. (42)
Round 19 – 25
Put 1sc into each stitch of the round. (42)
Round 26
(1sc x 5, sc2tog) x 6. (36)
Round 27
(1sc x 4, sc2tog) x 6. (30)
Round 28
(1sc x 3, sc2tog) x 6. (24)
Add The Eyes
Insert safety eyes into the front of the unicorn’s head. Leaving the sloped section underneath, forming her jaw line.
Round 29
(1sc x 2, sc2tog) x 6. (18)
Round 30
(1sc, sc2tog) x 6. (12)
Fill with toy safe stuffing.
Round 31
Sc2tog six times.
Sew closed and leave a long thread of yarn.
Crochet Unicorn Horn Pattern
Begin with your 4mm crochet hook and Magenta DK yarn.
Round 1
Make a magic circle of 3 stitches (3)
Round 2
Make 2sc in each stitch (6)
Round 3
(1sc, 2sc) x 3. (9)
Round 4 – 10
Put 1sc in each stitch. (9)
Round 11 – 13
Make 2sc, then 1sc in the remaining stitches (10)
Round 14
1sc in each stitch for the round. (10)
Tie off and leave a long length of yarn.
Stuff the horn fully. Don’t let the stitches become stretched out.
Using a steel yarn needle, attach the horn to the head just above the eyes.
How To Crochet Unicorn Ears
Begin with the 4mm crochet hook in the Cream yarn.
Round 1
Make a magic circle of 5 stitches (5)
Round 2
Put 2sc in each stitch (10)
Round 3 – 7
Make 1sc in each stitch. (10)
Round 8
(1sc, 2sc) x 5. (15)
Round 9
Put 1sc in each stitch. (15)
Crochet Unicorn Neck
Begin with the 4mm crochet hook using your Cream yarn.
Round 1
Make a chain of forty two stitches, then slip stitch to join.
Round 2 – 3
Ch2, then make 1sc into each stitch. Sl st to join at the end of the round.
Round 4
Ch2. (1sc x 5, sc2tog) x 6. Sl st to join.
Round 5
Ch2. (1sc x 4, sc2tog) x 6. Sl st to join.
Round 6
Put 1sc in each stitch
Round 7
Ch2. (1sc x 3, sc2tog) x 6. Sl st to join.
Round 8 – 13
Put 1 sc in each stitch. Cut off and leave a long tail.
Crochet Unicorn Body
Begin with your 4mm crochet hook and Cream DK Smoothie yarn.
Round 1
Make a magic circle of six stitches. (6)
Round 2
Put 2sc into each stitch. (12)
Round 3
(1sc, 2sc) x 6. (18)
Round 4
(1sc x 2, 2sc) x 6. (24)
Round 5
(1sc x 3, 2sc) x 6. (30)
Round 6
(1sc x 4, 2sc) x 6. (36)
Round 7
(1sc x 5, 2sc) x 6. (42)
Round 8 – 35
Put 1sc into each stitch. (42)
Round 36
Make 1sc in the first five stitches, then single crochet the next two stitches together. Repeat five further times. ( (1sc x 5, sc2tog) x 6 ) (36)
Round 37
(1sc x 4, sc2tog) x 6. (30)
Round 38
(1sc x 3, sc2tog) x 6. (24)
Round 39
(1sc x 2, sc2tog) x 6. (18)
Fill with toy safe stuffing.
Round 40
(1sc, sc2tog) x 6. (12)
Round 41
sc2tog six times to close.
Cut off and leave a long tail of yarn
Crochet Unicorn Front Legs
Make two crochet unicorn front legs.
Begin with your 4mm crochet hook and the Lilac Mix yarn.
Round 1
Make a magic circle of 6. (6)
Round 2
Put 2sc in each stitch. (12)
Round 3
(1sc, 2sc) x 6. (18)
Round 4
(1sc x 2, 2sc) x 6. (24)
Round 5 – 6
Put 1sc in each stitch. (24)
Round 7
(1sc x 2, sc2tog) x 6, cc to Magenta at the end of the round. (18)
Round 8
Put 1 sc in each, cc to Cream at the end of the round. (18)
Round 9
(1sc, sc2tog) x 6 (12)
Round 10 – 31
1sc in each stitch. (12)
Fill the hoof and leg with toy stuffing.
Round 32
sc2tog to close. Tie off, leaving a long end for sewing the leg to the body later.
Crochet Unicorn Back Legs
Make two back legs using the following pattern:
Begin with the Lilac Mix yarn and your 4mm crochet hook.
Round 1
Make a magic circle of 6 stitches. (6)
Round 2
Put 2sc in each stitch. (12)
Round 3
(1sc, 2sc) x 6. (18)
Round 4
(1sc x 2, 2sc) x 6. (24)
Round 5 – 6
Put 1sc in each stitch. (24)
Round 7
(1sc x 2, sc2tog) x 6, cc to Magenta at the end of the round. (18)
Round 8
Put 1 sc in each, cc to Cream at the end of the round. (18)
Round 9
(1sc, sc2tog) x 6 (12)
Round 10 – 28
Put 1sc in each st (12)
Round 29
(1sc, 2sc) x 6 (18)
Round 30
(1sc x 2, 2sc) x 6 (24)
Round 31
(1sc x 2, sc2tog) x 6 (18)
Round 32
(1sc, sc2tog) x 6 (12)
Fill to the top of row 28 with toy stuffing
Round 33
Sc2tog until closed
Crochet Unicorn Tail
To make your unicorn tail, take two strands of yarn. One strand from your cream ball and one from your multicoloured ball. Thread a sharp steel yarn needle and pull through at the top of the unicorn’s bottom. Pull a length through to midway, which is approximately the height of the crochet unicorn toy standing. Cut off the length and repeat.
When you have a thick collection of strands in this area, take your dark purple yarn and wind it around the base. To secure loop it a few times through itself. Do this at the side which won’t be on display, just underneath the tail.
I then took sections of the tail in groups of three and braided them together. I collected the braids and wrapped another long strand of dark purple yarn around at the base to secure.
Creating The Unicorn’s Mane
Your crochet unicorn mane is made similarly to the tail. Bring strands of yarn through using your needle, cutting them at matching lengths. Sew the hair from the unicorn’s forehead, working down the neck. Make the insertion points gradually closer together as you decend the neck.
Crochet Unicorn Toy Safety
Crochet toys are not recommended for kids under three years old. The crochet unicorn described here was made for an adult as a decoration piece, in place of a lost beloved childhood toy. It was therefore not designed with child safety in mind. But don’t worry if you would like your crochet unicorn to act as a toy, there are a few adjustments you can make.
Although the eyes are safety eyes and therefore shouldn’t come out and act as a choking hazard, the unicorn shown here has hair that is woven in loosely. It could therefore be pulled out.
If you want to create the same unicorn with sturdier hair, I recommend braiding it in the same way as the tail and tying off in groups along the neckline. This will make the hair harder to remove.
Make sure that your stitching is very thorough at the joints and sacrifice any movement in the legs for posing in order to get the tightest seam possible.
Gentle supervised play should then therefore be absolutely fine for over 3’s. My daughter plays and sleeps with a collection of the crochet animals you will find on this site, and they can make treasured toys as well as creative decorative objects.


She is beautiful!
Thanks Gillian, I am glad you like her 🙂
It looks brilliant. Can’t wait to get started.
I’m new to crochet and self taught. I’ve made single blankets useing my interpretation of single crochet stitch. But I’m now wanting to crochet properly as the toys look wonderful.
That’s great, Maria! Do let me know how you get along 🙂
This is beautiful never done anything like this but I am going to try
How big is this unicorn
Hi Paula, I am afraid that I didn’t measure him before he went to his new home. To my recollection though he’s very roughly 20cm tall. One of the larger toys I have made.
Sorry I can’t be more help right now. I will update the article next time I make one though. Best wishes, Lucy Kate.
Love him!! cant wait to finish sewing all the pieces together but can’t find instructions it’s especially the neck that I don’t understand it’s placement is it just me or is there no making up instructions
Thank you again
Hi Jackie, Thanks for your comment. You are absolutely right – I have no idea how I missed this off! I don’t have time to go through it right now I am afraid and write up a description, but it is exactly the same construction as the crochet horse. You can find the joining instructions for the horse here: https://lucykatecrochet.com/crochet-horse Sorry about that and I will write up the unicorn’s instructions asap! Lucy Kate, x
I .like to read through the pattern before I start a project. I’m confused as I can’t find the instructions for finishing off and stitching together. The neck seems extraordinarily large and I can’t visualise his thus guts onto the head and body.
Any advice will be greatly appreciated.
Kind Regards
Anne
Hi Anne,
The wide end attaches to the body. It forms the arc of the neck and almost slots onto the entire end of the body. It’s the give the horse-like slope to the neck.
The thin neck end then attaches onto the head.
I will check out what happened to the sewing instructions!
Best wishes, Lucy
Thanks for the reply. I’ve looked at your crochet horse as you suggested to another query and it all makes sense. However, I am stuck with the mane; there are 9 sets at the end of row 10 so rows 11-13 read, make 2sc then 1sc in each stitch (10). I am reading this as an increase which would be 12 sts at end of row 13, but Row 14 has 10 sts. Will you explain this to me please. I just can’t figure it out.
Kind Regards
Anne