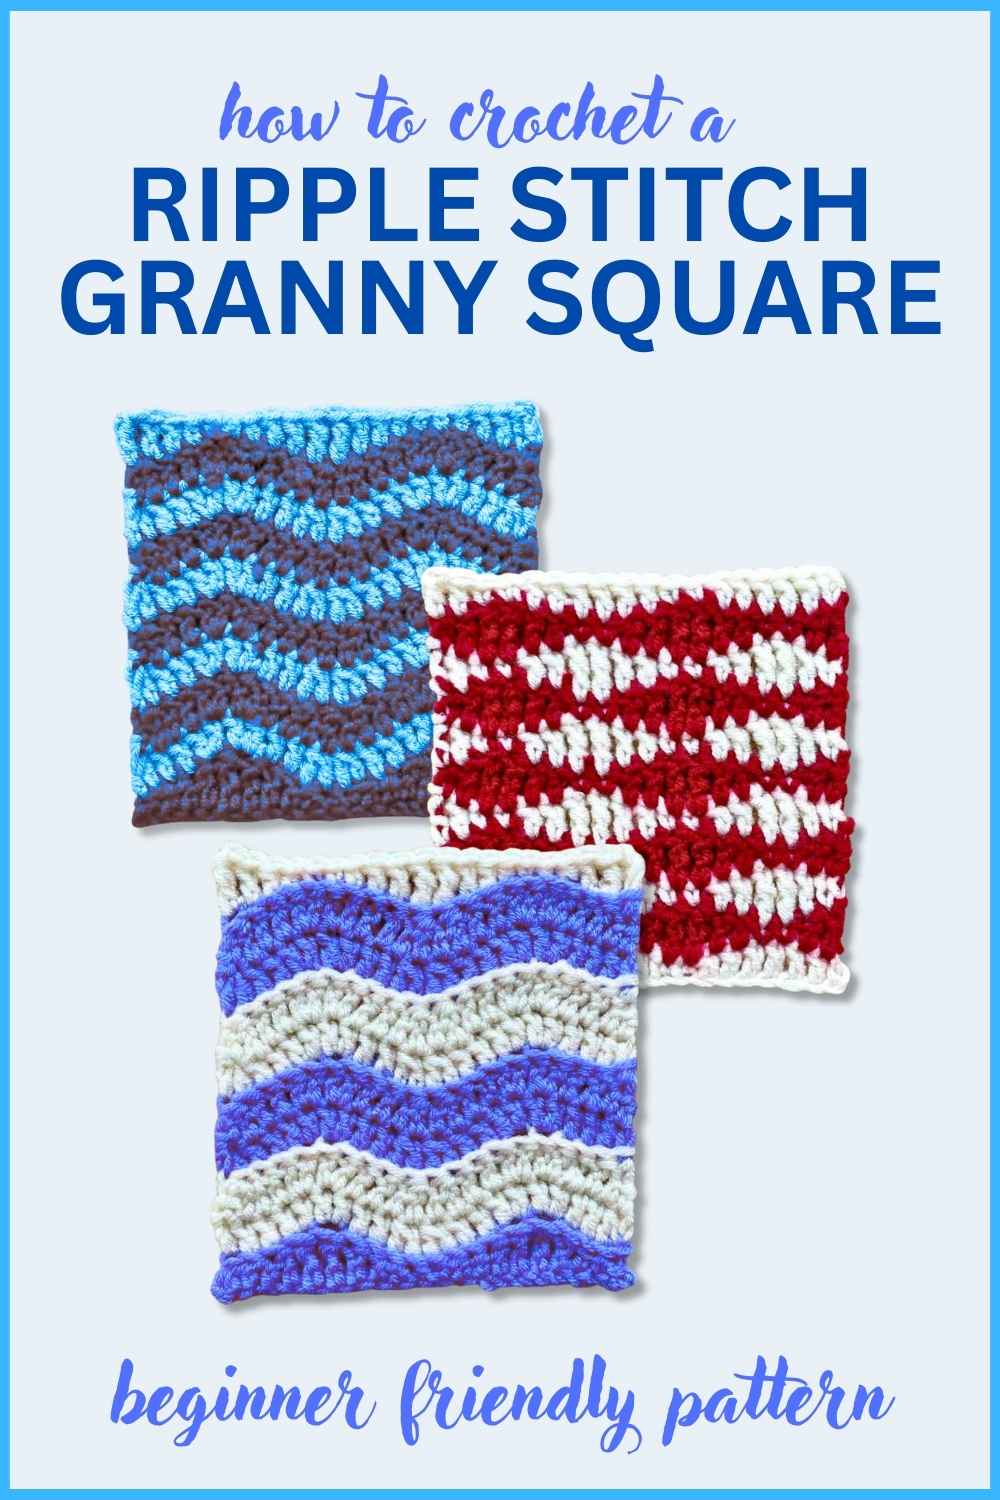
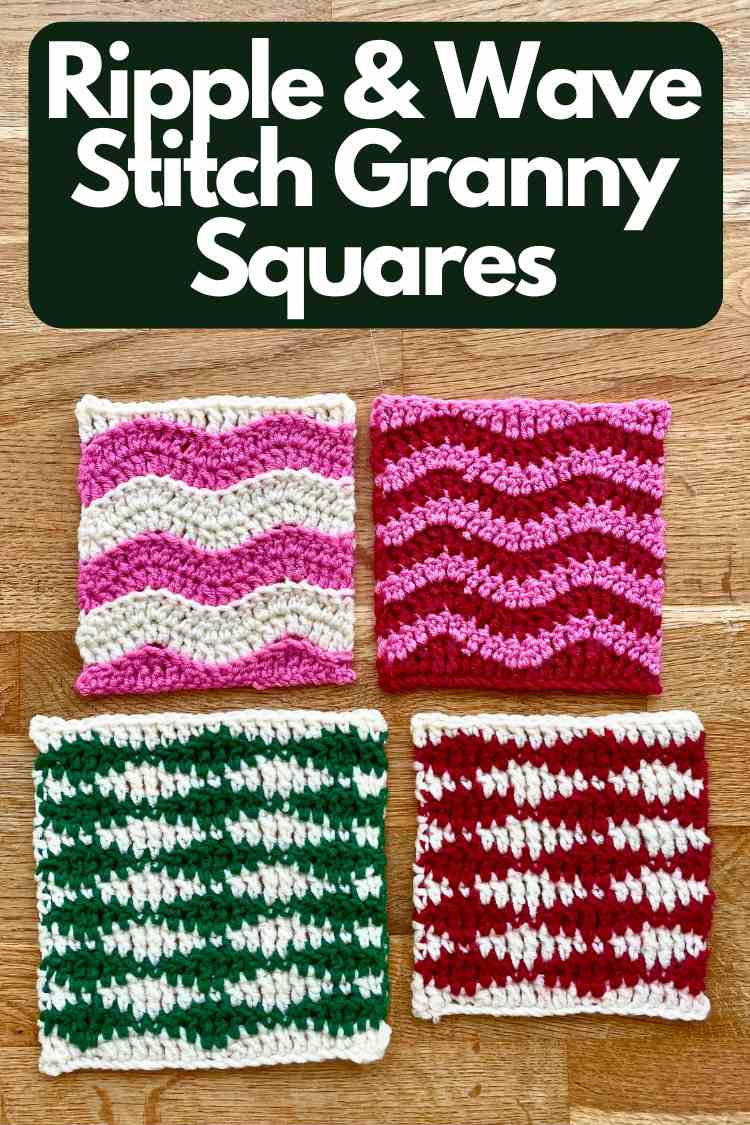
4 Ways To Make Ripple Stitch And Wave Stitch Granny Squares
Hello and welcome to my quick guide to making ripple stitch and wave stitch granny squares. Ripple stitch and wave stitch patterns are gorgeously curvy and undulating. When you use them inside granny squares, they provide a striking visual contrast to the straight edges and sharp corners of the square itself. Perfect for making eye-catching blankets, throw pillows or tote bags!
I also love them for how meditative they are to make – they are simple enough to let your mind wander at the same time, but not so basic as to be monotonous to work on.
Take me straight to the patterns!
I’ve got some pretty nerdy things to say about adapting ripple stitch and wave stitch pattern for use on a granny square scale. And I’m going to share them all, so that you can get the best out of these patterns, and even adapt them for your own project if you need to. But if you don’t want to read them, these links will take your straight to the patterns:
- Simple ripple pattern granny square
- 3D ripple granny square
- Simple wave pattern granny square – single row repeat
- Improved wave pattern granny square – two row repeat
Ripple stitches and wave stitches
First things first, what are ripple stitches, what are wave stitches, and how do you tell them apart?
Ripple stitch patterns look like rows of slightly rounded-off zigzags. All the stitches are the same length (usually double crochets) and the wiggly pattern is achieved using increases and decreases. The top and bottom edges of each row run parallel with each other.
Wave stitch patterns look like stacks of smoothed-off diamond shapes. Each row has an oscillating pattern of taller and shorter stitches, so the top and bottom edges get closer together and further apart each time the pattern repeats.
In short –
Ripple stitch: stitches all the same height, curves achieved with increases and decreases.
Wave stitch: stitches in several different heights, no increases or decreases.
Using wave stitch and ripple stitch in granny squares
Variations of wave stitch and ripple stitch have existed in crochet for a loooooooong time. They’re popular choices for blankets, because they’re simple to make, but produce visually arresting results. And there are literally hundreds of tutorials for replicating the classic ripple stitch pattern and wave stitch pattern elsewhere online. But I’m interested in how to get the most out of them on a small scale, in granny squares. If you’re planning a granny square project using ripple or wave patterns, there are a few things to consider:
1. Scale
Ripple and wave patterns are usually based on a repeating pattern of 14 stitches (give or take). But a traditional 4” granny square made in DK yarn is usually only about 16 stitches across. So you won’t get enough pattern repeats for the ripples or waves to really reveal themselves. To achieve a more effective result, you either need to make bigger than usual squares, or adapt the pattern to fit more ripples or waves into the same space.
Coming up down below is my solution for fitting a nice tight ripple or wave pattern into a standard granny square. It’s all about matching the scale of the pattern to the size of the square!
2. Pattern placement
Most traditional wave stitch patterns are based on a single repeating row. But I’m going to show you how using a pattern with two repeating rows can result in better pattern placement and a more versatile design for granny squares.
3. Getting straight edges
Usually with ripple stitch and wave stitch the top and bottom edge of the work are wavy. For blankets that’s no big deal – it’s a nice design feature in fact. But for granny squares it’s no good, because it makes it difficult to join those edges quickly and neatly. To give my granny squares four straight edges, there are special instructions for the first and last rows.
4. Getting strong edges
Finally, we want the vertical edges of our squares to be strong and straight too, so that we can join them securely without worrying about stretching or distortion. I love to achieve this using stacked single crochets at the start of each row instead of turning chains. I’ll show you how to do that now, before we go on.
Starting rows with stacked single crochets
Using stacked single crochets in place of turning chains at the beginning of a row creates a strong, straight edge. And they’re so easy you’ll hardly ever want to use a turning chain again!
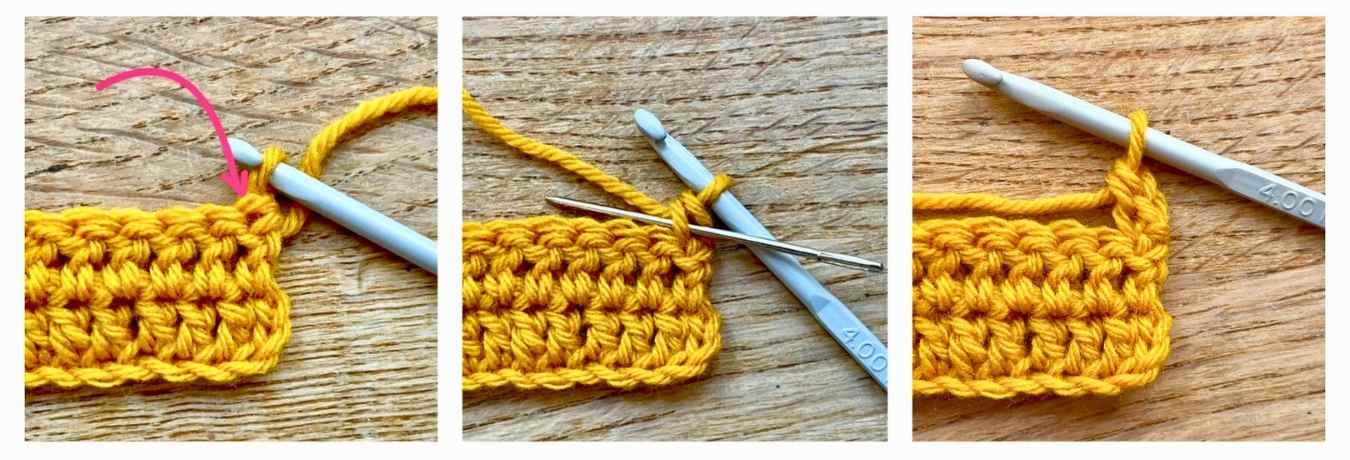
- At the beginning of your new row, make a single crochet straight into the top of the first stitch (below left). Note – there’s no turning chain first.
- Next insert the hook under the left leg of that single crochet (below center).
- And make another single crochet (below right). The result is a stitch about the same height and width as a regular double crochet stitch.
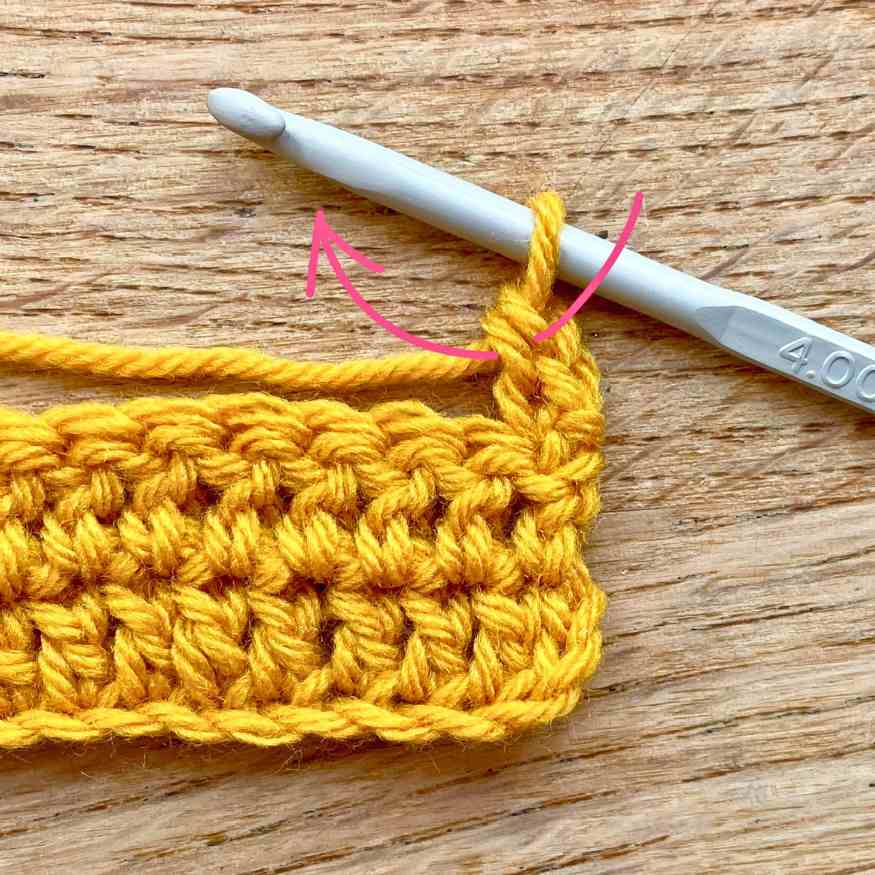
To make a stacked treble crochet, just insert the hook into the left leg of the top single crochet (indicated by the arrow below) and make another single crochet.
NOTE: This technique doesn’t work for the first row. If you try and single crochet into the closest chain to the hook of a foundation chain, that chain stitch will just unravel! So, the first row of my granny squares include some turning chains, which don’t count as stitches in the next row.
The patterns
Right, let’s get stuck into some granny squares! The stitches and their abbreviations you’ll need to know are:
St(s) Stitch(es)
Ch Chain
Sk Skip
Sc Single crochet
Hdc Half treble crochet
Dc Double crochet
Tr Treble crochet
Lucy’s written details on these basic stitches here. For the ripple patterns I’ve also used the following:
Inc Increase (make two double crochets in the same space)
Dc2tog Double crochet two together
If you’re not familiar with the double crochet two together instruction, it goes like this:
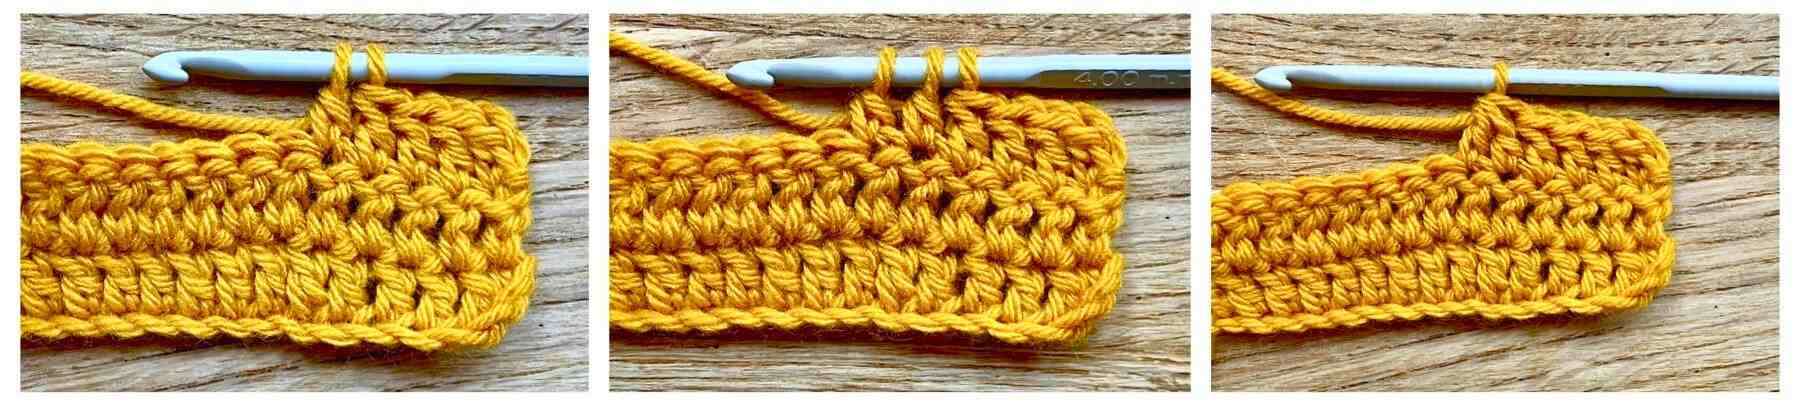
- Start a double crochet stitch in the next space, but stop with two loops still left on the hook (below left).
- Repeat exactly the same steps in the next stitch (below center).
- You’ll have three loops left on the hook. Put the yarn over your hook, and draw it through all three loops (below right).
You can even decrease with the stacked single crochets at the start of a row. Make the first single crochet as usual, then pull the yarn through its left leg, and stop there without finishing the second single crochet. Then start another double crochet in the next stitch, and pick up from step 2 above.
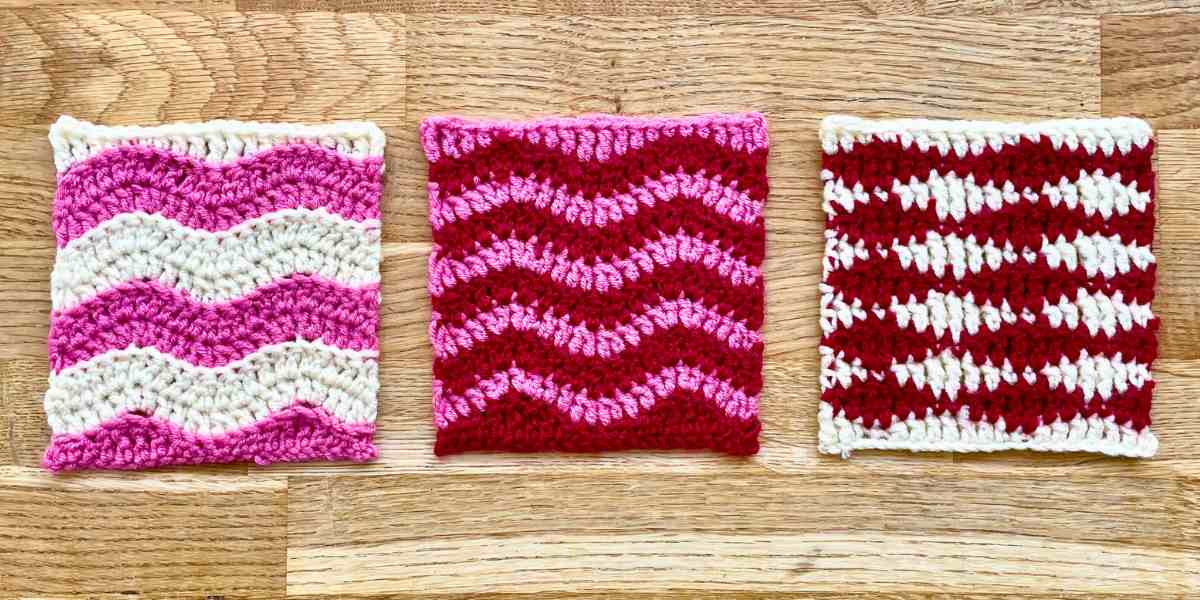
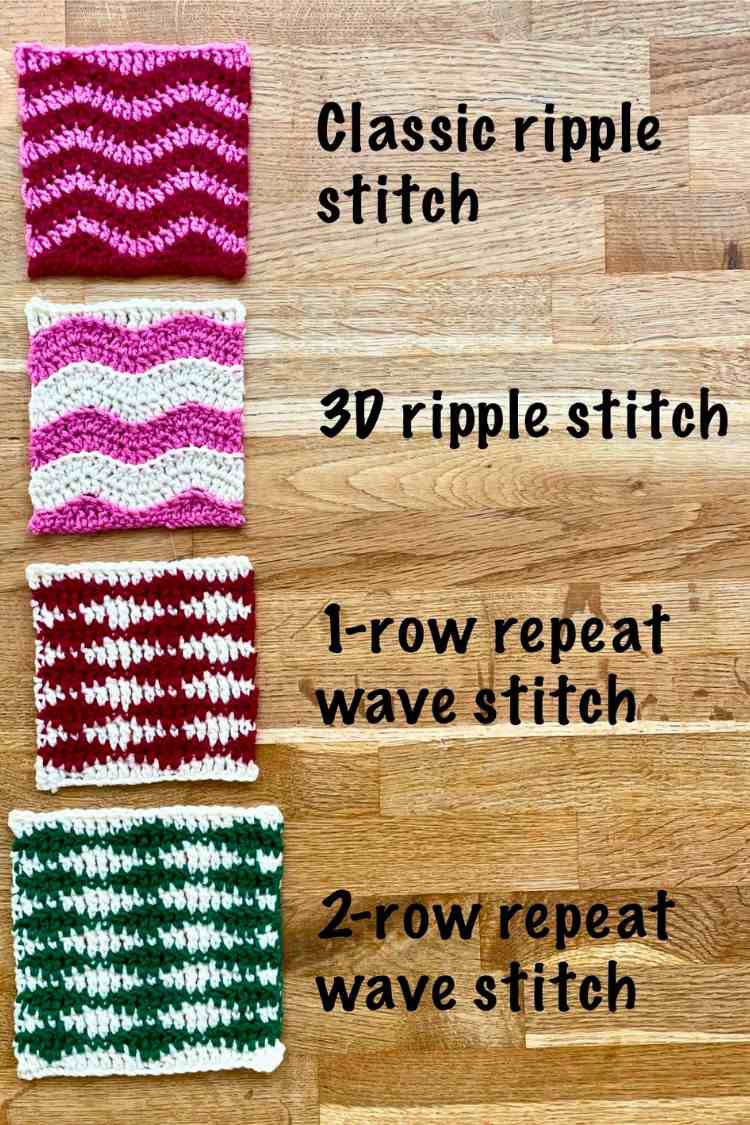
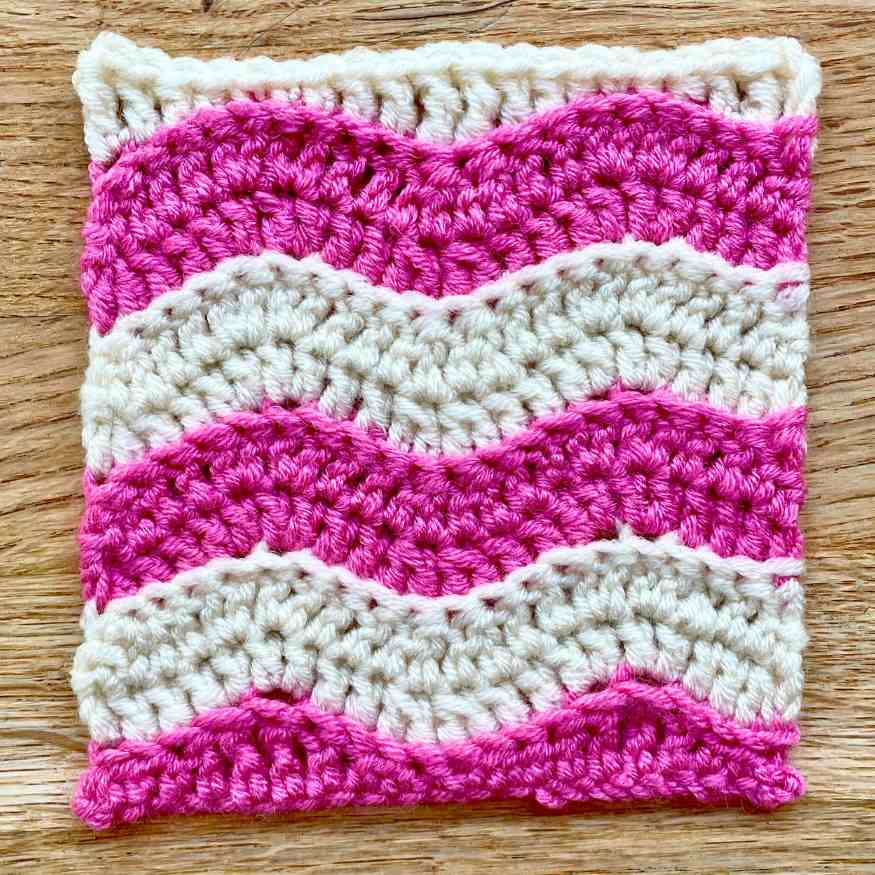
Simple ripple pattern granny square
This is a simple single row repeat for the most part, but as for all these squares, it needs a special top and bottom row to give it straight edges.
- Foundation chain: Multiple of 10, plus 1. I’ve used 21 sts.
- Row 1: Sk 1, *sc, hdc 2, dc, tr 2, dc, hdc 2, sc* to end. Change color.
- Row 2: *Dc2tog, dc 2, inc 2, dc 2, dc2tog* to end. Change color.
- Repeat row 2 until your granny is just shy of square.
- Final row: *Tr, dc 2, hdc, sc 2, hdc, dc 2, tr* to end.
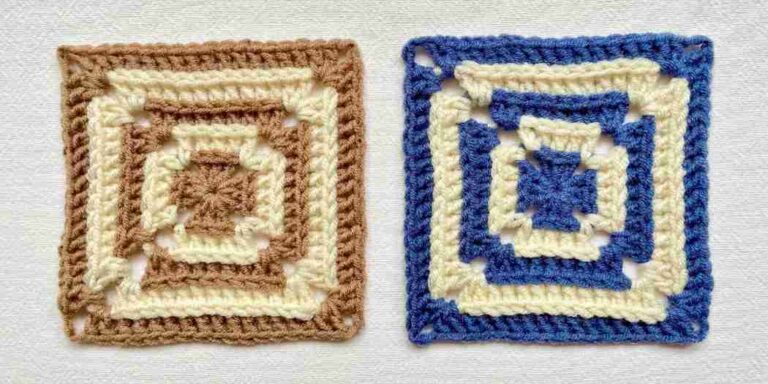
3D ripple granny square
This is a really easy twist on the pattern above, and it looks so effective. The only bummer is, I just can’t get a photo that does it justice! It’s not a bulky 3D effect, it’s a subtle one where each ripple looks like it slightly overlaps the previous one. Quite simply, it elevates them into *real* ripples, and I love it.
- Foundation chain: Multiple of 10, plus 1. I’ve used 21 sts.
- Row 1: Sk 1, *sc, hdc 2, dc, tr 2, dc, hdc 2, sc* to end. Change color.
- Row 2: Working into the back loops only of the previous row: *dc2tog, dc 2, inc 2, dc 2, dc2tog* to end.
- Row 3: Working into both loops of the previous row: *dc2tog, dc 2, inc 2, dc 2, dc2tog* to end. Change color.
- Repeat rows 2 and 3 until your granny is just shy of square.
- Final row: Working into the back loops only of the previous row: *tr, dc 2, hdc, sc 2, hdc, dc 2, tr* to end.
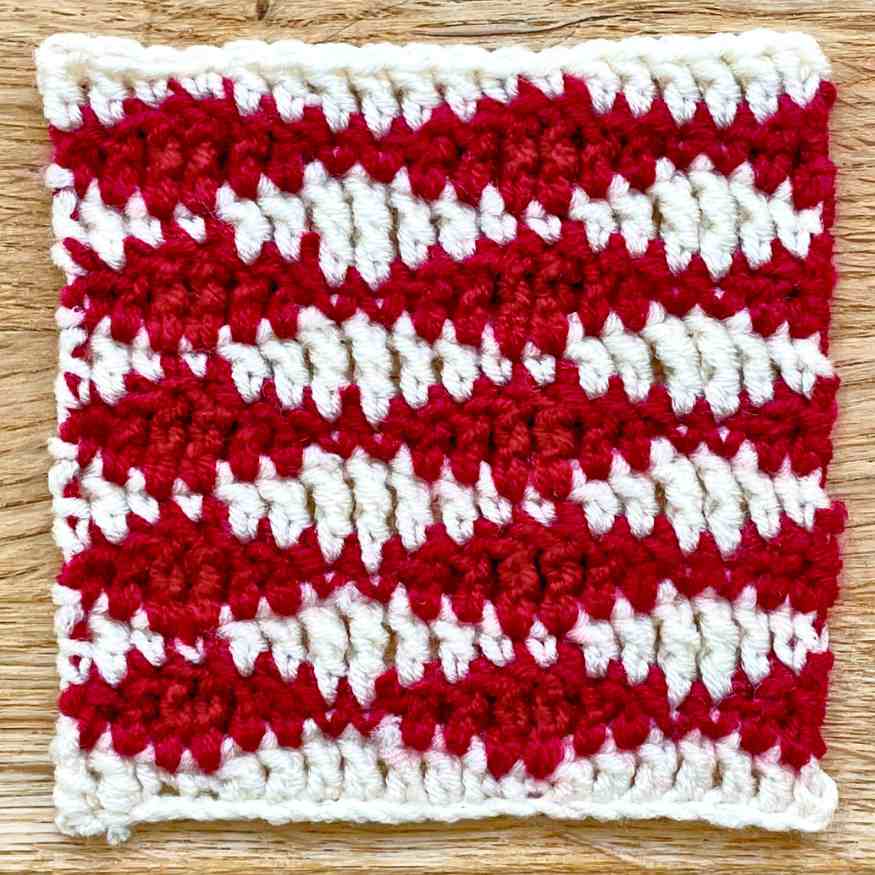
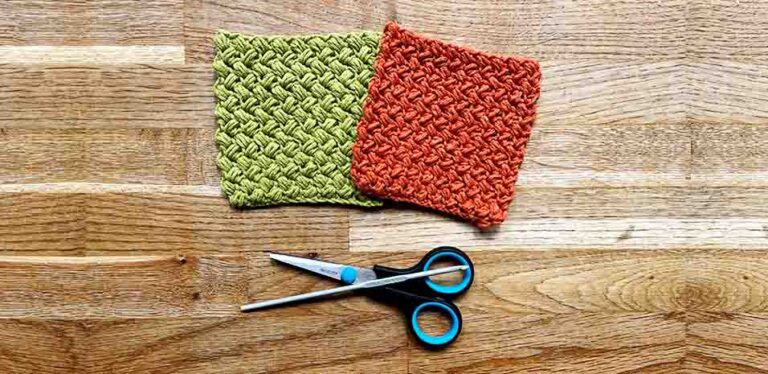
Simple wave pattern granny square – single row repeat
Now let’s look at the wavy designs. This single row repeat is the classic wave stitch pattern. It would do the job for a granny square project showcasing a different design in every square, but in every other respect I think the alternative approach below is better!
- Foundation chain: Multiple of 8, plus 4. I’m using 20 stitches.
- Row 1: Sk 2, *dc 6, sc 2* to two stitches from end, dc 2. Change color.
- Row 2: *Dc 2, tr 2, dc 2, sc 2* to two stitches from end, dc 2. Change color.
- Repeat row 2 until your granny is just shy of square.
- Final row: *Dc 6, sc 2* to two stitches from end, dc 2.
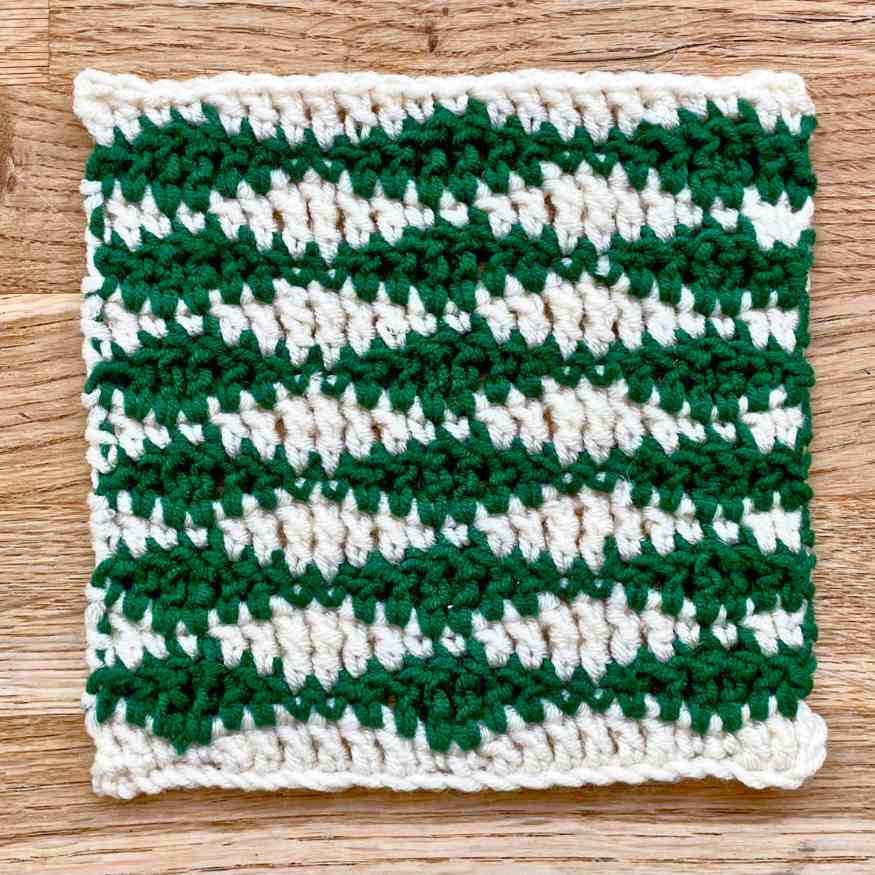
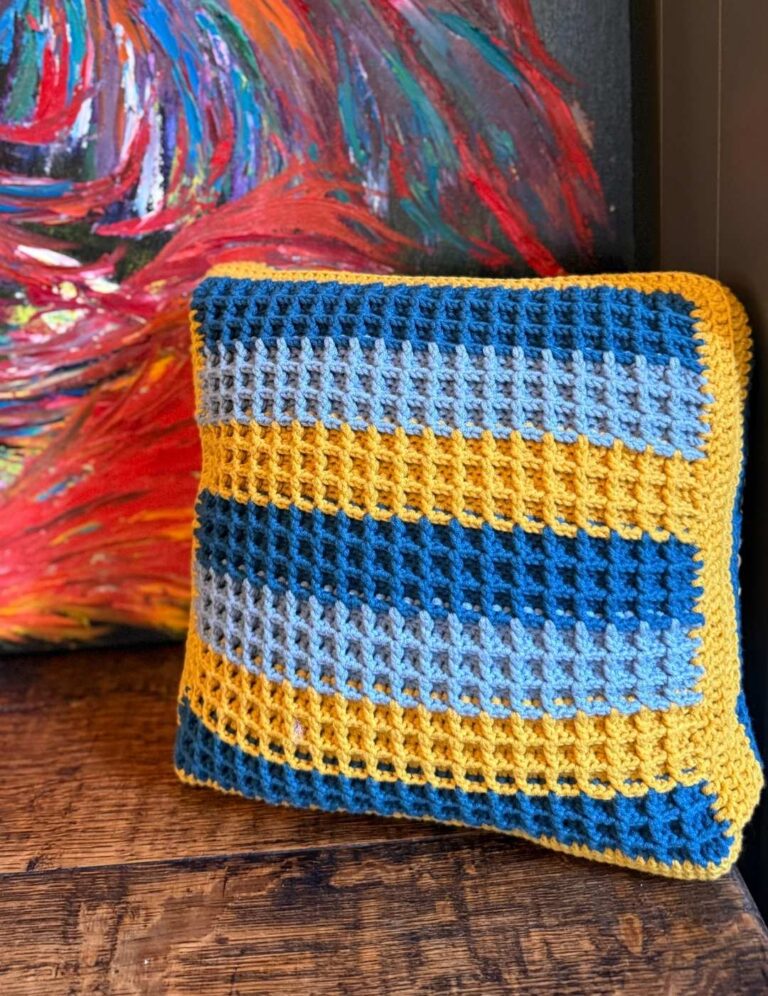
Improved wave pattern granny square – two row repeat
The problem with the pattern above is that each row stops half way through a wave. Which I think looks clunky if you want to line up the squares next to others that look the same. This version fixes that.
- Foundation chain: Multiple of 8, plus 6.
- Row 1: Sk 2, dc 2, *sc 2, dc 6* to 4 sts from end, sc 2, dc 2. Change color.
- Row 2: *Dc 2, tr 2, dc 2, sc 2* to 6 sts from end, dc 2, tr 2, dc 2. Change color.
- Row 3: *Dc 2, sc 2, dc 2, tr 2* to 6 sts from end, dc 2, sc 2, dc 2. Change color.
- Repeat rows 2 and 3 until your granny is just shy of being square, finishing on a repeat of row 2.
- Final row: Dc 2, *sc 2, dc 6* to 4 sts from end, sc 2, dc 2.
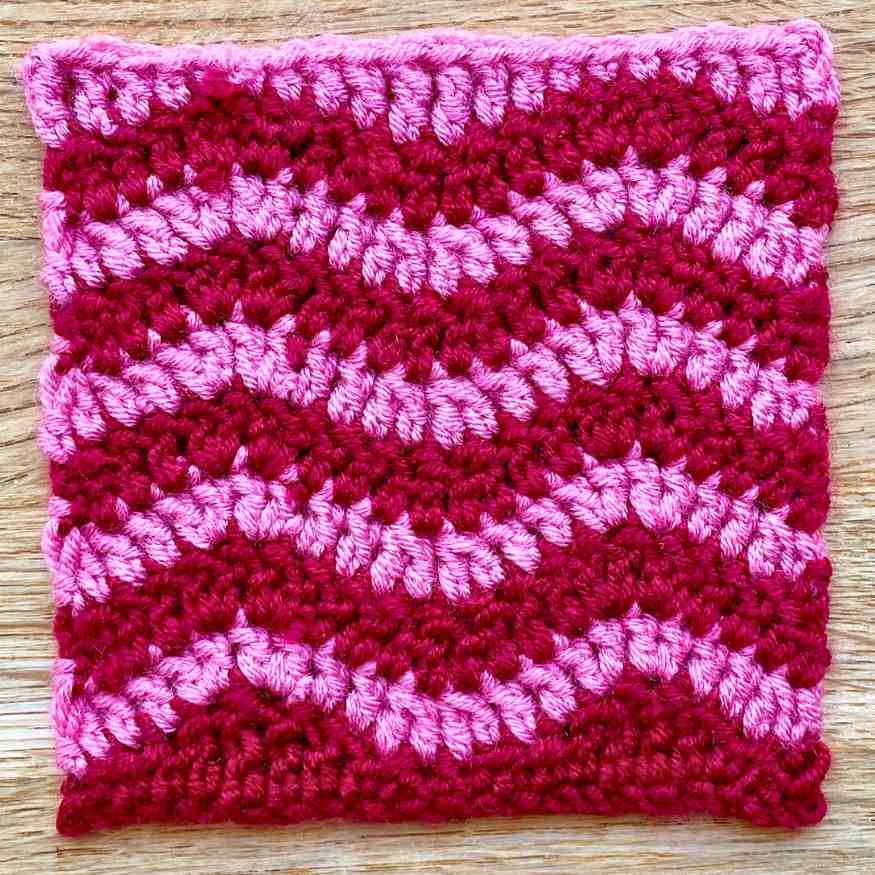
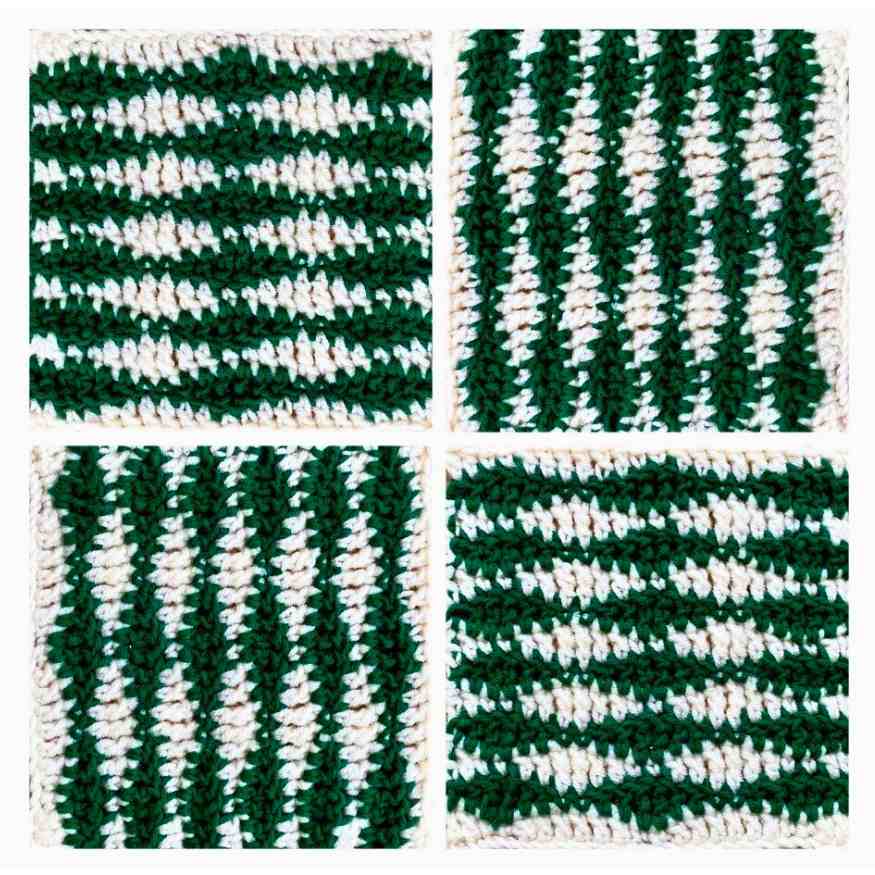
The green rows are repeats of row 2, and the off white rows are repeats of row 3. Once you’ve made the pattern like this, you can arrange the squares at right angles to achieve a result like this. It’s giving strong ‘60s vibes and I love it!
Ripple stitch and wave stitch granny squares
There you have it – everything I’ve learned about making ripple stitch and wave stitch granny squares, from hours of trial and error. And the only four patterns I think you’ll ever need! There’s just one more thing you need to know before you go: because ripple and wave stitches rely on changing color between rows to make their pattern stand out, you’ll end up with lots of ends to weave in. I can’t tell you how much of time I spent preparing this article was taken up just by weaving in ends!


WOW! I love all of those ripple squares. Your instructions for the straight edges is also exactly what I have been looking for. Thank you so much. Can hardly wait to grab my crochet hook and yarn!