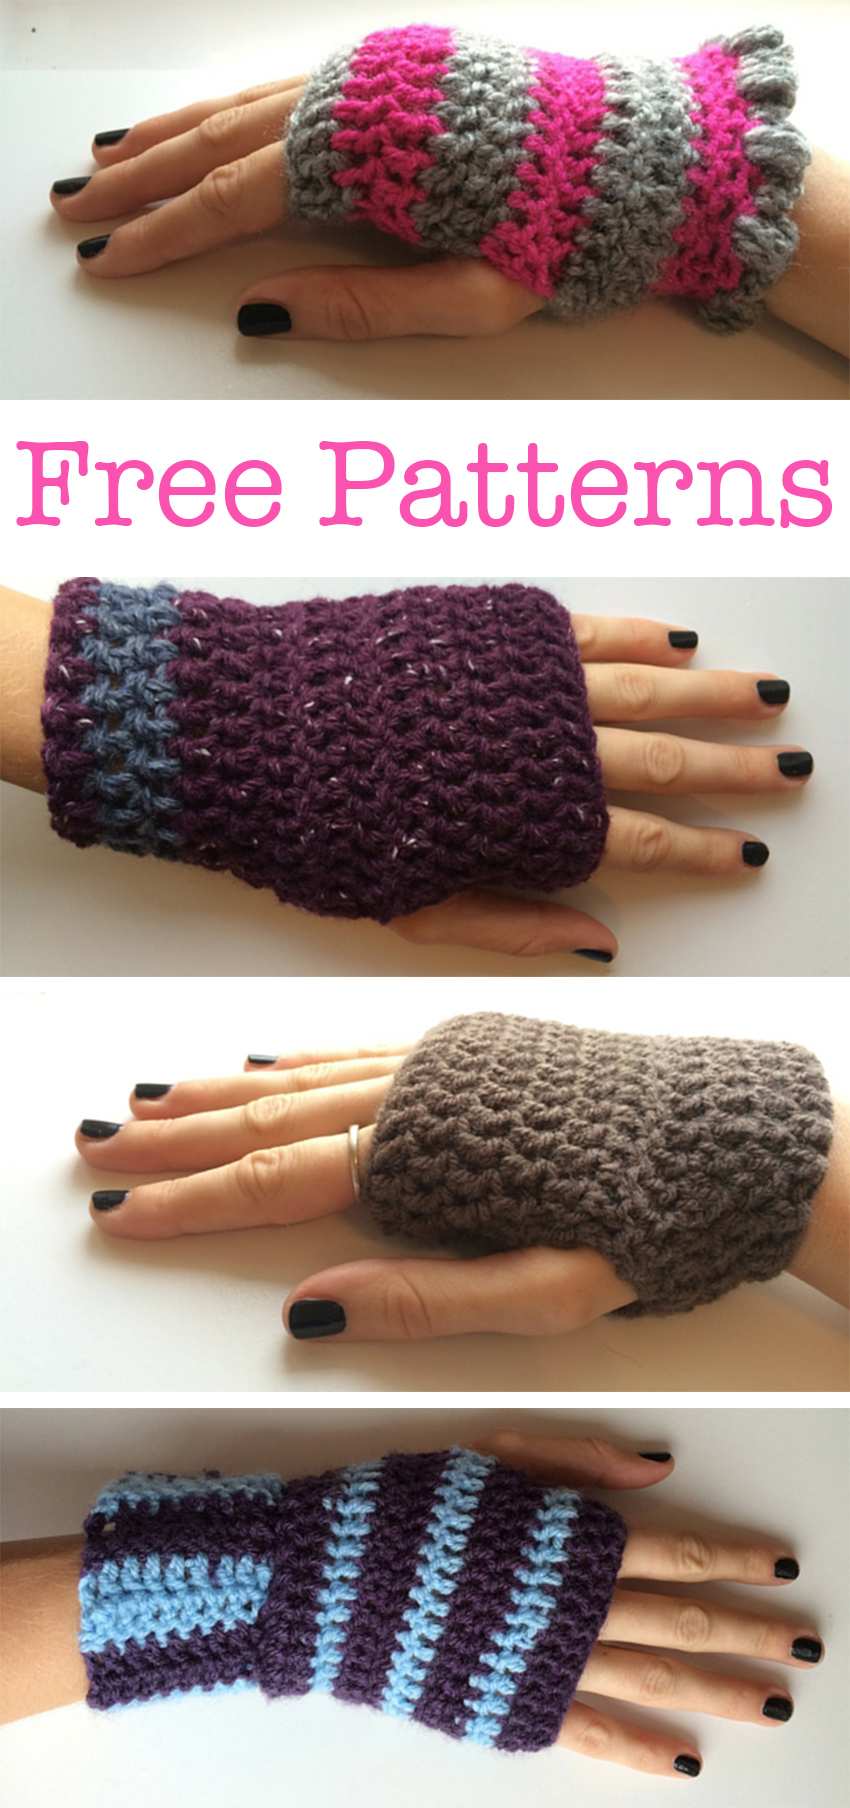
5 Free Fingerless Gloves Crochet Patterns

I have five simple but stunning free fingerless gloves crochet patterns for you. You’ll work them up quickly, and produce gorgeous, cosy crochet hand warmers to keep your hands toasty in the cold weather.

If you are a fairly confident crocheter, you will find that you can put together your crochet fingerless gloves within an hour. If you are new to crochet then it will take a little longer, but it should be a project that even someone totally fresh to the scene will be able to produce in the same day that they start it.
Stitches and Techniques
To follow the most basic crochet pattern for fingerless mitts, you will need to know how to make a chain, double crochet, increase and decrease.
To crochet an increase, just make an additional crochet into the same loop. In the pattern I will put ‘2dc’ instead of ‘dc’, to denote two double crochets instead of one double crochet.
Crocheting a decrease is a little more complicated than an increase. You will begin the stitch in the same way that you usually do, but before you make the final yarn over and through, you move into the next stitch.
- Yarn over your hook.
- Hook through the stitch.
- Yarn over the hook and pull through the stitch.
- Yarn over the hook again and pull through the first two loops.
- Yarn over and insert your hook through the next stitch along.
- Yarn over and pull through the stitch
- Yarn over and pull through the first two loops
- Yarn over and pull through all three remaining loops on the hook.
How to crochet a puff stitch
A puff stitch is a way of making your crochet raised and textured. It is quite literally, puffed out. You will need to hold out the yarn during the stitch, repeatedly yarning over to create this effect.
Sizing your fingerless gloves
My crochet fingerless glove patterns are designed for women’s adult sized hands, of a small to average width around the wrist.
If you have larger or smaller hands than the sizes suggested, wrap the initial chain around your knuckles before you begin. If the chain feels tight then add a couple of loops, if it’s loose undo a couple.
Basic Crochet Fingerless Gloves Pattern

The basic crochet fingerless gloves pattern produces short, chunky hand warmer style of fingerless gloves. They are a loose fit, easy to pop on and off and will fit most adult hand sizes, male and female. Great for wearing with your long sleeve tops.
For this crochet pattern you will need:
- Size J / 6mm crochet hookPaid Link
- 50g DK yarn in a single color
- Scissors
- Yarn needlePaid Link
The bracketed number at the end of each row is a stitch count, to help you make sure you are on the right track as you go along.
Row 1
Chain (ch) 27 stitches, slip stitch (sl st) to join as a circle (27)
Row 2
*Ch2, then dc (US) into the 3rd stitch from the hook. Dc into the next 26 stitches. Sl st into the top of the initial chain to join. (27)
Row 3 to 5
Repeat from * (27)
You are now beginning to make your thumb hole. The next few rows will not continue in a circle, but will leave a large gap.
Row 6
Ch2, dc into the 3rd st from the hook. Dc once into the next 22 stitches. Ch2 from the final stitch. (23)
Turn over the glove
Row 7
dc into 3rd st from the hook. Dc once into next 22 stitches. (23)
Turn over the glove
Row 8
ch2, 2dc into next st, dc once into next 21 st, 2dc into final st of the row. Sl st to join. (25)
You have now made the thumb hole.
Row 9
ch2, 2 x dc2tog, dc once into 18 st, 2 x dc2tog, sl st. (23)
Row 10
ch2, 2 x dc2tog, dc once into next 12 st, then 2 x dc2tog, sl st (17)
At the end of the row cut off a long tail or yarn, and weave it back into the glove.
Simple Crochet Fingerless Gloves Pattern

These fingerless gloves are more tailored to the shape of your hand. Made to fit small to medium sized female hand and wrist diameters. The wool blend gives a very warm finish, although slightly rougher than some of the other materials.
The thick base stripe gives a defined finish to your glove, and completes the look.
You will need:
- 5mm crochet hook
- Aran Blend Wool – Approx 50g main color +10g accent color for both hand warmers
- Scissors
- Yarn needlePaid Link
Row 1
Chain (ch) 26, slip stitch (sl st) to join as a circle. (26)
Row 2
*ch2, then double crochet (dc) US into the back loop only (blo) of the 3rd chain from the hook. dc once into the next 25 stitches. Sl st into the top of the initial chain to join (26)
Row 3 and 4
ch2, dc into both loops of the 3rd stitch from the hook. dc once into each subsequent stitch. Sl st to join at the end of the row. (26)
We will now be working on opening a thumb hole in your hand warmer.
Row 5
ch2, dc into both loops of the 3rd stitch from the hook. dc once into the next 24 stitches. Do not join. (25)
Row 6 and 7
turn your glove over. Ch2, dc into the 3rd stitch from the hook. Dc once into the next 24 stitches. (25)
Row 8
turn your glove over. Ch2, dc into the same stitch you made the chain from. Dc once into the next 23 stitches. 2dc into the last st in the row. Sl st to join. (27)
You have now created your thumb hole. We will now be working a reduction for the final part of your hand.
Row 9
ch2, dc the next 2 stitches together twice ( 2 x dc2tog). Dc once into the next 18 st. 2 x dc2tog. Dc into the base of the initial chain. Sl st to join. (24)
Row 10
ch2, 2 x dc2tog. Dc once into the next 14 st. 2 x dc2tog. Dc into the base of the chain. Sl st to join. (20)
Row 11
ch2, dc2tog. Dc once into the next 14 st. dc2tog. Sl st to join, beginning your color change (cc) in this join. (18)
We will now be adding a little bit of length to the hand warmer, and working with your accent color
Row 12
ch 2, using the ch as the 1st st, dc once into each st in the round. Sl st to join. (18)
Row 13
ch 2, using the ch as the 1st st, dc once into each st in the round. Sl st to join. (18)
Row 14
ch 2, using the ch as the 1st st, dc once into each st in the round. Sl st to join. (18)
Finally to finish off, sew the ends into the body of your hand warmer using a yarn needle. Make sure to leave a generous tail when you cut off.
Striped Crochet Fingerless Gloves Pattern
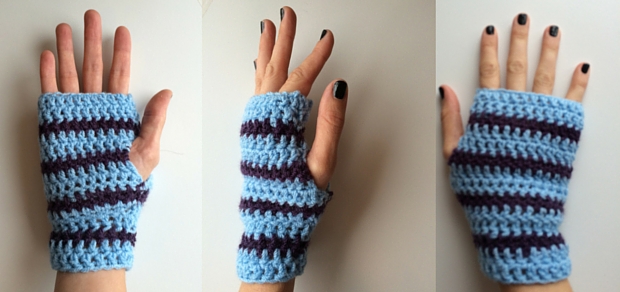
These crocheted fingerless gloves contain a repetitive striping pattern, which gives them a more sculpted look when finished. The pale and dark contrast is nice and eye catching, and they follow a little further down your arm to give extra warmth.
You will need:
- 5mm crochet hook
- 50g dk blue wool, 50g dk purple (I used Women’s Institute acrylic yarn)
- Scissors
- Yarn needlePaid Link
Begin with the blue yarn.
Row 1
ch25, sl st to join
Row 2
ch2, dc into the next 24 stitches, sl st
Row 3
ch2, dc 24, cc, sl st
Row 4
ch2, dc 24, cc, sl st
Row 5
ch2, dc 24, sl st
You are now beginning your thumb hole. Do not join the next few rows at their end.
Row 6
ch2, dc 23, cc.
Row 7
ch2, dc 23, cc.
Row 8
ch2, dc 23
Row 9
ch2, dc into the based of the same chain as an increase. Dc into the next 22, 2dc into the final stitch, cc, sl st to join
Row 10
ch2, 2x dc2tog, dc into the next 18 stitches, 2x dc2tog, cc, sl st
Row 11
ch2, 2x dc2tog, dc 15, 2x dc2tog, sl st
Row 12
ch2, dc 19, cc, sl st
Row 13
ch2, dc 19, cc, sl st
Row 14
ch2, dc 19, sl st
Row 15
ch2, dc 19, sl st
Finally to finish off, sew the ends into the body of your hand warmer, using a yarn needle. Keep it to other areas that were worked in your blue yarn, so that the sewing doesn’t show through the pattern.
Warm Cuffed Crochet Fingerless Gloves Pattern
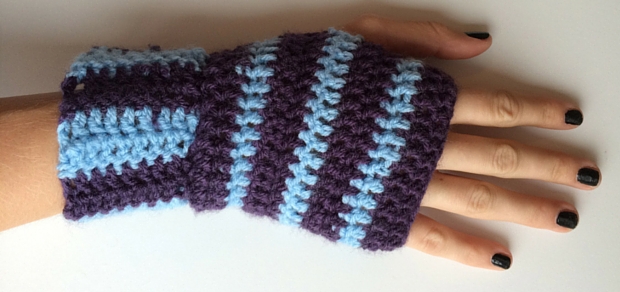
This crochet fingerless gloves pattern is similar to the one above, with reversed colors and a different style to your cuff.
You will need:
- 5mm crochet hook
- 50g dk blue wool, 50g dk purple (I used Women’s Institute acrylic yarn)
- Scissors
- Yarn needlePaid Link
Begin with the purple yarn.
Row 1
ch25, sl st to join
Row 2
ch2, dc into the next 24 stitches, sl st
Row 3
ch2, dc 24, cc, sl st
Row 4
ch2, dc 24, cc, sl st
Row 5
ch2, dc 24, sl st
You are now beginning your thumb hole. Do not join the next few rows at their end.
Row 6
ch2, dc 23, cc.
Row 7
ch2, dc 23, cc.
Row 8
ch2, dc 23
Row 9
ch2, dc into the based of the same chain as an increase. Dc into the next 22, 2dc into the final stitch, cc, sl st to join
Row 10
ch2, 2x dc2tog, dc into the next 18 stitches, 2x dc2tog, cc, sl st
Row 11
ch2, 2x dc2tog, dc 15, 2x dc2tog, sl st
Row 12
ch2, dc 19, cc, sl st to join.
Section Two
You will now need to begin a separate piece, which we will incorporate as a cuff when completed.
Row 1
ch9, sl st
Row 2
ch2, dc into next 8 stitches.
Row 3
ch2, dc into next 8 stitches.
Remember to use the end of the previous chain as the final stitch or your rows will gradually decrease.
Row 4 to 15
ch2, dc into the next 8 stitches.
Row 16
join the cuff into a circle by dc-ing each stitch together
Row 13/16
Combining the cuff and glove. Dc on the inside of the cuff and glove around from row 12, once into each stitch and through the cuff’s edge.
Make sure you leave long tails when each part is complete, to securely sew it into the pattern.
Puff Stitch Cuffed Crochet Fingerless Gloves Pattern
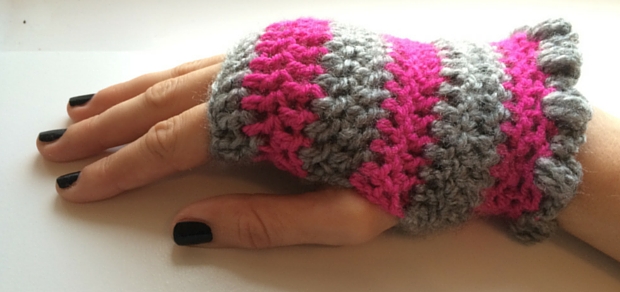
The final pattern is my personal favorite. Wear these fingerless gloves with longer sleeves. They have a defined short puff stitch cuff. This thick stitch keeps this normally exposed area from catching a chill, as well as providing some definition and styling.
You will need:
- 5mm crochet hook
- 50g grey wool blend aran yarn (I used Patons)
- 50g pink dk yarn
- Scissors
- Yarn needlePaid Link
Row 1
chain 27, sl st
Row 2
ch2, dc into the next 26, color change, sl st
Row 3
ch2, dc 26, sl st
Row 4
ch2, dc 26, color change, sl st
Row 5
ch2, dc 26, sl st
Row 6
ch2, dc 26, cc.
Row 7
ch2, dc 26
Row 8
ch2, dc 26, cc.
Row 9
ch2 & dc, 25 dc, 2dc, sl st
Row 10
ch2, 2 x dc2tog, dc 20, 2 x dc2tog, cc, sl st
Row 11
ch2, 2 x dc2tog, dc 16, 2 x dc2tog
Row 12
ch2, 2 x dc2tog, dc 17, cc, sl st
We are now going to make the cuff using puff stitches
Row 13
ch2, puff stitch, ch 2, sl st into the next stitch, *ch2 from the sl st, puff stitch into the next st, ch2 from the puff stitch, sl st into the next st. Repeat from * until rows end.

These are great! Thanks gor putting the pattern on the internet for FREE! Keep up the good work xxx Teddy
Thanks! I am so pleased to hear you liked them 🙂
Super cute!!! Thanks for sharing with us.